Beko MCF25210X Manuel D'utilisation
Masquer les pouces
Voir aussi pour MCF25210X:
- Manuel d'instructions (40 pages) ,
- Manuel d'instructions (47 pages)

Manuels Connexes pour Beko MCF25210X


Sommaire des Matières pour Beko MCF25210X
- Page 1 Microwave Oven User Manual MCF25210X MCF28310X MCF32410X EN DE FR ES RO PL TR RU AR 01M-8802983200-4418-01...
- Page 2 Please read this manual first! Dear Customer, Thank you for purchasing a Beko product. We hope that you get the best results from your product which has been manufactured with high quality and state-of-the-art technology. Therefore, please read this entire user manual and all other accompanying documents carefully before using the product and keep it as a reference for future use.
- Page 3 CONTENTS ENGLISH 13-23 DEUTSCH 24-46 FRANÇAIS 47-68 ESPAÑOL 69-92 ROMÂNĂ 93-116 ITALIANO 117-138 POLSKI 139-161 TÜRKÇE 162-183 184-206 РУССКИЙ 01M-8802973200-2518-01 01M-8802993200-2518-01 3 / EN Microwave Oven / User Manual...
- Page 4 Important safety and environmental instructions Important Safety Bed and Breakfast type environ- • ments. Instructions Read Do not attempt to start the oven Carefully And Keep • when its door is open; otherwise For Future Reference you may be exposed to harmful microwave energy.
- Page 5 Important safety and environmental instructions No responsibility or warranty claim Do not use your appliance to dry • • shall be assumed for damages clothes or kitchen towels. arising from misuse or improper Appliance becomes very hot while • handling of the appliance. it is in use.
- Page 6 Keep Beko Microwave Ovens comply the power cable away from hot • with the applicable safety stan- surfaces and naked flame.
- Page 7 Important safety and environmental instructions When heating food in plastic or Class B equipment is suitable for • • paper containers, keep an eye on use in domestic establishments the oven due to the possibility of and establishments directly con- ignition.
- Page 8 Important safety and environmental instructions Eggs in their shell and whole hard- WARNING: It is hazardous for • • boiled eggs must not be heated in anyone other than a competent microwave ovens since they may person to carry out any service or explode, even after microwave repair operation which involves heating has ended.
- Page 9 Important safety and environmental instructions This appliance can be used by the Keep the product and its power • • children who are at the age of 8 or cable so that they are inaccessible over and by the people who have by children under 8 years old.
- Page 10 Important safety and environmental instructions 1.4 Compliance with the WEEE Directive and Disposing of the Waste Product This product complies with EU WEEE Directive (2012/19/EU). This product bears a classification symbol for waste electrical and electronic equip- ment (WEEE). This product has been manufactured with high quality parts and materials which can be reused and are suitable for recycling.
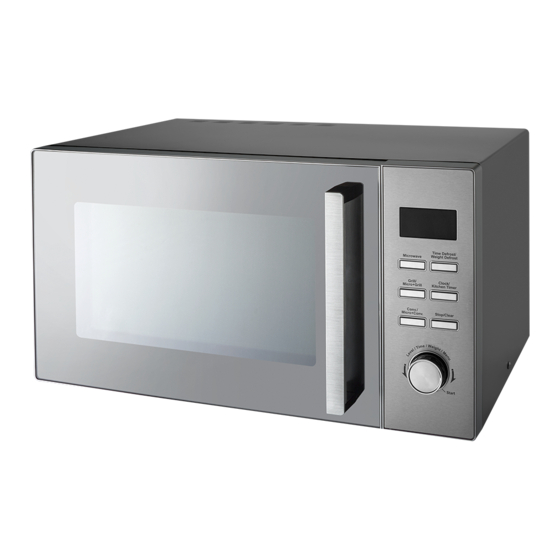
- Page 11 Your microwave oven 2.1 Overview 1. Control panel 2. Turntable shaft 3. Turntable support 4. Glass tray 5. Oven window 6. Door safety interlock system 7. Grill heater 8. Wave guide (Please do not remove the mica plate covering the wave guide) 9.
- Page 12 Your microwave oven 2.2 Technical data MCF25210X MCF28310X MCF32410X Voltage / Frequency 230-240V/50Hz Power Input - Microwave 1400W 1500W Power Output - 900W 1000W Microwave Power - Grill 1200W 1250W Input Power 2250W 2300W (Convection) Microwave Frequency 2450MHz Turntable diameter...
- Page 13 Installation and connection 3.1 Installation 2. Reorient the receiving antenna of radio or te- levision. 1. Make sure that all the packing materials are re- 3. Relocate the microwave oven with respect to moved from the inside of the door. the receiver.
- Page 14 Installation and connection 3.4 Microwave cooking 3.6 Utensils guide principles 1. Microwave cannot penetrate metal. Only use utensils that are suitable for use in microwave 1. Arrange food carefully. Place thickest areas to- ovens. Metallic containers for food and bevera- wards outside of dish.
- Page 15 Installation and connection The list below is a general guide to help you select the correct utensils. Cookware Microwave Grill Convection Combination* Heat–Resistant Glass Non Heat–Resistant Glass Heat–Resistant Ceramics Microwave–Safe Plastic Dish Kitchen Paper Metal Tray Baking plate Aluminum Foil & Foil Container * Combination: applicable for both “micro+grill”, and “micro+convection”...
- Page 16 Operation 4.1 Control panel 4.2 Menu Action Screen • Cooking time, power, action indicators, and clock time are displayed. "Microwave" • Press this button to set microwave cooking program. "Clock/Kitchen Timer" • Press to set clock time. • Press set kitchen timer function. Conv/Micro + Conv.
- Page 17 Operation 4.3 How to set the oven 4.5 Quick start controls The oven will cook food quickly at HIGH power (100% power output) for quick start cooking pro- • When the oven first plugged in, beep will sound gram. and the display will show ”1:01”. Just press the "Start"...
- Page 18 Operation 3. Press "Start" to confirm. 4.10.1 Combination 1 The oven stops during defrosting 30% of time for "Microwave" cooking, 70% for grill to let the user to turn food over for cooking. Use for fish, potatoes or au gratin. uniform defrosting and then press Suppose you want to set combination 1 cooking "Start"...
- Page 19 Operation Suppose you want to cook at 180˚C for 40 min- The longest preheat time is 30 min- utes. utes, and the preheat time cannot be set. When reaches the preheat 1. In waiting mode, place food into oven, and close temperature the oven will sound beeps every 5 seconds, if there is 2.
- Page 20 Operation 4.15.3 Sensor malfunction When the timer is counting, you can protection press "Clock/Kitchen Timer" to see the timer time for 5 seconds and The system enters into protection mode when press "Stop/Clear" within 5 seconds the system sensor is Short Circuited. The display to cancel it.
- Page 21 Operation Auto cooking menu Code Food NOTES: Milk/Coffee (200ml/cup) 1. For milk/coffee and potato, the screen will show the Popcorn (99g) number of serving instead of food weight. Spaghetti (g) 2. For item A-7 the oven stops during defrosting to let Potato (230g/unit) the user to turn food over for uniform defrosting and then press "Start"...
- Page 22 Cleaning and maintenance 5.1 Cleaning and care 11. When it becomes necessary to replace the oven light, please consult a dealer to have it 1. Turn off the oven and remove the power plug replaced. from the wall socket before cleaning. 12.
- Page 23 Troubleshooting Normal Microwave oven interferes with TV reception Radio and TV reception may be interfered when microwave oven is operating. It is similar to the interference caused by small electrical appliances, like mixer, vacuum cleaner, and electric fan. It is normal.
- Page 24 Bitte zunächst diese Anleitung lesen! Werter Kunde, Danke, dass Sie sich für ein Produkt der Marke Beko entschieden haben. Wir hoffen, dass Sie mit diesem Produkt, das mit den höchsten Qualitätsanforderungen und der modernsten Technologie hergestellt wurde, beste Ergebnisse erzielen. Bitte lesen Sie die gesamte Bedienungsanleitung und alle anderen Begleitdokumente aufmerksam, bevor Sie das Produkt verwenden;...
- Page 25 Wichtige Hinweise zu Sicherheit und Umwelt Dieser Abschnitt enthält hensweise ist gefährlich. Sicherheitsanweisungen, die Ihr Produkt dient dem Garen, Er- • beim Schutz vor Personen- hitzen und Auftauen von Leb- und Sachschäden, Bränden, ensmitteln zuhause. Es darf nicht Stromschlägen und dem Austreten gewerblich eingesetzt werden.
- Page 26 Wichtige Hinweise zu Sicherheit und Umwelt Fernsteuerungssystemen be- benötigen Sie Küchenhandschuhe trieben werden. zum Halten von Utensilien. Vor der ersten Inbetriebnahme Sie sollten prüfen, ob Utensilien • • des Gerätes alle Komponenten mikrowellengeeignet sind. reinigen. Siehe dazu Abschnitt Stellen Sie den Mikrowellen- •...
- Page 27 • ungskabel verwenden. 1.1.1 Elektrische Gerät oder Netzstecker nie mit • Sicherheit feuchten oder nassen Händen Der Beko-Mikrowellenherd stimmt berühren. • mit geltenden Sicherheitsstan- Gerät so aufstellen, dass der Netz- • dards überein; daher sollten Gerät stecker immer zugänglich ist.
- Page 28 Wichtige Hinweise zu Sicherheit und Umwelt pierbehältern regelmäßig prüfen, erodiermaschinen in Form von da sich der Behälter entzünden elektromagnetischer Strahlung könnte. verwendet wird. Drähte und/oder Metallgriffe von Geräte der Klasse B eignen sich • • mikrowellengeeigneten Papier- für den Einsatz in Wohnbereichen oder Kunststoffbehältern vor dem sowie Bereichen, die direkt mit Erhitzen im Mikrowellenherd ent-...
- Page 29 Wichtige Hinweise zu Sicherheit und Umwelt Kastanien. auchen. Das Gerät muss so aufgestellt Der Mikrowellenherd ist nur zum • • werden, dass die Rückseite zur Auftauen, Garen und Schmoren Wand zeigt. von Lebensmitteln vorgesehen. Falls die Tür oder Türdichtungen Übergaren Sie Lebensmittel nicht; •...
- Page 30 Wichtige Hinweise zu Sicherheit und Umwelt diese nicht durch einen Erwach- elektrischen und elektronischen Altgeräten“ an- gegebenen gefährlichen und verbotenen senen beaufsichtigt werden. Materialien. Das Gerät erfüllt die Vorgaben der Verschluckungsgefahr! Alle Ver- WEEE-Richtlinie. Dieses Produkt wurde aus hoch- • wertigen Teilen und Materialien hergestellt, die packungsmaterialien von Kindern wiederverwendet werden können und zum...
- Page 31 Ihr Mikrowellenofen 2.1 Übersicht 1. Bedienfeld 2. Drehtellerachse 3. Drehtellerhalterung 4. Glasteller 5. Fenster 6. Türsicherheitssperrsystem 7. Grillheizelement 8. Mikrowellenleitblech (keinesfalls die Glimmerplatte entfernen, die das Leitblech bedeckt) 9. Backblech Markierungen am Produkt oder in den mitgelieferten Dokumenten angegebene Werte stellen Werte dar, die unter Laborbedingungen nach jeweils geltenden Standards ermittelt wurden.
- Page 32 Ihr Mikrowellenofen 2.2 Technische Daten MCF25210X MCF28310X MCF32410X Spannung/Frequenz 230 – 240 V/50 Hz, Leistungsaufnahme – 1400 W 1500 W Mikrowelle Leistungsabgabe – 900 W 1000 W Mikrowelle Leistung – Grill 1200 W 1250 W Leistungsaufnahme 2250 W 2300 W...
- Page 33 Installation und Anschluss 3.1 Montage 7. Die Steckdose muss gut zugänglich sein, damit der Stecker im Notfall leicht herausgezogen 1. Stellen sicher, dass alle werden kann. Verpackungsmaterialien von der Innenseite der 8. Verwenden Sie den Ofen nicht im Freien. Tür entfernt werden. 3.2 Funkstörungen WARNUNG: Überprüfen Sie den Ofen auf Beschädigungen, wie z.
- Page 34 Installation und Anschluss 3.5 Bevor Sie den Falls Sie Fragen zu Erdung und Kundendienst anrufen Anschluss haben, wenden Sie sich bitte an einen quali- Sollte der Ofen nicht arbeiten: fizierten Elektriker oder 1. Vergewissern Sie sich, dass der Ofen korrekt Kundendienstpersonal.
- Page 35 Installation und Anschluss 4. Runde oder ovale Behälter sind empfehlens- wert, da Lebensmittel in Ecken zum Überhitzen neigen. 5. Schmale Streifen Aluminiumfolie können ver- wendet werden, um ein Überhitzen exponi- erter Stellen zu verhindern. Aber seien Sie vorsichtig, verwenden Sie nicht zu viel davon, halten Sie zusätzlich einen Abstand von 2,54 cm zwischen Folie und Ofenwand ein –...
- Page 36 Bedienung 4.1 Bedienfeld 4.2 Bedien- und Anzeigefeld • Garzeit, Leistung, Funktionsanzeigen und Uhr- zeit werden angezeigt. „Mikrowelle“ • Drücken Sie diese Taste, um ein Mikrowellen- garprogramm einzustellen. „Uhr/Gartimer“ • Drücken, um die Uhrzeit einzustellen. • Drücken, um die Gartimer-Funktion einzustel- len.
- Page 37 Bedienung • Einfach mehrmals drücken, um die Garzeit 2. Drehen Sie das Einstellrad „Stufe/Zeit/ einzustellen und sofort mit voller Leistung zu Gewicht/Menü“, um die Stundenziffer 8 ein- garen. zustellen. Auftauzeit/Auftaugewicht 3. Drücken Sie einmal die Taste „Uhr/Gartimer“, um die Stundeneinstellung zu bestätigen. •...
- Page 38 Bedienung 2. Drehen Sie das Einstellrad „Stufe/Zeit/Gewicht/ Gerät bietet Menü“, um die Auftauzeit auszuwählen. Kochleistungsstufen (P100, P-90, P-80, P-70, P-60, P-50, P-40, P-30, 3. Bestätigen Sie mit „Start“. P-20, P-10, P-00), die Sie durch Der Ofen stoppt während des Drehen des Einstellrades „Stufe/ Auftauens, damit Sie die Speisen Zeit/Gewicht/Menü“...
- Page 39 Bedienung 4.10.2 Kombination 2 3. Bestätigen Sie mit „Start“. 4. Stellen Sie mit dem Drehknopf „Stufe/Zeit/ 55 % der Zeit zum „Mikrowellengaren", 45 % zum Gewicht/Menü“ die Garzeit ein (Die längste Zeit Grillen. Für Pudding, Omeletts, Bratkartoffeln und ist 95 Minuten). Geflügel.
- Page 40 Bedienung Angenommen, Sie möchten den Ofentimer auf 30 Die längste Vorheizzeit beträgt Minuten einstellen: 30 Minuten, die Vorheizzeit kann nicht eingestellt werden. Wenn 1. Drücken Sie einmal die Taste „Uhr/Gartimer“. Vorheiztemperatur erreicht 2. Drehen Sie das Einstellrad „Stufe/Zeit/ ist, ertönt alle 5 Sekunden ein Gewicht/Menü“...
- Page 41 Bedienung 4.15.2 Tieftemperaturschutz Wenn System Super- Tieftemperaturschutzstatus übergeht, zeigt die Digitalanzeige „E02“ an, ein Warnton ist zu hören. Wenn Sie danach die Taste „Stopp/Löschen“ drücken, kehrt das System in den normalen Bereitschaftsmodus zurück. 4.15.3 Sensorfehlfunktionsschutz Das System schaltet in den Schutzmodus, wenn der Systemsensor kurzgeschlossen wird.
- Page 42 Bedienung Automatikgaren-Menü Code Lebensmittel HINWEISE: Milch/Kaffee (200 ml/ Tasse) 1. Bei Milch/Kaffee Kartoffeln wird Display die Anzahl der Portionen anstelle des Popcorn (99 g) Lebensmittelgewichtes angezeigt. Spaghetti (g) 2. Bei Auswahl A-7 stoppt der Ofen während des Kartoffeln (230 g/Gericht) Auftauens, damit Sie die Speisen zum gleichmäßigen Auftauen umdrehen können.
- Page 43 Reinigen und pflegen 5.1 Reinigung und Pflege 9. Rollring Geräteboden soll- Vermeidung übermäßiger 1. Schalten Sie den Ofen aus, ziehen Sie vor der Geräuschentwicklung regelmäßig gere- Reinigung den Netzstecker aus der Steckdose. inigt werden. Wischen Sie einfach den Boden des Ofenraums mit einem sanften 2.
- Page 44 Reinigen und pflegen 5.2 Lagerung • Lagern Sie das Gerät sorgfältig, wenn Sie es längere Zeit nicht nutzen sollten. • Sorgen Sie dafür, dass das Gerät vom Stromnetz getrennt, gänzlich abgekühlt und trocken ist. • Lagern Sie das Gerät an einem kühlen, trocke- nen Ort.
- Page 45 Fehlerbehebung Normal Mikrowellenherd verursacht Störungen des Der Radio- und Fernsehempfang kann durch Fernsehempfangs den Betrieb des Mikrowellenherdes gestört werden. Dies ähnelt den Störungen, die durch kleine Elektrogeräte, wie Mixer, Staubsauger und Ventilatoren, verursacht werden. Dies ist normal. Die Beleuchtung verdunkelt sich Arbeitet der Mikrowellenherd mit geringer Leistung, kann sich die Beleuchtung verdunkeln.
- Page 46 A-1230, Wien http://at.beko.com/ Sehr geehrter Kunde! Vielen Dank, dass Sie sich für ein Qualitätsprodukt von Beko entschieden haben! Unsere Geräte werden nach den neuesten technischen Erkenntnissen entwickelt, produziert und geprüft. Sollte trotzdem eine Störung auftreten, so bitten wir Sie, sich mit Ihrem Fachhändler bzw. mit der Verkaufsstelle in Verbindung zu setzen.
- Page 47 Avant d'utiliser l'appareil, veuillez lire ce manuel ! Chère cliente, cher client, Merci d’avoir choisi les produits Beko. Nous espérons que ce produit, fabriqué dans des installations modernes et soumis à un processus de contrôle qualité rigoureux, vous offre les meilleures performances possibles. C’est pourquoi nous vous recommandons, avant d’utiliser ce produit, de lire attentivement ce manuel et tous les autres documents...
- Page 48 Instructions importantes en matière de sécurité et d’environnement Cette section contient les consignes Votre appareil est conçu pour la • de sécurité qui aident à se prému- cuisson, le chauffage et la décon- nir contre les risques d'incendie, gélation des aliments à domicile. Il d' é...
- Page 49 Instructions importantes en matière de sécurité et d’environnement Cet appareil ne doit pas être uti- Les récipients de cuisson peuvent • • lisé avec une minuterie extérieure devenir très chauds en raison du ou un système de télécommande transfert de chaleur des aliments séparé.
- Page 50 1.2 Sécurité électrique Ne touchez jamais l’ a ppareil ou sa • prise avec les mains humides ou Les fours à micro-ondes Beko sont • mouillées. conformes aux normes de sécurité Placez l' a ppareil de manière à ce applicables.
- Page 51 Instructions importantes en matière de sécurité et d’environnement N' i mmergez pas l' a ppareil, le câble ISM Groupe 2 de Classe B. Le • d' a limentation ou la prise d' a limen- Groupe 2 comprend tous les équi- tation électrique dans de l' e au ou pements ISM (Industriel, Scien- tout autre liquide.
- Page 52 Instructions importantes en matière de sécurité et d’environnement 1.4 Utilisation prévue Ne faites pas de rôtisserie dans le • four. De l' h uile chaude pourrait en- Cet appareil a été conçu unique- • dommager les composants et ma- ment pour une utilisation encas- tériaux du four, et même entraîner trée.
- Page 53 Instructions importantes en matière de sécurité et d’environnement Les procédures de nettoyage et 1.5 Conformité avec la directive DEEE et mise au d’entretien par l’utilisateur ne rebut des produits usagés doivent pas être exécutées par les enfants à moins qu’ils soient sur- Ce produit ne contient pas de substan- ces dangereuses et prohibées, telles veillés par les adultes.
- Page 54 Votre four à micro-ondes 2.1 Aperçu 1. Panneau de commande 2. Arbre du plateau tournant 3. Support du plateau tournant 4. Plateau en verre 5. Fenêtre du four 6. Dispositif de verrouillage de sécurité de la por- 7. Élément chauffant de gril 8.
- Page 55 Votre four à micro-ondes 2.2 Données techniques MCF25210X MCF28310X MCF32410X Voltage/ 230-240 V/50 Hz, Fréquence Puissance 1 400 W 1 500 W d'entrée - Micro- ondes Puissance de 900 W 1000 W sortie - Micro- ondes Puissance - Gril 1 200 W...
- Page 56 Installation et raccordement 3.1 Installation 3.2 Interférences radio 1. Assurez-vous de retirer tous les matériaux Le fonctionnement du four à micro-ondes d' e mballage sur la partie intérieure de la porte. peut créer des interférences avec la radio, la télévision ou d’autres appareils similaires. En cas AVERTISSEMENT : Vérifiez d' i nterférences, il est possible de les réduire ou de...
- Page 57 Installation et raccordement 2. Vérifiez si un fusible de circuit a sauté ou si un Ni le fabricant ni le revendeur ne disjoncteur principal s' e st déclenché. Si ceux-ci peuvent être tenus responsables semblent fonctionner correctement, testez la des dommages au four ou des bles- prise en y branchant un autre appareil.
- Page 58 Installation et raccordement La liste ci-dessous est un guide général pour vous aider à choisir les bons ustensiles. Ustensiles de cuisine Micro- Gril Chaleur Cuisson ondes tournante combinée* Verre thermorésistant Verre non thermorésistant Céramiques thermorésistantes Plat en plastique sûr pour le micro-ondes Essuie-tout Plateau métallique...
- Page 59 Fonctionnement 4.1 Panneau de commande 4.2 Écran d'action du menu • Le temps de cuisson, l'alimentation, les indica- teurs d' a ction et l' h eure sont affichés. « Micro-ondes » • Appuyez sur cette touche pour régler le prog- ramme de cuisson au micro-ondes.
- Page 60 Fonctionnement • Il suffit d'appuyer plusieurs fois pour régler le PAR EXEMPLE : Supposons que vous vouliez temps de cuisson et faire cuire immédiatement régler l'heure du four à 8 h 30. les aliments à pleine puissance 1. Appuyez sur le bouton « Horloge/ Minuterie de cuisine »...
- Page 61 Fonctionnement Supposons par exemple que vous souhaitez cuisi- Pendant la décongélation, le ner pendant 10 minutes à une puissance « Micro- four s' a rrête pour permettre à ondes » de 450 W. l'utilisateur de retourner les ali- 1. Appuyez une fois sur la touche « Micro-ondes », ments pour une décongélation uni- puis tournez le bouton «...
- Page 62 Fonctionnement 4.10 Micro + Gril 4.11 Convection Le temps de cuisson maximum est de 95 minutes. Pendant la cuisson par convection, de l' a ir chaud Cette fonction vous permet de combiner la cuis- circule dans toute la cavité du four pour brunir et son au gril et au micro-ondes sur deux réglages préparer des aliments croustillants rapidement différents.
- Page 63 Fonctionnement 2. Appuyez une fois sur la touche « Conv/ 5. Tournez le bouton « Niveau/Heure/Poids/ Micro+Conv. », puis tournez le cadran « Niveau/ Menu » pour régler le temps de cuisson. Heure/Poids/Menu » dans le sens horaire pour 6. Appuyez sur le bouton « Démarrer ». entrer la température de convection 170 ˚C.
- Page 64 Fonctionnement Pour annuler la SÉCURITÉ ENFANTS : 1. En mode Veille, tournez le cadran « Niveau/ En mode Sécurité enfants, l' o uverture ou la fer- Heure/Poids/Menu » dans le sens antihoraire meture de la porte du four peut annuler le prog- pour sélectionner le code des aliments 2.
- Page 65 Fonctionnement Menu Cuisson automatique Code Aliments REMARQUES : Lait / Café (200 ml/tasse) 1. Pour le lait/café et les pommes de terre, l' é cran af- Popcorn (99 g) fiche le nombre de portions au lieu du poids des ali- ments.
- Page 66 Nettoyage et entretien 5.1 Nettoyage et entretien 9. Nettoyez régulièrement l' a nneau de rouleau et le plancher du four pour éviter des bru- 1. Éteignez le four et débranchez la fiche its excessifs. Essuyez simplement la surface d' a limentation de la prise murale avant le net- inférieure du four à...
- Page 67 Nettoyage et entretien 5.2 Rangement • Si vous ne comptez pas utiliser votre appareil pendant un certain temps, veuillez le ranger soigneusement. • Veillez également à ce que l'appareil soit débranché, complètement refroidi et entièrement sec. • Conservez l' a ppareil dans un endroit frais et sec. •...
- Page 68 Dépannage Problème Raison éventuelle Solution Le four ne démarre pas. 1) Le cordon d' a limentation Débranchez. Branchez ensuite n' e st pas correctement après 10 secondes. enfiché. 2) Fusible grillé ou disjoncteur Remplacez le fusible ou activé. le disjoncteur (réparé par un professionnel de notre entreprise).
- Page 69 ¡Lea este manual antes de utilizar el aparato! Estimado cliente: Gracias por elegir un producto Beko. Esperamos que obtenga los mejores resultados de nuestro producto ya que ha sido fabricado con gran calidad y con tecnología de última generación. Por tanto, le aconsejamos que lea con atención este manual del usuario y todos los demás documentos adjuntos antes de utilizar el producto y que lo guarde...
- Page 70 Instrucciones importantes para la seguridad y el medio ambiente Esta sección contiene instrucciones No debe utilizarse para fines co- de seguridad que ayudarán a la pro- merciales. El fabricante no se res- tección contra los riesgos de incen- ponsabilizará por los daños que dio, descarga eléctrica, exposición a puedan surgir por mal uso.
- Page 71 Instrucciones importantes para la seguridad y el medio ambiente Antes de utilizar el aparato por pri- Los utensilios se deberán verifi- • • mera vez, limpie todas sus piezas. car para asegurarse de que sean Consulte los detalles en la sección aptos para su uso en hornos mi- "Limpieza y mantenimiento".
- Page 72 Nunca toque el aparato o su en- • chufe con las manos húmedas o eléctrica mojadas. El horno microondas Beko cumple • Coloque siempre el aparato de con todas las normas de seguridad • forma que el enchufe quede a aplicables;...
- Page 73 Instrucciones importantes para la seguridad y el medio ambiente Vigile el horno cuando caliente Este producto es un equipo de • • alimentos en recipientes de plás- Grupo 2 Clase B ISM. El Grupo 2 tico o papel, y controle el horno engloba todos los equipos ISM (in- frecuentemente, ya que existe la dustriales, científicos y médicos)
- Page 74 Instrucciones importantes para la seguridad y el medio ambiente 1.2 Uso previsto No use el horno para freír alimen- • tos. El aceite caliente puede dañar Este horno microondas se ha di- • los componentes y materiales del señado únicamente para su uso horno, y puede incluso causar integrado.
- Page 75 Instrucciones importantes para la seguridad y el medio ambiente Los niños de ocho o más años y Es posible que el aparato y las su- • • las personas con las capacidades perficies accesibles estén muy ca- físicas, sensoriales o mentales lientes durante el funcionamiento.
- Page 76 Su horno microondas 2.1 Información general 1. Panel de control 2. Eje del plato giratorio 3. Soporte del plato giratorio 4. Bandeja de cristal 5. Ventana del horno 6. Sistema de bloqueo de seguridad de la puerta 7. Calentador de la parrilla 8.
- Page 77 Su horno microondas 2.2 Datos técnicos MCF25210X MCF28310X MCF32410X Voltaje/Frecuencia 230-240 V / 50 Hz, Potencia de entrada - 1400 W 1500 W Microondas Potencia de salida - 900 W 1000 W Microondas Potencia de la parrilla 1200 W 1250 W...
- Page 78 Instalación y conexión 3.1 Instalación 3.2 Interferencias de radio El horno microondas puede causar interferencias 1. Asegúrese de haber retirado todos los materia- en su radio, televisor o aparatos similares. Cuando les de embalaje del interior del horno. se den estas interferencias, puede reducirlas o ADVERTENCIA: Compruebe si eliminarlas tomando las siguientes medidas: el horno presenta algún daño, como...
- Page 79 Instalación y conexión 2. Compruebe si hay algún fusible fundido o si Ni el fabricante ni el comerciante se se ha disparado un disyuntor en su instalación hacen responsables de los daños en eléctrica. Si no observa ninguna de esas el horno o las lesiones personales anomalías, compruebe la toma eléctrica enchu- causadas por la no observancia de...
- Page 80 Instalación y conexión 5. Puede usar tiras estrechas de papel de aluminio para evitar la cocción excesiva de las zonas ex- puestas, pero hágalo con precaución, evite usar demasiadas tiras y mantenga una distancia de 2,54 cm entre el aluminio y la cavidad del horno. La siguiente lista es una guía general que le ayudará...
- Page 81 Funcionamiento 4.1 Panel de control 4.2 Pantalla de acción de menú • Se muestran el tiempo de cocción, la potencia, los indicadores de acción y la hora. «Microondas» • Pulse este botón para ajustar el programa de cocción con microondas. «Reloj/Temporizador de cocina»...
- Page 82 Funcionamiento Tiempo de descongelación/Peso de 2. Gire el mando «Nivel/Tiempo/Peso/Menú» descongelación para fijar el dígito de las horas (8). • Pulse una vez para establecer el programa de 3. Pulse el botón «Reloj/Temporizador de cocina» descongelación basado en el tiempo introdu- una vez para confirmar el ajuste de las horas.
- Page 83 Funcionamiento 2. Gire el mando «Nivel/Tiempo/Peso/Menú» Dispone de 11 niveles de potencia para introducir el tiempo de descongelación. de cocción (P100, P-90, P-80, P-70, P-60, P-50, P-40, P-30, P-20, P-10, 3. Pulse «Inicio» para confirmar. P-00) a escoger girando el mando El horno se detiene durante la des- «Nivel/Tiempo/Peso/Menú».
- Page 84 Funcionamiento 4.10.2 Combinación 2 4. Gire el mando «Nivel/Tiempo/Peso/Menú» para introducir el tiempo de cocción (el tiempo 55 % del tiempo para cocción «Microondas», 45 máximo que se puede introducir es de 95 minu- % del tiempo para cocción a la parrilla. Úselo para tos).
- Page 85 Funcionamiento Supongamos que desea ajustar el temporizador El tiempo de precalentamiento de la cocina a 30 minutos: máximo es de 30 minutos. El tiem- po de precalentamiento no puede 1. Pulse el botón «Reloj/Temporizador de cocina» preseleccionarse. Cuando el horno una vez.
- Page 86 Funcionamiento 4.15.2 Protección frente a bajas temperaturas Cuando el sistema pasa al estado de protección frente a temperaturas extremadamente bajas, la pantalla digital muestra «E02» y sigue pitando hasta pulsar «Parar/Borrar»; el sistema regresa al modo en espera normal. 4.15.3 Protección frente a un mal funcionamiento del sensor El sistema pasa al modo de protección cuando el sensor del sistema está...
- Page 87 Funcionamiento Menú de cocción automática Código Alimento NOTAS: Leche/Café (200 ml / taza) 1. Para leche/café y patatas, la pantalla mostrará el número de servicios en vez del peso de los alimentos. Palomitas (99 g) 2. En la opción A-7, el horno se detiene durante la Espagueti (g) descongelación para permitir al usuario dar la vuelta a los alimentos con el fin de lograr una descongelación...
- Page 88 Limpieza y mantenimiento 5.1 Limpieza y cuidados 9. El anillo del rodillo y el suelo del horno deben limpiarse con regularidad para evitar ruidos 1. Apague el horno y desenchúfelo de la toma de excesivos. Lave la superficie inferior del horno corriente antes de proceder a su limpieza.
- Page 89 Limpieza y mantenimiento 5.3 Manejo y transporte • Durante el manejo y el transporte, lleve el apa- rato en su embalaje original. El embalaje del aparato lo protege de daños físicos. • No coloque cargas pesadas en el aparato o en el embalaje.
- Page 90 Resolución de problemas Normal El horno microondas interfiere con la recepción La recepción de las señales de radio y televisión de la señal de televisión. pueden sufrir interferencias cuando el horno microondas está funcionando. Es similar a la interferencia producida por pequeños electrodomésticos, como la batidora, la aspiradora y el ventilador.
- Page 91 ...
- Page 92 ...
- Page 93 Vă rugăm să citiți mai întâi acest manual! Stimate client, Vă mulțumim pentru că ați cumpărat un produs Beko. Sperăm să obțineți cele mai bune rezultate de la produsul dumneavoastră, care a fost fabricat la o calitate înaltă și cu tehnologii performante.
- Page 94 Instrucțiuni importante referitoare la siguranță și mediul înconjurător Instrucțiuni impor- Ferme • tante cu privire la De către clienți în hoteluri, mo- • teluri sau alte medii de tip siguranță Citiți cu rezidențial; atenție și păstrați-le Medii de tip pensiune. pentru referință...
- Page 95 Instrucțiuni importante referitoare la siguranță și mediul înconjurător Nu utilizați acest produs afară, în Nu utilizați substanțe chimice ab- • baie, în medii umede sau locuri în razive sau abur pentru curățarea care se poate uda. produsului. Acest cuptor este des- tinat încălzirii și gătirii alimentelor.
- Page 96 Cuptoarele cu microunde de la • • alte produse de generare a căldu- Beko sunt conforme standarde- rii. În caz contrar, acesta poate fi lor de siguranță aplicabile; din avariat și garanția devine nulă. acest motiv, în caz de orice avarii...
- Page 97 Instrucțiuni importante referitoare la siguranță și mediul înconjurător Puneți aparatul într-o poziție în Înainte de introducerea în cuptor a • • așa fel încât ștecherul să fie întot- pungilor adecvate pentru utilizare deauna accesibil. în cuptorul cu microunde, scoateți firele de sârmă și/sau mânerele Preveniți avarierea cablului de •...
- Page 98 Instrucțiuni importante referitoare la siguranță și mediul înconjurător Echipamentul din clasa B este Ouăle în coajă și ouăle fierte tari • • adecvat utilizării casnice și în nu trebuie încălzite în cuptoarele locuințe conectate direct la cu microunde deoarece pot ex- rețeaua de alimentare cu tensi- ploda, chiar după...
- Page 99 Instrucțiuni importante referitoare la siguranță și mediul înconjurător 1.3 Siguranța copiilor AVERTISMENT: Este pericu- • los ca operațiunile de service sau Atunci când cuptorul este utilizat • reparații care implică scoaterea lângă copii și persoane care pre- capacului care protejează împo- zintă...
- Page 100 Instrucțiuni importante referitoare la siguranță și mediul înconjurător Permiteți copiilor să utilizeze AVERTISMENT: Permiteți • • cuptorul fără supraveghere copiilor să utilizeze cuptorul fără numai atunci când aceștia au fost supraveghere numai atunci când instruiți corespunzător cu privire aceștia au fost instruiți cores- la utilizarea în siguranță...
- Page 101 Cuptorul dumneavoastră cu microunde 2.1 Prezentare generală 1. Panou de control 2. Ax disc turnant 3. Suport disc turnant 4. Tăviță de sticlă 5. Geam cuptor 6. Sistem de blocare de siguranță a ușii 7. Încălzitor grill 8. Ghid de unde (nu îndepărtați folia de mică ce acoperă...
- Page 102 Cuptorul dumneavoastră cu microunde 2.2 Date tehnice MCF25210X MCF28310X MCF32410X Tensiune/ Frecvență 230-240 V/50 Hz, Putere de intrare - Cuptor cu 1400 W 1500 W microunde Putere de ieșire - Cuptor cu 900 W 1000W microunde Putere-Grill 1200 W 1250 W Putere de intrare (Convecție)
- Page 103 Instalare și conectare 3.2 Interferențe radio 3.1 Montarea Funcționarea cuptorului cu microunde poate pro- 1. Asigurați-vă că materialele de ambalare sunt voca interferențe cu radioul, televizorul dvs. sau îndepărtate de pe interiorul ușii. cu echipamente asemănătoare. Atunci când există AVERTISMENT: Verificați cup- interferențe, acestea pot fi reduse sau eliminate torul, pentru a identifica o eventuală...
- Page 104 Instalare și conectare 3.5 Înainte de a solicita Dacă aveți întrebări despre service împământare despre instrucțiunile privind curentul elec- În cazul în care cuptorul nu funcționează: tric, consultați un electrician califi- 1. Verificați pentru a vă asigura că cuptorul este cat sau un specialist în service.
- Page 105 Instalare și conectare 4. Se recomandă mai degrabă vase rotunde/ovale în locul celorpătrate/dreptunghiulare, deoare- ce alimentele din colțuri tind să se prepare în exces. 5. Se pot utiliza fâșii înguste de folie de aluminiu, pentru a împiedica prepararea în exces a zone- lor expuse.
- Page 106 Funcționarea 4.1 Panou de comandă 4.2 Ecran de acționare meniu • Se afișează timpul de preparare, puterea, indi- catorii de acțiune și ora de pe ceas. „Cuptor cu microunde” • Apăsați acest buton, pentru a seta programul de preparare la microunde. „Ceas/cronometru de bucătărie”...
- Page 107 Funcționarea • Pur și simplu apăsați-l de un număr de ori, 1. Apăsați și mențineți apăsat butonul „Ceas/ pentru a seta timpul de preparare și preparați Cronomnetru de bucătărie” timp de 3 secunde, imediat la nivelul maxim de putere pentru a selecta ciclul de ceas cu 12 ore (dacă doriți să...
- Page 108 Funcționarea 2. Apăsați „Start”, pentru a confirma. 1. În modul de așteptare, apăsați o dată panoul „Decongelare/Greutate decongelare”. 3. Rotiți butonul „Nivel/Timp/Greutate/Meniu”, pentru a seta durata de preparare. 2. Rotiți cadranul „Nivel/Timp/Greutate/Meniu”, pentru a introduce timpul de decongelare. 4. Apăsați „Start”. 3.
- Page 109 Funcționarea 4.10.2 Combinare 2 5. Apăsați butonul „Start”. Puteți verifica temperatura de 55% din timp pentru prepararea „la microunde”, convecție cât timp prepararea este 45% pentru prepararea la grill. Utilizați pentru în curs, atingând panoul „Conv/ budinci, omlete, cartofi copți și carne de pui. Micro+Conv.”.
- Page 110 Funcționarea 4.12 Micro +convecție Atunci când cronometrul numără, puteți apăsa „Ceas/cronometru Acest cuptor are patru setări pre-programate care de bucătărie”, pentru a vedea ora pot facilita automat prepararea, atât cu căldură cronometrului timp de 5 secunde și prin convecție, cât și „cu microunde”. Timpul max- apăsați „Stop/Ștergere”...
- Page 111 Funcționarea 4.15.3 Senzor de protecție împotriva funcționării necorespunzătoare Sistemul intră în modul de protecție atunci când senzorul sistemului este scurtcircuitat. Afișajul indică „E03” și emite în continuare semnale so- nore, până când apăsați „Stop/Ștergere”, sistemul revine la modul normal de standby. 4.16 Preparare automată...
- Page 112 Curățarea și întreținerea 5.1 Curățarea și îngrijirea detergent ușor. Inelul rotativ poate fi spălat în apă plină de săpun ușor sau în mașina de 1. Opriți cuptorul și scoateți ștecherul din priza spălat vase. Atunci când se îndepărtează inelul de perete înainte de curățare. rotativ de pe partea inferioară...
- Page 113 Curățarea și întreținerea 5.3 Manevrarea și transportul • În timpul manevrării și transportului, păstrați produsul în ambalajul său original. Ambalajul produsului îl protejează împotriva deteriorării fizice. • Nu plasați obiecte grele pe aparat sau pe amba- laj. Produsul poate fi deteriorat. •...
- Page 114 Depanarea Normal Cuptorul cu microunde interferează cu recepția În momentul când cuptorul cu microunde este semnalului TV funcțional, recepția semnalului radio și tv poate suferi interferențe. Acest lucru este similar interferențelor cauzate de produsele electrice mici, cum ar fi mixerul, aspiratorul și ventilatorul electric.
- Page 115 în perioada de garanţie. Vă mulţumim că aţi optat pentru cumpărarea unui produs Beko! Durata medie de utilizare a produselor BEKO este de 5 ani! Perioada de garanţie legală de conformitate este de 2 ani de la intrarea produsului în posesia consumatorului.
- Page 116 oriilor. C, la lui. și brie nr. 210. 20:00;...
- Page 117 Leggere per prima cosa questo manuale! Gentile Cliente, Grazie per aver scelto un prodotto Beko. Speriamo che Lei riesca ad ottenere i risultati migliori da questo prodotto, realizzato con tecnologia di alta qualità e all'avanguardia. Pertanto, legga questo intero manuale utente e tutti gli altri documenti allegati con attenzione prima di utilizzare il prodotto e lo conservi come riferimento per usi futuri.
- Page 118 Istruzioni importanti sulla sicurezza e l’ambiente Questa sezione contiene istruzioni Non deve essere usato a scopo di sicurezza che consentono di pre- commerciale. Il fabbricante non venire il pericolo di incendio, scos- sarà ritenuto responsabile per sa elettrica, esposizione all' e nergia danni provocati da errato utilizzo.
- Page 119 Istruzioni importanti sulla sicurezza e l’ambiente Prima di usare l' a pparecchio per la Bisogna controllare gli utensili per • • prima volta, pulire tutte le parti. assicurarsi che siano idonei all' u ti- Vedere i dettagli presenti nella se- lizzo nei forni a microonde.
- Page 120 1.1.1 Sicurezza elettrica Posizionare l' a pparecchio in modo • tale che la spina sia sempre acces- Il forno a microonde Beko è con- • sibile. forme agli standard di sicurezza Per evitare danni al cavo di alimen- applicabili; pertanto, in caso di •...
- Page 121 Istruzioni importanti sulla sicurezza e l’ambiente Rimuovere strisce metalliche e/o Gli apparecchi di Classe B sono • • manici di metallo dai sacchetti di idonei per essere usati in ambienti carta o plastica prima di utilizzare domestici e ambienti direttamente nel forno sacchetti idonei al forno collegati a una rete di alimenta- a microonde.
- Page 122 Istruzioni importanti sulla sicurezza e l’ambiente Se lo sportello o le guarnizioni Non utilizzare dispositivi di pulizia • • dello sportello sono danneggiati, con vapore per pulire l' a pparec- il forno non deve essere utilizzato chio. finché non sia stato riparato da 1.3 Sicurezza dei una persona qualificata.
- Page 123 Istruzioni importanti sulla sicurezza e l’ambiente Consentire ai bambini di utiliz- 1.4 Conformità con la direttiva • RAEE e lo smaltimento dei zare il forno senza supervisione rifiuti solo quando sono state fornite istruzioni adeguate in modo che Questo prodotto non contiene materiali dannosi e proibiti specificati nel il bambino sia in grado di usare il “Regolamento per la supervisione dei...
- Page 124 Il forno a microonde 2.1 Panoramica 1. Pannello di controllo 2. Asta piatto girevole 3. Supporto piatto girevole 4. Vassoio di vetro 5. Vetro sportello forno 6. Sistema di interblocco di sicurezza sportello 7. Riscaldatore grill 8. Guida microonde (non rimuovere la piastra in mica che copre la guida del microonde) 9.
- Page 125 Il forno a microonde 2.2 Dati tecnici MCF25210X MCF28310X MCF32410X Tensione/Frequenza 230-240 V/50 Hz, Ingresso di potenza - Microonde 1400 W 1500 W Uscita di potenza - Microonde 900 W 1000 W Potenza - Grill 1200 W 1250 W Potenza in ingresso (Convezione)
- Page 126 Installazione e collegamento 3.2 Interferenze radio 3.1 Installazione Il funzionamento del microonde può causare in- 1. Assicurarsi che tutti i materiali di imballaggio terferenze con radio, TV o apparecchiatura simile. vengano rimossi dall’interno dello sportello. In caso di interferenza, questa potrebbe essere AVVERTENZA: Verificare la ridotta o eliminata prendendo le misure seguenti: presenza di eventuali danni al forno,...
- Page 127 Installazione e collegamento 2. Verificare la presenza di un fusibile di circuito Né il fabbricante né il rivenditore bruciato o un interruttore di circuito di rete sal- possono assumersi alcuna re- tato. Una volta verificato il corretto funziona- sponsabilità per danni al forno o le- mento di questi ultimi, provare a collegare alla sioni personali derivanti dalla man- presa un altro apparecchio.
- Page 128 Installazione e collegamento Il seguente elenco è una guida generale per facili- tare la selezione degli utensili corretti. Pentole Microonde Grill Convezione Modalità combinata* Vetro resistente al calore Sì Sì Sì Sì Vetro non resistente al calore Ceramica resistente al calore Sì...
- Page 129 Funzionamento 4.1 Pannello di controllo 4.2 Schermata di azione del menu • Vengono visualizzati tempo di cottura, potenza, indicatori di azione e tempo dell’orologio. “Microonde” • Premere questo pulsante per impostare il prog- ramma di cottura a microonde. “Timer orologio/cucina” •...
- Page 130 Funzionamento • Premerla semplicemente una serie di volte per 1. Premere e tenere premuto “Orologio/Timer da impostare il tempo di cottura e cucinare imme- cucina” per 3 secondi per selezionare il ciclo di diatamente a livello di potenza massima. orologio a 12 ore (se si desidera selezionare l’orologio a 24 ore, premere di nuovo il tasto).
- Page 131 Funzionamento 4. Premere “Avvio”. 2. Ruotare la manopola “Livello/Tempo/Peso/ Menu” per inserire il tempo di scongelamento. Vi sono 11 tipi di livelli di potenza di 3. Premere “Avvio” per confermare. cottura (P100, P-90, P-80, P-70, P-60, P-50, P-40, P-30, P-20, P-10, Il forno si arresta dopo lo scongela- P-00) tra cui è...
- Page 132 Funzionamento 4.10.2 Modalità combinata 2 4. Ruotare la manopola “Livello/Tempo/Peso/ Menu” per inserire il tempo di cottura (il tempo Il 55% del tempo per la cottura “a microonde”, il più lungo è 95 min). 45% per la cottura al grill. Utilizzare per dolci, frit- 5.
- Page 133 Funzionamento 4.12 Micro+convezione Quando il timer è in funzione, è possibile premere “Orologio/Timer Il forno ha quattro impostazioni pre-programmate da cucina” per visualizzare il tempo che facilitano la cottura sia con riscaldamento a del timer per 5 secondi e premere convezione sia “a microonde”...
- Page 134 Funzionamento 4.15.3 Protezione da malfunzionamento di sensore Il sistema entra nella modalità di protezione quan- do il sensore di sistema entra in corto circuito. Sul display viene visualizzato “E03” e questo continua a suonare fino a che non viene premuto “Stop/ Cancella”...
- Page 135 Pulizia e manutenzione 5.1 Pulizia e manutenzione la rimozione dell’anello del rullo dalla superficie della cavità per la pulizia, assicurarsi di riposizi- 1. Spegnere il forno e rimuovere la spina di ali- onarlo nella posizione corretta. mentazione dalla presa a parete prima della 10.
- Page 136 Pulizia e manutenzione 5.3 Movimentazione e trasporto • Durante la movimentazione e il trasporto, trasportare l'apparecchio nel suo imballaggio originale. L’imballaggio lo proteggerà contro eventuali danni materiali. • Non posizionare carichi pesanti sull’apparecchio o sul suo imballaggio. L’apparecchio potrebbe danneggiarsi. •...
- Page 137 Ricerca e risoluzione dei problemi Normale Il forno a microonde interferisce con la ricezione La ricezione radio e TV può essere influenzata dal funzionamento del forno a microonde. È simile all' i nterferenza provocata da piccoli apparecchi elettrici, come mixer, aspirapolvere e ventilatore elettrico.
- Page 138 Condizioni di Garanzia 1. BEKO Italy S.r.l. garantisce l’ a pparecchio per un periodo di 2 anni dalla data di acquisto (12 mesi se acquistato con fattura di vendita e non con scontrino fiscale).
- Page 139 Proszę najpierw przeczytać tę instrukcję obsługi! Drodzy Klienci, Dziękujemy za wybór wyrobu marki Beko. Mamy nadzieję, że wyrób ten, wyprodukowany przy użyciu wysokiej jakości najnowszej technologii, okaże się w najwyższym stopniu zadowalający. Dlatego proszę przed jego użyciem uważnie przeczytać całą tę instrukcję...
- Page 140 Ważne instrukcje dotyczące bezpieczeń- stwa i ochrony środowiska naturalnego Rozdział ten zawiera instrukcje Produkt jest przeznaczony do • zachowania bezpieczeństwa, które gotowania, podgrzewania i roz- pomogą chronić się przed ryzykiem mrażania żywności w warunkach pożaru, porażenia prądem elektry- domowych. Nie należy go używać cznym, wycieku mikrofal, obraże- do celów komercyjnych.
- Page 141 Ważne instrukcje dotyczące bezpieczeń- stwa i ochrony środowiska naturalnego Zawsze używaj tego urządzenie Nie uruchamiaj kuchenki, kiedy • • na stabilnej, płaskiej, czystej i nie- jest pusta. śliskiej powierzchni. Przybory kuchenne mogą się na- • Urządzenia tego nie wolno uży- grzać...
- Page 142 środowiska naturalnego 1.1.1 Bezpieczeństwo: Nigdy nie dotykaj urządzania ani • jego wtyczki wilgotnymi lub mo- Elektryczność krymi dłońmi. Kuchenka mikrofalowa firmy Beko • Urządzenie ustaw tak, aby zawsze spełnia wszystkie wymogi sto- • był możliwy dostęp do wtyczki. sownych norm bezpieczeństwa.
- Page 143 Ważne instrukcje dotyczące bezpieczeń- stwa i ochrony środowiska naturalnego Podczas podgrzewania potraw To urządzenie jest sprzętem grupy • • w plastikowych lub papierowych 2 klasa B ISM. Grupa 2 obejmuje pojemnikach często sprawdzaj wszystkie sprzęty ISM (Industrial, kuchenkę ze względu na ryzyko Scientific and Medical - przemy- zapłonu.
- Page 144 Ważne instrukcje dotyczące bezpieczeń- stwa i ochrony środowiska naturalnego Nie piecz niczego w kuchence. Go- Nie używaj tego urządzenia do • • rący olej może uszkodzić części i celów niezgodnych z jego prze- materiały, z których jest wykonana znaczeniem. kuchenka, i może spowodować Nie używaj tego urządzenia jako •...
- Page 145 Ważne instrukcje dotyczące bezpieczeń- stwa i ochrony środowiska naturalnego Dzieci nie powinny bawić się tym 1.4 Zgodność z dyrektywą • WEEE i pozbywanie się urządzeniem. Dzieci nie powinny zużytych wyrobów czyścić go ani konserwować, o ile nie są pod nadzorem osoby doro- Wyrób ten nie zawiera materiałów sz- kodliwych ani zabronionych określo- słej.
- Page 146 Kuchenka mikrofalowa 2.1 Opis ogólny 1. Panel sterowania 2. Trzpień talerza obrotowego 3. Podpora talerza obrotowego 4. Tacka szklana 5. Okno kuchenki 6. System blokady zabezpieczającej drzwi 7. Grzałka grilla 8. Falowód (nie zdejmuj płyty mikowej zakrywającej falowód) 9. Tacka do pieczenia Wartości oznaczone na urządzeniu i podane w innych dokumentach wraz z nim dostarczonych uzyskano w warunkach laboratoryjnych, według stosownych norm.
- Page 147 Kuchenka mikrofalowa 2.2 Dane techniczne MCF25210X MCF28310X MCF32410X Napięcie/Częstotliwość 230–240 V / 50 Hz, Moc wejściowa – mikrofale 1400 W 1500W Moc wyjściowa – mikrofale 900 W 1000 W Moc – grill 1200 W 1250 W Moc wejściowa 2250 W...
- Page 148 Montaż i podłączanie 3.2 Zakłócenia radiowe 3.1 Instalacja Kuchenka mikrofalowa może podczas użytkowania 1. Upewnić się, że wszystkie materiały pakowe zakłócać działanie odbiorników radiowych, tel- zostały wyjęte z wnętrza kuchenki. ewizyjnych i podobnego sprzętu. Zakłócenia OSTRZEŻENIE: Sprawdzić można zmniejszyć lub wyeliminować, stosując kuchenkę...
- Page 149 Montaż i podłączanie 2. Sprawdzić, czy nie przepalił się bezpiecznik lub Ani producent, ani sprzedawca nie zadziałał główny automatyczny przerywacz ob- ponoszą żadnej odpowiedzialności wodu. Jeśli działają prawidłowo, sprawdzić gni- prawnej za uszkodzenia kuchenki azdko, podłączając inne urządzenie. lub urazy osobiste będące skutkiem nieprzestrzegania procedur wyko- 3.
- Page 150 Montaż i podłączanie Poniższa lista stanowi ogólny poradnik ułatwiają- cy wybór właściwych przyborów. Naczynia kuchenne Mikrofale Grill Konwekcja Tryb miesza- Szkło żaroodporne Szkło nieodporne na wysoką temperaturę Ceramika żaroodporna Naczynia z tworzyw sztucz- nych nadające się do użytku w kuchence mikrofalowej Papier kuchenny Metalowa tacka Blacha do pieczenia...
- Page 151 Użytkowanie 4.1 Panel sterowania 4.2 Ekran menu Działanie • Wyświetlany jest czas gotowania, moc, wskaźniki działań i godzina. „Mikrofale” • Nacisnąć ten przycisk, aby nastawić program gotowania mikrofalami. „Zegar / minutnik kuchenny” • Nacisnąć, aby nastawić czas na zegarze. • Nacisnąć, aby nastawić funkcję minutnika kuc- hennego.
- Page 152 Użytkowanie Rozmrażanie na czas / Rozmrażanie 1. Nacisnąć i przytrzymać przez 3 sekundy przycisk wg wagi „Zegar / Minutnik kuchenny”, aby wybrać for- mat 12-godzinny (drugie naciśnięcie umożliwia • Nacisnąć raz, aby nastawić program rozmrażania wybór 24-godzinnego formatu wyświetlania oparty na wprowadzonym czasie. godziny).
- Page 153 Użytkowanie 3. Obrócić pokrętło „Poziom/Czas/Waga/Menu”, 1. W trybie czekania nacisnąć raz przycisk aby ustawić czas gotowania. „Rozmrażanie na czas / Rozmrażanie wg wagi”. 4. Nacisnąć przycisk „Start”. 2. Obrócić pokrętło „Poziom/Czas/Waga/Menu” w celu wprowadzenia czasu rozmrażania. Obracając pokrętło „Poziom/Czas/ 3. Nacisnąć przycisk „Start”, aby potwierdzić Waga/Menu”, można wybrać...
- Page 154 Użytkowanie 2. Nacisnąć przycisk „Start”, aby potwierdzić 2. Nacisnąć raz przycisk „Konw. / Mikro + Konw.”, wybór. a następnie obrócić w prawo pokrętło „Poziom/ Czas/Waga/Menu” w celu wprowadzenia tem- 3. Obrócić pokrętło „Poziom/Czas/Waga/Menu” w peratury konwekcji 180˚C. celu wprowadzenia czasu gotowania. 3.
- Page 155 Użytkowanie 4.13 Nastawianie minutnika Maksymalny czas podgrzewania kuchennego wynosi 30 minut i nie można ustawić żądanego czasu podgrze- Zegar kuchenki można nastawić, aby przypominał wania. Po osiągnięciu tempera- o czasie gotowania. Najdłuższy czas, jaki można tury podgrzewania kuchenka co ustawić, wynosi 95 minut. 5 sekund wydaje sygnał...
- Page 156 Użytkowanie 4.15 Zabezpieczenia 2. Nacisnąć raz przycisk „Start”. 3. Obrócić pokrętło „Poziom/Czas/Waga/Menu”, 4.15.1 Zabezpieczenie przed aby wybrać żądaną masę. przegrzaniem 4. Nacisnąć przycisk „Start”. Gdy system przejdzie w stan zabezpieczenia przed bardzo wysoką temperaturą, wyświetlacz cy- frowy wskazuje błąd „E01” i emitowane są krótkie sygnały dźwiękowe do chwili rozwiązania probl- emu, następnie należy nacisnąć...
- Page 157 Użytkowanie Menu automatycznego gotowania Żywność UWAGI: Mleko/kawa (200 ml / kubek) 1. W przypadku mleka/kawy i ziemniaków na ekranie, zamiast masy żywności, wyświetlana będzie liczba Popcorn (99 g) porcji. Spaghetti (g) 2. W przypadku pozycji A-7 kuchenka przerywa rozmrażanie, aby pozwolić użytkownikowi przewrócić Ziemniaki (230 g / jeden) żywność...
- Page 158 Czyszczenie i konserwacja 5.1 Czyszczenie i konserwacja 9. Należy regularnie czyścić pierścień obro- towy i spód kuchenki, aby zapobiec nadmi- 1. Przed czyszczeniem wyłączyć kuchenkę i ernemu hałasowi. Wystarczy wytrzeć dolną wyjąć jej wtyczkę z gniazdka ściennego. powierzchnię kuchenki łagodnym detergen- tem.
- Page 159 Czyszczenie i konserwacja 5.2 Przechowywanie • Jeśli urządzenie nie będzie używane przez dłuższy czas, należy je starannie przechowywać. • Należy się upewnić, że urządzenie jest odłączone od zasilania, ostygło i jest całkiem suche. • Przechowywać urządzenie w chłodnym i suchym miejscu. •...
- Page 160 Rozwiązywanie problemów Normalne Kuchenka mikrofalowa zakłóca odbiór TV. Odbiór radia i telewizji może być zakłócony w czasie działania kuchenki mikrofalowej. Jest to podobne do zakłóceń powodowanych przez małe urządzenia elektryczne, jak mikser, odkurzacz i wentylator. Jest to normalne zjawisko. Światło w kuchence jest przyćmione W przypadku gotowania z użyciem niskiej mocy światło w kuchence może być...
- Page 162 Lütfen önce bu kılavuzu okuyun! Değerli Müşterimiz, Beko ürününü tercih ettiğiniz için teşekkür ederiz. Yüksek kalite ve teknoloji ile üretilmiş olan ürününüzün size en iyi verimi sunmasını istiyoruz. Bunun için, bu kılavuzun tamamını ve verilen diğer belgeleri ürünü kullanmadan önce dikkatle okuyun ve bir başvuru kaynağı...
- Page 163 Önemli güvenlik ve çevre talimatları Bu bölümde, yangın riski, elektrik Cihaz sadece evde, gıdaların • çarpması, kaçak mikrodalga enerjis- hazırlanması, ısıtılması ve ine maruz kalınması, yaralanma ya buzlarının çözülmesi için da maddi hasar tehlikelerini önle- kullanılmak üzere tasarlanmıştır; meye yardımcı olacak güvenlik tal- ticari maksatla kullanılmamalıdır.
- Page 164 • sıcaklıkları yüksek olabilir. Cihazı giysi ya da mutfak • havlularınızı kurutmak için 1.1.1 Elektrik güvenliği kullanmayın. Beko Mikrodalga Fırın, geçerli • Kullanım sırasında cihaz çok ısınır. güvenlik standartlarına uygun- • Cihazın içindeki sıcak elemanlara dur; bundan dolayı herhangi bir dokunmamaya dikkat edilmelidir.
- Page 165 Önemli güvenlik ve çevre talimatları Cihazı topraklı prizde kullanın. Plastik veya kağıt kaplardaki • • yiyecekleri ısıtırken tutuşma Elektrik kablosu veya cihaz • olasılığına karşı fırını sık sık kontrol hasarlıysa cihazı asla kullanmayın. edin. Bu cihazı uzatma kablosuyla • Mikrodalga fırında kullanıma uygun kullanmayın.
- Page 166 Önemli güvenlik ve çevre talimatları Sınıf B cihazları, evlerde ve Mikrodalga fırınınızı kabuklu veya • • insanların yaşadığı binalara elek- kabuksuz,çırpılmamış yumurtaları trik sağlayan düşük gerilimli ele- pişirmek veya tekrar ısıtmak için ktrik şebekesine doğrudan bağlı kullanmayın. binalarda kullanılmak için uygun- Cihazın arkasında ve yanlarında •...
- Page 167 Önemli güvenlik ve çevre talimatları 1.3 Çocuk güvenliği Izgara veya kombi modunda • oluşacak ısınmalardan dolayı Cihaz çocukların ve sınırlı fizik- • çocuklar bu modları sadece sel, duyusal ya da zihinsel kapa- yetişkin birinin gözetiminde siteye sahip insanların yakınında kullanılmalıdır. kullanıldığında son derece dikkatli Cihazı...
- Page 168 Mikrodalga fırınınız 2.1 Genel Bakış 1. Kontrol paneli 2. Döner tabla mili 3. Döner tabla desteği 4. Cam tepsi 5. Fırın camı 6. Kapak güvenlik kilidi sistemi 7. Izgara ısıtıcı 8. Dalga kılavuzu (Lütfen dalga kılavuzunu kapla- yan mika plakayı sökmeyin) 9.
- Page 169 Mikrodalga fırınınız 2.2 Teknik veriler MCF25210X MCF28310X MCF32410X Gerilim/Frekans 230-240V/50Hz, Güç Girişi - Mikrodalga 1400 W 1500 W Güç Çıkışı - Mikrodalga 900 W 1000 W Güç - Izgara 1200 W 1250 W Giriş Gücü 2250 W 2300W (Konveksiyon) Mikrodalga Frekansı...
- Page 170 Kurulum ve bağlantı 3.1 Kurulum 1. Fırının kapağını ve sızdırmazlık yüzeyini temiz- leyin. 1. Kapağın iç kısmındaki tüm ambalaj malzemele- 2. Radyonun veya televizyonun alıcı anteninin yö- rini sökün. nünü değiştirin. UYARI: Fırını hasara karşı ince- 3. Mikrodalga fırının yerini alıcıya göre değiştirin. leyin;...
- Page 171 Kurulum ve bağlantı 3.4 Mikrodalga pişirme 3.6 Gereç kılavuzu esasları 1. Mikrodalga, metallerden geçemez. Yalnızca mikrodalga fırınlar için uygun olan gereçleri kul- 1. Yiyecekleri dikkatli bir şekilde yerleştirin. En ka- lanın. Yiyecek ve içecekler için kullanılan metal lın kısımları kabın dışına doğru koyun. kaplara, mikrodalga pişirme sırasında izin veril- 2.
- Page 172 Kurulum ve bağlantı Aşağıdaki liste, doğru gereçleri seçmenize yardımcı olacak genel bir kılavuzdur. Pişirme gereci Mikrodal- Izgara Konveksi- Kombinas- yon* Isıya Dayanıklı Cam Evet Evet Evet Evet Isıya Dayanıksız Cam Hayır Hayır Hayır Hayır Isıya Dayanıklı Seramik Evet Evet Evet Evet Mikrodalgada Kullanılabilir Evet...
- Page 173 Kullanım 4.1 Kontrol paneli 4.2 Menü İşlem Ekranı • Pişirme süresi, güç, işlem göstergeleri ve saat görüntülenir. "Microwave" (Mikrodalga) • Bu tuşa basarak mikrodalga pişirme programını ayarlayabilirsiniz. "Clock/Kitchen Timer" (Saat/Mutfak Zamanlayıcısı) • Bu tuşa basarak saati ayarlayabilirsiniz. • Bu tuşu, mutfak zamanlayıcısı fonksiyonunu ayarlamak için kullanabilirsiniz.
- Page 174 Kullanım “Start" (Başlat) (Kadran) 2. Level/Time/Weight/Menu kadranını çevirerek saat hanesini 8’e ayarlayın. • Bir pişirme programı başlatmak için bir kez basın. 3. “Clock/Kitchen Timer” düğmesine bir kez basa- • Pişirme süresini ayarlamak ve tam güçte hızlı rak saat ayarını onaylayın. pişirme yapmak için birkaç...
- Page 175 Kullanım “ L e v e l / T i m e / We i g h t / M e n u ” Fırın, buz çözme işlemi esnasında kadranını çevirerek seçebileceğiniz durarak, eşit buz çözme olması için 11 tür pişirme gücü seviyesi vardır kullanıcıyı...
- Page 176 Kullanım 12 dakikalık pişirme işlemi için kombinasyon 2’yi Konveksiyonla Ön Isıtma ve Pişirme kullanmak istediğinizi varsayalım. Yapmak Fırınınız, ön ısıtma ve konveksiyonlu pişirme 1. "Grill/Micro+Grill" düğmesine iki kez basıp ek- işlemlerini birleştirecek şekilde programlanabilir. randa “Gr3” görüntülenene kadar "Level/Time/ Fırını 170˚C’ye ısıtmak ve sonra 35 dakika pişirme Weight/Menu"...
- Page 177 Kullanım 2. "Conv/Micro+Conv." düğmesine iki kez basın. ÇOCUK KİLİDİ’nin iptal edilmesi: Çocuk kilidi modunda, fırın kapağını açıp kapatarak pro- 3. "Level/Time/Weight/Menu" kadranını çevirerek gramı iptal edebilirsiniz. konveksiyon sıcaklığını belirtin. 4. “Start” düğmesine basarak onaylayın. 4.15 Koruma 5. “Level/Time/Weight/Menu” kadranını çevirerek pişirme süresini girin.
- Page 178 Kullanım Otomatik pişirme menüsü Yiyecek NOTLAR: Süt/Kahve (200 ml/ fincan) 1. Süt/kahve ve patates için, ekranda yiyeceğin ağırlığı yerine porsiyon sayısı görüntülenir. Patlamış mısır (99g) 2. A-7 ögesi için fırın, buz çözme işlemi esnasında dura- Spagetti (g) rak, buzun eşit bir şekilde çözülebilmesi için kullanıcıyı yiyeceği çevirmesi konusunda uyarır.
- Page 179 Temizlik ve bakım 5.1 Temizlik ve bakım 10. Bir bardak su ile bir limonun suyunu ve kabu- ğunu derin bir mikrodalga kasesinde karıştırıp 1. Temizlik işleminden önce fırını kapatın ve fişi mikrodalga fırında 5 dakika ısıtarak fırınınızdaki prizden çekin. kötü kokuları giderebilirsiniz. İyice silip yumu- şak bir bezle kurulayın.
- Page 180 Sorun giderme Normal Cihaz TV’ d e parazitlenmeye neden oluyor Cihaz çalışırken radyo ve TV’ d e parazitlenme olabilir. Mikser, elektrikli süpürge ve elektrikli vantilatör gibi küçük elektrikli cihazların neden olduğu parazitlenmeye benzer. Bu durum normaldir. Fırın lambası kısık Cihaz düşük güçte pişirme sırasında, fırın lambası kısılabilir.
- Page 181 Tüketici hizmetleri Değerli Müşterimiz, Aşağıdaki önerilere uymanı- zı rica ederiz. Beko Çağrı Merkezi haftanın 7 günü 24 saat hizmet vermektedir. 1. Ürününüzü aldığınızda Garanti belgesini Yetkili Beko Çağrı Sabit veya cep telefonlarınızdan alan kodu Satıcınıza onaylattırınız. Merkezi tuşlamadan çağrı merkezi numaramızı arayarak 2.
- Page 182 Kullanım Hataları ve Garanti ile İlgili Dikkat Edilmesi Gereken Hususlar Aşağıda belirtilen sorunların giderilmesi ücret karşılığında yapılır. Bu durumlar için garanti şartları uygulanmaz; 1) Kullanım hatalarından kaynaklanan hasar ve arızalar, 2) Malın tüketiciye tesliminden sonraki yükleme, boşaltma, taşıma vb. sırasında oluşan hasar ve arızalar, 3) Malın kullanıldığı...
- Page 183 Unvanı: Arçelik A.Ş. Markası: Beko Adresi: Arçelik A.Ş. Karaağaç Caddesi No:2-6, Cinsi: Mikrodalga Fırın 34445, Sütlüce / İSTANBUL Modeli: MCF25210X / MCF28310X / MCF32410X Telefonu: (0-216) 585 8 888 Bandrol ve Seri No: Faks: (0-216) 423 23 53 Garanti Süresi: 3 YIL web adresi: www.beko.com.tr Azami Tamir Süresi:...
- Page 184 Прочитайте это руководство перед началом эксплуатации! Уважаемый покупатель! Благодарим вас за выбор продукции компании Beko. Мы надеемся, что про- дукция, изготовленная на современном оборудовании и имеющая высокий уровень качества, будет служить вам наилучшим образом. Для этого перед началом эксплуатации внимательно прочитайте данное руководство и все...
- Page 185 Важные инструкции по технике безо- пасности и защите окружающей среды В этом разделе содержатся пра- • Работы по обслуживанию печи, вила техники безопасности, со- предусматривающие демонтаж блюдение которых позволит из- крышки, которая обеспечивает бежать риска возникновения по- защиту от воздействия микро- жара, получения...
- Page 186 Важные инструкции по технике безо- пасности и защите окружающей среды • Ни в коем случае не разби- Она не предназначена для ис- райте электроприбор. В слу- пользования в промышленных чае неисправности вследствие или лабораторных условиях. неправильного обращения с • Запрещается использовать электроприбором...
- Page 187 шнур питания или электропри- бор повреждены. 1.1.1. Электрическая • Не подключайте электроприбор безопасность через удлинитель. • Микроволновая печь Beko со- • Никогда не прикасайтесь к элек- ответствует действующим стан- троприбору, если у вас мокрые дартам безопасности. В случае или влажные руки.
- Page 188 Важные инструкции по технике безо- пасности и защите окружающей среды • Во избежание повреждения • Перед тем как помещать бумаж- шнура питания не допускайте ные или пластиковые пакеты в его сдавливания, перегиба или печь, необходимо убедиться в контакта с острыми кромками. том, что...
- Page 189 Важные инструкции по технике безо- пасности и защите окружающей среды • Данный электроприбор отно- • При нагреве напитков в микро- сится к оборудованию ISM группы волновой печи они могут вски- 2, класс B. К группе 2 относится петь и расплескаться после их оборудование...
- Page 190 Важные инструкции по технике безо- пасности и защите окружающей среды 1.3. Безопасность • Не следует использовать микро- волновую печь для приготовле- детей ния или разогрева яиц с целым • Рекомендуется соблюдать пре- желтком, как в скорлупе, так и дельную осторожность при ис- без...
- Page 191 Важные инструкции по технике безо- пасности и защите окружающей среды • Детям можно позволять само- Соответствует требованиям Директивы ЕС об утилизации электрического и электрон- стоятельно пользоваться печью ного оборудования. Это изделие изготов- только после соответствующего лено из высококачественных материалов и инструктажа, чтобы...
- Page 192 Votre four à micro-ondes 2.1 Aperçu 1. Panneau de commande 2. Arbre du plateau tournant 3. Support du plateau tournant 4. Plateau en verre 5. Fenêtre du four 6. Dispositif de verrouillage de sécurité de la porte 7. Élément chauffant de gril 8.
- Page 193 Votre four à micro-ondes 2.2 Données techniques MCF25210X MCF28310X MCF32410X Voltage/Fréquence 230-240 V/50 Hz, Puissance d'entrée - 1 400 W 1 500 W Micro-ondes Puissance de sortie - 900 W 1000 W Micro-ondes Puissance - Gril 1 200 W 1 250 W Puissance d'entrée...
- Page 194 Installation et raccordement 3.1 Installation 8. N'utilisez pas le four à l'extérieur. 3.2 Interférences radio 1. Assurez-vous de retirer tous les matériaux d'emballage sur la partie intérieure de la Le fonctionnement du four à micro-ondes porte. peut créer des interférences avec la radio, AVERTISSEMENT : Vérifiez la télévision ou d’autres appareils similaires.
- Page 195 Installation et raccordement 3.5 Avant d'appeler le service Si vous avez des questions après-vente relatives à la mise à la terre ou aux instructions en matière Si le four ne fonctionne pas : d'électricité, consultez 1. Vérifiez que le four est bien branché. Si ce électricien qualifié...
- Page 196 Installation et raccordement 3. Lorsque vous cuisinez au micro-ondes, n’utilisez pas des papiers recyclés car ils pourraient contenir de petits fragments métalliques pouvant causer des étincelles ou un incendie. 4. Il est recommandé d'utiliser des plats ronds ou ovales plutôt que des plats carrés ou allongés, car les aliments dans les coins ont tendance à...
- Page 197 Fonctionnement 4.1 Panneau de commande 4.2 Écran d'action du menu • Le temps de cuisson, l'alimentation, les indicateurs d'action et l'heure sont affichés. « Micro-ondes » • Appuyez sur cette touche pour régler le programme de cuisson au micro-ondes. « Horloge/Minuterie de cuisine » •...
- Page 198 Fonctionnement Bouton « Démarrer » 4.4 Réglage de l'heure • Appuyez une fois sur cette touche pour L’horloge peut avoir le format 12 ou 24 heures. lancer un programme de cuisson. Vous pouvez sélectionner votre format en • Il suffit d'appuyer plusieurs fois pour appuyant sur la touche Horloge / Cuisson.
- Page 199 Fonctionnement au four à micro- 2. Tournez le cadran « Niveau/Heure/Poids/ Cuisson Menu » pour sélectionner le poids des ondes aliments à décongeler. Pour la cuisson « Micro-ondes », le niveau de 3. Appuyez sur « Démarrer » pour confirmer. puissance de cuisson et le temps de cuisson Pendant la décongélation, le peuvent être réglés.
- Page 200 Fonctionnement 1. Appuyez une fois sur le bouton « Gril/ 2. Appuyez sur « Démarrer » pour confirmer. Micro+Gril ». 3. Tournez le cadran « Niveau/Heure/Poids/ 2. Appuyez sur « Démarrer » pour confirmer. Menu » pour entrer le temps de cuisson. 3.
- Page 201 Fonctionnement Pour préchauffer et faire la cuisine Appuyez deux fois sur le bouton « Conv/ par convection Micro+Conv. », puis tournez cadran « Niveau/Heure/Poids/Menu » pour Votre four peut être programmé pour combiner programmer la température de convection les opérations de préchauffage et de cuisson (200 °C¦170 °C¦140 °C¦110 °C).
- Page 202 Fonctionnement 4.15.2 Protection contre les Lorsque la minuterie démarre, basses températures vous pouvez appuyer « Horloge/ Minuterie de cuisine » Lorsque le système se met en mode Protection pour voir le temps de la minuterie contre les températures très basses, l'afficheur pendant 5 secondes et appuyez numérique affiche «...
- Page 203 Fonctionnement Menu Cuisson automatique Code Aliments REMARQUES : Lait / Café (200 ml/tasse) 1. Pour le lait/café et les pommes de terre, l'écran Popcorn (99 g) affiche le nombre de portions au lieu du poids des Spaghetti (g) aliments. Pomme de terre (230 g/ 2.
- Page 204 Nettoyage et entretien 5.1 Nettoyage et entretien 9. Nettoyez régulièrement l'anneau de rouleau et le plancher du four pour éviter des bruits 1. Éteignez le four et débranchez la fiche excessifs. Essuyez simplement la surface d'alimentation de la prise murale avant le inférieure du four à...
- Page 205 Nettoyage et entretien 5.2 Rangement • Si vous ne comptez pas utiliser votre appareil pendant un certain temps, veuillez le ranger soigneusement. • Veillez également à ce que l'appareil soit débranché, complètement refroidi et entièrement sec. • Conservez l'appareil dans un endroit frais et sec.
- Page 206 Устранение неполадок Нормальное Микроволновая печь создает помехи приему При работе микроволновой печи возможно телевизионных программ создание помех для приема радио- и телевизи- онных программ. Помехи аналогичны помехам, возникающим при использовании малых электро- приборов, таких как миксер, пылесос и электро- вентилятор. Это нормально. Освещение...
- Page 208 استكشاف األعطال وإصالحها عادي قد يتأثر استقبال أجهزة التلفاز والراديو عند تشغيل فرن .يتداخل فرن المايكروويف مع أجهزة استقبال التلفاز المايكروويف. ذلك األمر مشابه للتداخل الذي تتسبب فيه األجهزة الكهربائية الصغيرة مثل الخالط، أو المكنسة .الكهربائية، أو المروحة الكهربائية. هذا األمر طبيعي عند...
- Page 209 الصيانة والتنظيف 1.5 التنظيف والعناية يمكنك إزالة الروائح من الفرن الخاص بك بوضع عصارة وقشرة ليمونة على كوب من الماء وسكبه قم بإيقاف تشغيل الفرن وافصل قابس التيار الكهربائي في تجويف فرن المايكروويف وتشغيل الفرن لمدة .من مقبس الحائط قبل التنظيف خمس...
- Page 210 التشغيل 3.51.4 الحماية من أعطال المستشعر يدخل النظام في وضع الحماية عندما يحدث قصر في « على الشاشةE03» دائرة مستشعر النظام. يظهر وتستمر في إصدار صوت صفير إلى أن تضغط على ” )توقف/تنظيف(، عندها يعود النظام إلىStop/Clear“ .وضع االستعداد الطبيعي 61.4 الطهي...
- Page 211 التشغيل 21.4 المايكروويف +الحمل الحراري .” )البدء( للتأكيدStart“ اضغط على يحتوي هذا الفرن على إعدادات مبرمجة مسب ق ً ا تس ه ّل حين يبدأ المؤقت بالعد، يمكنك الضغط عملية الطهي باستخدام ك ال ً من حرارة الحمل الحراري ”Clock/Kitchen Timer“ على...
- Page 212 التشغيل .” )البدء( للتأكيدStart“ اضغط على يوجد 11 نوع لمستوى طاقة الطهي وP-70 وP-80 وP-90 وP100) يتوقف الفرن عن العمل أثناء عملية إزالة وP-30 وP-40 وP-50 وP-60 التجميد ليتيح للمستخدم تدوير الطعام يمكنك (P-00و P-10و P-20 لتوحيد إزالة التجميد عنه ثم اضغط على االختيار...
- Page 213 التشغيل 2 2.01.4 الخليط .” )البدء( للتأكيدStart“ اضغط على ”Level/Time/Weight/Menu“ أدر المقبض ”Microwave“ لطهي الوقت من )المستوى/الوقت/الوزن/القائمة( إلدخال وقت الطهي )المايكروويف(، و%54 لطهي الشواية. يستخدم لعمل .()أطول وقت هو 59 دقيقة .البودنج، وعجة البيض، والبطاطا المشوية، والدجاج .(” )البدءStart“ اضغط على زر .لنفترض...
- Page 214 التشغيل ”Time Defrsot/Weight Defrost“ ”Level/Time/Weight/Menu“ أدر مقبض )المستوى/الوقت/الوزن/القائمة( لضبط الدقائق عند )(إزالة التجميد حسب الوقت/إزالة التجميد حسب الوزن .30 الرقم اضغط مرة واحدة لضبط برنامج إزالة التجميد بنا ء ً على • .الوقت المحدد ”Clock/Kitchen Timer“ اضغط على الزر .)الساعة/مؤقت المطبخ( مرة واحدة لتأكيد اإلعداد اضغط...
- Page 215 التشغيل 2.4 شاشة قائمة اإلجراءات 1.4 لوحة التحكم تعرض مدة الطهي والطاقة ومؤشرات اإلجراءات • .والساعة )” (المايكروويفMicrowave“ اضغط على هذا الزر لضبط برنامج الطهي • .للمايكروويف ”Clock/Kitchen Timer“ )(الساعة/مؤقت المطبخ .اضغط لضبط الوقت • .اضغط لضبط وظيفة مؤقت المطبخ •...
- Page 216 التركيب والتوصيل 6.3 دليل األواني 4.3 مبادئ الطهي بالمايكروويف أعد الطعام بحذر. ضع المناطق األكثر سم ك ً ا بالقرب ال يمكن للمايكروويف اختراق المعادن. استخدم فقط األواني المالئمة لالستخدام في أفران الميكروويف. ال .من الجزء الخارجي للطبق يسمح باستخدام األواني المعدنية المخصصة للطعام أو تابع...
- Page 217 التركيب والتوصيل ت ُ عد القائمة أدناه دلي ال ً عا م ًا للمساعدة في اختيار األواني .المناسبة *الخليط الحَ مل الحراري الشواية المايكروويف أواني الطهي نعم نعم نعم نعم الزجاج المقاوم للحرارة ال ال ال ال الزجاج غير المقاوم للحرارة نعم...
- Page 218 التركيب والتوصيل 1.3 التركيب تغيير موضع فرن المايكروويف مع وضع في االعتبار .االستقبال الخاص بالراديو أو التلفاز تأكد من إزالة جميع مواد التعبئة من الجزء الداخلي .حرك فرن المايكروويف بعي د ً ا عن المستقبل .للباب قم بتوصيل فرن المايكروويف في مأخذ تيار كهرباء تحذير: تحقق...
- Page 219 فرن المايكروويف الخاص بك 2.2 البيانات الفنية MCF32410X MCF28310X MCF25210X الجهد / التردد ،042-032 فولط/05 هرتز 0051 واط 0041 واط دخل الطاقة - المايكروويف خرج الطاقة - المايكروويف 0001 واط 009 واط 0521 واط 0021 واط الطاقة - الشواية 0032 واط...
- Page 220 فرن المايكروويف الخاص بك 1.2 نظرة عامة لوحة التحكم عمود القرص الدوار دعامة القرص الدوار الصينية الزجاجية نافذة الفرن نظام قفل الباب للسالمة سخان الشواية موجه الموجات )يرجي عدم إزالة لوحة الميكا التي (تغطي موجه الموجات صينية الخبز دق .ةلصلا تاذ ريياعملل ا ً قفو ةيلمعم فورظ يف اهيلع لوصحلا مت ميق يه زاهجلا عم ةمدقملا ةعوبطملا تادنتسملا يف ةحضوملا ميقلا وأ زاهجلا ىلع تامالعلا .تلوف...
- Page 221 تعليمات هامة للسالمة والبيئة تحذير: ال تسمح لألطفال باستخدام الفرن بدون مراقبة إذا ما تم إصدار تعليمات مناسبة بالشكل الذي يسمح للطفل باستخدام فرن المايكروويف بطريقة آمنة وفهم مخاطر االستخدام غير .المناسب WEEE 4.1 متوافق مع تشريعات .وتشريعات التخلص من المنتجات الفاسدة هذا...
- Page 222 تعليمات هامة للسالمة والبيئة يمكن استخدام هذا الجهاز من خالل األطفال الذين تحذير: إذا تلف الباب أو قفل الباب، ال يجب هم بعمر 8 أو أكبر ومن خالل األشخاص الذين .تشغيل الفرن حتى يقوم بإصالحه شخص مؤهل لديهم إعاقة بدنية، أو حسية، أو ذهنية، أو الذين تحذير: من...
- Page 223 تعليمات هامة للسالمة والبيئة 2.1.1 سالمة المنتج ال تسحب كابل طاقة الجهاز لفصله عن مزود . ً الطاقة، وال تقم بلف كابل الطاقة حول الجهاز أبد ا تسخين المشروبات في فرن المايكروويف قد ال تغمر الجهاز أو كابل الطاقة أو قابس الطاقة في يتسبب...
- Page 224 .هو غير م ُعد لالستخدامات الصناعية أو المعملية .آخرين مؤهلين لتجنب المخاطر ال تستخدم جهازك لتجفيف المالبس أو أواني بمعايير السالمةBeko تلتزم أفران مايكروويف .المطبخ السارية؛ وعلى ذلك ففي حالة حدوث أي تلف بالجهاز، أو كابل الطاقة، يجب إصالحه أو...
- Page 225 تعليمات هامة للسالمة والبيئة احرص على قراءة عليك عدم اللعب بأي أجسام بين الجانب األمامي وباب الفرن. ال تسمح لألتربة أو بقايا مواد تعليمات السالمة الهامة .التنظيف بالتراكم على أسطح اإلغالق بعناية واحتفظ بها للرجوع إليها في المستقبل أي أعمال صيانة تتطلب إزالة الغطاء الذي يوفر الحماية...
- Page 226 المحتويات 04-21 عربى 01M-8802973200-2518-01 01M-8802993200-2518-01 3 / AR فرن مايكروويف / دليل استعمال المستخدم...
- Page 227 !ً يرجى قراءة هذا الدليل أو ال ،عزيزي العميل شكرً ا لشرائك منتج شركة بيكو. نأمل أن تحصل على أفضل النتائج من جهازك الذي قد تم تصنيعه بأعلى جودة وبأحدث التقنيات. وعلى ذلك، يرجى قراءة كامل دليل المستخدم هذا وجميع المستندات المصاحبة له بعناية قبل استخدام المنتج واالحتفاظ...
- Page 228 فرن المايكروويف دليل المستخدم MCF25210X MCF28310X MCF32410X 01M-8802983200-4418-01...