Télécharger Imprimer la page

Publicité

Les langues disponibles

Les langues disponibles

Liens rapides

Wetterstation „Bergen"
10029954

Publicité

loading

Sommaire des Matières pour oneConcept Bergen

  • Page 1 Wetterstation „Bergen“ 10029954...
  • Page 2 Sehr geehrter Kunde, wir gratulieren Ihnen zum Erwerb Ihres Gerätes. Lesen Sie die folgenden Hinweise sorgfäl- tig durch und befolgen Sie diese, um möglichen Schäden vorzubeugen. Für Schäden, die durch Missachtung der Hinweise und unsachgemäßen Gebrauch entstehen, übernehmen wir keine Haftung. Sicherheitshinweise •...
  • Page 3 Technische Daten Artikelnummer 10029954 Stromversorgung Basisstation Batterien: 2XAA 1,5 V LR6 Stromversorgung Batterien: 2XAAA 1,5 V LR03 Funk-Messstation Kabellose Temperatur-Messung (innen & außen) • Kabellose Messung der Luftfeuchtigkeit (i & a) • Aufzeichnung der jeweiligen Min- & Max-Werte • Barometer mit 12-h-Aufzeichnung (hPa / inHg) •...
  • Page 4 Inbetriebnahme Nehmen Sie die Batteriefachabdeckung der Messtation ab und setzen Sie zwei Batterien vom Typ AA ein. Beachten Sie die korrekte Polarität wie auf der Innenseite der Batteriefä- cher jeweils schematisch angegeben. Warten Sie eine Weile, bis die von der Messstation gemessene (Außen-)Temperatur auf der Basisstation angezeigt wird.
  • Page 5 Übersicht Display Luftdruck-Entwicklung der letzen 12 h Kanal Luftdruckanzeige Funksymbol Frost Temperaturalarm Wetter Tendenz Temperatur (außen) Luftdruck-Balkendiagramm Tendenz Temperatur (innen) Tendenz Luftdruck Tendenz Luftfeuchtigkeit (außen) Niedriger Batteriestand (innen) Dynamisches Smiley Niedriger Batteriestand (außen) Trend Innentemperatur...
  • Page 6 Woche Datum Wochentag Monduntergang Alarm Mondaufgang Monat Mondphase Zeit Ort (Stadt) Sommerzeit Sonnenuntergang Sonnenaufgang Rückseite / Anschlüsse MODE CHANNEL SNOOZE / LIGHT RESET HISTORY...
  • Page 7 Außenstation RF Symbol (Außen-)Luftfeuchtigkeit Channel CH (Kanalwahl) (Außen-)Temperatur °C/°F Einrichtung und Bedienung Nach dem Einsetzen der Batterien beginnt die Anzeige der Höhenmeter (m über NN) zu blinken. Nutzen Sie die Tasten + und -, um die Höhenmeter einzugeben (falls bekannt). Zum Beenden, spieichern und fortfahren drücken Sie HISTORY.
  • Page 8 Falls der Verbindungsaufbau fehlschlägt, halten Sie CHANNEL 3 Sekunden gedrückt, um einen erneuten Verbindungsaufbau zu erzwingen. Der (automatische) Empfang des DCF-Signals (Funkuhr-Signal mit Trägersignal von 77,5 kHz, Empfangsgebiet ist der Radius (Soll) von 2000km um Mainflingen bei Frankfurt am Main) beginnt 3 Minuten nach der erfolgreichen Verbindung von Basis- und Außenstation. Das entsprechende „Funk“-Symbol wird auf dem Display angezeigt (blinkt während des Verbindungsaufbaus).
  • Page 9 Wecker ein-/ausschalten Wechseln Sie ins A1- oder ins A2-Display (MODE) und drücken Sie die Taste - , um Alarm 1 zu aktivieren/deaktivieren. Das Wecker-Symbol wird jeweils bei aktiviertem Alarm auf dem Display angezeigt. Bitte beachten Sie: Alarm1 ist nur an Wochentagen, Alarm2 nur am Wochenende aktiv. Nach 20 Sekunden ohne Eingabe wird der Setup-Modus automatisch verlassen.
  • Page 10 Weitere Funktionen Wettervorhersage Auf Basis der Luftdruck-Tendenzen wird eine Wettervorhersage in Form von Symbolen auf dem Display dargestellt (sonnig / leich bewölkt / bewölkt / Regen). Barometer Drücken Sie HISTORY, um die gemessenen Luftdrücke der letzten 12 Stunden anzuzeigen. Beleuchtung Drücken Sie SNOOZE/LIGHT, um die Hintergrundbeleuchtung für das Display für 5 Sekun- den zu aktivieren.
  • Page 11 Luftfeuchtigkeit im Wohnraum Die von der Basisstation gemessene Luftfeuchtigkeit wird für die schnelle Ablesbar- und Interpretierbarkeit mit den folgenden Symbolen (für „gut“, „zu trocken“ und „zu feucht“) dargestellt: Niedriger Batteriestand • Bei niedriger Batteriekapazität erscheinen die entsprechenden Batterie-Symbole im Innen-, oder im Außen-Bereich der Anzeige (8 / 10, siehe „Übersicht“). •...
  • Page 12 Hinweise zur Entsorgung Befi ndet sich die diese Abbildung (durchgestrichene Mülltonne auf Rädern) auf dem Produkt, gilt die Europäische Richtlinie 2012/19/EU. Diese Produk- te dürfen nicht mit dem normalen Hausmüll entsorgt werden. Informieren Sie sich über die örtlichen Regelungen zur getrennten Sammlung elektri- scher und elektronischer Gerätschaften.
  • Page 13 Dear Customer, Congratulations on purchasing this product. Please read and follow these instructions, in order to avoid damaging the item. We do not cover any damages that may arise from improper use of the item or the disregard of the safety instructions. Important Safety Advice •...
  • Page 14 Features / Technical Data Item # 10029954 Power supply indoor unit Batteries: 2XAA 1,5V LR6 Power supply outdoor unit Batteries: 2XAAA 1,5V LR03 Radio controlled clock • Automatic receiving of time signal DCF77 • Automatically switches to/from daylight saving • time (summer/winter time) Time display in 12/24 format •...
  • Page 15 Initial Use • Open the battery compartment located on the rear side of the devices. Place the batter- ies in the battery compartment. Observe the shown polarity. ( both indoor and outdoor device). • It can take a few moments until the outdoor temperature as measured by the outdoor unit is displayed on the indoor station.
  • Page 16 Overview Display 12 hour history of pressure Channel Air pressure data RF symbol Freeze Temperature alert Weather Outdoor temperature trend Bar of air pressure Indoor temperature trend Air pressure trend Outdoor humidity trend Indoor low battery Living face Outdoor low battery Indoor humidity trend...
  • Page 17 Week Date Day of week Moon set Alarm Moon rise Month Moon phase Time Cities (Location) Summer time Sun set Sun rise Rear MODE CHANNEL SNOOZE / LIGHT RESET HISTORY...
  • Page 18 Outdoor Unit RF Symbol (Outdoor) humidity Channel CH (channel selection) (Outdoor) temperature °C/°F Setup and Use • After inserting the batteries, the display section of altitude begins to fl ash. Use the + and - buttons to enter the altitude of your location (if known). Press HISTORY to continue. •...
  • Page 19 77.5 kHz, reception area is a radius of 2000km around Mainflingen near Frankfurt am Main, Germany) begins 3 minutes after the established connection of indoor unit and outdoor unit. A corresponding "radio"-icon will be displayed (flashes during connection attempt). Manual setup (when the radio clock signal can not be found): •...
  • Page 20 To activate the snooze function, Press the SNOOZE/LIGHT while the alarm sounds. If the snooze function is activated, alarm symbol is flashing. The alarm repeats after 5 minutes. Press any (other) button to stop. Min. & Max. Values Press + for displaying indoor/outdoor max./min. of temperature and humidity. Temperature Alert Setup •...
  • Page 21 Additional Functions Weather forecast The weather is forecasted based on the temperature, humidity and air press and shows the corresponding symbols for "Sunny" / "Slightly cloudy" / "Cloudy" / "Rainy". Barometer Air pressure can be in hPa and inHg. Check the past 12 hour air press by pressing HISTORY Illumination Press SNOOZE/LIGHT to activate the display illumination for 5 seconds when battery operated.
  • Page 22 Living space humidity The weather station uses saved data to determine the humidity in the living space and shows the respective symbols (comfortable, dry, humid): Low battery condition display • The weather station displays the low battery condition symbol to remind the batteries of the weather station or the outdoor sensor need to be exchanged.
  • Page 23 Environmental Concerns According to the European waste regulation 2012/19/EU this symbol on the product or on its packaging indicates that this product may not be treated as household waste. Instead it should be taken to the appropriate collection point for the recycling of electrical and electronic equipment. By ensuring this product is disposed of correctly, you will help prevent poten- tial negative consequences for the environment and human health, which could otherwise be caused by inappropriate waste handling of this product.
  • Page 24 Chère cliente, cher client, Toutes nos félicitations pour l’acquisition de ce nouvel appareil. Veuillez lire attentivement les instructions suivantes de branchement et d’utilisation afin d’éviter d’éventuels dom- mages. Le fabricant ne saurait être tenu pour responsable des dommages dus au non- respect des consignes de sécurité...
  • Page 25 Fiche technique Numéro d'article 10029954 Alimentation de la station de Piles : 2X AA 1,5 V LR6 base Alimentation de la station de Piles : 2X AAA 1,5 V LR03 mesure sans fil Mesure sans fil de la température (intérieure et •...
  • Page 26 
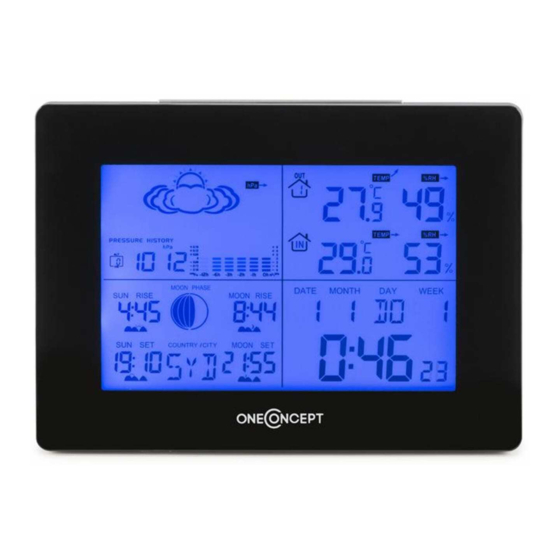
Mise en service Retirez le cache du compartiment à piles de la station de mesure et installez deux piles de type AA. Soyez attentif à respecter la polarité telle qu’indiquée par le schéma à l’intérieur du compartiment à piles. Patientez un moment jusqu’à ce que la température mesurée par la station extérieure soit affichée sur la station de base.
  • Page 27 Aperçu Ecran Évolution de la pression barométrique Canal des 12 dernières heures Affi chage de la pression atmos- Icône radio phérique Alerte de température Tendance de la température (extérieu- Météo Graphique à barres de pression at- Tendance de la température (intéri- mosphérique eure) Tendance de l'humidité...
  • Page 28 Semaine Date Jour de la semaine Coucher de lune Alarme Lever de lune Mois Phase de la lune Heure Lieu (ville) Heure d'été Coucher du soleil Lever du soleil Dos de l‘appareil / branchements MODE CHANNEL SNOOZE / LIGHT RESET HISTORY...
  • Page 29 Unité extérieure Icône RF Humidité de l'air (extérieure) Channel CH (choix du canal) Température (extérieure) °C/°F Confi guration et fonctionnement Une fois que les piles sont installées, l‘affi chage de la hauteur en mètres (m au-dessus du ni- veau de la mer) se met à clignoter. Utilisez les touches + et – pour saisir la hauteur en mètres (si vous la connaissez).
  • Page 30 Si la connexion échoue, maintenez la touche CHANNEL 3 secondes pour relancer une nou- velle tentative de connexion. La réception (automatique) du signal DCF (Signal radio de l‘heure avec un signal porteur de 77,5 kHz, la zone de réception est le rayon (théorique) de 2000 km autour de Mainflin- gen près de Francfort-sur-le-Main) débute 3 minutes une fois la connexion établie entre la station de base et la station extérieure.
  • Page 31 Allumer/éteindre le réveil Passez sur l‘écran A1 ou A2 (MODE) et appuyez sur la touche – pour activer/désactiver l‘alarme 1. L‘icône du réveil est toujours affiché sur l‘écran lorsque l‘alarme est activée. Veuillez noter : l‘alarme 1 est active les jours de la semaine seulement, l‘alarme 2 le week- end seulement.
  • Page 32 Autres fonctions Prévisions météo Basée sur les tendances de la pression de l‘air, une prévision météorologique est affichée sous la forme de symboles (ensoleillé / légèrement nuageux / nuageux / pluie). Baromètre Appuyez sur HISTORY pour afficher la pression atmosphérique mesurée au cours des 12 dernières heures.
  • Page 33 Humidité de l‘air dans l‘habitation L‘humidité mesurée par la station de base est affichée à l‘aide des symboles suivants pour faciliter la lecture et l‘interprétation (pour «bon», «trop sec» et «trop humide»): Niveau de batterie faible • Lorsque la capacité de la batterie est faible, les symboles de batterie correspondants apparaissent sur la partie intérieure ou extérieure de l‘affichage (8/10, voir „Vue d‘ensemble“).
  • Page 34 Conseils pour le recyclage Le pictogramme ci-contre apposé sur le produit signifi e que la directive européenne 2012/19/UE s‘applique (poubelle à roues barrée d’une croix). Ces produits ne peuvent être jetés dans les poubelles domestiques cou- rantes. Renseignez-vous concernant les règles appliquées pour la collecte d’appareils électriques et électroniques.

Ce manuel est également adapté pour:

10029954