Omron M3 Intellisense Mode D'emploi
Masquer les pouces
Voir aussi pour M3 Intellisense:
- Mode d'emploi (38 pages) ,
- Manuel d'instructions (21 pages) ,
- Mode d'emploi (21 pages)
Table des Matières
Publicité
Les langues disponibles
Les langues disponibles
7051_E.book Page 1 Friday, July 15, 2005 4:36 PM
Digital Automatic Blood Pressure Monitor
Model M3 Intellisense
• Instruction Manual
• Mode d'emploi
• Gebrauchsanweisung
• Manuale di istruzioni
• Manual de instrucciones
• Gebruiksaanwijzing
• РУКОВОДСТВО ПО ЭКСПЛУАТАЦИИ
EN
FR
DE
IT
ES
NL
RU
IM-HEM-7051-E-01-07/05
Publicité
Chapitres
Table des Matières
Dépannage

Manuels Connexes pour Omron M3 Intellisense


Sommaire des Matières pour Omron M3 Intellisense
- Page 1 7051_E.book Page 1 Friday, July 15, 2005 4:36 PM Digital Automatic Blood Pressure Monitor Model M3 Intellisense • Instruction Manual • Mode d’emploi • Gebrauchsanweisung • Manuale di istruzioni • Manual de instrucciones • Gebruiksaanwijzing • РУКОВОДСТВО ПО ЭКСПЛУАТАЦИИ IM-HEM-7051-E-01-07/05...
-
Page 2: Table Des Matières
7051_E.book Page 2 Friday, July 15, 2005 4:36 PM Contents Contents..................2 Introduction ................3 Important Safety Information ..........4 1. Overview ................5 2. Preparation ................8 2.1 Installing/Replacing the Batteries........8 2.2 Setting the Date and Time ..........10 2.3 Adjusting the Settings Modes ........13 3. -
Page 3: Introduction
7051_E.book Page 3 Friday, July 15, 2005 4:36 PM Introduction Thank you for purchasing the OMRON M3 Intellisense Upper Arm Blood Pressure Monitor. The OMRON M3 Intellisense is a fully automatic blood pressure monitor, operating on the oscillometric principle. It measures your blood pressure and pulse rate simply and quickly. -
Page 4: Important Safety Information
Consult your doctor during pregnancy, arrhythmia and arteriosclerosis. You should never change the dosage of medication prescribed by your doctor. Use the M3 Intellisense only for yourself. Caution: • Do not leave the unit unattended with infants or persons who cannot express their consent. -
Page 5: Overview
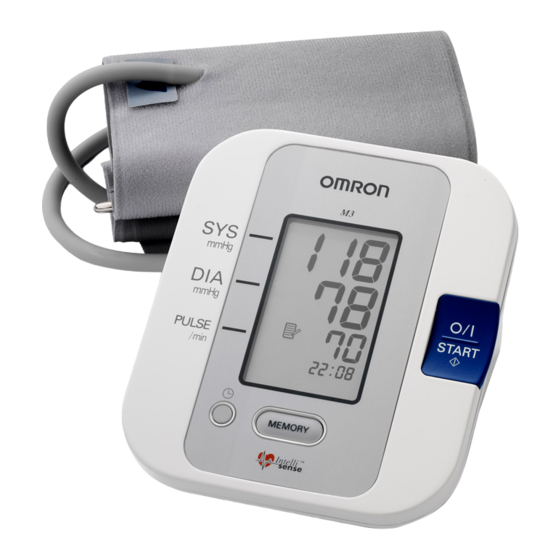
7051_E.book Page 5 Friday, July 15, 2005 4:36 PM 1.Overview 1. Overview Main unit A. Display E. Battery compartment B. O/I START button F. Air jack C. MEMORY button G. AC adapter jack (for optional AC adapter) D. SET button... - Page 6 7051_E.book Page 6 Friday, July 15, 2005 4:36 PM 1.Overview Arm Cuff If air starts to leak from the arm cuff, please replace with a new one. (Refer to Chapter 7 “Optional Parts”.) H. Arm cuff (Medium cuff: arm circumference 22-32 cm) I.
- Page 7 7051_E.book Page 7 Friday, July 15, 2005 4:36 PM 1.Overview Display K. Systolic blood pressure Q. Heartbeat symbol L. Diastolic blood pressure 1. (Flashes during measurement) M. Memory symbol 2. (If flashing after measurement (Displayed when viewing complete indicates blood values stored in memory) pressure out of recommended range)
-
Page 8: Preparation
7051_E.book Page 8 Friday, July 15, 2005 4:36 PM 2.Preparation 2. Preparation Installing/Replacing the Batteries Turn the main unit upside down. Slide the battery cover in the direction of the arrow while pressing the ribbed part of the cover. “ ”... - Page 9 7051_E.book Page 9 Friday, July 15, 2005 4:36 PM 2.Preparation Battery Life & Replacement If the battery low symbol ( ) appears on the display, replace all four batteries at the same time. - When the battery low symbol ( ) starts to blink, you will still be able to use the unit for a short while.
-
Page 10: Setting The Date And Time
7051_E.book Page 10 Friday, July 15, 2005 4:36 PM 2.Preparation Setting the Date and Time Your blood pressure monitor automatically stores up to 42 measurements values in its memory and calculates an average value based on the three most recent measurements taken within 10 minutes of the last reading. - Page 11 7051_E.book Page 11 Friday, July 15, 2005 4:36 PM 2.Preparation Press the SET button to confirm the setting when the desired number appears on the display. The year is set and the month digits flash on the display. Repeat steps 2 and 3 to set the month.
- Page 12 7051_E.book Page 12 Friday, July 15, 2005 4:36 PM 2.Preparation Repeat steps 2 and 3 to set the hour. The hour is set and the minutes digits flash on the display. Repeat steps 2 and 3 to set the minutes. The minutes settings is set.
-
Page 13: Adjusting The Settings Modes
7051_E.book Page 13 Friday, July 15, 2005 4:36 PM 2.Preparation Adjusting the Settings Modes You can modify the options for the various settings of your unit. This is done by pressing the SET button to select a setting, then pressing the MEMORY button to select the options for that setting. -
Page 14: Using The Unit
7051_E.book Page 14 Friday, July 15, 2005 4:36 PM 3.Using the Unit 3. Using the Unit How to Sit Correctly When Taking a Measurement You can take a measurement on either your left or right arm. Notes: • Measurements should be taken in a quiet place and you should be in a relaxed, seated position. - Page 15 7051_E.book Page 15 Friday, July 15, 2005 4:36 PM 3.Using the Unit Notes: • Correct posture during measurement is necessary to get accurate results. • You should also try to measure your blood pressure at the same time each day. (Within 1 hour after waking up is recommended.) Incorrect Posture •...
-
Page 16: Applying The Arm Cuff
7051_E.book Page 16 Friday, July 15, 2005 4:36 PM 3.Using the Unit Applying the Arm Cuff Be sure to wrap the arm cuff correctly so that you get accurate results. Measurements can be taken in light clothing. However, please remove thick clothes, such as sweaters, before taking a reading. - Page 17 7051_E.book Page 17 Friday, July 15, 2005 4:36 PM 3.Using the Unit Position the arm correctly. 1) The air tube should run down the inside of your forearm and be in line with your middle finger. 2) The bottom of the cuff should be approximately 1 to 2 cm above your elbow.
-
Page 18: Taking A Reading
7051_E.book Page 18 Friday, July 15, 2005 4:36 PM 3.Using the Unit Taking a Reading Press the O/I START button to turn on the unit. Sit in a chair with your feet flat on the floor and place your arm on a table so that the cuff will be at the same level as your heart. - Page 19 7051_E.book Page 19 Friday, July 15, 2005 4:36 PM 3.Using the Unit Check the measurement results. Systolic blood The unit automatically stores blood pressure pressure and pulse rate into its Diastolic blood pressure memory. Refer to “3.5 Using the Pulse display Memory Function”.
- Page 20 7051_E.book Page 20 Friday, July 15, 2005 4:36 PM 3.Using the Unit • Your blood pressure monitor includes an irregular heartbeat feature. Irregular heartbeats can influence the results of the measurement. The irregular heartbeat algorithm automatically determines if the measurement is usable or needs to be repeated.
- Page 21 7051_E.book Page 21 Friday, July 15, 2005 4:36 PM 3.Using the Unit What is Arrhythmia? A heartbeat is stimulated by electrical signals that cause the heart to contract. Arrhythmia is a condition where the heartbeat rhythm is abnormal due to flaws in the bio-electrical system that drives the heartbeat.
-
Page 22: Instructions For Special Conditions
7051_E.book Page 22 Friday, July 15, 2005 4:36 PM 3.Using the Unit Instructions for special conditions If your systolic pressure is known to be more than 220 mmHg, press and hold the O/I START button until the arm cuff inflates 30 to 40 mmHg higher than your suspected systolic pressure. -
Page 23: Using The Memory Function
7051_E.book Page 23 Friday, July 15, 2005 4:36 PM 3.Using the Unit Using the Memory Function This unit has a memory capable of storing 42 sets of readings. Every time you complete the measurement, the unit automatically stores the blood pressure and pulse rate. If there are three readings within 10 minutes of the last reading, the average of the three readings is displayed. - Page 24 7051_E.book Page 24 Friday, July 15, 2005 4:36 PM 3.Using the Unit Press the MEMORY button again, while the average values screen is displayed. The result from the most recent measurement is displayed. The date and time of each measurement is displayed alternately with the measurement values.
- Page 25 7051_E.book Page 25 Friday, July 15, 2005 4:36 PM 3.Using the Unit To Delete All the Values Stored in Memory You cannot delete individual stored readings, all the readings in the unit will be deleted. To delete stored readings, first press the MEMORY button.
-
Page 26: Quick Reference Guide
7051_E.book Page 26 Friday, July 15, 2005 4:36 PM 4.Quick Reference Guide 4. Quick Reference Guide If you are using this device for the first time, please read carefully chapter 3 of this instruction manual. To help ensure a reliable reading, avoid eating, smoking, or exercising for at least 30 minutes before taking a measurement. -
Page 27: Handling Errors And Problems
7051_E.book Page 27 Friday, July 15, 2005 4:36 PM 5.Handling Errors and Problems 5. Handling Errors and Problems Error Messages Error Display Cause Remedy Carefully read and repeat the steps Cuff is under inflated. listed under section 3.4. Repeat measurement. Remain still and do not talk during Movement during measurement. - Page 28 7051_E.book Page 28 Friday, July 15, 2005 4:36 PM 5.Handling Errors and Problems Error Display Cause Remedy Contact your OMRON retail outlet or distributor. Device error. Refer to Chapter 8. Note: The irregular heartbeat symbol may also be displayed with error messages.
-
Page 29: Troubleshooting
7051_E.book Page 29 Friday, July 15, 2005 4:36 PM 5.Handling Errors and Problems Troubleshooting Problem Cause Remedy Apply the arm cuff Arm cuff not applied correctly. correctly. Refer to section 3.2. Remain still and do not talk during Movement or talking The reading is measurement. - Page 30 5.Handling Errors and Problems Problem Cause Remedy Press the O/I START button and repeat measurement. If the problem continues, try replacing the batteries Other problems. with new ones. If this still does not solve the problem, contact your OMRON retail outlet or distributor.
-
Page 31: Maintenance And Storage
• Use a soft, moistened cloth and soap to clean the arm cuff. • Do not carry out repairs of any kind by yourself. If a defect occurs, consult your OMRON retail outlet or distributor as mentioned on the packaging. - Page 32 • It is generally recommended to have the unit inspected every two years to ensure correct functioning and accuracy. Please consult your authorised OMRON dealer or the OMRON Customer Service at the address given on the packaging or attached literature.
- Page 33 7051_E.book Page 33 Friday, July 15, 2005 4:36 PM 6.Maintenance and Storage Storage Keep the unit in its storage case when not in use. Unplug the air tube from the air jack. Gently fold the air tube into the arm cuff.
-
Page 34: Optional Parts
7051_E.book Page 34 Friday, July 15, 2005 4:36 PM 7.Optional Parts 7. Optional Parts Medium Arm Cuffs Large Arm Cuff AC Adapter “Q” Arm circumference 22 - 32 cm Arm circumference 32 - 42 cm CM-4997086-7 CL-4997065-4 Q Adapter-1098336-8 CM1-7935058-8 Using the Optional AC Adapter Insert batteries into the battery compartment even when using the AC adapter. -
Page 35: Technical Data
7051_E.book Page 35 Friday, July 15, 2005 4:36 PM 8.Technical Data 8. Technical Data Product Description Digital Automatic Blood Pressure Monitor Model OMRON M3 Intellisense (HEM-7051-E) Display LCD Digital Display Measurement Method Oscillometric method Pressure: 0 mmHg to 299 mmHg Measurement Range Pulse: 40 to 180/min. - Page 36 7051_E.book Page 36 Friday, July 15, 2005 4:36 PM 8.Technical Data OMRON HEALTHCARE UK LTD. Subsidiary Opal Drive Fox Milne, Milton Keynes MK 15 0DG, United Kingdom OMRON Medizintechnik Handelsgesellschaft m.b.H. Subsidiary Windeckstraße 81a D-68163 Mannheim, Germany www.omron-medizintechnik.de OMRON SANTÉ FRANCE...
-
Page 37: Some Useful Information About Blood Pressure
7051_E.book Page 37 Friday, July 15, 2005 4:36 PM 9.Some Useful Information about Blood Pressure 9. Some Useful Information about Blood Pressure What is Blood Pressure? Blood pressure is a measure of the force of blood flowing against the walls of the arteries. Arterial blood pressure is constantly changing during the course of the heart's cycle. - Page 38 7051_E.book Page 38 Friday, July 15, 2005 4:36 PM 9.Some Useful Information about Blood Pressure Upper curve: systolic blood pressure Lower curve: diastolic blood pressure Time of day Example: fluctuation within a day (male, 35 years old) Classification of Blood Pressure by the World Heath Organization The World Health Organization (WHO) and the International Society of Hypertension (ISH) developed the Blood Pressure...
- Page 39 7051_E.book Page 39 Friday, July 15, 2005 4:36 PM Tensiomètre numérique automatique Modèle M3 Intellisense • Instruction Manual • Mode d’emploi • Gebrauchsanweisung • Manuale di istruzioni • Manual de instrucciones • Gebruiksaanwijzing • РУКОВОДСТВО ПО ЭКСПЛУАТАЦИИ IM-HEM-7051-E-01-07/05...
- Page 40 7051_E.book Page 40 Friday, July 15, 2005 4:36 PM Table des matières Table des matières ..............40 Introduction ................41 Informations importantes sur la sécurité ......42 1. Présentation générale............43 2. Préparation ................46 2.1 Installation/Remplacement des piles......46 2.2 Réglage de la date et de l’heure ........48 2.3 Réglage des modes de réglage ........51 3.
-
Page 41: Introduction
7051_E.book Page 41 Friday, July 15, 2005 4:36 PM Introduction Merci d’avoir fait l’acquisition du tensiomètre brassard OMRON M3 Intellisense. L’OMRON M3 Intellisense est un tensiomètre entièrement automatisé qui fonctionne sur le principe de l’oscillométrie. Il mesure la pression artérielle et la fréquence du pouls, simple- ment et rapidement. -
Page 42: Informations Importantes Sur La Sécurité
Vous ne devez jamais changer la dose de médicament prescrite par votre médecin. Utiliser le M3 Intellisense uniquement sur vous-même. Attention : • Ne pas laisser l’appareil sans surveillance en présence de jeunes enfants ou de personnes qui ne peuvent pas donner leur consentement. -
Page 43: Présentation Générale
7051_E.book Page 43 Friday, July 15, 2005 4:36 PM 1.Présentation générale 1. Présentation générale Unité principale A. Ecran E. Compartiment des piles B. Bouton O/I START F. Prise jack à air C. Bouton MEMORY G. Prise jack de transformateur (pour un transformateur option- D. - Page 44 7051_E.book Page 44 Friday, July 15, 2005 4:36 PM 1.Présentation générale Brassard Si de l’air commence à s’échapper du brassard, remplacer ce dernier (se reporter au Chapitre 7 « Pièces optionnelles »). H. Brassard (Brassard moyen : circonférence du bras entre 22 et 32 cm) I.
- Page 45 7051_E.book Page 45 Friday, July 15, 2005 4:36 PM 1.Présentation générale Ecran K. Pression artérielle systolique Q. Symbole des pulsations cardia- ques L. Pression artérielle diastolique 1. (Clignote lors de la mesure) M. Symbole de la mémoire (affiché lors de la visualisation 2.
-
Page 46: Préparation
7051_E.book Page 46 Friday, July 15, 2005 4:36 PM 2.Préparation 2. Préparation Installation/Remplacement des piles Retourner l’appareil. Faire glisser le couvercle du compartiment des piles vers le bas de la flèche tout en appuyant sur la partie nervurée du couvercle. Installer ou remplacer les qua- tre piles AA en faisant corres- pondre les polarités + (positive) - Page 47 7051_E.book Page 47 Friday, July 15, 2005 4:36 PM 2.Préparation Durée de vie des piles et remplacement Si le symbole de faiblesse des piles ( ) apparaît sur l’écran, remplacer les quatre piles simultanément. - Lorsque le symbole de faiblesse des piles ( ) commence à...
-
Page 48: Réglage De La Date Et De L'heure
7051_E.book Page 48 Friday, July 15, 2005 4:36 PM 2.Préparation Réglage de la date et de l’heure Le tensiomètre stocke automatiquement jusqu’à 42 valeurs de mesure en mémoire et calcule une valeur moyenne d’après les trois dernières mesures prises dans les 10 minutes suivant la dernière mesure. - Page 49 7051_E.book Page 49 Friday, July 15, 2005 4:36 PM 2.Préparation Appuyer sur le bouton SET pour confirmer le réglage lorsque le chiffre souhaité apparaît sur l’écran. L’année est réglée et les chiffres du jour (date) clignotent sur l’écran. Répéter les étapes 2 et 3 pour régler le mois.
- Page 50 7051_E.book Page 50 Friday, July 15, 2005 4:36 PM 2.Préparation Répéter les étapes 2 et 3 pour régler l’heure. L’heure est réglée et les chif- fres des minutes clignotent sur l’écran. Répéter les étapes 2 et 3 pour régler les minutes. Les minutes sont réglées.
-
Page 51: Réglage Des Modes De Réglage
7051_E.book Page 51 Friday, July 15, 2005 4:36 PM 2.Préparation Réglage des modes de réglage Les options des différents réglages de l’appareil peuvent être modifiées. Pour ce faire, appuyer sur le bouton SET pour sélectionner un réglage, puis appuyer sur le bouton MEMORY pour sélectionner les options de ce réglage. -
Page 52: Utilisation De L'appareil
7051_E.book Page 52 Friday, July 15, 2005 4:36 PM 3.Utilisation de l’appareil 3. Utilisation de l’appareil Position assise correcte lors de la réalisation d’une mesure La mesure peut être réalisée sur le bras gauche ou droit. Remarques : • Elle doit être prise dans un endroit tranquille et sur une per- sonne assise et détendue. - Page 53 7051_E.book Page 53 Friday, July 15, 2005 4:36 PM 3.Utilisation de l’appareil Remarques : • Avoir une position correcte lors de la mesure est indispensa- ble pour obtenir des résultats fiables. • Il est préférable de mesurer la pression artérielle à la même heure chaque jour.
-
Page 54: Application Du Brassard
7051_E.book Page 54 Friday, July 15, 2005 4:36 PM 3.Utilisation de l’appareil Application du brassard Veiller à enrouler correctement le brassard afin d’obtenir des résultats fiables. Les mesures peuvent être prises par-dessus des vêtements légers. Retirer toutefois les vêtements épais (pull, par exemple) avant de prendre une mesure. - Page 55 7051_E.book Page 55 Friday, July 15, 2005 4:36 PM 3.Utilisation de l’appareil Positionner le bras correctement. 1) Le tuyau à air doit passer sur toute la longueur de la partie interne de l’avant- bras en s’alignant avec le majeur. 2) La partie inférieure du brassard doit être placée entre 1 et 2 cm environ au-dessus du coude.
-
Page 56: Réalisation D'une Mesure
7051_E.book Page 56 Friday, July 15, 2005 4:36 PM 3.Utilisation de l’appareil Réalisation d’une mesure Appuyer sur le bouton O/I START pour allumer l’appareil. S’asseoir sur une chaise, les pieds posés à plat sur le sol, et placer le bras sur une table afin de mettre le brassard au même niveau que le cœur. - Page 57 7051_E.book Page 57 Friday, July 15, 2005 4:36 PM 3.Utilisation de l’appareil Vérifier les résultats de la mesure. Pression arté- rielle systolique L’appareil stocke automatiquement la Pression arté- pression artérielle et la fréquence du rielle diastolique pouls en mémoire. Se reporter à la Affichage du section «...
- Page 58 7051_E.book Page 58 Friday, July 15, 2005 4:36 PM 3.Utilisation de l’appareil • Le tensiomètre est doté d’une fonction de détection des pulsations cardiaques irréguliè- res. Les pulsations cardiaques irrégulières peu- vent fausser les résultats de la mesure. L’algorithme de détection des pulsations car- diaques irrégulières détermine automatique- ment si la mesure peut être prise en compte ou si elle doit être répétée.
- Page 59 7051_E.book Page 59 Friday, July 15, 2005 4:36 PM 3.Utilisation de l’appareil Qu’est-ce que l’arythmie ? Les pulsations cardiaques sont provoquées par des signaux électriques qui entraînent la contraction du cœur. L’arythmie est un état dans lequel le rythme cardiaque est anormal en raison de défaillances du système bioélectrique qui commande les pulsations cardiaques.
-
Page 60: Instructions En Cas De Conditions Spéciales
7051_E.book Page 60 Friday, July 15, 2005 4:36 PM 3.Utilisation de l’appareil Instructions en cas de conditions spéciales Si votre pression systolique est habituellement supérieure à 220 mmHg, appuyer sur le bouton O/I START et le maintenir enfoncé jusqu’à ce que le brassard gonfle 30 à 40 mmHg au- dessus de votre pression systolique présumée. -
Page 61: Utilisation De La Fonction De Mémoire
7051_E.book Page 61 Friday, July 15, 2005 4:36 PM 3.Utilisation de l’appareil Utilisation de la fonction de mémoire Cet appareil est doté d’une mémoire capable d’enregistrer 42 séries de mesures. Après chaque mesure, l’appareil enregistre automatiquement la pression artérielle et la fréquence du pouls. Si trois mesures ont été... - Page 62 7051_E.book Page 62 Friday, July 15, 2005 4:36 PM 3.Utilisation de l’appareil Appuyer de nouveau sur le bouton MEMORY lorsque l’écran des valeurs moyennes est affiché. Le résultat de la mesure la plus récente est affiché. La date et l’heure de chaque mesure sont affichées tour à...
- Page 63 7051_E.book Page 63 Friday, July 15, 2005 4:36 PM 3.Utilisation de l’appareil Pour supprimer toutes les valeurs stockées en mémoire La suppression partielle des mesures stockées en mémoire est impossible ; toutes les mesures de l’appareil seront suppri- mées. Pour supprimer les mesures stoc- kées en mémoire, appuyer d’abord sur le bouton MEMORY.
-
Page 64: Guide De Référence Rapide
7051_E.book Page 64 Friday, July 15, 2005 4:36 PM 4.Guide de référence rapide 4. Guide de référence rapide Si vous utilisez ce dispositif pour la première fois, lire attenti- vement le chapitre 3 du présent mode d’emploi. Pour obtenir une mesure fiable, ne pas manger, fumer ou faire du sport pendant au moins 30 minutes avant la mesure. -
Page 65: Résolution Des Erreurs Et Des Problèmes
7051_E.book Page 65 Friday, July 15, 2005 4:36 PM 5.Résolution des erreurs et des problèmes 5. Résolution des erreurs et des problèmes Messages d’erreur Affichage des Cause Solution erreurs Lire attentivement les instructions Le brassard est sous-gonflé. et répéter les étapes indiquées à la section 3.4. - Page 66 5.Résolution des erreurs et des problèmes Affichage des Cause Solution erreurs Contacter votre détaillant ou votre revendeur OMRON. Erreur liée à l’appareil. Se reporter au Chapitre 8. Remarque : Le symbole des pulsations cardiaques irrégulières peut également être affi- ché avec des messages d’erreur.
-
Page 67: Dépannage
7051_E.book Page 67 Friday, July 15, 2005 4:36 PM 5.Résolution des erreurs et des problèmes Dépannage Problème Cause Solution Appliquer correctement le brassard. Brassard mal appliqué. Se reporter à la section 3.2. Rester immobile et ne pas Vous avez bougé ou La mesure est extrême- parler lors de la mesure. - Page 68 Solution Appuyer sur le bouton O/I START et répéter la mesure. Si le problème persiste, essayer de remplacer les Autres problèmes. piles par des piles neuves. Si le problème n’est toujours pas résolu, contacter votre détaillant ou votre revendeur OMRON.
-
Page 69: Maintenance Et Stockage
• Utiliser un chiffon doux humidifié et du savon pour nettoyer le brassard. • Ne pas procéder vous-même à des réparations d’aucune sorte. En cas de défaillance, contacter votre détaillant ou votre revendeur OMRON comme indiqué sur l’emballage. - Page 70 • Il est généralement recommandé de faire inspecter l’appareil tous les deux ans afin de garantir son bon fonctionnement et sa précision. Contacter un revendeur OMRON agréé ou le service clientèle d’OMRON à l’adresse indiquée sur l’embal- lage ou dans la documentation fournie.
- Page 71 7051_E.book Page 71 Friday, July 15, 2005 4:36 PM 6.Maintenance et stockage Stockage Garder l’appareil dans son étui de rangement lorsqu’il n’est pas utilisé. Débrancher le tuyau à air de la prise jack à air. Plier délicatement le tuyau à air dans le brassard.
-
Page 72: Pièces Optionnelles
7051_E.book Page 72 Friday, July 15, 2005 4:36 PM 7.Pièces optionnelles 7. Pièces optionnelles Brassard moyen Grand brassard Transformateur « Q » Circonférence du bras entre 22 et Circonférence du bras entre 32 32 cm et 42 cm CM-4997086-7 CL-4997065-4 Transformateur Q-1098336-8 CM1-7935058-8... -
Page 73: Données Techniques
7051_E.book Page 73 Friday, July 15, 2005 4:36 PM 8.Données techniques 8. Données techniques Description du produit Tensiomètre numérique automatique Modèle OMRON M3 Intellisense (HEM-7051-E) Ecran Ecran numérique LCD Méthode de mesure Méthode oscillométrique Pression : 0 mmHg à 299 mmHg Plage de mesure Pouls : 40 à... - Page 74 7051_E.book Page 74 Friday, July 15, 2005 4:36 PM 8.Données techniques OMRON HEALTHCARE UK LTD. Succursale Opal Drive Fox Milne, Milton Keynes MK 15 0DG, Royaume-Uni OMRON Medizintechnik Handelsgesellschaft m.b.H. Succursale Windeckstraße 81a D-68163 Mannheim, Allemagne www.omron-medizintechnik.de OMRON SANTÉ FRANCE...
-
Page 75: Informations Utiles Sur La Pression Artérielle
7051_E.book Page 75 Friday, July 15, 2005 4:36 PM 9.Informations utiles sur la pression artérielle 9. Informations utiles sur la pression artérielle Qu’est-ce que la pression artérielle ? La pression artérielle est une mesure de la pression exercée par le sang sur les parois des artères. La pression artérielle change constamment tout au long du cycle cardiaque. - Page 76 7051_E.book Page 76 Friday, July 15, 2005 4:36 PM 9.Informations utiles sur la pression artérielle Courbe supérieure : pression artérielle systolique Courbe inférieure : pression artérielle diastolique Horaire Exemple : fluctuation dans une journée (homme, 35 ans) Classification de la pression artérielle par l’Organisation mondiale de la Santé...
- Page 77 7051_E.book Page 77 Friday, July 15, 2005 4:36 PM Automatisches digitales Blutdruckmessgerät Modell M3 Intellisense • Instruction Manual • Mode d’emploi • Gebrauchsanweisung • Manuale di istruzioni • Manual de instrucciones • Gebruiksaanwijzing • РУКОВОДСТВО ПО ЭКСПЛУАТАЦИИ IM-HEM-7051-E-01-06/05...
- Page 78 7051_E.book Page 78 Friday, July 15, 2005 4:36 PM Inhalt Inhalt..................78 Einführung ................79 Sicherheitsinformationen ............80 1. Überblick................81 2. Vorbereitung..............84 2.1 Batterien einsetzen und auswechseln ......84 2.2 Datum und Uhrzeit einstellen .........86 2.3 Anpassen der Einstellungsmodi........89 3. Verwendung des Messgeräts...........90 3.1 So sitzen Sie beim Messen richtig .........90 3.2 Anlegen der Armmanschette .........92 3.3 Eine Messung vornehmen ..........94 3.4 Anweisungen für spezielle Bedingungen .......98...
-
Page 79: Einführung
7051_E.book Page 79 Friday, July 15, 2005 4:36 PM Einführung Vielen Dank, dass Sie sich für das OMRON M3 Oberarm-Blut- druckmessgerät entschieden haben. Das OMRON M3 Intellisense ist ein vollautomatisches Blut- druckmessgerät, das auf dem oszillometrischen Prinzip beruht. Es misst Ihren Blutdruck und die Pulsfrequenz einfach und schnell. -
Page 80: Sicherheitsinformationen
Bei Schwangerschaft, Arrhythmie und Arteriosklerose sollten Sie sich an Ihren Arzt wenden. Ändern Sie niemals die Dosis eines vom Arzt verordneten Medikaments. Verwenden Sie das M3 Intellisense nur für sich selbst. Achtung: • Das Messgerät nicht unbeaufsichtigt bei Kleinkindern oder sol- chen Personen lassen, die ihre Zustimmung nicht ausdrücken... -
Page 81: Überblick
7051_E.book Page 81 Friday, July 15, 2005 4:36 PM 1.Überblick 1. Überblick Hauptgerät A. Anzeige E. Batteriefach B. Taste EIN/AUS-START (O/I) F. Luftschlauchbuchse C. Taste MEMORY G. Netzanschluss (für das optio- nale Netzteil) D. Taste SET... - Page 82 7051_E.book Page 82 Friday, July 15, 2005 4:36 PM 1.Überblick Armmanschette Falls die Armmanschette anfängt, Luft zu verlieren, sollten Sie sie gegen eine neue austauschen. (Siehe hierzu Kapitel 7 „Optionale Zusatzprodukte“.) H. Armmanschette (mittlere Manschette: Armumfang 22-32 cm) I. Luftschlauch J.
- Page 83 7051_E.book Page 83 Friday, July 15, 2005 4:36 PM 1.Überblick Anzeige K. Systolischer Blutdruck Q. Herzschlagsymbol L. Diastolischer Blutdruck 1. (Blinkt bei der Messung) M. Speichersymbol 2. (Wenn es nach Abschluss der (Erscheint, wenn die im Spei- Messungen blinkt, zeigt dies, cher hinterlegten Werte ange- dass der Blutdruck außerhalb zeigt werden.)
-
Page 84: Vorbereitung
7051_E.book Page 84 Friday, July 15, 2005 4:36 PM 2.Vorbereitung 2. Vorbereitung Batterien einsetzen und auswechseln Das Hauptgerät kopfüber drehen. Schieben Sie die Batterieab- deckung in Pfeilrichtung und drücken Sie dabei auf den geriffelten Teil der Abdeckung. Installieren oder ersetzen Sie vier AA Batterien so, dass der + (positive) und - (negative) Pol... - Page 85 7051_E.book Page 85 Friday, July 15, 2005 4:36 PM 2.Vorbereitung Batterie-Lebensdauer und Austausch Wenn das Batterieladestand-Symbol ( ) auf dem Display erscheint, alle vier Batterien auswechseln. - Wenn das Batterieladestand-Symbol ( ) zu blinken beginnt, können Sie das Messgerät noch eine kurze Zeit verwenden.
-
Page 86: Datum Und Uhrzeit Einstellen
7051_E.book Page 86 Friday, July 15, 2005 4:36 PM 2.Vorbereitung Datum und Uhrzeit einstellen Das Blutdruckmessgerät speichert automatisch bis zu 42 Mess- werte im Speicher und berechnet einen Mittelwert, der auf den letzten drei Messungen, die innerhalb von 10 Minuten zur der letz- ten Messung liegen, basiert. - Page 87 7051_E.book Page 87 Friday, July 15, 2005 4:36 PM 2.Vorbereitung Drücken Sie die Taste SET, um die Einstellung zu bestätigen, wenn die gewünschte Zahl in der Anzeige erscheint. Wenn das Jahr eingestellt ist, blinken die Ziffern für den Monat (Datum) auf der Anzeige. Schritte 2 und 3 wiederholen, um den Monat einzustellen.
- Page 88 7051_E.book Page 88 Friday, July 15, 2005 4:36 PM 2.Vorbereitung Schritte 2 und 3 wiederholen, um die Stunde einzustellen. Wenn die Stunde eingestellt ist, blinken die Ziffern für die Minuten auf der Anzeige. Schritte 2 und 3 wiederholen, um die Minuten einzustellen. Die Minuten sind eingestellt.
-
Page 89: Anpassen Der Einstellungsmodi
7051_E.book Page 89 Friday, July 15, 2005 4:36 PM 2.Vorbereitung Anpassen der Einstellungsmodi Sie können die Optionen für die verschiedenen Einstellungen Ihres Messgeräts ändern. Dazu wird durch Drücken der Taste SET eine Einstellung gewählt und anschließend werden durch Drücken der Taste MEMORY die Optionen für diese Einstellung gewählt. Nach der Wahl einer Einstellung diese durch Drücken der Taste EIN/AUS-START (O/I) bestätigen und das Gerät ausschalten. -
Page 90: Verwendung Des Messgeräts
7051_E.book Page 90 Friday, July 15, 2005 4:36 PM 3.Verwendung des Messgeräts 3. Verwendung des Messgeräts So sitzen Sie beim Messen richtig Sie können die Messung am rechten oder linken Arm durchführen. Hinweise: • Messungen sollten an einem ruhigen Ort durchgeführt wer- den und Sie sollten entspannt sitzen. - Page 91 7051_E.book Page 91 Friday, July 15, 2005 4:36 PM 3.Verwendung des Messgeräts Hinweise: • Die richtige Körperhaltung ist zum Erlangen genauer Ergeb- nisse notwendig. • Sie sollten auch versuchen, Ihren Blutdruck täglich zur selben Zeit zu messen. (Innerhalb von 1 Stunde nach dem Aufstehen wird empfohlen.) Falsche Haltung •...
-
Page 92: Anlegen Der Armmanschette
7051_E.book Page 92 Friday, July 15, 2005 4:36 PM 3.Verwendung des Messgeräts Anlegen der Armmanschette Stellen Sie zum Erlangen genauer Messwerte sicher, dass die Armmanschette richtig um Ihren Arm gewickelt ist. Messungen sollten bei leichter Bekleidung erfolgen. Dicke Klei- dungstücke, wie Pullover, sollten Sie vor dem Messen entfernen. Den Luftschlauchanschluss in die Luftschlauchbuchse auf der linken Seite des Hauptgeräts einstecken. - Page 93 7051_E.book Page 93 Friday, July 15, 2005 4:36 PM 3.Verwendung des Messgeräts Armmanschette richtig anbringen. 1) Der Schlauch muss mittig entlang der Innenseite des Unterarms in Höhe des Mittelfingers verlaufen. 2) Der untere Rand der Man- schette muss ca. 1 bis 2 cm oberhalb des Ellbo- gens liegen.
-
Page 94: Eine Messung Vornehmen
7051_E.book Page 94 Friday, July 15, 2005 4:36 PM 3.Verwendung des Messgeräts Eine Messung vornehmen Drücken Sie die Taste EIN/AUS-START (O/I), um das Messge- rät einzuschalten. Setzen Sie sich auf einen Stuhl, stellen Sie Ihre Füße flach auf den Boden auf, und stützen Sie Ihren Arm so auf einem Tisch auf, dass sich die Manschette auf der Höhe Ihres Herzens befindet. - Page 95 7051_E.book Page 95 Friday, July 15, 2005 4:36 PM 3.Verwendung des Messgeräts Überprüfen Sie die Messergebnisse. Systolischer Das Messgerät speichert Blutdruck Blutdruck und Pulsfrequenz automatisch im Diastolischer Blutdruck Speicher. Siehe hierzu „3.5 Benut- Pulsanzeige zung der Speicherfunktion“. Der Summer ertönt, wenn die Mes- sung abgeschlossen ist.
- Page 96 7051_E.book Page 96 Friday, July 15, 2005 4:36 PM 3.Verwendung des Messgeräts • Ihr Blutdruckmessgerät beinhaltet eine Funk- tion für unregelmäßige Herzschläge. Unregel- mäßige Herzschläge können die Messergeb- nisse beeinflussen. Der entsprechende Algo- rithmus ermittelt automatisch, ob die Messung verwertbar ist oder ob sie wiederholt werden muss.
- Page 97 7051_E.book Page 97 Friday, July 15, 2005 4:36 PM 3.Verwendung des Messgeräts Was ist Arrhythmie? Ein Herzschlag wird durch elektrische Signale angeregt, die ein Kontrahieren des Herzens verursachen. Arrhythmie ist eine Krankheit, bei der der Herzrhythmus auf- grund von Fehlern im bioelektrischen System, das den Herz- schlag steuert, anormal ist.
-
Page 98: Anweisungen Für Spezielle Bedingungen
7051_E.book Page 98 Friday, July 15, 2005 4:36 PM 3.Verwendung des Messgeräts Anweisungen für spezielle Bedingungen Ist von Ihrem systolischen Blutdruck bekannt, dass er mehr als 220 mmHg beträgt, drücken und halten Sie die Taste EIN/AUS- START (O/I) gedrückt, bis das Gerät die Armmanschette um 30 bis 40 mmHg höher als Ihr erwarteter systolischer Blutdruck aufpumpt. -
Page 99: Benutzung Der Speicherfunktion
7051_E.book Page 99 Friday, July 15, 2005 4:36 PM 3.Verwendung des Messgeräts Benutzung der Speicherfunktion Das Gerät besitzt einen Speicher zum Speichern von bis zu 42 Messungen. Nach jeder Messung speichert das Gerät automa- tisch den Blutdruck und die Pulsfrequenz. Falls drei Messungen innerhalb von 10 Minuten zur letzten Messung vorliegen, wird der Mittelwert dieser drei Messwerte angezeigt. - Page 100 7051_E.book Page 100 Friday, July 15, 2005 4:36 PM 3.Verwendung des Messgeräts Drücken Sie, während der Mittelwert angezeigt wird, die Taste MEMORY erneut. Das Ergebnis der letzten Messung wird angezeigt. Das Datum und die Uhrzeit jeder Messung werden im Wechsel mit den Messwerten angezeigt.
- Page 101 7051_E.book Page 101 Friday, July 15, 2005 4:36 PM 3.Verwendung des Messgeräts Löschen aller gespeicherten Werte Sie können nicht einzelne gespeicherte Messwerte löschen. Alle Messwerte im Messgerät werden gelöscht. Um gespeicherte Messwerte zu löschen, drücken Sie zuerst die Taste MEMORY. Halten Sie diese gedrückt und drücken Sie dabei die Taste EIN/AUS-START (O/I) gleich- zeitig 2 bis 3 Sekunden lang.
-
Page 102: Kurzanleitung
7051_E.book Page 102 Friday, July 15, 2005 4:36 PM 4.Kurzanleitung 4. Kurzanleitung Wenn Sie das Messgerät das erste Mal verwenden, sollten Sie Kapitel 3 dieser Gebrauchsanweisung sorgfältig lesen. Um eine verlässliche Messung zu garantieren, mindestens 30 Minuten vorher nicht essen, rauchen oder körperliche Anstrengungen unternehmen. -
Page 103: Störungen: Ursachen Und Behebung
7051_E.book Page 103 Friday, July 15, 2005 4:36 PM 5.Störungen: Ursachen und Behebung 5. Störungen: Ursachen und Behebung Fehlermeldungen Fehleranzeige Ursache Behebung Die Schritte aus Abschnitt Abschnitt Manschettendruck ist zu 3.4 sorgfältig durchlesen und wie- niedrig. derholen. Messung wiederholen. Halten Sie still und sprechen Sie nicht während Bewegung bei der Mes- der Messung. - Page 104 7051_E.book Page 104 Friday, July 15, 2005 4:36 PM 5.Störungen: Ursachen und Behebung Fehleranzeige Ursache Behebung Wenden Sie sich an Ihren OMRON- Fachhändler oder Distributor. Gerätefehler. Siehe hierzu Kapitel 8. Hinweis: Das Symbol unregelmäßiger Herzschlag kann auch mit einer Fehlermeldung...
-
Page 105: Fehlersuche Und -Behebung
7051_E.book Page 105 Friday, July 15, 2005 4:36 PM 5.Störungen: Ursachen und Behebung Fehlersuche und -behebung Problem Ursache Behebung Armmanschette richtig Armmanschette anlegen. nicht richtig ange- legt. Siehe hierzu Abschnitt 3.2. Halten Sie still und spre- Bewegung oder chen Sie nicht während Die Messwerte sind Sprechen bei der der Messung. - Page 106 Die Taste EIN/AUS-START (O/l) drücken und die Messung wiederholen. Wenn das Problem weiter bestehen bleibt, die Bat- Andere Probleme. terien versuchsweise gegen neue austauschen. Falls das Problem dadurch immer noch nicht beho- ben ist, wenden Sie sich an Ihren OMRON-Fach- händler oder Distributor.
-
Page 107: Wartung Und Aufbewahrung
ähnliche Lösungsmittel verwenden. • Die Armmanschette mit einem weichen, feuchten Tuch und mit Seife reinigen. • Nehmen Sie selbst keine Reparaturen vor. Wenden Sie sich bei Auftreten eines Defekts an Ihren OMRON-Fachhändler oder Distributor, der auf der Verpackung angegeben ist. - Page 108 • Es wird im Allgemeinen empfohlen, bei dem Messgerät alle zwei Jahre eine Inspektion durchführen zu lassen, um die kor- rekte Funktion und Genauigkeit des Gerätes sicherzustellen. Wenden Sie sich an Ihren autorisierten OMRON-Fachhändler oder OMRON-Kundendienst, dessen Adresse auf der Verpa- ckung oder den beigelegten Broschüren angegeben ist.
- Page 109 7051_E.book Page 109 Friday, July 15, 2005 4:36 PM 6.Wartung und Aufbewahrung Aufbewahrung Das Messgerät in die Aufbewahrungstasche legen, wenn es nicht verwendet wird. Ziehen Sie den Luftschlauch aus der Luftschlauchbuchse her- aus. Legen Sie den Luftschlauch vor- sichtig zusammengelegt in die Arm- manschette.
-
Page 110: Optionale Zusatzprodukte
7051_E.book Page 110 Friday, July 15, 2005 4:36 PM 7.Optionale Zusatzprodukte 7. Optionale Zusatzprodukte Mittlere Armmanschetten Große Armmanschette Netzteil „Q“ Armumfang 22-32 cm Armumfang 32-42 cm CM-4997086-7 CL-4997065-4 Q Adapter-1098336-8 CM1-7935058-8 Verwendung des optionalen Netzteils Legen Sie auch bei Verwendung des Netzteils Batterien ins Batteriefach ein. -
Page 111: Technische Daten
7051_E.book Page 111 Friday, July 15, 2005 4:36 PM 8.Technische Daten 8. Technische Daten Produktbeschreibung Automatisches digitales Blutdruckmessgerät Modell OMRON M3 Intellisense (HEM-7051-E) Anzeige Digitale LCD-Anzeige Messmethode Oszillometrische Methode Druck: 0 mmHg bis 299 mmHg Messbereich Puls: 40 bis 180/Min. - Page 112 7051_E.book Page 112 Friday, July 15, 2005 4:36 PM 8.Technische Daten OMRON HEALTHCARE UK LTD. Niederlassung Opal Drive Fox Milne, Milton Keynes MK 15 0DG, Vereinigtes Königreich OMRON Medizintechnik Handelsgesellschaft m.b.H. Niederlassung Windeckstraße 81a D-68163 Mannheim, Deutschland www.omron-medizintechnik.de OMRON SANTÉ FRANCE...
-
Page 113: Einige Nützliche Informationen Über Den Blutdruck
7051_E.book Page 113 Friday, July 15, 2005 4:36 PM 9.Einige nützliche Informationen über den Blutdruck 9. Einige nützliche Informationen über den Blutdruck Blutdruck - was ist das eigentlich? Der Blutdruck ist die Kraft, mit der der Blutstrom gegen die Arterienwände drückt. Der arterielle Druck ändert sich im Ver- lauf des Herzzyklus ständig. - Page 114 7051_E.book Page 114 Friday, July 15, 2005 4:36 PM 9.Einige nützliche Informationen über den Blutdruck Obere Kurve: systolischer Blutdruck Untere Kurve: diastolischer Blutdruck Tageszeit Beispiel: Schwankungen innerhalb eines Tages (männlich, 35 Jahre alt) Einstufung von Blutdruckwerten durch die Weltgesund- heitsorganisation (WHO) Die Weltgesundheitsorganisation (WHO) und die Internationale Bluthochdruckgesellschaft (ISH) haben die in der nachstehen- den Abbildung gezeigte Einstufung des Blutdrucks entwickelt.
- Page 115 7051_E.book Page 115 Friday, July 15, 2005 4:36 PM Misuratore di pressione automatico digitale Modello M3 Intellisense • Instruction Manual • Mode d’emploi • Gebrauchsanweisung • Manuale di istruzioni • Manual de instrucciones • Gebruiksaanwijzing • РУКОВОДСТВО ПО ЭКСПЛУАТАЦИИ IM-HEM-7051-E-01-07/05...
- Page 116 7051_E.book Page 116 Friday, July 15, 2005 4:36 PM Sommario Sommario................116 Introduzione................117 Informazioni importanti sulla sicurezza ......118 1. Panoramica ..............119 2. Preparazione..............122 2.1 Installazione/sostituzione delle batterie......122 2.2 Impostazione di data e ora...........124 2.3 Regolazione delle modalità di impostazione ....127 3. Uso dell’apparecchio ............128 3.1 Come assumere una posizione corretta quando si esegue una misurazione ..........128 3.2 Applicazione del bracciale..........130...
-
Page 117: Introduzione
Introduzione Grazie per aver acquistato il misuratore di pressione arteriosa OMRON M3 Intellisense. OMRON M3 Intellisense è un misuratore di pressione comple- tamente automatico, il cui funzionamento si basa sul principio oscillometrico. L’apparecchio misura in modo semplice e rapido la pressione arteriosa e la frequenza delle pulsazioni. -
Page 118: Informazioni Importanti Sulla Sicurezza
Consultare il medico curante in caso di gravidanza, aritmia o arterio- sclerosi. Non modificare mai le dosi di medicinali prescritte dal medico curante. Usare l’apparecchio M3 Intellisense solo per una persona. Attenzione: • Non lasciare l’apparecchio incustodito in presenza di bambini o persone che non sono in grado di esprimere il proprio consenso. -
Page 119: Panoramica
7051_E.book Page 119 Friday, July 15, 2005 4:36 PM 1.Panoramica 1. Panoramica Unità principale A. Display E. Alloggiamento batterie B. Pulsante O/I START F. Presa tubo dell’aria C. Pulsante MEMORY G. Presa alimentatore (per l’ali- mentatore opzionale) D. Pulsante SET... - Page 120 7051_E.book Page 120 Friday, July 15, 2005 4:36 PM 1.Panoramica Bracciale Se il bracciale dovesse presentare perdite d’aria, sostituirlo con un nuovo bracciale. (Fare riferimento al Capitolo 7 “Compo- nenti opzionali”.) H. Bracciale (Bracciale medio: circonferenza del braccio da 22 a 32 cm) I.
- Page 121 7051_E.book Page 121 Friday, July 15, 2005 4:36 PM 1.Panoramica Display K. Pressione sistolica Q. Indicatore del battito cardiaco L. Pressione diastolica 1. (Lampeggia durante la misura- zione) M. Indicatore della memoria (Appare quando si visualizzano 2. (Se l’indicatore lampeggia i valori conservati in memoria) dopo il completamento della misurazione, la pressione...
-
Page 122: Preparazione
7051_E.book Page 122 Friday, July 15, 2005 4:36 PM 2.Preparazione 2. Preparazione Installazione/sostituzione delle batterie Capovolgere l’unità principale. Far scorrere il coperchio dell’alloggiamento batterie in direzione della freccia, pre- mendo contemporaneamente l’area zigrinata. Installare o sostituire quattro “ ” batterie in modo che la polarità... - Page 123 7051_E.book Page 123 Friday, July 15, 2005 4:36 PM 2.Preparazione Durata delle batterie e sostituzione Se sul display viene visualizzato il simbolo di batteria in esauri- mento ( ), sostituire contemporaneamente tutte e quattro le batterie. - Quando il simbolo di batterie in esaurimento ( ) inizia a lampeggiare, l’apparecchio è...
-
Page 124: Impostazione Di Data E Ora
7051_E.book Page 124 Friday, July 15, 2005 4:36 PM 2.Preparazione Impostazione di data e ora Il misuratore di pressione conserva automaticamente in memo- ria i valori delle ultime misurazioni (fino a 42) e calcola un valore medio in base alle ultime tre misurazioni eseguite entro 10 minuti dall’ultima misurazione. - Page 125 7051_E.book Page 125 Friday, July 15, 2005 4:36 PM 2.Preparazione Una volta comparso sul display il numero desiderato, premere il pulsante SET per confermare l’impostazione. L’anno risulta impostato e sul display viene visualizzato il mese, con le cifre lampeggianti. Ripetere le fasi 2 e 3 per impostare il mese.
- Page 126 7051_E.book Page 126 Friday, July 15, 2005 4:36 PM 2.Preparazione Ripetere le fasi 2 e 3 per impostare l’ora. L’ora risulta impostata e sul display lampeggiano le cifre relative ai minuti. Ripetere le fasi 2 e 3 per impostare i minuti. I minuti risultano impostati.
-
Page 127: Regolazione Delle Modalità Di Impostazione
7051_E.book Page 127 Friday, July 15, 2005 4:36 PM 2.Preparazione Regolazione delle modalità di impostazione È possibile modificare le opzioni relative alle diverse impostazioni dell’apparecchio. Per far ciò, premere il pulsante SET per sele- zionare un parametro, quindi premere il tasto MEMORY per sele- zionare le opzioni di impostazione relative a tale parametro. -
Page 128: Uso Dell'apparecchio
7051_E.book Page 128 Friday, July 15, 2005 4:36 PM 3.Uso dell’apparecchio 3. Uso dell’apparecchio Come assumere una posizione corretta quando si esegue una misurazione La misurazione può essere eseguita sia al braccio sinistro sia al braccio destro. Note: • Eseguire la misurazione in un luogo tranquillo, stando seduti in posizione rilassata. - Page 129 7051_E.book Page 129 Friday, July 15, 2005 4:36 PM 3.Uso dell’apparecchio Note: • Per ottenere risultati accurati è necessario assumere una posizione corretta durante la misurazione. • La pressione arteriosa dovrebbe inoltre essere misurata tutti i giorni alla stessa ora (si consiglia di eseguire la misurazione entro 1 ora dal risveglio).
-
Page 130: Applicazione Del Bracciale
7051_E.book Page 130 Friday, July 15, 2005 4:36 PM 3.Uso dell’apparecchio Applicazione del bracciale Per ottenere risultati accurati, accertarsi di indossare corretta- mente il bracciale. È possibile eseguire le misurazioni se si indossano capi d’abbi- gliamento leggeri. Gli indumenti pesanti, come ad esempio i maglioni, vanno tuttavia tolti prima di eseguire la misurazione. - Page 131 7051_E.book Page 131 Friday, July 15, 2005 4:36 PM 3.Uso dell’apparecchio Posizionare correttamente il braccio. 1) Il tubo dell’aria deve scor- rere lungo la parte interna dell’avambraccio ed essere allineato con il dito medio. 2) La parte inferiore del brac- ciale deve trovarsi al di sopra del gomito, a una distanza di circa 1-2 cm.
-
Page 132: Misurazione
7051_E.book Page 132 Friday, July 15, 2005 4:36 PM 3.Uso dell’apparecchio Misurazione Premere il pulsante O/I START per accendere l’apparecchio. Sedersi in modo da avere i piedi completamente appoggiati sul pavimento e posizionare il braccio sul tavolo in modo tale che il bracciale si trovi allo stesso livello del cuore. - Page 133 7051_E.book Page 133 Friday, July 15, 2005 4:36 PM 3.Uso dell’apparecchio Controllare il risultato della misura- Pressione zione. sistolica L’apparecchio conserva automatica- Pressione diastolica mente in memoria i valori relativi alla pressione arteriosa e alla frequenza Indicatore pulsazioni delle pulsazioni. Fare riferimento alla sezione “3.5 Uso della funzione di memorizzazione”.
- Page 134 7051_E.book Page 134 Friday, July 15, 2005 4:36 PM 3.Uso dell’apparecchio • Il misuratore di pressione comprende una fun- zione di rilevazione del battito cardiaco irrego- lare. Il battito cardiaco irregolare può influire sui risultati della misurazione. L’algoritmo che rileva il battito cardiaco irregolare determina automaticamente se la misurazione è...
- Page 135 7051_E.book Page 135 Friday, July 15, 2005 4:36 PM 3.Uso dell’apparecchio Che cos’è l’aritmia? Il battito cardiaco è stimolato da segnali elettrici che consen- tono al cuore di contrarsi. L’aritmia è una condizione nella quale il ritmo cardiaco pre- senta un’anomalia dovuta a problemi a livello del sistema bioe- lettrico che determina il battito cardiaco.
-
Page 136: Istruzioni Per Situazioni Particolari
7051_E.book Page 136 Friday, July 15, 2005 4:36 PM 3.Uso dell’apparecchio Istruzioni per situazioni particolari Se si è a conoscenza del fatto che la propria pressione sisto- lica è superiore a 220 mmHg, premere e tenere premuto il pul- sante O/I START finché il bracciale non si sia gonfiato fino a 30-40 mmHg in più... -
Page 137: Uso Della Funzione Di Memorizzazione
7051_E.book Page 137 Friday, July 15, 2005 4:36 PM 3.Uso dell’apparecchio Uso della funzione di memorizzazione La memoria dell’apparecchio è in grado di conservare i dati relativi a 42 misurazioni. Ogni volta che si completa una misu- razione, l’apparecchio memorizza automaticamente la pres- sione arteriosa e la frequenza delle pulsazioni. - Page 138 7051_E.book Page 138 Friday, July 15, 2005 4:36 PM 3.Uso dell’apparecchio Premere nuovamente il pulsante MEMORY durante la visualizzazione della schermata dei valori medi. Viene visualizzato il risultato della misurazione più recente. Insieme ai valori relativi a ciascuna misurazione vengono visualizzate alternativamente la data e l’ora rela- tive alla misurazione stessa.
- Page 139 7051_E.book Page 139 Friday, July 15, 2005 4:36 PM 3.Uso dell’apparecchio Cancellazione di tutti i valori conservati in memoria Non è possibile cancellare parzialmente le singole misurazioni memorizzate; tutte le misurazioni contenute nell’apparecchio verranno cancellate. Per cancellare le misurazioni memo- rizzate, premere innanzitutto il pul- sante MEMORY.
-
Page 140: Guida Rapida Di Riferimento
7051_E.book Page 140 Friday, July 15, 2005 4:36 PM 4.Guida rapida di riferimento 4. Guida rapida di riferimento Se è la prima volta che si usa l’apparecchio, leggere con cura il Capitolo 3 del Manuale di istruzioni. Per garantire l’affidabilità della misurazione, evitare di mangiare, fumare o svolgere attività... -
Page 141: Gestione Di Errori E Problemi
7051_E.book Page 141 Friday, July 15, 2005 4:36 PM 5.Gestione di errori e problemi 5. Gestione di errori e problemi Messaggi di errore Errore visualizzato Causa Soluzione Il bracciale non è abba- Leggere e ripetere con cura le fasi stanza gonfio. elencate nella sezione 3.4. - Page 142 5.Gestione di errori e problemi Errore visualizzato Causa Soluzione Contattare il rivenditore o il distri- butore OMRON. Errore del dispositivo. Fare riferimento al Capitolo 8. Nota: Insieme ai messaggi di errore potrebbe essere visualizzato anche il simbolo di battito cardiaco irregolare.
-
Page 143: Risoluzione Dei Problemi
7051_E.book Page 143 Friday, July 15, 2005 4:36 PM 5.Gestione di errori e problemi Risoluzione dei problemi Problema Causa Soluzione Posizionare corretta- mente il bracciale. Bracciale posizionato in modo errato. Fare riferimento alla sezione 3.2. Rimanere fermi e non parlare durante la misu- Si è... - Page 144 Premere il pulsante O/I START e ripetere la misura- zione. Se il problema persiste, provare a sostituire le bat- Altri problemi. terie con batterie nuove. Se tale operazione non risolve il problema, contat- tare il rivenditore o il distributore OMRON.
-
Page 145: Manutenzione E Conservazione
• Non usare petrolio, diluenti o solventi analoghi per pulire il brac- ciale. • Per pulire il bracciale usare sapone e un panno soffice inumidito. • Non tentare in alcun modo di riparare da soli l’apparecchio. In caso di problemi, consultare il rivenditore autorizzato o il distributore OMRON indicato sulla confezione. - Page 146 • Per garantirne la precisione e il funzionamento corretto, si consiglia di far controllare l’apparecchio ogni due anni. Con- tattare il rivenditore autorizzato OMRON o il Servizio clienti OMRON all’indirizzo presente sulla confezione o nella docu- mentazione allegata al prodotto.
- Page 147 7051_E.book Page 147 Friday, July 15, 2005 4:36 PM 6.Manutenzione e conservazione Conservazione Quando non si usa l’apparecchio, conservarlo nell’apposita custodia. Scollegare il tubo dell’aria dalla presa. Ripiegare con delicatezza il tubo dell’aria all’interno del bracciale. Nota: Non piegare eccessiva- mente il tubo dell’aria.
-
Page 148: Componenti Opzionali
7051_E.book Page 148 Friday, July 15, 2005 4:36 PM 7.Componenti opzionali 7. Componenti opzionali Bracciali medi Bracciale grande Alimentatore CA “Q” Circonferenza braccio da 22 a 32 cm Circonferenza braccio da 32 a 42 cm CM-4997086-7 CL-4997065-4 Alimentatore Q-1098336-8 CM1-7935058-8 Uso dell’alimentatore opzionale Inserire le batterie nell’apposito alloggiamento anche se si uti- lizza l’alimentatore. -
Page 149: Dati Tecnici
7051_E.book Page 149 Friday, July 15, 2005 4:36 PM 8.Dati tecnici 8. Dati tecnici Descrizione del prodotto Misuratore di pressione automatico digitale Modello OMRON M3 Intellisense (HEM-7051-E) Display Display LCD digitale Metodo di misurazione Metodo oscillometrico Pressione: da 0 a 299 mmHg... - Page 150 7051_E.book Page 150 Friday, July 15, 2005 4:36 PM 8.Dati tecnici OMRON HEALTHCARE UK LTD. Consociata Opal Drive Fox Milne, Milton Keynes MK 15 0DG, Regno Unito OMRON Medizintechnik Handelsgesellschaft m.b.H. Consociata Windeckstraße 81a D-68163 Mannheim, Germania www.omron-medizintechnik.de OMRON SANTÉ FRANCE...
-
Page 151: Informazioni Utili Sulla Pressione Arteriosa
7051_E.book Page 151 Friday, July 15, 2005 4:36 PM 9.Informazioni utili sulla pressione arteriosa 9. Informazioni utili sulla pressione arteriosa Che cos’è la pressione arteriosa? La pressione arteriosa è una misura della forza di scorrimento del sangue contro le pareti delle arterie. La pressione arteriosa cambia costantemente nel corso del ciclo cardiaco. - Page 152 7051_E.book Page 152 Friday, July 15, 2005 4:36 PM 9.Informazioni utili sulla pressione arteriosa Curva superiore: pressione arteriosa sistolica Curva inferiore: pressione arteriosa diastolica Orario Esempio: fluttuazioni durante il giorno (soggetto maschio, 35 anni) Classificazione della pressione arteriosa secondo l’Orga- nizzazione Mondiale della Sanità...
- Page 153 7051_E.book Page 153 Friday, July 15, 2005 4:36 PM Monitor de presión arterial digital automático Modelo M3 Intellisense • Instruction Manual • Mode d’emploi • Gebrauchsanweisung • Manuale di istruzioni • Manual de instrucciones • Gebruiksaanwijzing • РУКОВОДСТВО ПО ЭКСПЛУАТАЦИИ...
- Page 154 7051_E.book Page 154 Friday, July 15, 2005 4:36 PM Índice Índice ..................154 Introducción .................155 Información importante sobre seguridad ......156 1. Descripción general ............157 2. Preparación ..............160 2.1 Colocación o sustitución de las pilas ......160 2.2 Ajuste de la fecha y la hora..........162 2.3 Ajustar los modos de configuración ......165 3.
-
Page 155: Introducción
Gracias por comprar el monitor de presión arterial OMRON M3 Intellisense para brazo. El OMRON M3 Intellisense es un monitor de presión arterial totalmente automático cuyo funcionamiento se basa en el prin- cipio oscilométrico. Mide su presión arterial y su pulso de manera sencilla y rápida. -
Page 156: Información Importante Sobre Seguridad
No modifique nunca la dosis de medicación que le haya prescrito su médico. Utilice M3 Intellisense únicamente para usted mismo. Precaución: • No permita que niños o personas que no puedan expresar su consentimiento utilicen este aparato sin supervisión. -
Page 157: Descripción General
7051_E.book Page 157 Friday, July 15, 2005 4:36 PM 1.Descripción general 1. Descripción general Unidad principal A. Pantalla E. Compartimiento de pilas B. Botón de INICIO (O/I) F. Toma para el aire (conexión para el brazalete) C. Botón MEMORY G. Toma para el adaptador AC D. - Page 158 7051_E.book Page 158 Friday, July 15, 2005 4:36 PM 1.Descripción general Brazalete Si comienza a escaparse aire del brazalete, cámbielo por uno nuevo. (Consulte Capítulo 7 “Piezas opcionales”). H. Brazalete (Brazalete mediano: perímetro del brazo 22-32 cm) I. Tubo de aire J.
- Page 159 7051_E.book Page 159 Friday, July 15, 2005 4:36 PM 1.Descripción general Pantalla K. Presión arterial sistólica Q. Símbolo de latido cardíaco L. Presión arterial diastólica 1. (Parpadea durante la medi- ción) M. Símbolo de memoria (Aparece cuando se están 2. (Si parpadea después de que viendo valores guardados en la finalice la medición indica que memoria)
-
Page 160: Preparación
7051_E.book Page 160 Friday, July 15, 2005 4:36 PM 2.Preparación 2. Preparación Colocación o sustitución de las pilas Ponga boca abajo la unidad principal. Deslice la tapa de las pilas en la dirección de la flecha mien- tras presiona la parte estriada de la tapa. - Page 161 7051_E.book Page 161 Friday, July 15, 2005 4:36 PM 2.Preparación Duración de las pilas y su sustitución Si aparece el símbolo de pilas bajas ( ) en la pantalla, susti- tuya las cuatro pilas a la vez. - Cuando el símbolo de pilas bajas ( ) comience a parpa- dear, aún podrá...
-
Page 162: Ajuste De La Fecha Y La Hora
7051_E.book Page 162 Friday, July 15, 2005 4:36 PM 2.Preparación Ajuste de la fecha y la hora Su monitor de presión arterial guarda automáticamente en la memoria un máximo de 42 mediciones y calcula un promedio basándose en las tres últimas mediciones tomadas en los 10 minutos anteriores a la última lectura. - Page 163 7051_E.book Page 163 Friday, July 15, 2005 4:36 PM 2.Preparación Pulse el botón SET para confirmar el ajuste cuando se vea en la pantalla el número deseado. El año se ajusta y los dígitos de mes parpadean en la pantalla. Repita los pasos 2 y 3 para ajustar el mes.
- Page 164 7051_E.book Page 164 Friday, July 15, 2005 4:36 PM 2.Preparación Repita los pasos 2 y 3 para ajustar la hora. La hora se ajusta y los dígitos de minutos parpadean en la pantalla. Repita los pasos 2 y 3 para ajustar los minutos.
-
Page 165: Ajustar Los Modos De Configuración
7051_E.book Page 165 Friday, July 15, 2005 4:36 PM 2.Preparación Ajustar los modos de configuración Puede modificar las opciones correspondientes a varios ajus- tes de su monitor de presión arterial. Para ello, pulse el botón SET para seleccionar un ajuste y luego pulse el botón MEMORY para seleccionar las opciones para ese ajuste. -
Page 166: Uso Del Monitor De Presión Arterial
7051_E.book Page 166 Friday, July 15, 2005 4:36 PM 3.Uso del monitor de presión arterial 3. Uso del monitor de presión arterial Cómo sentarse correctamente cuando se realice la medición Puede realizar la medición en el brazo izquierdo o en el derecho. Notas: •... - Page 167 7051_E.book Page 167 Friday, July 15, 2005 4:36 PM 3.Uso del monitor de presión arterial Notas: • Una postura correcta durante la medición es determinante para obtener resultados precisos. • Debería también intentar medir su presión a la misma hora todos los días.
-
Page 168: Colocación Del Brazalete
7051_E.book Page 168 Friday, July 15, 2005 4:36 PM 3.Uso del monitor de presión arterial Colocación del brazalete Asegúrese de que el brazalete está correctamente ajustado para obtener resultados precisos. Las mediciones pueden tomarse con ropa ligera. No obstante, quítese la ropa gruesa, como jerseys, antes de tomar una lec- tura. - Page 169 7051_E.book Page 169 Friday, July 15, 2005 4:36 PM 3.Uso del monitor de presión arterial Coloque el brazo correctamente. 1) El tubo de aire deberá colocarse sobre el ante- brazo y estar en línea con el dedo corazón. 2) La parte inferior del braza- lete deberá...
-
Page 170: Obtener Una Lectura
7051_E.book Page 170 Friday, July 15, 2005 4:36 PM 3.Uso del monitor de presión arterial Obtener una lectura Pulse el botón de INICIO O/I para encender la unidad. Siéntese en una silla, con los pies bien apoyados en el suelo y ponga el brazo sobre la mesa de tal manera que el brazalete esté... - Page 171 7051_E.book Page 171 Friday, July 15, 2005 4:36 PM 3.Uso del monitor de presión arterial Compruebe los resultados de la Presión arterial medición. sistólica Presión arterial La unidad guarda automáticamente diastólica en la memoria la presión arterial y el Indicador de ritmo de su pulso.
- Page 172 7051_E.book Page 172 Friday, July 15, 2005 4:36 PM 3.Uso del monitor de presión arterial • Su monitor de presión arterial tiene una función de pulso cardíaco irregular. El pulso cardíaco irregular puede influir en los resultados de la medición. El algoritmo de pulso cardíaco irre- gular determina inmediatamente si la medición es válida o si ha de repetirse.
- Page 173 7051_E.book Page 173 Friday, July 15, 2005 4:36 PM 3.Uso del monitor de presión arterial ¿Qué es la arritmia? Un latido cardíaco se genera por señales eléctricas que hacen que el corazón se contraiga. La arritmia es una afección en la que el ritmo cardíaco es anor- mal debido a fallos en el sistema bioeléctrico que dirige el latido cardíaco.
-
Page 174: Instrucciones Para Casos Especiales
7051_E.book Page 174 Friday, July 15, 2005 4:36 PM 3.Uso del monitor de presión arterial Instrucciones para casos especiales Si se sabe que su presión arterial sistólica es superior a 220 mmHg, pulse y mantenga pulsado el botón de INICIO O/I hasta que el brazalete alcance 30 a 40 mmHg por encima de su presión arterial sistólica prevista. -
Page 175: Uso De La Función De Memoria
7051_E.book Page 175 Friday, July 15, 2005 4:36 PM 3.Uso del monitor de presión arterial Uso de la función de memoria Esta unidad tiene una memoria capaz de guardar 42 medicio- nes. Cada vez que finaliza una medición, la unidad almacena automáticamente la presión arterial y el pulso. - Page 176 7051_E.book Page 176 Friday, July 15, 2005 4:36 PM 3.Uso del monitor de presión arterial Pulse de nuevo el botón MEMORY, mientras en pantalla se muestran los valores medios. Aparece el resultado de la medición más reciente. La fecha y la hora de cada medición se alterna en la pantalla con los valores de las mediciones.
- Page 177 7051_E.book Page 177 Friday, July 15, 2005 4:36 PM 3.Uso del monitor de presión arterial Para borrar todos los valores almacenados en la memoria No pueden borrarse las lecturas almacenadas una por una; se borrarán todas las lecturas que tenga la unidad. Para borrar lecturas almacenadas, pulse primero el botón MEMORY.
-
Page 178: Guía De Referencia Rápida
7051_E.book Page 178 Friday, July 15, 2005 4:36 PM 4.Guía de referencia rápida 4. Guía de referencia rápida Si utiliza este dispositivo por primera vez, lea atentamente el Capítulo 3 de este Manual de Instrucciones. Para contri- buir a garantizar una lectura válida, evite comer, fumar o hacer ejercicio al menos durante 30 minutos antes de hacer la medición. -
Page 179: Tratamiento De Errores Y Problemas
7051_E.book Page 179 Friday, July 15, 2005 4:36 PM 5.Tratamiento de errores y problemas 5. Tratamiento de errores y problemas Mensajes de error Indicador de error Causa Solución El brazalete no está sufi- Lea y repita atentamente los pasos cientemente inflado. que se describen en la sección 3.4. - Page 180 7051_E.book Page 180 Friday, July 15, 2005 4:36 PM 5.Tratamiento de errores y problemas Indicador de error Causa Solución Consulte con su tienda o distribui- dor OMRON. Error del dispositivo. Consulte Capítulo 8. Nota: El símbolo de latido cardíaco irregular puede mostrarse también con mensajes de error.
-
Page 181: Resolución De Problemas
7051_E.book Page 181 Friday, July 15, 2005 4:36 PM 5.Tratamiento de errores y problemas Resolución de problemas Problema Causa Solución Coloque bien el braza- El brazalete no está colo- lete. cado correctamente. Consulte sección 3.2. No se mueva ni hable Se ha movido o ha durante la medición. - Page 182 Solución Pulse el botón O/I START y repita la medición. Si el problema persiste, pruebe a sustituir las pilas Otros problemas. por unas nuevas. Si ello sigue sin solucionar el problema, póngase en contacto con su tienda o distribuidor OMRON.
-
Page 183: Mantenimiento Y Almacenaje
• Utilice un paño suave humedecido y jabón para limpiar el braza- lete. • No efectúe ningún tipo de reparación por su cuenta. Si se produce algún error, consulte con su tienda o con el distribui- dor OMRON que se indica en el embalaje. - Page 184 Consulte a su dis- tribuidor autorizado OMRON o al Servicio de Atención al Cliente de OMRON en la dirección que figura en el envase o en la documentación adjunta. • No lleve a cabo ninguna reparación usted mismo. Si se pro-...
- Page 185 7051_E.book Page 185 Friday, July 15, 2005 4:36 PM 6.Mantenimiento y almacenaje Almacenaje Guarde el monitor de presión arterial en su estuche cuando no lo use. Desenchufe el tubo de aire de la toma de aire. Recoja suavemente el tubo de aire en el brazalete.
-
Page 186: Piezas Opcionales
7051_E.book Page 186 Friday, July 15, 2005 4:36 PM 7.Piezas opcionales 7. Piezas opcionales Brazalete mediano Brazalete grande Adaptador AC “Q” Perímetro de brazo 22 - 32 cm Perímetro de brazo 32 - 42 cm CM-4997086-7 CL-4997065-4 Adaptador Q-1098336-8 CM1-7935058-8 Uso del adaptador AC opcional Introduzca las pilas en el compartimiento de pilas incluso cuando utilice el adaptador AC. -
Page 187: Datos Técnicos
7051_E.book Page 187 Friday, July 15, 2005 4:36 PM 8.Datos técnicos 8. Datos técnicos Descripción del producto Monitor de presión arterial digital automático Modelo OMRON M3 Intellisense (HEM-7051-E) Pantalla Pantalla digital LCD Método de medición Método oscilométrico Tensión: 0 mmHg a 299 mmHg Intervalo de medición... - Page 188 7051_E.book Page 188 Friday, July 15, 2005 4:36 PM 8.Datos técnicos OMRON HEALTHCARE UK LTD. Empresa filial Opal Drive Fox Milne, Milton Keynes MK 15 0DG, Reino Unido OMRON Medizintechnik Handelsgesellschaft m.b.H. Empresa filial Windeckstraße 81a D-68163 Mannheim, Alemania www.omron-medizintechnik.de OMRON SANTÉ...
-
Page 189: Información Útil Acerca De La Presión Arterial
7051_E.book Page 189 Friday, July 15, 2005 4:36 PM 9.Información útil acerca de la presión arterial 9. Información útil acerca de la presión arterial ¿Qué es la presión arterial? La presión arterial es una medida de la fuerza ejercida por el flujo sanguíneo contra las paredes de las arterias. - Page 190 7051_E.book Page 190 Friday, July 15, 2005 4:36 PM 9.Información útil acerca de la presión arterial Curva superior: presión arterial sistólica Curva inferior: presión arterial diastólica Hora del día Ejemplo: fluctuación dentro de un día (varón, 35 años) Clasificación de la presión arterial, realizada por la Organi- zación Mundial de la Salud La Organización Mundial de la Salud (OMS) y la Sociedad Inter- nacional de Hipertensión (SIH), han desarrollado una clasifica-...
- Page 191 7051_E.book Page 191 Friday, July 15, 2005 4:36 PM Digitale automatische bloeddrukmeter Model M3 Intellisense • Instruction Manual • Mode d’emploi • Gebrauchsanweisung • Manuale di istruzioni • Manual de instrucciones • Gebruiksaanwijzing • РУКОВОДСТВО ПО ЭКСПЛУАТАЦИИ IM-HEM-7051-E-01-07/05...
- Page 192 7051_E.book Page 192 Friday, July 15, 2005 4:36 PM Inhoud Inhoud ...................192 Inleiding ................193 Belangrijke veiligheidsinformatie ........194 1. Overzicht................195 2. Voorbereiding..............198 2.1 De batterijen plaatsen/vervangen ........198 2.2 De datum en tijd instellen..........200 2.3 De instellingen wijzigen..........203 3. Het apparaat gebruiken ..........204 3.1 De juiste zithouding tijdens metingen ......204 3.2 De armmanchet aanbrengen ........206 3.3 Een meting verrichten ..........208...
-
Page 193: Inleiding
7051_E.book Page 193 Friday, July 15, 2005 4:36 PM Inleiding Dank u voor de aankoop van de OMRON M3 Intellisense bloeddrukmeter voor de bovenarm. De OMRON M3 Intellisense is een volledig automatische bloeddrukmeter die werkt volgens het oscillometrische prin- cipe. Hiermee meet u de bloeddruk en de hartslag eenvoudig en snel. -
Page 194: Belangrijke Veiligheidsinformatie
Belangrijke veiligheidsinformatie Raadpleeg uw arts bij zwangerschap, aritmie of arteriosclerose. Wijzig nooit de dosis van door uw arts voorgeschreven medicatie. Gebruik de M3 Intellisense alleen voor uzelf. Let op: • Laat de meter niet zonder toezicht bij kinderen of personen die geen instemming kunnen geven. -
Page 195: Overzicht
7051_E.book Page 195 Friday, July 15, 2005 4:36 PM 1.Overzicht 1. Overzicht Hoofdeenheid A. Display E. Batterijvak B. O/I START-knop F. Luchtslangaansluiting C. MEMORY-knop (geheugen) G. Netadapteraansluiting (voor de optionele netadapter) D. SET-knop (instellen) - Page 196 7051_E.book Page 196 Friday, July 15, 2005 4:36 PM 1.Overzicht Armmanchet Als er lucht uit de armmanchet begint te lekken, vervangt u de manchet door een nieuwe. (Zie Hoofdstuk 7 “Optionele onder- delen”.) H. Armmanchet (Medium: armomtrek 22-32 cm) I. Luchtslang J.
- Page 197 7051_E.book Page 197 Friday, July 15, 2005 4:36 PM 1.Overzicht Display K. Systolische bloeddruk Q. Hartslagsymbool L. Diastolische bloeddruk 1. (knippert tijdens de meting) M. Geheugensymbool 2. (als het na de meting knippert, (weergegeven als u metingen geeft dit aan dat de bloeddruk uit het geheugen bekijkt) buiten het aanbevolen bereik valt)
-
Page 198: Voorbereiding
7051_E.book Page 198 Friday, July 15, 2005 4:36 PM 2.Voorbereiding 2. Voorbereiding De batterijen plaatsen/vervangen Draai de hoofdeenheid ondersteboven. Schuif het batterijdeksel in de richting van de pijl, terwijl u op het geribbelde gedeelte drukt. “ ” Plaats of vervang vier bat- terijen. - Page 199 7051_E.book Page 199 Friday, July 15, 2005 4:36 PM 2.Voorbereiding Levensduur en vervanging van batterijen Als het batterijsymbool ( ) op de display wordt weergegeven, moeten alle vier de batterijen worden vervangen. - Als het batterijsymbool ( ) gaat knipperen, kunt u de meter nog even gebruiken.
-
Page 200: De Datum En Tijd Instellen
7051_E.book Page 200 Friday, July 15, 2005 4:36 PM 2.Voorbereiding De datum en tijd instellen De bloeddrukmeter slaat automatisch maximaal 42 metingen op in het geheugen en berekent een gemiddelde meetwaarde op basis van de drie meest recente metingen die binnen 10 minuten van de laatste meting zijn verricht. - Page 201 7051_E.book Page 201 Friday, July 15, 2005 4:36 PM 2.Voorbereiding Druk als de gewenste waarde op de display wordt weergege- ven ter bevestiging op SET. Het jaar is ingesteld en de maand (datum) knippert op de dis- play. Herhaal stap 2 en 3 voor het instellen van de maand.
- Page 202 7051_E.book Page 202 Friday, July 15, 2005 4:36 PM 2.Voorbereiding Herhaal stap 2 en 3 voor het instellen van de uuraandui- ding. De uuraanduiding is inge- steld en de minuutaanduiding knippert op de display. Herhaal stap 2 en 3 voor het instellen van de minuutaan- duiding.
-
Page 203: De Instellingen Wijzigen
7051_E.book Page 203 Friday, July 15, 2005 4:36 PM 2.Voorbereiding De instellingen wijzigen U kunt de opties voor de verschillende instellingen van de meter wijzigen. Dit doet u door met de SET-knop een instelling te selecteren en vervolgens met de MEMORY-knop de opties voor de instelling. -
Page 204: Het Apparaat Gebruiken
7051_E.book Page 204 Friday, July 15, 2005 4:36 PM 3.Het apparaat gebruiken 3. Het apparaat gebruiken De juiste zithouding tijdens metingen U kunt de meting aan uw linker- of uw rechterarm verrichten. Opmerkingen: • Verricht de meting op een rustige plaats in een ontspannen zithouding. - Page 205 7051_E.book Page 205 Friday, July 15, 2005 4:36 PM 3.Het apparaat gebruiken Opmerkingen: • De juiste houding tijdens het meten is essentieel voor het ver- krijgen van goede meetresultaten. • Probeer tevens uw bloeddruk elke dag op dezelfde tijd te meten.
-
Page 206: De Armmanchet Aanbrengen
7051_E.book Page 206 Friday, July 15, 2005 4:36 PM 3.Het apparaat gebruiken De armmanchet aanbrengen Zorg ervoor dat u de armmanchet goed aanbrengt, zodat u goede meetresultaten krijgt. In lichte kleding kunt u de metingen verrichten. Verwijder ech- ter dikke kleding, zoals truien, voordat u gaat meten. Steek de luchtplug in de luchtslan- gaansluiting aan de linkerzijde van de hoofdeenheid. - Page 207 7051_E.book Page 207 Friday, July 15, 2005 4:36 PM 3.Het apparaat gebruiken Plaats de arm in de juiste positie. 1) De luchtslang moet langs de binnenkant van uw onder- arm naar beneden en langs uw middelvinger lopen. 2) De onderrand van de manchet moet zich onge- veer 1 tot 2 cm boven de elleboog bevinden.
-
Page 208: Een Meting Verrichten
7051_E.book Page 208 Friday, July 15, 2005 4:36 PM 3.Het apparaat gebruiken Een meting verrichten Schakel de meter in met O/I START. Ga op een stoel zitten met uw voeten plat op de vloer en leg uw arm op een tafel, zodanig dat de armmanchet op dezelfde hoogte zit als uw hart. - Page 209 7051_E.book Page 209 Friday, July 15, 2005 4:36 PM 3.Het apparaat gebruiken Controleer het meetresultaat. Systolische De bloeddruk en hartslag worden bloeddruk door de meter automatisch in het Diastolische bloeddruk geheugen opgeslagen. Zie “3.5 Hartslagweer- Gebruik van de geheugenfunctie”. gave De zoemer klinkt als de meting is vol- tooid.
- Page 210 7051_E.book Page 210 Friday, July 15, 2005 4:36 PM 3.Het apparaat gebruiken • Uw bloeddrukmeter heeft ook een functie voor onregelmatige hartslag. Een onregelmatige hartslag kan de resultaten van de meting beïn- vloeden. Het algoritme voor onregelmatige hartslag bepaalt automatisch of de meting bruikbaar is of moet worden herhaald.
- Page 211 7051_E.book Page 211 Friday, July 15, 2005 4:36 PM 3.Het apparaat gebruiken Wat is aritmie? De hartslag wordt veroorzaakt door elektrische signalen die het hart doen samentrekken. Aritmie is een toestand waarbij het hartritme abnormaal is door storingen in het bio-elektrisch systeem dat voor de hartslag zorgt.
-
Page 212: Instructies Voor Speciale Omstandigheden
7051_E.book Page 212 Friday, July 15, 2005 4:36 PM 3.Het apparaat gebruiken Instructies voor speciale omstandigheden Als u weet dat uw systolische druk hoger is dan 220 mmHg, houdt u O/I START ingedrukt tot de armmanchet is opgeblazen tot een druk die 30 tot 40 mmHg hoger is dan uw verwachte systolische druk. -
Page 213: Gebruik Van De Geheugenfunctie
7051_E.book Page 213 Friday, July 15, 2005 4:36 PM 3.Het apparaat gebruiken Gebruik van de geheugenfunctie Deze meter heeft een geheugenopslagcapaciteit van 42 metin- gen. Telkens als u een meting verricht, slaat de meter automa- tisch de bloeddruk en hartslag op. Als er drie metingen binnen 10 minuten voor de laatste meting zijn, wordt het gemiddelde van de drie metingen weergegeven. - Page 214 7051_E.book Page 214 Friday, July 15, 2005 4:36 PM 3.Het apparaat gebruiken Druk opnieuw op MEMORY terwijl het gemiddelde wordt weergegeven. Het resultaat van de meest recente meting wordt weergegeven. De datum en tijd van elke meting worden afwisselend met de meet- waarden weergegeven.
- Page 215 7051_E.book Page 215 Friday, July 15, 2005 4:36 PM 3.Het apparaat gebruiken Alle in het geheugen opgeslagen waarden wissen U kunt de opgeslagen metingen niet afzonderlijk wissen. Alle metingen in de meter worden gewist. Druk voor het wissen van de metin- gen eerst op MEMORY.
-
Page 216: Snelstartgids
7051_E.book Page 216 Friday, July 15, 2005 4:36 PM 4.Snelstartgids 4. Snelstartgids Lees als u dit instrument voor het eerst gebruikt zorgvuldig hoofdstuk 3 van deze handleiding. Om een betrouwbare meting te verkrijgen, is het beter minimaal 30 minuten voor de meting niet meer te eten, te roken of lichamelijke inspan- ning te verrichten. -
Page 217: Oplossen Van Fouten En Problemen
7051_E.book Page 217 Friday, July 15, 2005 4:36 PM 5.Oplossen van fouten en problemen 5. Oplossen van fouten en problemen Foutmeldingen Foutweergave Oorzaak Oplossing De manchet is niet vol- Lees en herhaal de stappen zoals doende opgeblazen. beschreven in paragraaf 3.4. Herhaal de meting. - Page 218 7051_E.book Page 218 Friday, July 15, 2005 4:36 PM 5.Oplossen van fouten en problemen Foutweergave Oorzaak Oplossing Neem contact op met uw OMRON-winkel of -distributeur. Apparaatfout. Zie Hoofdstuk 8. Opmerking: Het symbool voor onregelmatige hartslag kan bij de foutmeldingen worden weergegeven.
-
Page 219: Problemen Oplossen
7051_E.book Page 219 Friday, July 15, 2005 4:36 PM 5.Oplossen van fouten en problemen Problemen oplossen Probleem Oorzaak Oplossing Bevestig de armman- Armmanchet niet cor- chet correct. rect aangebracht. Zie paragraaf 3.2. Praat en beweeg niet tij- Beweging of praten tij- dens de meting. - Page 220 5.Oplossen van fouten en problemen Probleem Oorzaak Oplossing Druk op O/I START en herhaal de meting. Vervang als het probleem aanwezig blijft, de batte- Overige problemen. rijen door nieuwe. Als dit het probleem niet oplost, neemt u contact op met de OMRON-verkoper of -distributeur.
-
Page 221: Opslag En Onderhoud
• Gebruik geen benzine, verdunners of soortgelijke oplosmiddelen om de armmanchet schoon te maken. • Gebruik voor het reinigen van de armmanchet een zachte, voch- tige doek en zeep. • Voer nooit zelf reparaties uit. Raadpleeg bij defecten uw OMRON-verkoper of -distributeur zoals aangegeven op de verpakking. - Page 222 • Het wordt algemeen aanbevolen de meter elke twee jaar te laten controleren op juiste werking en nauwkeurigheid. Raad- pleeg de erkende verkoper of de klantenservice van OMRON via het op de verpakking of in de bijgevoegde informatie ver- melde adres.
- Page 223 7051_E.book Page 223 Friday, July 15, 2005 4:36 PM 6.Opslag en onderhoud Opslag Bewaar de meter in de opbergdoos als deze niet wordt gebruikt. Maak de luchtslang los van de aansluiting. Vouw de luchtslang voorzichtig in de armmanchet. Opmerking: Buig de luchtslang niet door.
-
Page 224: Optionele Onderdelen
7051_E.book Page 224 Friday, July 15, 2005 4:36 PM 7.Optionele onderdelen 7. Optionele onderdelen Medium armmanchet Grote armmanchet Netadapter “Q” Armomtrek 22 - 32 cm Armomtrek 32 - 42 cm CM-4997086-7 CL-4997065-4 Q Adapter-1098336-8 CM1-7935058-8 De optionele netadapter gebruiken Plaats ook als u de netadapter gebruikt batterijen in het batterij- vak. -
Page 225: Technische Gegevens
7051_E.book Page 225 Friday, July 15, 2005 4:36 PM 8.Technische gegevens 8. Technische gegevens Productomschrijving Digitale automatische bloeddrukmeter Model OMRON M3 Intellisense (HEM-7051-E) Display LCD digitaal display Meetmethode Oscillometrische methode Druk: 0 tot 299 mmHg Meetbereik Hartslag: 40 tot 180 slagen/min. - Page 226 7051_E.book Page 226 Friday, July 15, 2005 4:36 PM 8.Technische gegevens OMRON HEALTHCARE UK LTD. Dochteronderneming Opal Drive Fox Milne, Milton Keynes MK 15 0DG, Verenigd Koninkrijk OMRON Medizintechnik Handelsgesellschaft m.b.H. Dochteronderneming Windeckstraße 81a D-68163 Mannheim, Duitsland www.omron-medizintechnik.de OMRON SANTÉ FRANCE...
-
Page 227: Nuttige Informatie Over Bloeddruk
7051_E.book Page 227 Friday, July 15, 2005 4:36 PM 9.Nuttige informatie over bloeddruk 9. Nuttige informatie over bloeddruk Wat is bloeddruk? Bloeddruk is de druk van het bloed op de slagaderwand. Arteri- ele bloeddruk verandert voortdurend tijdens de hartcyclus. De hoogste bloeddruk in deze cyclus wordt de systolische bloeddruk genoemd, de laagste is de diastolische bloeddruk. - Page 228 7051_E.book Page 228 Friday, July 15, 2005 4:36 PM 9.Nuttige informatie over bloeddruk Bovenste curve: systolische bloeddruk Onderste curve: diastolische bloeddruk Tijdstip Voorbeeld: fluctuatie gedurende de dag (man van 35 jaar) Classificatie van bloeddruk door de Wereldgezondheids- organisatie WHO De Wereldgezondheidsorganisatie (WHO) en de International Society of Hypertension (Internationale Gemeenschap voor Hoge Bloeddruk (ISH)) hebben de bloeddrukclassificatie ont- wikkeld zoals weergegeven in deze afbeelding.
- Page 229 7051_E.book Page 229 Friday, July 15, 2005 4:36 PM Измеритель артериального давления и частоты пульса автоматический Модель M3 Intellisense • Instruction manual • Mode d’emploi • Gebrauchsanweisung • Manuale di istruzioni • Manual de instrucciones • Gebruiksaanwijzing • РУКОВОДСТВО ПО ЭКСПЛУАТАЦИИ...
- Page 230 7051_E.book Page 230 Friday, July 15, 2005 4:36 PM Содержание Содержание ................230 Введение ...................231 Важные меры предосторожности ........232 1. Обзор ..................233 2. Подготовка к работе ..............236 2.1 Установка/замена батарей ..........236 2.2 Установка даты и времени ..........238 2.3 Настройка установок прибора ........241 3.
-
Page 231: Введение
7051_E.book Page 231 Friday, July 15, 2005 4:36 PM Введение Благодарим Вас за покупку прибора OMRON M3 Intellisense для измерения давления на плече. OMRON M3 Intellisense является полностью автоматическим прибором для измерения давления, работающим на осциллометрическом принципе. Он измеряет артериальное... -
Page 232: Важные Меры Предосторожности
При беременности, аритмии или атеросклероз проконсультируйтесь с лечащим врачом. Никогда не изменяйте дозировку медикаментов, выписанных лечащим врачом. M3 Intellisense предназначен только для личного использования. Внимание: • Не оставляйте прибор без присмотра в присутствии детей или лиц, которые не отвечают за свои действия. -
Page 233: Обзор
7051_E.book Page 233 Friday, July 15, 2005 4:36 PM 1.Обзор 1. Обзор Электронный блок A. Дисплей E. Отсек для батарей B. Кнопка O/I START (Выкл./Вкл. F. Гнездо воздушной трубки СТАРТ) G. Гнездо для адаптера C. Кнопка MEMORY (Память) переменного тока (адаптер D. - Page 234 7051_E.book Page 234 Friday, July 15, 2005 4:36 PM 1.Обзор Манжета для измерений на плече При появлении утечки воздуха из манжеты ее следует заменить новой. (Обратитесь к Главе 7 «Дополнительные принадлежности».) H. Манжета для измерений на плече (Средняя манжета: окружность руки 22-32 см) Воздушная...
- Page 235 7051_E.book Page 235 Friday, July 15, 2005 4:36 PM 1.Обзор Дисплей K. Систолическое артериальное Q. Символ сердцебиения давление 1. (Мигает при измерении) L. Диастолическое артериальное 2. (Мигание после окончания давление измерения означает, что M. Символ памяти артериальное давление не (Выводится на экран при попадает...
-
Page 236: Подготовка К Работе
7051_E.book Page 236 Friday, July 15, 2005 4:36 PM 2.Подготовка к работе 2. Подготовка к работе Установка/замена батарей Переверните измерительный блок передней панелью вниз. Сдвигайте крышку отсека для батарей в направлении стрелки, нажимая на рифленую часть крышки. Вставьте или замените четыре «... - Page 237 7051_E.book Page 237 Friday, July 15, 2005 4:36 PM 2.Подготовка к работе Срок службы батарей и их замена Если на экране появился символ разряда батарей ( замените сразу все четыре батареи одновременно. - Когда символ разряда батарей ( ) начинает мигать, прибор...
-
Page 238: Установка Даты И Времени
7051_E.book Page 238 Friday, July 15, 2005 4:36 PM 2.Подготовка к работе Установка даты и времени Прибор для измерения артериального давления автоматически запоминает до 42 результатов измерений в памяти и вычисляет среднее значение трех последних измерений, сделанных не ранее, чем за 10 минут до последнего... - Page 239 7051_E.book Page 239 Friday, July 15, 2005 4:36 PM 2.Подготовка к работе Для подтверждения выбранного значения нажмите кнопку SET, когда желаемое значение появится на экране. Теперь значение года установлено, и на экране начинают мигать цифры месяца. Повторите шаги 2 и 3 для установки...
- Page 240 7051_E.book Page 240 Friday, July 15, 2005 4:36 PM 2.Подготовка к работе Повторите шаги 2 и 3 для установки часа. Значение часа установлено, и на экране начинают мигать цифры минут. Повторите шаги 2 и 3 для установки минут. Минуты установлены. После...
-
Page 241: Настройка Установок Прибора
7051_E.book Page 241 Friday, July 15, 2005 4:36 PM 2.Подготовка к работе Настройка установок прибора Вы можете изменять параметры различных установок прибора. Это осуществляется нажатием кнопки SET для выбора изменяемой установки прибора и затем нажатием кнопки MEMORY для выбора ее параметров. После выбора необходимых... -
Page 242: Использование Прибора
7051_E.book Page 242 Friday, July 15, 2005 4:36 PM 3.Использование прибора 3. Использование прибора Правильная поза при выполнении измерения Измерение можно производить на левой или правой руке. Примечания: • Измерения следует выполнять, сидя в расслабленном положении и в спокойной обстановке. Убедитесь, что в комнате... - Page 243 7051_E.book Page 243 Friday, July 15, 2005 4:36 PM 3.Использование прибора Примечания: • Правильное положение при измерении необходимо для получения точных результатов. • Кроме этого, следует стараться измерять артериальное давление каждый день в одно и то же время. (Рекомендуемое время – в течение одного часа после пробуждения.) Неправильное...
-
Page 244: Закрепление Манжеты На Плече
7051_E.book Page 244 Friday, July 15, 2005 4:36 PM 3.Использование прибора Закрепление манжеты на плече Для получения точных результатов убедитесь, что манжета правильно обернута вокруг плеча. Измерения можно выполнять в легкой одежде. Тем не менее, перед измерением следует снять толстую одежду, такую как свитер. - Page 245 7051_E.book Page 245 Friday, July 15, 2005 4:36 PM 3.Использование прибора Расположите руку в правильном положении. 1) Воздушная трубка должна спускаться по внутренней стороне предплечья и быть на одной линии со средним пальцем. 2) Нижняя часть манжеты должна быть примерно на...
-
Page 246: Выполнение Измерения
7051_E.book Page 246 Friday, July 15, 2005 4:36 PM 3.Использование прибора Выполнение измерения Нажмите кнопку O/I START, чтобы включить прибор. Сядьте на стул так, чтобы ступни ног опирались на пол, и положите руку на стол так, чтобы манжета была на уровне сердца. - Page 247 7051_E.book Page 247 Friday, July 15, 2005 4:36 PM 3.Использование прибора Проверка результатов измерения. Систолическое артериальное Прибор автоматически заносит в давление память артериальное давление и Диастолическое артериальное пульс. Обратитесь к разделу «3.5 давление Использование функции памяти». Значение пульса По окончании измерения прибор подает...
- Page 248 7051_E.book Page 248 Friday, July 15, 2005 4:36 PM 3.Использование прибора • Ваш прибор для измерения давления имеет функцию определения нерегулярного сердцебиения. Нерегулярное сердцебиение может влиять на результаты измерений. Алгоритм обнаружения нерегулярного сердцебиения автоматически определяет пригодность результатов измерения и необходимость его повторения. Если во время измерения...
- Page 249 7051_E.book Page 249 Friday, July 15, 2005 4:36 PM 3.Использование прибора Что такое аритмия? Биение сердца вызывается электрическими сигналами, заставляющими сердце сокращаться. Аритмия – это состояние, когда ритм сердцебиения нарушен из-за сбоев в биоэлектрической системе, управляющей сердцебиением. Ее типичными признаками являются выпадающие...
-
Page 250: Указания Для Особых Состояний
7051_E.book Page 250 Friday, July 15, 2005 4:36 PM 3.Использование прибора Указания для особых состояний Если известно, что Ваше систолическое давление превышает 220 мм рт. ст., нажмите и удерживайте кнопку O/I START до тех пор, пока давление в манжете не достигнет значения, на 30-40 мм... -
Page 251: Использование Функции Памяти
7051_E.book Page 251 Friday, July 15, 2005 4:36 PM 3.Использование прибора Использование функции памяти Этот прибор имеет память, в которой могут храниться результаты 42 измерений. Каждый раз по окончании измерения прибор автоматически заносит в память артериальное давление и частоту пульса. Если... - Page 252 7051_E.book Page 252 Friday, July 15, 2005 4:36 PM 3.Использование прибора Еще раз нажмите кнопку MEMORY, когда на экран выведены средние значения измерения. При этом на экран будут выведены результаты самого последнего измерения. Вместе с результатами измерения на экран поочередно выводятся дата...
- Page 253 7051_E.book Page 253 Friday, July 15, 2005 4:36 PM 3.Использование прибора Удаление всех значений из памяти В приборе невозможно удаление результатов отдельных сохраненных измерений, можно удалить только все значения сразу. Для удаления сохраненных результатов сначала нажмите кнопку MEMORY. Затем, не отпуская ее, нажмите...
-
Page 254: Краткое Справочное Руководство
7051_E.book Page 254 Friday, July 15, 2005 4:36 PM 4.Краткое справочное руководство 4. Краткое справочное руководство Если Вы используете прибор впервые, пожалуйста, внимательно прочтите главу 3 данного руководства по эксплуатации. Для того, чтобы получить достоверные результаты измерений, не ешьте, не курите... -
Page 255: Устранение Ошибок И Неисправностей
7051_E.book Page 255 Friday, July 15, 2005 4:36 PM 5.Устранение ошибок и неисправностей 5. Устранение ошибок и неисправностей Сообщения об ошибках Условное Причина Средство обозначение ошибки Внимательно прочтите и Недостаточное повторите шаги, описанные в давление в манжете. разделе 3.4. Повторите измерение. Не двигайтесь... - Page 256 Низкое напряжение «AA» новыми. батарей. Обратитесь к разделу 2.1. Мигает или постоянно изображен на экране Свяжитесь с представителем фирмы OMRON или Ошибка прибора. дистрибьютором. Обратитесь к главе 8. Примечание: При выводе сообщений об ошибках может также высвечиваться символ нерегулярного сердцебиения.
-
Page 257: Поиск И Устранение Неисправностей
7051_E.book Page 257 Friday, July 15, 2005 4:36 PM 5.Устранение ошибок и неисправностей Поиск и устранение неисправностей Проблема Причина Средство Правильно закрепите Неправильно манжету на плече. наложена манжета на плечо. Обратитесь к разделу 3.2. Не двигайтесь и не Движение или разговаривайте... - Page 258 ничего не происходит. Вставьте батареи, Неправильно соблюдая полярность вставлены батареи. (+/-). Нажмите кнопку O/I START и повторите измерение. Если проблема не исчезает, попробуйте Другие неисправности. заменить батареи на новые. Если это не разрешило проблему, свяжитесь с представителем фирмы OMRON или дистрибьютором.
-
Page 259: Обслуживание И Хранение
• Использования бензина, разбавителей или подобных растворителей для чистки манжеты. • Для чистки манжеты используйте мягкую влажную ткань и мыло. • Самостоятельного выполнения любого ремонта. При обнаружении дефекта, проконсультируйтесь с представителем фирмы OMRON или дистрибьютором, указанным на упаковке прибора. РУ... - Page 260 • Для обеспечения правильной работы и точности прибора рекомендуется проверять прибор каждые два года. Пожалуйста, свяжитесь с полномочным представителем OMRON или с Центром обслуживания покупателей OMRON по адресу, указанному на упаковке или в приложенной документации. • Не выполняйте никакого ремонта самостоятельно. Если...
- Page 261 7051_E.book Page 261 Friday, July 15, 2005 4:36 PM 6.Обслуживание и хранение Хранение Когда прибор не используется, храните его в футляре. Отсоедините воздушную трубку от гнезда воздушной трубки. Аккуратно сверните воздушную трубку и положите ее внутрь манжеты для измерения на плече. Примечание: Не...
-
Page 262: Дополнительные Принадлежности
7051_E.book Page 262 Friday, July 15, 2005 4:36 PM 7.Дополнительные принадлежности 7. Дополнительные принадлежности Средние манжеты на плечо Большая манжета на Адаптер плечо переменного Окружность руки 22-32 см тока «Q» Окружность руки 32-42 см CM-4997086-7 CL-4997065-4 Q Adapter-1098336-8 CM1-7935058-8 Использование дополнительного адаптера переменного... -
Page 263: Технические Характеристики
7051_E.book Page 263 Friday, July 15, 2005 4:36 PM 8.Технические характеристики 8. Технические характеристики Измеритель артериального давления и частоты пульса Наименование прибора автоматический Модель OMRON M3 Intellisense (HEM-7051-E) Дисплей Цифровой ЖК дисплей Метод измерений Осциллометрический Давления воздуха в компрессионной манжете: от 0 до 299 мм рт.ст. Диапазон измерений... - Page 264 7051_E.book Page 264 Friday, July 15, 2005 4:36 PM 8.Технические характеристики OMRON HEALTHCARE UK LTD. Филиал Opal Drive Fox Milne, Milton Keynes MK 15 0DG, Великобритания OMRON Medizintechnik Handelsgesellschaft m.b.H. Филиал Windeckstraße 81a D-68163 Mannheim, Германия www.omron-medizintechnik.de OMRON SANTÉ FRANCE Филиал...
-
Page 265: Некоторая Полезная Информация Об Артериальном Давлении
7051_E.book Page 265 Friday, July 15, 2005 4:36 PM 9.Некоторая полезная информация об артериальном давлении 9. Некоторая полезная информация об артериальном давлении Что такое артериальное давление? Артериальное давление является мерой силы, с которой поток крови давит на стенки артерий. Артериальное давление постоянно... - Page 266 7051_E.book Page 266 Friday, July 15, 2005 4:36 PM 9.Некоторая полезная информация об артериальном давлении Верхняя кривая: систолическое артериальное давление Нижняя кривая: диастолическое артериальное давление Время дня Пример: колебания в течение дня (мужчина 35 лет) Классификация артериального давления Всемирной организации здравоохранения Всемирная...