Stagnoli ALPHEO Instructions
Table des Matières
Les langues disponibles
Les langues disponibles
Liens rapides
Stagnoli
Istruzioni Instruction Instructions Betriebsanleitung
I - Motoriduttore a braccio snodato per cancelli battenti
GB - Gear motor with articulated arm for swing gates
F - Motoréducteur à bras articulé pour portails à battants
D - Getriebemotor mit Gelenkarm für Flügeltore
ALPHEO
Rev. 01- 10/09
1
Table des Matières

Manuels Connexes pour Stagnoli ALPHEO


Sommaire des Matières pour Stagnoli ALPHEO
- Page 1 I - Motoriduttore a braccio snodato per cancelli battenti GB - Gear motor with articulated arm for swing gates F - Motoréducteur à bras articulé pour portails à battants D - Getriebemotor mit Gelenkarm für Flügeltore ALPHEO Rev. 01- 10/09...
- Page 35 89/392 et des normes EN 12453 et EN 12445. • ALPHEO a été réalisé spécialement pour gérer l’automatisme de portail à battant, il est donc interdit d’utiliser le produit dans un but différent de celui pour lequel il a été conçu ou de manière impropre.
- Page 36 Stagnoli Istruzioni Instruction Instructions Betriebsanleitung...
-
Page 37: Données Techniques
Stagnoli Istruzioni Instruction Instructions Betriebsanleitung Caractéristiques techniques ALPHEO Données techniques ALPHEO ALPHEO 24V 230V Alimentation 230V~ (50 Hz) 230V~ (50 Hz) Courant max. absorbé (A) Alimentation moteur 230V~ 24V ––––– Puissance max. moteur (W) 300 W 100 W Condensateur 10 µF... -
Page 38: Montage Et Réglage Des Butées Mécaniques De Fin De Course
Pour utiliser les butées mécaniques, il faut les placer sur les guides prévus à cet effet qui se trouvent sur la partie inférieure de la base de l’Alpheo. Pour obtenir la fermeture désirée, lorsque le portail est complètement fermé, il faut déplacer la butée 1 contre le bras bien droit et bloquer la butée en serrant une vis M8x30 à... - Page 39 Stagnoli Istruzioni Instruction Instructions Betriebsanleitung Contrôles préliminaires Avant d’effectuer l’installation de l’Alpheo, vérifier les points suivants: • Contrôler que la structure du portail soit suffisamment robuste et qu’il n’y ait aucun point de friction. • Contrôler que les charnières du portail soient efficaces et lubrifiées de manière appropriée.
- Page 40 Stagnoli Istruzioni Instruction Instructions Betriebsanleitung OUVERTURE 155 ÷ 210 90° 230 max 155 ÷ 210 90° 230 max 155 ÷ 210 90° 230 max 155 ÷ 210 90° 230 max 155 ÷ 210 90° 230 max 155 ÷ 210 90°...
-
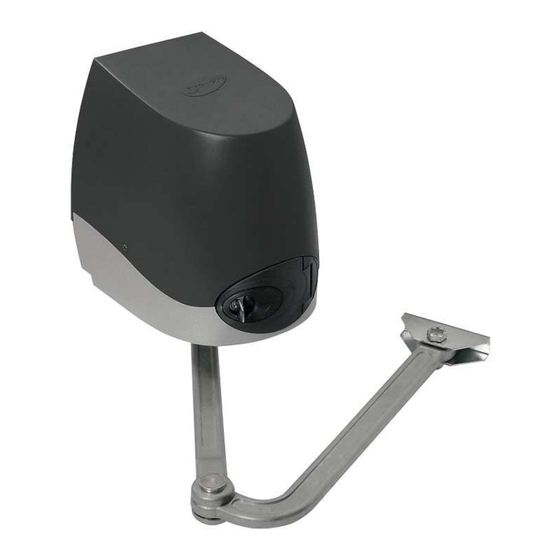
Page 41: Fixation Du Motoréducteur
Stagnoli Istruzioni Instruction Instructions Betriebsanleitung Figure 2 Fixation du motoréducteur Dévisser 4,2x9,5, puis enlever couvercle (figure 3). Introduire le motoréducteur dans la plaque de base en correspondance des trous et le bloquer avec les vis M8x90 et les écrous correspondants (figure 4). - Page 42 Stagnoli Istruzioni Instruction Instructions Betriebsanleitung Figure 4 Installation du bras articulé (figures 5, 6, 7) 7. Insérer l’extrémité du bras articulé en faisant correspondre la rainure avec l’arbre de sortie ; placer la rondelle ∅11x30 et bloquer le bras avec la vis M10x28, comme indiqué...
- Page 43 Stagnoli Istruzioni Instruction Instructions Betriebsanleitung Figure 5 Figure 6 Figure 7...
- Page 44 Stagnoli Istruzioni Instruction Instructions Betriebsanleitung Réglage des micro-interrupteurs (Alpheo 230V) avec le motoréducteur monté à gauche Ouverture Quand le motoréducteur est déverrouillé, faire tourner le vantail du portail de manière à atteindre l’ouverture prévue, puis tourner la came inférieure dans le sens des aiguilles d’une montre jusqu’à...
- Page 45 Stagnoli Istruzioni Instruction Instructions Betriebsanleitung Réglage des micro-interrupteurs (Alpheo 230V) avec le motoréducteur monté à droite Fermeture: Quand le motoréducteur est déverrouillé, faire tourner le vantail du portail de manière à atteindre la fermeture prévue, puis tourner la came inférieure dans le sens des aiguilles d’une montre jusqu’à...
- Page 46 Stagnoli Istruzioni Instruction Instructions Betriebsanleitung Ci-après, vue éclatée relative au moteur à bras articulé pour portail à battant ALPHEO dans la version 230V et 24V Stagnoli.
- Page 47 Stagnoli Istruzioni Instruction Instructions Betriebsanleitung...
- Page 48 Vis pour fixation étrier avec carters Ecrou autobloquant pour vis M8 Levier droit Goupille Ø3x30 Vis de fixation bras droit avec arbre Alpheo Rondelle 30-11-3 Cheville pour leviers DIN EN 22 341 BB 16x45 Levier courbe Etrier de fixation au battant Rondelle dentée pour M5 DIN 6798 A...
- Page 49 Stagnoli Istruzioni Instruction Instructions Betriebsanleitung Bague en laiton 14-12 L15 en bronze Bague en laiton 18-16 L15 en bronze Vis pour fixation levier courbe avec étrier d’accrochage Anneau élastique pour arbres Seeger Lamellar transformateur 45 VA Boulon pour vis bloque transformateur M4x40 UNI5931 Butée mécanique...
- Page 68 Stagnoli Istruzioni Instruction Instructions Betriebsanleitung Dichiarazione di conformità Il sottoscritto Francesco Albiero, dichiara che il prodotto ALPHEO è conforme a tutte le norme tecniche relative al prodotto entro il campo di applicabilità delle Direttive Comunitarie. Declaration of Conformity The undersigned, Francesco Albiero, declares that the product ALPHEO is in compliance with the technical requirements of the European Directives.