Sauder 425765 Mode D'emploi
CONTACT US FIRST
CONTACT US FIRST
sauder.com
sauder.com
sauder.com
BEFORE MAKING ANY RETURNS TO THE STORE.
BEFORE MAKING ANY RETURNS TO THE RETAILER.
sauder.com/service
Visit
Prefer the phone? Give us a ring at
Customer Service is available Monday-Friday - 9 a.m. to 5:30 p.m. EST (except holidays)
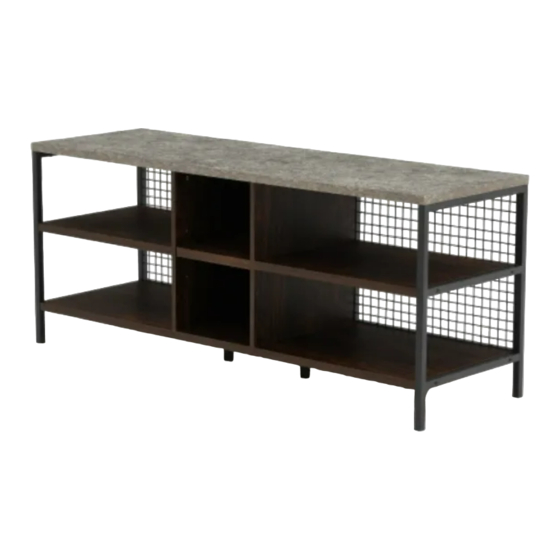
Credenza
Market Commons Collection | Model 425765
Sauder.com
Share your journey!
to order replacement parts, view video assembly tips, or chat with a live rep.
1-800-445-1527
.
It stands. You sit.
A thing of beauty,
this one.
NOTE: THIS INSTRUCTION
BOOKLET CONTAINS IMPORTANT
SAFETY INFORMATION.
PLEASE READ AND KEEP FOR
FUTURE REFERENCE.
English pg 1-18
Français pg 19-21
Español pg 22-24
Lot # 536163
Purchased: __________________
12/03/19

Manuels Connexes pour Sauder 425765


Sommaire des Matières pour Sauder 425765
- Page 1 It stands. You sit. A thing of beauty, this one. Credenza NOTE: THIS INSTRUCTION BOOKLET CONTAINS IMPORTANT SAFETY INFORMATION. Market Commons Collection | Model 425765 PLEASE READ AND KEEP FOR FUTURE REFERENCE. Sauder.com English pg 1-18 Français pg 19-21 Español pg 22-24...
- Page 2 • Check the size and weight of your TV. Compare it to the diagram below – before you begin assembly! • This Sauder unit is designed for use with fl at panel televisions weighing less than 70 pounds. Never use with a TV that weighs more.
- Page 3 Use this part identifi cation to help identify similar parts. TOP (1) BOTTOM (1) WIRE BACK (2) LEFT UPRIGHT (1) LEFT SHELF (1) FOOT (2) RIGHT UPRIGHT (1) RIGHT SHELF (1) ADJUSTABLE SHELF (1) BACK (1) END (2) 425765 www.sauder.com/service Page 3...
- Page 4 (Refer to the last step for proper location and application) BLACK 2" PAN HEAD SCREW - 4 BLACK 1-7/8" HEX HEAD SCREW - 8 BLACK 1-3/16" HEX HEAD SCREW - 4 BLACK 1/2" HEX HEAD SCREW - 4 BLACK 1/2" PAN HEAD SCREW - 8 Page 4 www.sauder.com/service 425765...
- Page 5 The arrow in the HIDDEN CAM must point Arrow toward the hole in the edge of the board. Hidden Cam Hidden Cam Hole Insert the CAM SCREW or CAM DOWEL into the HIDDEN CAM. Tighten the HIDDEN CAM. 425765 www.sauder.com/service Page 5...
- Page 6 Meet Part (A). This component has been engineered to be lighter, stronger, faster… well ok. Not technically faster. (4 used) But defi nitely makes for a sturdier 425765 that’ s easier to assemble and friendlier to the environment. Page 6 www.sauder.com/service 425765...
- Page 7 Turn four CAM SCREWS (2) into the UPRIGHTS (B and C). å Remember: Flip the UPRIGHTS (B and C) over. Push four HIDDEN å Righty tighty. CAMS (1) into the UPRIGHTS. Lefty loosey. (4 used) Arrow (4 used) 425765 www.sauder.com/service Page 7...
- Page 8 S u r D E N H I D This hole must be here. i t h o f a c S u r D E N H I D Page 8 www.sauder.com/service 425765...
- Page 9 UPRIGHT (B and C). Fasten the UPRIGHTS (B and C) to the TOP (A). Tighten å four HIDDEN CAMS. NOTE: Be sure the WOOD DOWELS in the UPRIGHTS å insert into the TOP. These holes must be here. 425765 www.sauder.com/service Page 9...
- Page 10 Meet Parts (F and G). These components have been engineered to be lighter, stronger, faster… well ok. Not technically faster. But defi nitely makes for a sturdier 425765 that’ s easier to assemble and friendlier to the environment. Arrow (4 used) Page 10 www.sauder.com/service...
- Page 11 Tighten two HIDDEN CAMS. recommended.) NOTE: Be sure the WOOD DOWELS in the RIGHT å UPRIGHT insert into the RIGHT SHELF. S u r f a c i t h H I D D E N 425765 www.sauder.com/service Page 11...
- Page 12 Fasten the END (H) to the TOP (A). Tighten two BLACK å 1-3/16" HEX HEAD SCREWS (10) using the L-WRENCH (6). BLACK 1-7/8" HEX HEAD SCREW BLACK 1-3/16" HEX HEAD SCREW (2 used in this step) (2 used in this step) Page 12 www.sauder.com/service 425765...
- Page 13 å Tighten two HIDDEN CAMS. NOTE: Be sure the WOOD DOWELS in the LEFT å UPRIGHT insert into the LEFT SHELF. D E N H I D i t h f a c S u r 425765 www.sauder.com/service Page 13...
- Page 14 Fasten the END (H) to the TOP (A). Tighten two BLACK å 1-3/16" HEX HEAD SCREWS (10) using the L-WRENCH (6). BLACK 1-7/8" HEX HEAD SCREW BLACK 1-3/16" HEX HEAD SCREW (2 used in this step) (2 used in this step) Page 14 www.sauder.com/service 425765...
- Page 15 å BLACK 1/2" PAN HEAD SCREWS (12). Push the GROMMET (5) into the hole in the BACK (D). å Metal grate is further from this edge. BLACK 1/2" PAN HEAD SCREW (4 used in this step) 425765 www.sauder.com/service Page 15...
- Page 16 L-WRENCH (6). NOTE: Be sure the WOOD DOWELS in the UPRIGHTS å insert into the BOTTOM. BLACK 1-7/8" HEX HEAD SCREW (4 used in this step) BLACK 2" PAN HEAD SCREW (4 used in this step) Page 16 www.sauder.com/service 425765...
- Page 17 å celebrate! With a nap. four BLACK 1/2" HEX HEAD SCREWS (11) using the L-WRENCH (6). BLACK 1/2" HEX HEAD SCREW (4 used for the FEET) BLACK 1/2" PAN HEAD SCREW (4 used in this step) 425765 www.sauder.com/service Page 17...
- Page 18 NOTE: Please read the back pages of the instruction booklet for important safety information. å This completes assembly. Clean with a damp cloth. Wipe dry. å And to celebrate, why not share your success story at sauder.com or To cover HIDDEN CAMS 70 lbs. 31,75 kg...
- Page 19 Modèle 425765 Crédence Utilisez les instructions d’ a ssemblage en français avec les NOUS CONTACTER EN PREMIER schémas étape par étape du manuel d’instruction en anglais. AVANT D'EFFECTUER TOUT RETOUR AU MAGASIN. Chaque étape en français correspond à la même étape en Nous faisons de notre mieux pour nous assurer que votre meuble anglais.
- Page 20 ! ÉTAPE 4 • Cette unité Sauder est conçue pour les téléviseurs à écrans plats pesant moins de 31 kg. Ne jamais utiliser avec des téléviseurs plus Insérer deux CHEVILLES EN BOIS (3) dans les bords supérieurs lourds.
- Page 21 EXCENTRIQUE ESCAMOTABLE. MONTANTS dans le DESSOUS. REMARQUE : Prière de lire les informations importantes sur la sécurité fi gurant sur les pages arrière du manuel d’instructions. Ceci complète l'assemblage. Nettoyer avec un tissu humide. Essuyer. 425765 www.sauder.com/service Page 21...
- Page 22 PANEL SUPERIOR ............1 EXCÉNTRICO ESCONDIDO .......8 su referencia futura. Si necesita ponerse en PARAL IZQUIERDO .............1 BIELA DE EXCÉNTRICO ........8 contacto con Sauder en PARAL DERECHO ............1 PASADOR DE MADERA ........16 cuanto a esta unidad, DORSO .................1 ESPIGA DEL ESTANTE ...........4 refi...
- Page 23 PASO 4 abajo - antes de comenzar el ensamblaje! • Esta unidad Sauder está diseñada para ser usada con Inserte dos PASADORES DE MADERA (3) entre los bordes televisores de panel plano cuyo peso sea inferior a 31 Kg. Nunca superiores de cada PARAL (B y C).
- Page 24 LLAVE EN L (6). Esto completa el ensamblaje. Limpiar con un trapo húmedo. NOTA: Asegúrese de que los PASADORES DE MADERA en los Seque con un paño. PARALES se inserten en el FONDO. Page 24 www.sauder.com/service 425765...
- Page 25 TOUJOURS décharger les tablettes et les tiroirs, en commençant par les surface supérieures, avant de déplacer le meuble. NE JAMAIS pousser ou tirer un meuble sur de la moquette. Demander à une autre personne de le soulever correctement pour le déplacer et/ou le repositionner. 425765 www.sauder.com/service Page 25...
- Page 26 SIEMPRE descargue los estantes y cajones, empezando con las superfi cies superiores, antes de moverlo. NUNCA empuje ni tire de los muebles sobre una alfombra. Obtenga que un amigo le ayude a levantarlo correctamente para moverlo y/o reposicionarlo. Page 26 www.sauder.com/service 425765...
- Page 27 à compter de la date d'achat la première fois et qui sont signalés à Sauder dans les limites de couverture de la contre tout défaut de matériaux ou de fabrication des composantes de mobilier Sauder.
- Page 28 BEFORE MAKING ANY RETURNS TO THE RETAILER. Dear Valued Customer: So, how did it go? Thanks so much for choosing Sauder® furniture. I hope the Set a world record for speed? purchase and assembly process was a positive experience Feeling good about yourself? and you feel good about the furniture you just built.