Publicité

Les langues disponibles

Les langues disponibles

Liens rapides

Stand fan
User Manual
EFS6000B
EN

Publicité

Table des Matières
loading

Sommaire des Matières pour Beko EFS6000B

  • Page 1 Stand fan User Manual EFS6000B...
  • Page 2 Please read this user manual first! Dear Customer, Thank you for preferring a Beko product. We hope that you get the best results from your product which has been manufactured with high quality and state-of- the-art technology. Therefore, please read this entire user manual and all other accompanying documents carefully before using the product and keep it as a reference for future use.
  • Page 3: Table Des Matières

    CONTENTS 1 Safety instructions 2 Installation instructions 2.1 Name of components ................6 3 Instructions for use 3.1 Instructions for key of remote controller .
  • Page 4: Safety Instructions

    Safety instructions Warning Read rules for safe operation and instructions carefully. •If the supply cord is damaged, it must be replaced by manufacturer or its service agent or a similarly qualified person in order to avoid a hazard. •To protect against the risk of electrical shock, do not immerse the unit, cord or plug in water or other liquid.
  • Page 5 Safety instructions Rules for safe operation •Never insert fingers, pencils, or any other object through the grille when fan is running. •Disconnect fan when moving from one location to another. •Be sure fan is on a stable surface when operating to avoid overturning.
  • Page 6: Installation Instructions

    Installation instructions 2.1 Name of components Install by aligning Base installation Align the column with the groove on the base and fix them together using a right-angle bolt. 1. Motor shaft 5. Right-angle bolt 2. Rear grill 6. Tighten knob 3.
  • Page 7 Installation instructions Front and rear guard installation Align catch of the front guard with the Press guards sequentially with both Self-catch installation illustrated position of the rear guard. hands. 1. Front grill 2. Lock nut of blade • L ock nut of blade anticlockwise, and then install the front fan cover. 3.
  • Page 8: Instructions For Use

    Instructions for use 3.1 Instructions for key of remote controller 1. “On/Off” key 4. “OSC” key 2. “Timer” key 5. “Speed” key 3. “Mode” key 6. Battery Considerate hint: Effective range of remote control: within 5 m distance and 30-degree deflection in front of product.
  • Page 9: Instructions For Display Of Body

    Instructions for use 3.2 Instructions for display of body 1. Mode display 2. Smart display 3. Oscillating display 4. Pre-set/timer display 5. Speed display 3.3 Instructions for operation of body Tilt adjustment Manual Body key Height adjustment Turn counterclockwise and loosen for performing height adjustment.
  • Page 10: Other

    Other 4.1 Maintenance instruction The fan requires little maintenance. Do not try to fix it by yourself. Refer it to qualified service personnel if service is needed. 1. Before cleaning and assembling, fan must be unplugged. 2. To ensure adequate air circulation to the motor, keep vents at the rear of the motor free of dust. Do not disassemble the fan to remove dust.
  • Page 11 Note: Do not dispose of electrical appliances as unsorted municipal waste, use separate collection facilities. Contact your local government for information regarding the collection systems available. If electrical appliances are disposed of in landfills or dumps, hazardous substances can leak into the groundwater and get into the food chain, damaging your health and well-being.
  • Page 12 www.beko.com...
  • Page 13 Ventilateur sur pied Manuel de l’utilisateur EFS6000B...
  • Page 14 ! Cher client, Nous vous remercions d’avoir choisi un produit Beko. Nous espérons que notre produit, fabriqué avec une technologie de qualité supérieure et de dernière génération, satisfera vos attentes. Par conséquent, veuillez lire attentivement ce manuel ainsi que tous les autres documents y afférents avant l’utilisation du produit.
  • Page 15 Tables des matières 1 Consignes de sécurité 2 Instructions d’installation 2.1 Noms des composants ................6 3 Instructions d’utilisation 3.1 Instructions relatives aux touches de la télécommande.
  • Page 16: Consignes De Sécurité

    Consignes de sécurité Avertissement Veuillez lire attentivement les instructions et consignes de sécurité. •Si le cordon d’alimentation est endommagé, il doit être remplacé par le constructeur, une personne mandatée pour faire le SAV ou toute autre personne qualifiée afin d’éviter toute mise en danger. •Ne jamais immerger l’unité, le cordon ou la fiche dans de l’eau ni dans tout autre liquide afin d’éviter tout risque d’électrocution.
  • Page 17 Consignes de sécurité Consignes de sécurité •Ne tentez jamais d’introduire vos doigts, un crayon ou tout autre objet à travers la grille lorsque le ventilateur est en marche. •Débranchez le ventilateur lorsque vous le déplacez d’un endroit à un autre. •Assurez-vous que le ventilateur est placé...
  • Page 18: Instructions D'installation

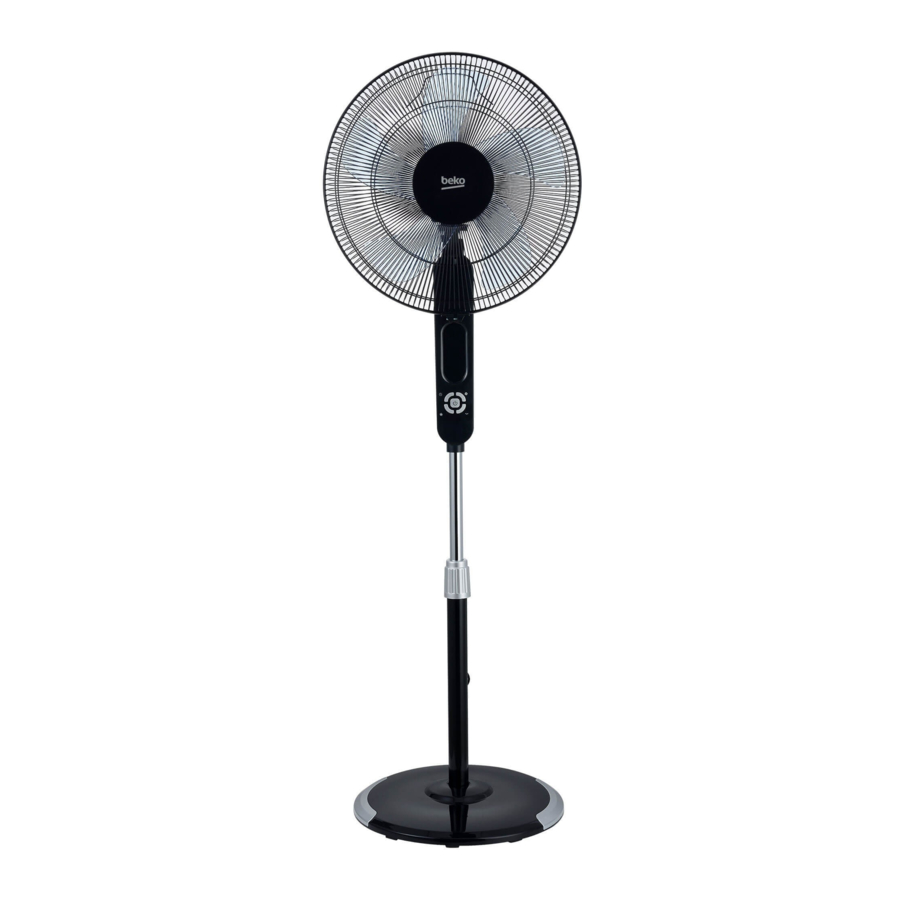
    Instructions d’installation 2.1 Noms des composants Aligner pour l’installation Installation du socle Positionner le pied dans l’orifice du socle, puis les fixer ensemble à l’aide d’un boulon en forme de L. 1. Axe du moteur 5. Boulon en forme de L 2.
  • Page 19 Instructions d’installation Installation des grilles de protection avant et arrière Illustration de l’alignement de l’ergot de la Appuyer avec les mains sur la grille Installation à fixation auto- grille avant avec la grille arrière. de protection en respectant l’ordre déformante indiqué.
  • Page 20: Instructions D'utilisation

    Instructions d’utilisation 3.1 Instructions relatives aux touches de la télécommande 1. Touche « Marche/Arrêt » 4. Touche « Oscillation » 2. Touche « Minuterie » 5. Touche « Vitesse » 3. Touche « Mode » 6. Pile Remarque bienveillante : Portée effective de la télécommande : jusqu’à...
  • Page 21: Instructions Relatives À L'affichage Sur Le Ventilateur

    Instructions d’utilisation 3.2 Instructions relatives à l’affichage sur le ventilateur 1. Voyant du mode 2. Affichage intelligent 3. Voyant de l’oscillation 4. Voyant de la programmation/ minuterie 5. Voyant de la vitesse 3.3 Instructions relatives au fonctionnement du rafraîchisseur d’air Réglage de l’inclinaison Manuel Touches du ventilateur...
  • Page 22: Autres Instructions

    Autres instructions 4.1 Consignes d’entretien Ce ventilateur exige peu d’entretien. N’essayez pas de le réparer par vous-même. Si une réparation est nécessaire, veuillez contacter un technicien qualifié. 1. Débranchez le ventilateur avant son nettoyage et/ou son montage. 2. Empêchez la poussière de s’accumuler à l’arrière de l’appareil, afin de garantir une bonne circulation de l’air vers le moteur.
  • Page 23 Remarque : Ne jetez pas les appareils électriques avec les déchets ménagers non triés. Déposez-les dans des infrastructures dédiées à la collecte sélective. Contactez votre administration locale pour obtenir des renseignements concernant les systèmes de collecte disponibles. Lorsque des appareils électriques sont jetés dans des décharges, des substances dangereuses peuvent s’infiltrer jusqu’aux eaux souterraines et contaminer la chaîne alimentaire, constituant ainsi un risque pour votre santé...
  • Page 24 www.beko.com...
  • Page 25 Ventilatore a piantana Manuale dell'utente EFS6000B...
  • Page 26 Leggere prima il presente manuale. Gentile Cliente, grazie per aver scelto un prodotto Beko. Ci auguriamo che lei ottenga i migliori risultati dal suo prodotto, realizzato secondo elevati standard di qualità e con una tecnologia all'avanguardia. Pertanto, prima di utilizzare il prodotto, legga attentamente tutto il manuale e tutti i documenti di accompagnamento e li conservi per riferimento futuro.
  • Page 27 SOMMARIO 1 Safety instructions 2 Installation instructions 2.1 Name of components ................6 3 Instructions for use 3.1 Instructions for key of remote controller .
  • Page 28 Istruzioni per la sicurezza Attenzione Leggere attentamente le regole e le istruzioni per il funzionamento sicuro. •Se il cavo di alimentazione è danneggiato, deve essere sostituito dal produttore, dal servizio di assistenza o da personale qualificato al fine di evitare rischi. •Per proteggersi dal rischio di scosse elettriche, non immergere l'unità, il cavo o la spina in acqua o altri liquidi.
  • Page 29 Istruzioni per la sicurezza - Pulire l'involucro del ventilatore e la protezione della ventola con un panno leggermente inumidito. Regole per il funzionamento sicuro •Non inserire mai dita, matite o altri oggetti attraverso la griglia mentre la ventola è in movimento. •Scollegare il ventilatore quando lo si sposta da un luogo a un altro.
  • Page 30 Istruzioni per l'installazione 2.1 Nome dei componenti Installare mediante allineamento Installazione della base Allineare la colonna alla scanalatura sulla base, quindi fissarle insieme utilizzando un dado ad angolo retto. 1. Albero motore 5. Dado ad angolo retto 2. Griglia posteriore 6.
  • Page 31 Istruzioni per l'installazione Installazione della protezione anteriore e posteriore Allineare il fermo della protezione Premere le protezione in modo Installazione del fermo anteriore alla posizione della protezione sequenziale con entrambe le mani. automatico posteriore illustrata. 1. Griglia anteriore 2. Dado di serraggio della griglia • A vvitare in senso antiorario il dado di serraggio della ventola e quindi installare la copertura della ventola anteriore.
  • Page 32 Istruzioni per l'uso 3.1 Istruzioni per il telecomando 1. Tasto “On/Off (Accensione/Spegnimento)” 4. Tasto “OSC (Oscillazione)” 2. Tasto “Timer” 5. Tasto “Speed (Velocità)” 3. Tasto “Mode (Modalità)” 6. Batteria Suggerimenti: Portata utile del telecomando: entro 5 m di distanza e una deviazione di 30° davanti al prodotto.
  • Page 33 Istruzioni per l'uso 3.2 Istruzioni per la visualizzazione del ventilatore 1. Visualizzazione Modalità 2. Visualizzazione modalità Smart 3. Visualizzazione oscillazione 4. Visualizzazione preimpostazione/timer 5. Visualizzazione velocità 3.3 Istruzioni per il funzionamento del ventilatore Regolazione dell' i nclinazione Manuale Tasti ventilatore Regolazione dell' a ltezza Per effettuare la regolazione dell’altezza, girare il ventilatore in senso antiorario e allentarlo.
  • Page 34 Istruzioni supplementari 4.1 Istruzioni per la manutenzione Il ventilatore non richiede particolari attenzioni. Non tentare di riparare il ventilatore da soli. Rivolgersi a personale qualificato se occorre eseguire delle riparazioni. 1. Prima di eseguire pulizia e assemblaggio, il ventilatore deve essere scollegato dall'alimentazione. 2.
  • Page 35 Nota: Non smaltire apparecchiature elettriche come rifiuti indifferenziati, ma servirsi di impianti per la raccolta appositi. Contattare l'ente territoriale preposto per informazioni concernenti i sistemi di raccolta disponibili. Se le apparecchiature elettriche sono smaltite in discariche, le sostanze pericolose possono penetrare nelle falde acquifere ed entrare nella catena alimentare, diventando un pericolo per la salute.
  • Page 36 www.beko.com...
  • Page 37 Standventilator Bedienungsanleitung EFS6000B...
  • Page 38 Lesen Sie zunächst diese Bedienungsanleitung durch! Sehr geehrte Kunden und Kundinnen! Vielen Dank, dass Sie sich für ein Produkt von Beko entschieden haben. Wir hoffen, dass Ihnen dieses Produkt optimalen Nutzen bringen wird. Dieses hochwertige Produkt wurde mit modernster Technologie hergestellt. Lesen Sie die gesamte Bedienungsanleitung und alle anderen Begleitdokumente sorgfältig durch, bevor Sie...
  • Page 39 INHALTSVERZEICHNIS 1 Sicherheitshinweise 2 Installationsanleitungen 2.1 Teileübersicht..................6 3 Gebrauchsanleitungen 3.1 Tasten auf der Fernbedienung .
  • Page 40: Sicherheitshinweise

    Sicherheitshinweise Warnung Lesen Sie die Hinweise für einen sicheren Gebrauch sowie alle Anleitungen sorgfältig durch. •Ein beschädigtes Netzkabel muss vom Hersteller, dessen Kundendienst oder einer ähnlich qualifizierten Fachkraft ersetzt werden, um Gefahrensituationen zu vermeiden. •Um Stromschläge zu vermeiden, dürfen weder das Produkt noch das Kabel oder der Stecker in Wasser oder andere Flüssigkeiten eingetaucht werden.
  • Page 41 Sicherheitshinweise - Wischen Sie das Gehäuse des Gebläses und die Abdeckung des Rotorblatts mit einem leicht angefeuchteten Lappen ab. Anleitungen für den sicheren Gebrauch •Stecken Sie während des Gebrauchs weder Finger noch Stifte oder andere Gegenstände durch die Schutzabdeckung. •Trennen Sie den Ventilator vom Netzstrom, bevor Sie diesen an einen anderen Ort stellen.
  • Page 42: Installationsanleitungen

    Installationsanleitungen 2.1 Teileübersicht Installation durch Ausrichtung Installation des Sockels Richten Sie die Säule mit der Rille am Sockel aus und befestigen Sie die Teile unter Verwendung der rechtwinkligen Schraube. 1. Motorwelle 5. Rechtwinklige Schraube 2. Rückseitiges Schutzgitter 6. Knopf festziehen 3.
  • Page 43 Installationsanleitungen Installation des vorderen und hinteren Schutzgitters Richten Sie die Verriegelung des vorderen Drücken Sie die Schutzgitter mit Installation der Schutzgitters mit der dargestellten beiden Händen zusammen. Selbstverriegelung Position des hinteren Schutzgitters aus. 1. Vorderes Schutzgitter 2. Sicherungsmutter des Flügelblatts • D rehen Sie die Sicherungsmutter des Flügelblatts entgegen dem Uhrzeigersinn und installieren Sie dann das vordere Schutzgitter.
  • Page 44: Gebrauchsanleitungen

    Gebrauchsanleitungen 3.1 Tasten auf der Fernbedienung 1. On/Off (Ein/Aus) 4. „OSC“ 2. Timer (Timer) 5. Speed (Leistung) 3. Mode (Modus) 6. Batterie Hinweis: Effektive Reichweite der Fernbedienung: 5 m und 30 Grad an der Vorderseite des Geräts. 8 / 12 DE Standventilator/Bedienungsanleitung...
  • Page 45: Anleitungen Für Das Display

    Gebrauchsanleitungen 3.2 Anleitungen für das Display 1. Modus 2. Smart-Anzeige 3. Oszillation 4. Voreinstellung/Timer 5. Leistung 3.3 Gebrauchsanleitungen für das Gerät Neigungswinkel einstellen Manuell Gerätetasten Höhe einstellen Entgegen dem Uhrzeigersinn drehen und lösen, um die Höhe einzustellen. Hohenverstellung 9 / 12 DE Standventilator/Bedienungsanleitung...
  • Page 46: Andere Funktionen

    Andere Funktionen 4.1 Wartung Der Ventilator muss nur geringfügig gewartet werden. Reparieren Sie den Ventilator nicht eigenständig. Sofern erforderlich, lassen Sie das Gerät nur von qualifizierten Wartungstechnikern reparieren. 1. Trennen Sie das Gerät vor der Reinigung und Installation vom Netzstrom. 2.
  • Page 47: Entsorgung

    Entsorgung Hinweis: Entsorgen Sie elektrische Geräte nicht über den normalen Hausmüll, sondern getrennt an entsprechenden Sammelstellen. Wenden Sie sich an Ihre Behörde vor Ort, um nähere Informationen über verfügbare Sammelstellen zu erhalten. Falls elektrische Geräte auf Müllhalden oder Deponien entsorgt werden, können gefährliche Substanzen in das Grundwasser und in die Nahrungskette gelangen und dadurch Risiken für die Gesundheit und das Wohlbefinden verursachen.
  • Page 48 www.beko.com...

Table des Matières