Table des Matières
Publicité
Les langues disponibles
Les langues disponibles
Liens rapides
INSTRUCTIONS
FOR USE
MilkSPA™ Breast Milk & Bottle Warmer
Chauffe-biberon
et Chauffe-lait
Maternel MilkSPA
Modèle numéro AC143
Use distilled water only • Utiliser de l'eau distillée seulement • Use solo agua destilada
INSTRUCTIONS
D'UTILISATION
Model Number AC143
Calentador de
Biberones y Leche
Materna MilkSPA™
MC
Número de modelo AC143
INSTRUCCIONES
DE USO
Publicité
Table des Matières

Manuels Connexes pour DrBrowns MilkSPA AC143

Sommaire des Matières pour DrBrowns MilkSPA AC143
- Page 1 INSTRUCTIONS INSTRUCTIONS INSTRUCCIONES FOR USE D’UTILISATION DE USO MilkSPA™ Breast Milk & Bottle Warmer Model Number AC143 Chauffe-biberon Calentador de et Chauffe-lait Biberones y Leche Maternel MilkSPA Materna MilkSPA™ Modèle numéro AC143 Número de modelo AC143 Use distilled water only • Utiliser de l’eau distillée seulement • Use solo agua destilada...
-
Page 2: Important Safety Instructions
READ AND SAVE THESE INSTRUCTIONS Package Contents: Specifications: MilkSPA™ Breast Milk & Bottle Warmer Nominal voltage: 120VAC/60Hz 2x storage caps Instruction Manual WARNING: Read the ENTIRE instruction manual to become familiar with the features of the product before operating. Failure to operate the product correctly can result in damage to the product, personal property and cause serious injury. - Page 3 If the plug does not fit fully into the outlet, reverse the plug. If it still does not fit, contact a qualified electrician. Do not attempt to modify the plug in any way. • Before servicing, unplug cord from wall outlet. Do not leave cord within child’s reach. •...
- Page 4 4. Place vessel into warming chamber as outlined below. BOTTLE: Remove bottle components, fill bottle and add storage cap. Place into warming basket. When warming items that are too large for the basket, warming water may overflow. Remove the basket and insert the item in the warming chamber.
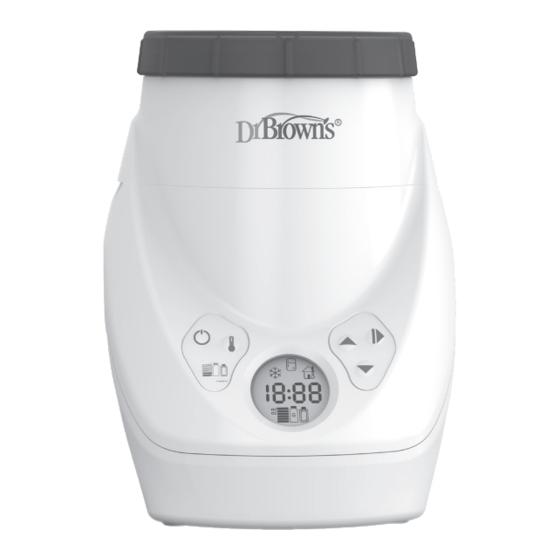
- Page 5 Select the button to choose the temperature condition of the vessel. Room Temperature Refrigerated Frozen Starting Temperature Timer Display Condition Manual Time Adjustment: While in the temperature condition mode, use the UP and DOWN buttons to change the timer setting. Note: The last used warming time is remembered for your next use.
- Page 6 WARMING TIME CHART (continued) THIS TIME CHART IS APPROXIMATE FOR DR. BROWN’S™ VESSEL SIZES. WARMING TIMES WILL VARY DEPENDING ON THE VESSEL MATERIAL, SHAPE AND VOLUME. TEMPERED GLASS HAS BEEN TESTED FOR USE IN THIS WARMER. CAUTION: NEVER FREEZE GLASS CONTAINERS, AS GLASS MAY BREAK. CLEANING THE WARMER CAUTION: Always unplug the appliance and ensure it is cool before cleaning any part.
-
Page 7: Customer Service
WARRANTY This warming appliance is warranted against defective material or workmanship for a period of one year from the date of purchase. Any defective part will be repaired or replaced at no charge if it has not been tampered with and appliance has been used according to these printed instructions. -
Page 8: Consignes De Sécurité Importantes
LIRE ET CONSERVER CES INSTRUCTIONS Contenu de l’emballage : Spécifications : Chauffe-biberon et Chauffe-lait Maternel MilkSPA Tension nominale : 120 V c.a./60 Hz 2 capuchons de rangement Mode d’emploi AVERTISSEMENT : Lisez le mode d’emploi en entier pour vous familiariser avec les fonctions du produit avant de l’utiliser. - Page 9 Si elle ne s’insère toujours pas, contactez un électricien qualifié. Ne tentez pas de modifier la fiche de quelque façon que ce soit. • Avant l’entretien, débranchez le cordon de la prise murale. Ne laissez pas le cordon à la portée de l’enfant.
-
Page 10: Réglage De La Durée De Chauffage
4. Placez le contenant dans la chambre tel que décrit ci-dessous. BIBERON : Retirez les pièces du biberon, remplissez le biberon, puis ajoutez le capuchon de rangement. Placez dans le panier de chauffage. Lorsque des articles trop larges pour le panier sont chauffés, l’eau de chauffage peut déborder. - Page 11 Réglez le bouton pour sélectionner la condition de température du récipient. Congelé Température ambiante Réfrigéré Condition de température Affichage de de démarrage la minuterie Réglage manuel de la durée : En mode condition de température, utilisez les boutons HAUT et BAS pour changer le réglage de la minuterie. Remarque : La dernière durée de chauffage utilisée est mémosée pour l’utilisation suivante.
-
Page 12: Nettoyage Du Chauffe-Biberon
TABLEAU DE DURÉES (suite) CE TABLEAU DE DURÉES EST APPROXIMATIF POUR LES TAILLES DES CONTENANTS DR. BROWN’S™. LES DURÉES DE CHAUFFAGE VARIENT SELON LA TAILLE ET LE VOLUME DU CONTENANT. LE VERRE TREMPÉ A ÉTÉ TESTÉ POUR USAGE DANS CE CHAUFFE-BIBERON. MISE EN GARDE : NE CONGELEZ JAMAIS LES CONTENANTS EN VERRE, CAR LE VERRE RISQUERAIT DE SE BRISER. -
Page 13: Dépannage
DÉPANNAGE Si le chauffe-liquide ne fonctionne pas, assurez-vous que : 1. Le cordon d’alimentation est branché dans la prise électrique. 2. L’eau atteint le niveau approprié. 3. L’appareil est assemblé correctement. 4. Si l’afficheur indique le message d’erreur « H20ERR », le chauffe-biberon peut être vide ou ne pas contenir assez d’eau. -
Page 14: Instrucciones De Seguridad Importantes
READ AND SAVE THESE INSTRUCTIONS Contenido del paquete: Especificaciones: Calentador de Biberones y Leche Materna MilkSPA™ Voltaje nominal: 120 V CA/60 Hz Guía Rápida 2 tapas para almacenamiento Manual de instrucciones ADVERTENCIA: Lea el manual de instrucciones COMPLETO para conocer las características del producto antes de ponerlo a funcionar. - Page 15 de corriente, dé vuelta al enchufe. Si continúa sin entrar, comuníquese con un electricista calificado. No intente modificar el enchufe de ninguna forma.Before servicing, unplug cord from wall outlet. Do not leave cord within child’s reach. • Antes de servir, desenchufe el cable de la toma de corriente en la pared. No deje el cable al alcance del niño.
- Page 16 4. Coloque el envase en la cámara de calentamiento como se describe a continuación. BIBERÓN: Retire los componentes del biberón, llene el biberón y coloque la tapa para almacenamiento. Coloque en la cesta del calentador. Cuando caliente objetos que sean demasiado grandes para la cesta, el agua caliente se puede desbordar.
- Page 17 Seleccione el botón para elegir la condición de temperatura del envase. Temperatura Ambiente Refrigerado Congelado Condición de Temperatura Monitor del de Inicio Temporizador Ajuste Manual del Tiempo: Estando en el modo de condición de temperatura, use los botones ARRIBA y ABAJO para cambiar la selección del temporizador. Nota: El tiempo de calentamiento que se usó...
- Page 18 TABLA DE TIEMPO DE CALENTAMIENTO (continuación) ESTA TABLA DE TIEMPOS ES APROXIMADA PARA LOS TAMAÑOS DE ENVASES DR. BROWN’S™. LOS TIEMPOS DE CALENTAMIENTO VARIARÁN DEPENDIENDO DE LA FORMA Y EL VOLUMEN DEL ENVASE. EL USO DE VIDRIO TEMPLADO HA SIDO PROBADO EN ESTE CALENTADOR. PRECAUCIÓN: NUNCA CONGELE LOS ENVASES DE VIDRIO, YA QUE SE PUEDEN ROMPER.
-
Page 19: Solución De Problemas
SOLUCIÓN DE PROBLEMAS Si el calentador no funciona, compruebe lo siguiente: 1. El cable de corriente está conectado a la toma de corriente. 2. Está lleno de agua hasta el nivel correcto. 3. La unidad está armada correctamente. 4. Si la pantalla muestra el error “H20ERR, ” puede que el calentador no tenga o tenga poca agua. - Page 20 WSP001...