Delta 1177LF Serie Mode D'emploi
®
ASM A112.18.1 /
B125.1
/
A117.1
Model/Modelo/Modèle
1177LF Series/Series/Seria
Write purchased model number here.
Escriba aquí el número del modelo comprado.
Inscrivez le numéro de modèle ici.
You may need / Usted puede necesitar / Articles dont vous pouvez avoir besoin:
For easy installation of your Delta
faucet you will need:
To READ ALL the instructions completely
before beginning.
To READ ALL warnings, care, and maintenance
information.
To purchase the correct water supply hook-up.
Para instalación fácil de su llave Delta
usted necesitará:
LEER TODAS las instrucciones completamente
antes de empezar.
LEER TODOS los avisos, cuidados, e
información de mantenimiento.
omprar las conexiones correctas para el
suministro de agua.
Pour installer votre robinet Delta
facilement, vous devez:
LIRE TOUTES les instructions avant de débuter;
LIRE TOUS les avertissements ainsi que toutes
les instructions de nettoyage et d'entretien;
• Acheter le bon nécessaire de raccordement.
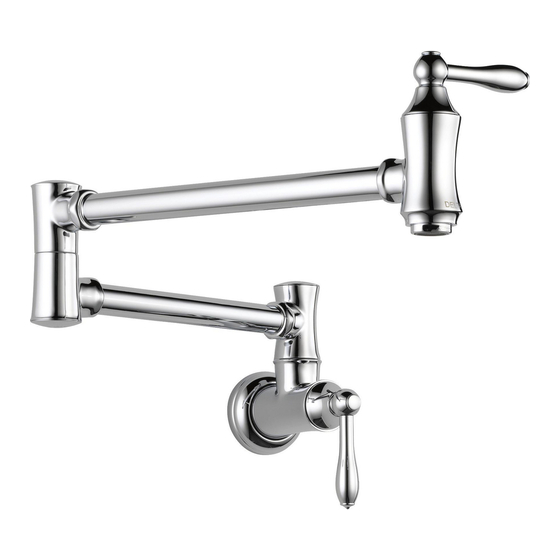
WALL MOUNTED POT FILLER FAUCETS
66323
LLAVES DE AGUA(GRIFOS) EXTENDIBLES, DE INSTALACI N EN
LA PARED, PARA LLENAR OLLAS
ROBINETS MONTÉS AU MUR POUR REMPLISSAGE DE MARMITES
66323
1
Ó
9/16/2011 Rev. B
Table des Matières

Manuels Connexes pour Delta 1177LF Serie


Sommaire des Matières pour Delta 1177LF Serie
- Page 1 To READ ALL warnings, care, and maintenance information. To purchase the correct water supply hook-up. Para instalación fácil de su llave Delta usted necesitará: LEER TODAS las instrucciones completamente antes de empezar. LEER TODOS los avisos, cuidados, e información de mantenimiento.
- Page 2 1/2" (13 mm) 1/2 po (13 mm) WARNING: Connect to Cold Water Only. AVISO: Conecte Sólo al Agua Fría. AVERTISSEMENT : Ne raccordez qu’à la conduite d’alimentation d’eau froide seulement. Wall Mount Models Use of stringers is recommended for a secure mounting. Connect to 1/2"...
- Page 3 Wrap plumber tape (1) around pipe threads. Install the gasket (2) and Tighten set screw in flange (1). Slide flange trim (2) over the wall flange. the flange (3) using the 4 screws (and anchors if required) provided. Place flange trim (1) onto the faucet as shown. Thread faucet onto pipe.
-
Page 4: Purgez L'installation
Flush Your System Remove aerator (1) and turn faucet handles (2) to the full on position. Turn on cold water supplies and flush water lines for one minute. Important: This flushes away any debris that could cause damage to internal parts. Check all connections at arrow for leaks. -
Page 5: Entretien
Maintenance If faucet leaks out of spout or handle - Replace valve cartridge (1). If faucet exhibits very low flow - Remove and clean aerator (3). Remove button, screw, handle and base (2). Unscrew and replace valve cartridge, 19 mm hex. Assemble in reverse order. Line up handles with. valves in closed position before pushing handles into place. -
Page 6: Cleaning And Care
MAKE ANY OTHER WARRANTY OF ANY KIND, INCLUDING THE IMPLIED WARRANTY OF MERCHANTABILITY. Delta will replace, FREE OF CHARGE, during the warranty period, any part or finish that proves defective in material and/or workmanship under normal installation, use and service. Replacement This warranty excludes all industrial, commercial &...