Netvue Sentry Plus Guide Rapide
Table des Matières
Liens rapides
Table des Matières

Manuels Connexes pour Netvue Sentry Plus


Sommaire des Matières pour Netvue Sentry Plus
- Page 1 Sentry Plus Quick Guide...
- Page 3 Warning This equipment has been tested and found to comply with the limits for a Class B digital device, pursuant to Part 15 of the FCC Rules. These limits are designed to provide reasonable protection against harmful interference when the equipment is operated in a commercial environment.
-
Page 4: Table Des Matières
Solar Lite Structure Insert Micro SD Card Battery Charging How To Turn On & Off The Camera 9-10 Read Before Setting Up 11-12 Set Up With Netvue App Installation 14-26 Status Light 27-28 Solar Lite Parameter 29-30 Netvue Protect Plan... - Page 5 Cómo encender y apagar la cámara 9-10 Leer antes de configurar 11-12 Configurar con la aplicación Netvue Instalación 14-26 Luz de estado 27-28 Parámetro solar ligero 29-30 Plan de protección de Netvue 31-32 Tienda de habilidades de IA de Netvue 33-35 Preguntas frecuentes...
- Page 6 Batteria in carica Come accendere e spegnere la fotocamera 9-10 Leggere prima di configurare 11-12 Configura con l'app Netvue Installazione 14-26 Spia di stato 27-28 Parametro Solar Lite 29-30 31-32 Piano Netvue Protect Negozio di abilità IA Netvue 33-35 Domande frequenti...
-
Page 7: What's In The Box
Ancore (Lunghe) USB Power Cable Sentry Plus Drilling Template USB-Stromkabel Sentry Plus Bohrschablone Câble d'alimentation USB Gabarit de perçage Sentry Plus Cable de alimentación USB Plantilla de perforación Sentry Plus Sentry Plus Cavo di alimentazione USB Modello di perforazione Sentry Plus... - Page 8 Solar Lite Drilling Template Solar Lite Mounting Screws (Short) Solar Lite Bohrschablone Solar Lite Befestigungsschrauben (Kurz) Gabarit de perçage Solar Lite Vis de montage Solar Lite (Court) Plantilla de perforación Solar Lite Tornillos de montaje Solar Lite (Corto) Modello di perforazione Solar Lite Viti di montaggio Solar Lite (Corto) Solar Lite Anchors (Short)
-
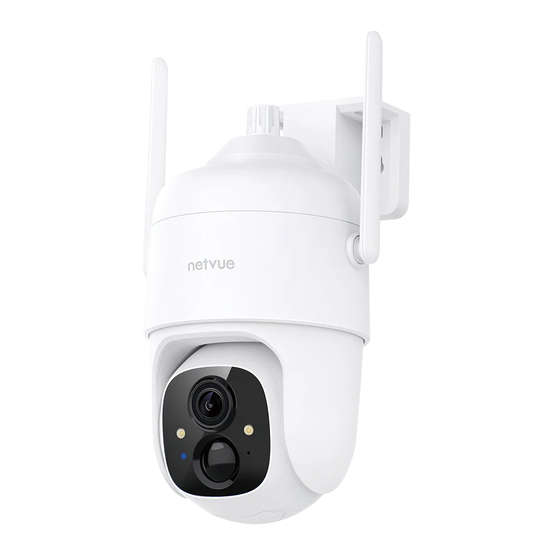
Page 9: Camera Structure
Camera Structure Antenna Antenne Antenne Antena Antenna Lens Linse Lentille Power Port Lente Stromanschluss Lente Port d'alimentation Puerto de alimentación Spot Light Porta di alimentazione Spot-Licht Infrared Light Projecteur Infrarotlicht Destacar Lumière infrarouge Riflettore Luz infrarroja Status Light Luce infrarossa Statusleuchte Microphone Voyant d'état... -
Page 10: Solar Lite Structure
Solar Lite Structure Drainage Hole Entwässerungsloch Trou de drainage Trou de drainage Foro di drenaggio Screw Hole Schraubenloch Trou de vis Orificio del tornillo Foro per vite 3M USB Cable 3M USB-Kabel Câble USB 3M Cable USB de 3M Cavo USB 3M... -
Page 11: Insert Micro Sd Card
Insert Micro SD Card Sentry Plus comes with a built-in card slot which supports up to 128GB Micro SD card. Sentry Plus verfügt über einen integrierten Kartensteckplatz, der bis zu 128 GB Micro-SD-Karte unterstützt. Sentry Plus est livré avec un emplacement pour carte intégré qui prend en charge jusqu'à... - Page 12 Schritt 1: Halten Sie die Kamera auf den Kopf. Schritt 2: Öffnen Sie den oberen Silikonstopfen. Legen Sie die Micro-SD-Karte ein. Achten Sie darauf, es in die richtige Richtung zu stecken. Schritt 3: Zum Schluss den Silikonstopfen abdecken. Étape 1: Tenez l'appareil photo à l'envers. Étape 2: Ouvrez le bouchon supérieur en silicone.
-
Page 13: Battery Charging
Battery Charging The batteries inside the camera are not fully charged according to the transportation safety regulations. Please fully charge the camera before using it. Please charge the batteries with provided USB Port Cable (DC5V / 1.5A adapter not included). The status light will be solid yellow when charging, and will turn to solid green when it is fully charged. - Page 14 Les batteries à l'intérieur de l'appareil photo ne sont pas complètement chargées conformément aux règles de sécurité relatives au transport. Veuillez charger complètement l'appareil photo avant de l'utiliser. Veuillez charger les batteries avec le câble de port USB fourni (adaptateur DC5V / 1.5A non inclus). Le voyant d'état sera en jaune fixe lors de la charge et deviendra vert fixe lorsqu'il sera complètement chargé.
-
Page 15: How To Turn On & Off The Camera
How To Turn On & Off The Camera Press To turn on the camera: Long press the power button for 3s to turn on the camera. Then the Status Light in the front of the camera will be solid blue. To turn off the camera: Long press the power button for 3s to turn off the camera. - Page 16 Pour allumer la caméra : Appuyez longuement sur le bouton d'alimentation pendant 3 secondes pour allumer l'appareil photo. Ensuite, le voyant d'état à l'avant de la caméra sera bleu fixe. Pour éteindre la caméra : Appuyez longuement sur le bouton d'alimentation pendant 3 secondes pour éteindre l'appareil photo.
-
Page 17: Read Before Setting Up
3. Vermeiden Sie es, das Gerät hinter Möbeln oder in der Nähe von Mikrowellenprodukten zu platzieren. Versuchen Sie, es in Reichweite Ihres Wi-Fi-Signals zu halten. 1. Gardez Sentry Plus et tous les accessoires hors de portée des enfants et des animaux domestiques. 2. Assurez-vous que la caméra a été complètement chargée (DC5V / 1.5A). - Page 18 3. Évitez de placer l'appareil derrière des meubles ou à proximité de produits micro-ondes. Essayez de le garder à portée de votre signal Wi-Fi. 1. Mantenga Sentry Plus y todos los accesorios fuera del alcance de los niños y las mascotas. 2. Asegúrese de que la cámara esté completamente cargada (DC5V / 1.5A).
-
Page 19: Set Up With Netvue App
Download Netvue App from App Store or Google Play. Follow the in-app instruction to complete the entire set up process. Laden Sie die Netvue-App aus dem App Store oder Google Play herunter. Befolgen Sie die Anweisungen in der App, um den gesamten Einrichtungsprozess abzuschließen. -
Page 20: Installation
Sicht nicht blockiert ist, und stellen Sie sicher, dass sie sich innerhalb der Reichweite des Wi-Fi-Netzwerks befindet. Vérifiez les éléments suivants avant de percer des trous sur votre mur: Sentry Plus a été ajouté avec succès à votre application Netvue et est capable de diffuser des vidéos. - Page 21 Wall Installation: Wandinstallation: Installation murale : Instalación en la pared: Installazione a parete:...
- Page 22 1. Use the provided drilling template to mark the position of holes on your wall. Use drill bit (15/64", 6mm) to drill two holes. 2. Install anchors to fix the screws. 3. Hold the Sentry Plus Bracket aiming at the two holes. Install the Sentry Plus Bracket on your wall with the screws provided. Schritt 1: 1.
- Page 23 Schritt 2: Halten Sie die Sentry Plus Zentrierung unter das Loch in der Halterung. Halten Sie den Halterung- sanschluss fest und drehen Sie ihn in das Loch, um die Halterung und Sentry Plus zu verbinden. Étape 2: Tenez le centrage Sentry Plus sous le trou du support. Tenez le connecteur de support et tournez-le dans le trou pour connecter le support et Sentry Plus.
- Page 24 Roof Installation: Dachinstallation: Pose du toit: Instalación de techo: Installazione sul tetto:...
- Page 25 1. Use the provided drilling template to mark the position of holes on your wall. Use drill bit (15/64", 6mm) to drill two holes. 2. Install anchors to fix the screws. 3. Hold the Sentry Plus Bracket aiming at the two holes. Install the Sentry Plus Bracket on your roof with the screws provided. Schritt 1: 1.
- Page 26 Schritt 2: Halten Sie die Sentry Plus Zentrierung unter das Loch in der Halterung. Halten Sie den Halterung- sanschluss fest und drehen Sie ihn in das Loch, um die Halterung und Sentry Plus zu verbinden. Étape 2: Tenez le centrage Sentry Plus sous le trou du support. Tenez le connecteur de support et tournez-le dans le trou pour connecter le support et Sentry Plus.
- Page 27 Install with Solar Lite Step 1: Find a good installation point and install the Solar Lite in a sunny location. Schritt 1: Suchen Sie sich einen guten Installationsort und installieren Sie den Solar Lite an einem sonnigen Standort. Étape 1: Trouvez un bon point d'installation et installez le Solar Lite dans un endroit ensoleillé.
- Page 29 Step 2: 1. Use the provided drilling template to mark the position of holes on your wall. Use drill bit (15/64", 6mm) to drill three holes. 2. Install anchors to fix the Mounting Screws. 3. Install the Solar Lite Bracket on your wall with the screws provided. Schritt 2: 1.
- Page 30 Step 3: Align the bracket screw with the screw hole on the back of the Solar Lite, and then turn it clockwise to tighten it. Schritt 3: Richten Sie die Halterungsschraube mit dem Schraubenloch auf der Rückseite des Solar Lite aus und drehen Sie sie dann im Uhrzeigersinn, um sie festzuziehen.
- Page 31 Step 4: Adjust the suitable angle of Solar Lite, and then rotate the Screw Cap on the universal joint clockwise to connect the solar lite with the bracket base. Schritt 4: Stellen Sie den geeigneten Winkel von Solar Lite ein und drehen Sie dann die Schraubkappe am Universalgelenk im Uhrzeigersinn, um das Solar Lite mit der Halterungsbasis zu verbinden.
- Page 32 Step 5: Connect the 3M USB cable to the device to charge Sentry Plus. Schritt 5: Schließen Sie das 3M USB-Kabel an das Gerät an, um Sentry Plus aufzuladen. Étape 5: Connectez le câble USB 3M à l'appareil pour charger Sentry Plus.
-
Page 33: Status Light
Status Light This camera uses status light to communicate. Diese Kamera verwendet die Statusanzeige zur Kommunikation. Cette caméra utilise un voyant d'état pour communiquer. Esta cámara utiliza luz de estado para comunicarse. Questa fotocamera utilizza la spia di stato per comunicare. Status Light Description Blue Light... - Page 34 Voyant d'état La description Lumière bleue En ligne Rien Hors ligne Lumière jaune Mode de charge Lumière verte Mode complètement chargé Lumière rouge Batterie à plat Luz de estado Descripción Luz azul En línea Ninguna Desconectado Luz amarilla Modo de carga Luz verde Modo completamente cargado Luz roja...
-
Page 35: Solar Lite Parameter
Solar Lite Parameter Solar Material: MONO Number of Cells: 24PCS Max Power Current: 500mA(+5%) Cell Efficiency: >19.5% Max Power Voltage: 6V(+5%) Max Power: 3W(+5%) Working Temperature: -20°C ~ 60°C Warranty: 1 years Solarmaterial: MONO Anzahl der Zellen: 24PCS Max. Strom: 500mA(+5%) Zelleffizienz: >19.5% Max. - Page 36 Matériel solaire: MONO Nombre de cellules: 24PCS Courant de puissance max: 500mA(+5%) Efficacité cellulaire: >19,5 % Tension d'alimentation maximale: 6 V(+5 %) Puissance maximale: 3W(+5%) Température de fonctionnement: -20°C ~ 60°C Garantie: 1 ans Material solar: MONO Número de celdas: 24 piezas Corriente de potencia máxima: 500 mA(+5%) Eficiencia celular:>19,5% Voltaje de potencia máximo: 6 V(+5%) Potencia máxima: 3W(+5%)
- Page 37 Netvue Protect Plan Netvue Protect Plan provides optional advanced features for those with higher security needs, and each plan supports multiple devices. Event Video Recording: It automatically records a video clip, not just several still pictures, and push it to your phone instantly, keeping you always stay in the know anywhere, anytime.
- Page 38 Obtenga más información en my.netvue.com. Netvue Protect Plan offre funzionalità avanzate opzionali per chi ha esigenze di sicurezza più elevate e ogni piano supporta più dispositivi. Registrazione video di eventi: Registra automaticamente un video clip, non solo diverse immagini fisse, e lo invia immediatamente al telefono, tenendoti sempre...
- Page 39 Indoor Detection: Detect, recognize, and label the events happening at home including pets, and humans on the Netvue App. Learn more on my.netvue.com. Der Netvue AI Skills Store ist der weltweit erste Markt für künstliche Intelligenz, der von Netvue in der Verbraucherbranche für Smart-Home-Kameras eingerichtet wurde. Hier sind einige kürzlich eingeführte KI-Fähigkeiten: Personenerkennung: Es verwendet maschinelles Lernen, um Personen in Ihrem Netvue-Video genau zu identifizieren, und sendet Ihnen spezifische menschliche Warnungen, wenn ein Mensch...
- Page 40 Haustiere und Menschen, in der Netvue-App. Erfahren Sie mehr auf my.netvue.com. Le Netvue AI Skills Store est le premier marché mondial de compétences en intelligence artificielle créé par Netvue dans le secteur des caméras domestiques intelligentes. Voici quelques compétences d'IA de lancement récent: Détection humaine: Il utilise l'apprentissage automatique pour identifier avec précision les...
- Page 41 Netvue. Obtenga más información en my.netvue.com. Netvue AI Skills Store è il primo mercato al mondo di abilità di intelligenza artificiale creato da Netvue nel settore consumer delle telecamere per la casa intelligente. Ecco alcune abilità AI di recente lancio: Rilevamento umano: Utilizza l'apprendimento automatico per identificare con precisione le...
-
Page 42: Frequently Asked Questions
Frequently Asked Questions Q1: Will the camera show red lights when night vision is activated? A1: The built-in infrared lamp beads make the camera only show some dim red lights when night vision is activated, but the image quality is still clear under no light environment. -
Page 43: Häufig Gestellte Fragen
Häufig gestellte Fragen F1: Zeigt die Kamera rote Lichter an, wenn die Nachtsicht aktiviert ist? A1: Die eingebauten Infrarotlampenperlen sorgen dafür, dass die Kamera bei aktivierter Nachtsicht nur schwache rote Lichter zeigt, aber die Bildqualität ist auch ohne Lichtumgebung klar. F2: Was sind die Anforderungen für Wi-Fi? A2: Bitte verwenden Sie ein 2,4-GHz-WLAN. -
Page 44: Questions Fréquemment Posées
Questions fréquemment posées Q1: La caméra affichera-t-elle des lumières rouges lorsque la vision nocturne est activée? R1: Les perles de lampe infrarouge intégrées font que la caméra n'affiche que des lumières rouges tamisées lorsque la vision nocturne est activée, mais la qualité de l'image est toujours claire dans un environnement sans lumière. -
Page 45: Preguntas Frecuentes
Preguntas frecuentes P1: ¿La cámara mostrará luces rojas cuando se active la visión nocturna? R1: Las perlas de la lámpara infrarroja incorporadas hacen que la cámara solo muestre algunas luces rojas tenues cuando se activa la visión nocturna, pero la calidad de la imagen sigue siendo clara en un entorno sin luz. -
Page 46: Domande Frequenti
Domande frequenti D1: La fotocamera mostrerà luci rosse quando è attivata la visione notturna? R1: Le sfere della lampada a infrarossi integrate fanno sì che la fotocamera mostri solo alcune luci rosse soffuse quando la visione notturna è attivata, ma la qualità... - Page 48 Feel free to contact us for additional help: Netvue Web Client @NetvueTech Netvue Inc @NetvueTech support@netvue.com @netvuetech Netvue Netvue Forum in-App Chat 1(866)749-0567 netvue.com/community netvue.com 240 W Whitter Blvd Ste A, La Habra, CA 90631 © Netvue Inc.