Table des Matières
Publicité
Les langues disponibles
Les langues disponibles
Liens rapides
Publicité
Chapitres
Table des Matières
Dépannage

Manuels Connexes pour TechniSat AUDIOMASTER MR3

Sommaire des Matières pour TechniSat AUDIOMASTER MR3
- Page 1 Bedienungsanleitung AUDIOMASTER MR3 3 x 30 W Wireless-3D-Lautsprecher...
-
Page 2: Abbildungen
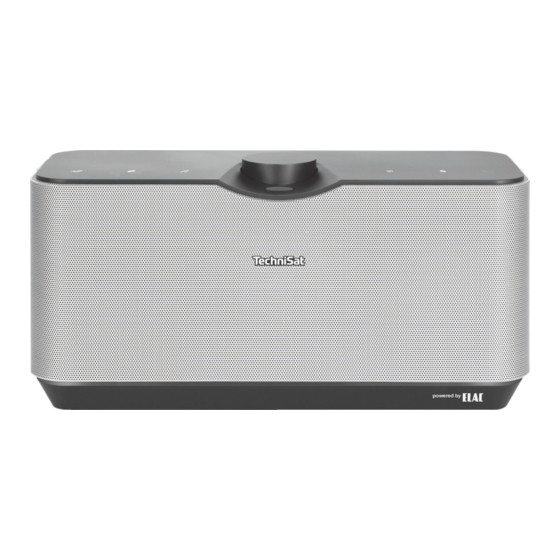
1 Abbildungen Geräteoberseite Internetradio-Symbol Spotify-Symbol Musik abspielen-Symol Ein/Standby/Lautstärke laut/leiser-Drehknopf MODE Quellenauswahl AUX IN externer Eingang-Symbol Bluetooth-Symbol Ein/Standby-Statusanzeige... - Page 3 Anschlüsse der Geräterückseite 11 AUX IN-Buchse 12 Netzteil Anschlussbuchse 13 LAN-Buchse...
-
Page 4: Table Des Matières
Die besonderen Eigenschaften des AUDIOMASTER MR3 ........ - Page 5 7.2.1 Quellenwahl ..................24 7.2.2 Ansichten .
-
Page 6: Vorwort
3 Vorwort Diese Bedienungsanleitung hilft Ihnen beim bestimmungsgemäßen und sicheren Gebrauch Ihres Lautsprecher- Systems, im folgenden auch Gerät genannt. 3.1 Die Zielgruppe dieser Bedienungsanleitung Die Bedienungsanleitung richtet sich an jede Person, die das Gerät aufstellt, bedient, reinigt oder entsorgt. 3.1.1 Bestimmungsgemäßer Gebrauch Das Gerät ist für den Empfang von Internet Radio, sowie der Audiowiedergabe von UPnP Quellen, Spotify Connect, Bluetooth oder über den Audioeingang entwickelt. -
Page 7: Sicherheit
3.2.1 Sicherheit Zu Ihrem Schutz müssen Sie die Sicherheitsvorkehrungen sorgfältig durchlesen, bevor Sie Ihr neues Gerät in Betrieb nehmen. Der Hersteller übernimmt keine Haftung für Schäden, die durch unsachgemäße Handhabung und durch Nichteinhaltung der Sicherheitsvorkehrungen entstanden sind. Öffnen Sie niemals das Gerät! Das Berühren Spannung führender Teile ist lebensgefährlich! Ein eventuell notwendiger Eingriff darf nur von geschultem Personal vorgenommen werden. - Page 8 Versuchen Sie niemals, das Gerät mit einer anderen Spannung zu betreiben. Das Netzteil darf erst angeschlossen werden, nachdem die Installation vorschriftsmäßig beendet ist. Wenn das Netzteil defekt ist bzw. wenn das Gerät sonstige Schäden aufweist, darf es nicht in Betrieb genommen werden.
- Page 9 Dieses Gerät ist nicht dafür bestimmt, durch Personen (einschließlich Kinder) mit eingeschränkten physischen, sensorischen oder geistigen Fähigkeiten oder mangels Erfahrung und/oder mangels Wissen benutzt zu werden, es sei denn, sie werden durcheine für ihre Sicherheit zuständige Person beaufsichtigt oder erhielten von ihr Anweisungen, wie das Gerät zu benutzen ist. Kinder müssen beaufsichtigt werden, um sicherzustellen, dass sie nicht mit dem Gerät spielen.
-
Page 10: Entsorgung
3.2.2 Entsorgung Die Verpackung Ihres Gerätes besteht ausschließlich aus wiederverwertbaren Materialien. Bitte führen Sie diese entsprechend sortiert wieder dem “Dualen System” zu. Dieses Produkt darf am Ende seiner Lebensdauer nicht über den normalen Haushaltsabfall entsorgt werden, sondern muss an einem Sammelpunkt für das Recycling von elektrischen und elektronischen Geräten abgegeben werden. -
Page 11: Rechtliche Hinweise
Hiermit erklärt TechniSat, dass der Funkanlagentyp AUDIOMASTER MR3 der Richtlinie 2014/53/EU entspricht. Der vollständige Text der EU-Konformitätserklärung ist unter der folgenden Internetadresse verfügbar: http://konf.tsat.de/?ID=11297 TechniSat ist nicht für Produktschäden auf Grund von äußeren Einflüssen, Verschleiß oder unsachgemäßer Handhabung, unbefugter Instandsetzung, Modifikationen oder Unfällen haftbar. - Page 12 Dieses Gerät ist für die Verwendung in allen Ländern der Europäischen Union sowie in der Schweiz, in Norwegen, Liechtenstein und Island vorgesehen. Der Betrieb im Frequenzbereich 5150 MHz - 5350 MHz ist nur in geschlossenen Räumen erlaubt. AUDIOMASTER MR3 und TechniSat sind eingetragene Warenzeichen der: TechniSat Digital GmbH Julius-Saxler-Straße 3 54541 Daun...
-
Page 13: Servicehinweise
Mo. - Fr. 8:00 - 20:00 unter Tel.: 03925/9220 1800 erreichbar. Für eine evtentuell erforderliche Einsendung des Gerätes verwenden Sie bitte ausschließlich folgende Anschrift: TechniSat Digital GmbH Service-Center Nordstr. 4a 39418 Staßfurt Namen der erwähnten Firmen, Institutionen oder Marken sind Warenzeichen oder eingetragene... -
Page 14: Aufstellen Des Gerätes
4 Aufstellen des Gerätes > Stellen Sie das Gerät auf einen festen, sicheren und horizontalen Untergrund. Sorgen Sie für gute Belüftung. Achtung!: > Stellen Sie das Gerät nicht auf weiche Oberflächen wie Teppiche, Decken oder in der Nähe von Gardinen und Wandbehängen auf. - Page 15 > Stellen Sie sicher, dass das Netzkabel oder das Netzteil immer leicht zugänglich sind, so dass Sie das Gerät schnell von der Stromversorgung trennen können! > Die Steckdose muss möglichst nah am Gerät sein. Zur Netzverbindung Netzstecker vollständig in die Steckdose stecken.
-
Page 16: Beschreibung Des Audiomaster Mr3
Anbieter. Sie können damit Musik-Medien streamen. Das Gerät bietet in in Verbindung mit der TechniSat CONNECT-App Multiroom Unterstützung (weitere Infos finden Sie in der TechniSat CONNECT-App und auf der Webseite www.technisat.de) 5.3 AUDIOMASTER MR3 zum Betrieb vorbereiten 5.3.1 Netzteil anschließen >... - Page 17 Ziehen Sie bei Nichtverwendung den Stecker aus der Steckdose. Ziehen Sie am Stecker und nicht am Kabel. Ziehen Sie vor Ausbruch eines Gewitters den Netzstecker. Wenn das Gerät längere Zeit nicht benutzt wird, z.B. vor Antritt einer längeren Reise, ziehen Sie ebenfalls den Netzstecker. Die beim Betrieb entstehende Wärme muss durch ausreichende Luftzirkulation abgeführt werden.
-
Page 18: Inbetriebnahme / Einbindung In Ein Bestehendes Netzwerk
6 Inbetriebnahme / Einbindung in ein bestehendes Netzwerk AUDIOMASTER MR3 wird über die TechniSat CONNECT-App, mittels Handy oder Tablet konfiguriert und bedient. Da die App mehrere TechniSat Geräte unterstützt, können auf den folgenden Seiten App-Bilder dargestellt werden, welche Menüpunkte zeigen, die auf den AUDIOMASTER MR3 nicht zutreffen. -
Page 19: Verbindung Aufnehmen Und In Das Bestehende Netzwerk Integrieren
Gerätes dar.) > Öffnen Sie nun die TechniSat CONNECT-App. 6.3 Audiosystem Setup Nach erstmaligem Öffnen der TechniSat CONNECT-App müssen Sie zuerst die Funktion Multiroom der Startansicht hinzufügen. > Tippen Sie dazu auf die Schaltfläche + Funktionen und wählen Sie anschließend Multiroom. -
Page 20: Verbindung Zum Audiomaster Mr3 Aufbauen
6.3.1 Verbindung zum AUDIOMASTER MR3 aufbauen > Tippen Sie in der Funktionsübersicht der TechniSat CONNECT-App auf die Funktion Multiroom. Wurde noch kein Multiroom-Lautsprecher eingerichtet, erhalten Sie eine entsprechende Meldung und die Möglichkeit, dies jetzt zu tun. Tippen Sie hierzu auf die Schaltläche LAUTSPRECHER HINZUFÜGEN. - Page 21 Konfiguration zu beginnen. > Im nächsten Schritt müssen Sie sich mit dem WLAN-Netzwerk des AUDIOMASTER verbinden. Verfahren Sie hierzu wie unter Punkt 6.2 beschrieben. Kehren Sie anschließend zur TechniSat CONNECT-App zurück, um mit der Konfiguration fortzufahren. > Wurde der AUDIOMASTER gefunden, können Sie nun einen individuellen Gerätenamen vergeben. Tippen Sie hierzu auf den Namen und geben Sie den neuen Namen über die engeblendete Tastatur ein.
-
Page 22: Netzwerkeinstellungen Vornehmen
6.3.2 Netzwerkeinstellungen vornehmen Bevorzugen Sie eine Kabelgebundene LAN-Verbindung, wählen Sie im ersten Schritt Netzwerkkonfiguration den Eintrag ÜBER LAN VERBINDEN. > Tippen Sie auf ÜBER WLAN VERBINDEN, um die Verbindung zu Ihrem WLAN-Netzwerk herzustellen. Anschließend werden alle zur Verfügung stehenden WLAN-Netzwerke gesucht. >... -
Page 23: Allgemeine Bedienung
FERTIGSTELLEN, um den AUDIOMASTER zu verwenden. 7 Allgemeine Bedienung Zur allgemeinen Bedienung des Gerätes verwenden Sie die TechniSat CONNECT-App. Im Folgenden wird die Bedienung mit Hilfe der TechniSat CONNECT-App in der iOS Version beschrieben. 7.1 Ein- und Ausschalten 7.1.1 Am Gerät >... -
Page 24: Quellen Und Ansichtenwechsel
Tippen Sie in der unteren Steuerleiste auf das Ein-/Standby-Symbol. > Tippen Sie erneut auf das Symbol, um den AUDIOMASTER wieder auzuschalten. Beachten Sie, dass zur Steuerung des AUDIOMASTER mittels TechniSat CONNECT-App, sich beide Geräte im selben Netzwerk befinden müssen. 7.2 Quellen und Ansichtenwechsel 7.2.1 Quellenwahl... -
Page 25: Ansichten
7.2.2 Ansichten > Wählen Sie in der Geräteansicht den AUDIOMASTER aus. Ziehen Sie nun mit dem Finger die Statusleiste nach oben (roter Pfeil), um zu den Wiedergabeansichten zu gelangen. Alternativ können Sie auch auf das Albumcover in der unteren linken Ecke der Statusleiste tippen. >... -
Page 26: Internet Radio Hören
7.3 Internet Radio hören AUDIOMASTER MR3 ist mit einem Internet-Radio Empfänger ausgestattet. Um Internet-Radio Stationen/Sender empfangen zu können, muss der AUDIOMASTER MR3 mit dem Internet verbunden sein. > Tippen Sie in der Quellenauswahl auf den Eintrag Internet-Radio. Sofern nicht im Vorfeld ein Internet Radio Sender ausgewählt wurde, erscheint nun die Ansicht zum... -
Page 27: Spotify Connect
Dich mit demselben WLAN-Netzwerk. Spiele einen Song auf Spotify ab und tippe auf „VERFÜGBARE GERÄTE”. Wähle Dein AUDIOMASTER MR3 aus und höre die Musik im ganzen Raum. Fertig! Viel Spaß beim Musikhören! Die Spotify Software unterliegt dritt-Anbieter Lizenzen, die Sie hier finden:... -
Page 28: Musikplayer Verwenden / Upnp
7.5 Musikplayer verwenden / UPnP Sie haben die Möglichkeit, Audio-Medien, die auf einem UPnP-Server liegen, über den AUDIOMASTER MR3 wiederzugeben. Hierzu ist eine Verbindung zu Ihrem Heimnetzwerk (Router) nötig. Der UPnP-Medienserver muss sich im selben Netzwerk befinden, wie der AUDIOMASTER MR3. -
Page 29: Audio-Eingang Verwenden
Gerät. Beachten Sie, dass bei einer sehr geringen Lautstärkeeinstellung des angeschlossenen Gerätes und entsprechend höherer Lautstärkeeinstellung des AUDIOMASTER MR3 auch störende Geräusche/Rauschen mehr verstärkt werden und somit deutlicher zu hören sind. Es empfiehlt sich die Lautstärke des AUDIOMASTER MR3 z. -
Page 30: Bedienelemente Der 'Wiedergabe' Ansicht
8 Bedienelemente der ‘Wiedergabe’ Ansicht Geräteauswahl Ansichtswahl Albumcover Durchsuchen Titel Lautstärke Zufallsmodus Wiederholen Fortschritt Steuerelemente Wiedergabe/Pause Nächster Titel/Vorheriger Titel... -
Page 31: Favoritenliste Aufrufen Und Verwalten
8.1 Favoritenliste aufrufen und verwalten Mit Hilfe der Favoritenliste können Sie Ihre Lieblingssender komfortabel ablegen und schnell wieder aufrufen. > Tippen Sie auf die Schaltfläche um die Favoritenliste zu öffnen. Die Möglichkeit zum anlegen von Favoriten ist nicht in allen Quellen möglich. Sender abrufen: >... -
Page 32: Geräteauswahl
8.2 Geräteauswahl Für den Fall dass Sie in der Zwischenzeit ein anderes Gerät oder eine andere Funktion mit der TechniSat CONNECT-App bedient haben, können Sie jederzeit wieder zum AUDIOMASTER MR3 zurückkehren. > Tippen Sie dazu in der Wiedergabe-Ansicht auf die Schaltfläche neben der Gerätebezeichnung in... -
Page 33: Geräte-Einstellungen
Tippen Sie auf Gerät konfigurieren, um die Gerätekonfiguration anzupassen. 8.4.1 Informationen Hier sehen die aktuelle Informationen zu Ihrem Heimnetzwerk, z.B. den Namen des Netzwerks, die IP-Adresse AUDIOMASTER MR3 oder auch die Signalstärke am Standort. 8.4.2 Einstellungen Sie können die Audio-Streaming-Qualität in 3 Stufen zwischen Niedrig, Standard und Hoch einstellen sowie die... -
Page 34: Software
8.4.3 Software Hier wird die aktuell installierte Software-Version dargestellt. Unter Status wird angezeigt, ob die installierte Software aktuell ist, oder ob es ein Software-Update gibt. 8.5 Equalizer Sie haben die Möglichkeit, den Ton des AUDIOMASTER Ihren Wünschen entsprechend zu verändern. Hierzu stehen Ihnen Equalizer Voreinstellungen zur Verfügung, sowie die Möglichkeit, Bässe und Höhen stufenlos anzupassen und unter der Einstellung Mein EQ zu speichern. -
Page 35: Multiroom
Multiroom bezeichnet ein Wohnraum-übergreifendes Musik-Streaming. Zum Aufbau eines Multiroom-Systems benötigen Sie multiroomfähige Empfangsgeräte, die Sie in Ihr Heimnetzwerk integrieren können. Zentral gesteuert per TechniSat CONNECT-App können Sie so Ihre Lieblingsmusik in den einzelnen Räumen gleichzeitig abspielen – Abhängig vom Empfangsgerät können Sie sich verschiedenster Musikquellen bedienen, wie z.B. -
Page 36: Multiroom-Gruppe Erstellen
Feld tippen. > Tippen Sie auf das Feld Gruppen-Master auswählen, um den Master festzulegen. In diesem Beispiel den AUDIOMASTER MR3. Über den Gruppen-Master läuft anschließend die Steuerung der einzelnen Geräte in der Gruppe. > Ist der Gruppen-Master festgelegt, können Sie den Client bestimmen, indem Sie auf das Feld Client- Gerät auswählen tippen. - Page 37 > Tippen Sie anschließend auf ANLEGEN, um die Gruppe zu erstellen. > In der Gruppen-Übersicht erscheint nun die angelegte Multiroom-Gruppe. In diesem Beispiel Gruppe 1. Beachten Sie beim Anlegen der Gruppe den Hinweis und bestätigen Sie ihn mit OK. Die Steuerung einer Gruppe funktioniert so, als würden Sie ein einzelnes Gerät steuern.
-
Page 38: Lautstärkeregelung Im Multiroom Betrieb
9.2 Lautstärkeregelung im Multiroom Betrieb Im Multiroom-Betrieb können Sie die Lautstärke der einzelnen Geräte getrennt oder gleichzeitig für alle Geräte regeln. > Wählen Sie eine Gruppe aus und geben Sie einen Musiktitel wieder. Gehen Sie in die Wiedergabe-Ansicht, indem Sie die Statusleiste nach oben ziehen (siehe auch Punkt 7.2.2). >... -
Page 39: Bluetooth
10 Bluetooth Um den Ton einer Musikquelle über Bluetooth direkt am AUDIOMASTER MR3 wiederzugeben, muss die Musikquelle erstmalig mit dem AUDIOMASTER MR3 gekoppelt werden. > Tippen Sie in der Quellenauswahl auf den Eintrag Bluetooth oder drücken Sie die Taste MODE so lange, bis das Bluetooth-Symbol blinkt. -
Page 40: Reinigen
11 Reinigen Um die Gefahr eines elektrischen Schlags zu vermeiden, dürfen Sie das Gerät nicht mit einem nassen Tuch oder unter fließendem Wasser reinigen. Netzstecker vor Reinigung ziehen! Sie dürfen keine Scheuerschwämme, Scheuerpulver und Lösungsmittel wie Alkohol, Benzin, Spiritus, Verdünnungen usw. verwenden; sie könnten die Oberfläche des Gerätes beschädigen. Keine der folgenden Substanzen verwenden: Salzwasser, Insektenvernichtungsmittel, Chlor- oder säurehaltige Lösungsmittel (Salmiak). -
Page 41: Fehler Beseitigen
12 Fehler beseitigen Wenn das Gerät nicht wie vorgesehen funktioniert, überprüfen Sie es anhand der folgenden Tabelle. Symptom Mögliche Ursache/Abhilfe Das Gerät wird nicht mit Strom versorgt. Schließen Sie das Netzteil Gerät lässt sich nicht einschalten. richtig an die Steckdose und am Gerät Erhöhen Sie die Lautstärke. -
Page 42: Technische Daten
13 Technische Daten Technische Änderungen und Irrtümer vorbehalten. Die Abmessungen sind ungefähre Werte. Empfangswege Internet, Bluetooth, UPnP, Aux und Spotify AC Input: 100-240V; 50-60Hz; Netzteil DC Output: 18V; 5,0A Netzwerk Standby-Verbrauch: <2W Ausgangsleistung Lautsprecher 90W RMS Abmessungen 388mm x 168mm x 200mm Gewicht 4,65Kg... -
Page 43: Entsorgungshinweise
14 Entsorgungshinweise Entsorgung der Verpackung Ihr neues Gerät wurde auf dem Weg zu Ihnen durch die Verpackung geschützt. Alle eingesetzten Materialien sind umweltverträglich und wieder verwertbar. Bitte helfen Sie mit und entsorgen Sie die Verpackung umweltgerecht. Über aktuelle Entsorgungswege informieren Sie sich bei Ihrem Händler oder über Ihre kommunale Entsorgungseinrichtung. - Page 44 18012019ORV3...
- Page 45 AUDIOMASTER MR1 AUDIOMASTER MR2 AUDIOMASTER MR3 TECHNISOUND MR2...
- Page 46 CONTENTS ENGLISH ................... 3-42 FRANÇAIS ..................43-82 ITALIANO ..................83-122...
- Page 47 Instruction Manual AUDIOMASTER MR1 AUDIOMASTER MR2 AUDIOMASTER MR3 TECHNISOUND MR2...
- Page 48 1 Illustrations Top of the AUDIOMASTER MR2 and MR3 Internet radio symbol Spotify symbol Play music symbol On/Standby/Volume up/down knob (TECHNISOUND MR2: On/Standby only) MODE source selection AUX IN external input symbol Bluetooth symbol ( AUDIOMASTER MR1, MR2 and MR3 only) On/Standby status display (AUDIOMASTER MR1, MR2 and MR3 only) Volume + (TECHNISOUND MR2 only) Volume - (TECHNISOUND MR2 only)
- Page 49 Device top AUDIOMASTER MR1 TECHNISOUND MR2...
- Page 50 Connections on the rear of the device AUDIOMASTER MR2 and MR3 AUDIOMASTER MR1 TECHNISOUND MR2 AUX IN DC IN LAN connection Mounting option Mono/right/left Selector switch...
- Page 51 Contents Illustrations ..................................4 Foreword ...................................9 Target group for this instruction manual ............................9 Important information ....................................9 Setting up the device ..............................17 Description of the device ............................19 Scope of delivery .....................................19 The special features of the device ..............................19 Preparing the device for use ................................19 Start-up / connection to an existing network .....................20 Activating the SET-UP mode ................................21 Connecting to and integrating into the existing network ....................
- Page 52 Device selection .......................................33 Control elements .....................................33 Settings ........................................33 Multi-room ..................................35 Volume control in multi-room mode .............................37 Mono / Stereo mode (AUDIOMASTER MR1 only) ........................37 Bluetooth (AUDIOMASTER MR1/MR2/MR3 only) ....................38 Cleaning ..................................39 Troubleshooting ................................40 Technical data ................................41 Disposal Instructions ..............................42...
-
Page 53: Foreword
2 Foreword This instruction manual will help you to use your audio system, hereinafter also referred to as the device, as intended and safely. 2.1 Target group for this instruction manual The instruction manual is intended for anyone who is installing, operating, cleaning or disposing of the device. 2.1.1 Intended use The device has been designed to receive Internet radio, as well as audio playback of UPnP sources, Spotify Connect, Bluetooth (only with AUDIOMASTER MR1, MR2, MR3) or via the audio input. - Page 54 2.2.1 Safety For your own protection you should read the safety precautions carefully before using your new device. The manufacturer accepts no liability for damage caused by inappropriate handling, or by non-compliance with the safety precautions. Never open the device! Touching live parts poses a danger to life! Any necessary repairs to the receiver should only be carried out by qualified personnel.
- Page 55 In the event of a thunderstorm, disconnect the device from the mains. Overvoltage can damage the device. In the event of an obvious fault with the device, emanation of odour or smoke, substantial malfunctions, damage to the housing or fluid ingress, immediately switch off the device and contact the Service department.
- Page 56 Do not listen to music or the radio at high volume. Doing so can cause permanent hearing impairment. This device is not intended to be used by people (including children) with limited physical, sensory or mental capacities or lack of experience and/or knowledge, unless they are supervised by a person responsible for their safety or they are instructed by them as to how to use the device.
- Page 57 2.2.2 Disposal The device packaging is exclusively comprised of recyclable materials. Please sort the components appropriately, and dispose of them in line with your local waste disposal regulations. At the end of its service life, this device must not be disposed of with your regular household waste. It must be taken to a recycling collection point for electrical and electronic equipment.
-
Page 58: Legal Notices
MR2 corresponds to Directive 2014/53/EU. The complete text of the EU declaration of conformity is available at the following website: AUDIOMASTER MR1 http://konf.tsat.de/?ID=11295 AUDIOMASTER MR2 http://konf.tsat.de/?ID=11296 AUDIOMASTER MR3 http://konf.tsat.de/?ID=11297 TECHNISOUND MR2 http://konf.tsat.de/?ID=11293 TechniSat accepts no liability for product damage as a result of external influences, wear or improper handling, unauthorised repairs, modifications or accidents. - Page 59 This device is intended for use in all countries of the European Union and in Switzerland, Norway, Liechtenstein and Iceland. Operation within the frequency range 5150 MHz - 5350 MHz is only permitted in enclosed spaces. AUDIOMASTER MR1/MR2/MR3, TECHNISOUND MR2 and TechniSat are registered trademarks of: TechniSat Digital GmbH Julius-Saxler-Straße 3 54541 Daun, Germany www.technisat.de...
- Page 60 Hotline is available Mon. - Fri. 8:00 am - 8:00 pm on tel.: +49 (0) 3925 9220 1800. Should you need to return the device, please do so to the following address only: TechniSat Digital GmbH Service-Center Nordstr. 4a 39418 Staßfurt, Germany The names of the companies, institutions or makes referred to are trademarks or registered trademarks of the respective owners.
-
Page 61: Setting Up The Device
3 Setting up the device > Place the device on a firm, secure and horizontal base. Make sure the area is well ventilated. Caution! > Do not place the radio on soft surfaces such as carpets and blankets or near to curtains and wall hangings. - Page 62 > Ensure that the mains cable or the power supply unit are always easily accessible so that the device can be quickly disconnected from the power supply. > The power outlet should be as close to the device as possible. Insert the plug fully into the socket to ensure connection to the mains.
-
Page 63: Description Of The Device
In conjunction with the MyDigitRadio Pro app, the device offers multi-room support (you can find more information in the MyDigitRadio Pro app and on the website www.technisat.de) 4.3 Preparing the device for use 4.3.1 Connecting the power supply unit >... -
Page 64: Start-Up / Connection To An Existing Network
The device is configured and operated via the MyDigitRadioPro app, using a mobile or tablet. Given that the app supports several TechniSat devices, on the following pages app illustrations are shown which feature menu items which do not apply to the device. -
Page 65: Activating The Set-Up Mode
5.1 Activating the SET-UP mode > The device is in SET-UP mode when started for the first time. AUDIOMASTER MR1/MR2/MR3: The On/Standby status display on top of the device flashes blue and the Internet radio symbol is permanently lit (the device takes a few seconds to start). TECHNISOUND MR2: The Internet radio symbol on the top of the device flashes (the device takes a few seconds to start). -
Page 66: Connecting To And Integrating Into The Existing Network
The device is now in SET-UP mode again. This is necessary if you wish to register the device in a new WLAN network. 5.2 Connecting to and integrating into the existing network > Open the WLAN settings on your smartphone or tablet and connect it to the network with the SSID Setup[device name] (the numbers/digits at the end of the SSID represent the MAC address for the device). - Page 67 5.3.1 Establishing the connection to the AUDIOMASTER MR3...
-
Page 68: General Operation
5.3.2 Performing network settings Use a cable LAN connection preferably - in the network connection step select the LAN item (AUDIOMASTER MR1/MR2/MR3 only). 6 General operation Use the MyDigitRadio Pro app for general operation of the device. Some settings can also be made via the web interface on the device. Operation using the iOS version of the MyDigitRadio Pro app is described below. -
Page 69: Switching On And Off
6.1 Switching on and off 6.1.1 On the device > Use the On/Standby/Volume up/down knob (4) on the device to switch the device on or to switch it back to standby. When switched on, the On/Standby status display (8) lights up in green. When switched off the On/ Standby status display lights up in red (AUDIOMASTER MR1/MR2/MR3 only). -
Page 70: Source Selection
6.2 Source selection Open Source view in the app. > To do so, tap the Source button. > Swipe the screen from left to right to reach the view. > Now tap one of the sources to select it. Alternatively, the source can also be selected by pressing the MODE (5) button on the top of the device. The active source is identified in the app by a green tick and on the device by an illuminated symbol. -
Page 71: Listening To Internet Radio
6.3 Listening to Internet radio Your device is equipped with an Internet radio receiver. In order to receive radio stations/broadcasters, the device must be connected to the Internet. > Tap Source selection on the Internet Radio item. Provided an Internet radio station has not been selected beforehand, the Browse view now appears. -
Page 72: Using Spotify
6.4 Using Spotify Join us in welcoming Spotify Premium With Spotify Premium you can listen to millions of songs without adverts. Your favourite and up-and-coming artists along with the latest hits - just for you! Simply press "Play" and you can hear any song you want in top quality sound. -
Page 73: Using The Music Player / Upnp
6.5 Using the music player / UPnP You have the option of using your device to play audio media located on a UPnP server. A connection to your home network (router) is required to do so. The UPnP media server must be in the same network as your device. -
Page 74: Using The Audio Input
6.6 Using the audio input It is possible to play sound from external devices using the analogue audio output. > Connect the external device to the AUX IN connection (11), (3.5mm jack) on the device rear. > In Source selection tap the AUX IN item. To set the volume optimally, use the volume control both on the device and on the connected external device. -
Page 75: Operating Controls On The 'Now Running' View
7 Operating controls on the ‘Now running’ view Device selection Settings View selection Favourites list Random mode Share Repeat Advance Control elements Volume... -
Page 76: Accessing And Managing The Favourites List
7.1 Accessing and managing the Favourites list By using the Favourites list you can easily store your favourite stations and quickly retrieve them again. > Press the corresponding button (Section 7) to open the Favourites list. Accessing stations: > To access a station on this list, simply tap the desired station. Saving stations: >... -
Page 77: Device Selection
7.2 Device selection In the event that you have, in the meantime, used another device with the MyDigitRadioPro app, you can, at any time, return to the AUDIOMASTER or TECHNISOUND MR2. > To do so, tap the device designation in the very top line of the Now running view. >... - Page 78 Changing the device name: > Tap on the pen next to the device name to edit it. > Use the keyboard shown on the display to edit the name. 7.4.1 Network information This shows the current information on your home network, e.g. the network name, the IP address of your device or the signal strength at the location.
-
Page 79: Changing The Pin
7.4.6 Changing the PIN Under certain circumstances, it may be necessary to secure the connection to your device with a PIN. > Tap on this item and enter a four-digit number. > Confirm the entry with OK. 7.4.7 Software update From time to time software updates may be provided which could contain improvements or bug fixes. - Page 80 > Tap on Device selection and then on the pencil under AUDIOMASTER, to carry out further settings. > Now select the device you would like to add to the group. > You can assign a specific name to the group by tapping Rename. >...
-
Page 81: Volume Control In Multi-Room Mode
8.1 Volume control in multi-room mode Multi-room mode adjusts the volume control. > Tap on the speaker icon to open the volume control. This is where you can now adjust the volume for each device included in the group. > Move the respective volume control to adjust a specific device. -
Page 82: Bluetooth (Audiomaster Mr1/Mr2/Mr3 Only)
> On the back of the AUDIOMASTER MR1, select which speaker should be the right-hand one (R) and which should be the left-hand one (L) (depending on the installation of the devices). To do so, move the Mono/ Left/Right selector switch (15) to the corresponding position. If you are only using the one AUDIOMASTER MR1, leave the Mono/Left/Right selector switch at the Mono position. -
Page 83: Cleaning
10 Cleaning To prevent the risk of an electric shock, you may not clean the device using a wet cloth or under running water. Remove the mains plug prior to cleaning! You may not use scouring pads, scouring powder and solvents such as alcohol, petrol, spirits, thinners, etc.;... -
Page 84: Troubleshooting
11 Troubleshooting If the device does not operate as intended, check the following table for information. Symptom Possible cause/remedy The device is not being supplied with power. Connect the power supply The device cannot be switched on. unit correctly to the socket and to the device. -
Page 85: Technical Data
AUDIOMASTER MR2: 60W RMS AUDIOMASTER MR3: 90W RMS TECHNISOUND MR2: 2 x 10W RMS Dimensions AUDIOMASTER MR1: 111mm x 220mm x 111mm AUDIOMASTER MR2: 288mm x 126mm x 185mm AUDIOMASTER MR3: 388mm x 168mm x 200mm TECHNISOUND MR2: 100mm x 210mm x 100mm... -
Page 86: Disposal Instructions
Weight AUDIOMASTER MR1: 1.33kg AUDIOMASTER MR2: 2.84kg AUDIOMASTER MR3: 4.65kg TECHNISOUND MR2: 1.24kg Thread (wall mounting) 1/4” - 20 UNC AUDIOMASTER MR1/MR2 and TECHNISOUND MR2 only 13 Disposal Instructions Disposal of the packaging Your new device was protected by packaging on its way to you. All materials used are environmentally friendly and recyclable. - Page 87 Mode d'emploi AUDIOMASTER MR1 AUDIOMASTER MR2 AUDIOMASTER MR3 TECHNISOUND MR2...
- Page 88 1 Illustrations Dessus des appareils AUDIOMASTER MR2 et MR3 Symbole de la radio Internet Symbole de Spotify Symbole de la lecture de musique Bouton rotatif de mise en marche/veille/volume +/- (TECHNISOUND MR2 : uniquement marche/veille) MODE Choix de la source Entré...
- Page 89 Dessus de l'appareil AUDIOMASTER MR1 TECHNISOUND MR2...
- Page 90 Raccords à l'arrière de l'appareil AUDIOMASTER MR2 et MR3 AUDIOMASTER MR1 TECHNISOUND MR2 Entrée AUX Entrée CC Port LAN Possibilité de fixation Mono/droite/gauche Sélecteur...
- Page 91 Sommaire Illustrations ..................................44 Avant-propos ................................. 49 Groupe cible de ce mode d’emploi ...............................49 Consignes importantes ..................................49 Installation de l’appareil ............................57 Description de l'appareil ............................59 Contenu de la livraison ..................................59 Caractéristiques particulières de l'appareil ..........................59 Préparation de l'appareil pour le fonctionnement ......................... 59 Mise en service de l'appareil/intégration à...
- Page 92 Choix de l'appareil ....................................73 Éléments de commande ..................................73 Réglages ........................................73 Multiroom ..................................75 Réglage du volume en mode Multiroom .............................77 Mode mono/stéréo (uniquement AUDIOMASTER MR1) .......................77 Bluetooth (uniquement AUDIOMASTER MR1/MR2/MR3) .................. 78 Nettoyage ..................................79 Dépannage ..................................80 Données techniques ..............................81 Consignes pour la mise au rebut ..........................
-
Page 93: Avant-Propos
2 Avant-propos Ce mode d’emploi vous aide à utiliser votre système de radio, ci-après nommé appareil, de manière sûre et conforme à sa destination. 2.1 Groupe cible de ce mode d’emploi Ce mode d’emploi s’adresse à toutes les personnes qui installent, utilisent, nettoient ou mettent l’appareil au rebut. - Page 94 2.2.1 Sécurité Pour votre sécurité, vous devez lire attentivement les consignes de sécurité avant de mettre en service votre nouvel appareil. Le fabricant décline toute responsabilité pour les dommages résultant d’une utilisation inappropriée de l’appareil et du non-respect des dispositions de sécurité. N’ouvrez jamais l’appareil ! Tout contact avec des pièces conductrices de tension peut entraîner la mort ! Les interventions éventuellement nécessaires doivent être uniquement effectuées par du personnel...
- Page 95 En cas d’orage, il est conseillé de débrancher l’appareil du secteur. Une surtension peut endommager l’appareil. Si l’appareil semble défectueux, s’il produit des odeurs ou fumées, s’il présente des dysfonctionnements importants, si le boîtier est endommagé, si du liquide est entré en contact avec l'appareil, arrêtez immédiatement l’appareil et contactez l’assistance technique.
- Page 96 N’écoutez pas la musique ou la radio à plein volume. Cela peut entraîner des lésions auditives permanentes. Cet appareil n’est pas destiné à être utilisé par des personnes (y compris les enfants) dont les capacités physiques, sensorielles ou mentales sont limitées ou manquant d’expérience et/ou de connaissances, sauf si elles sont surveillées par une personne responsable de leur sécurité...
-
Page 97: Élimination
2.2.2 Élimination L’emballage de votre appareil est exclusivement composé de matériaux recyclables. Merci de les remettre dans le circuit du tri sélectif. Une fois arrivé en fin de vie, ce produit ne doit pas être mis au rebut avec les déchets ménagers ordinaires. Il doit être déposé... -
Page 98: Mentions Légales
AUDIOMASTER MR2 http://konf.tsat.de/?ID=11296 AUDIOMASTER MR3 http://konf.tsat.de/?ID=11297 TECHNISOUND MR2 http://konf.tsat.de/?ID=11293 La société TechniSat ne peut être tenue pour responsable des dommages causés au produit dans le cas d’influences extérieures, d’une usure, d’une utilisation inappropriée, d’une réparation non autorisée, de modifications ou d’accidents. - Page 99 Norvège, au Liechtenstein et en Islande. Le fonctionnement dans une plage de fréquences de 5150 MHz à 5350 MHz est permis uniquement dans des pièces fermées. AUDIOMASTER MR1/MR2/MR3, TECHNISOUND MR2 et TechniSat sont des marques déposées de : TechniSat Digital GmbH...
-
Page 100: Consignes D'entretien
8h à 20h au + 49 (0) 392 592 201 800. En cas d'éventuel retour de l'appareil, merci d'adresser votre colis uniquement à l'adresse suivante : TechniSat Digital GmbH Service-Center Nordstr. 4a D-39418 Stassfurt Les noms de sociétés, institutions ou marques citées sont des marques ou des marques déposées de leurs... -
Page 101: Installation De L'appareil
3 Installation de l’appareil > Posez l’appareil sur une surface solide, sûre et horizontale. Assurez une circulation d'air suffisante. Attention ! : > N’installez pas l’appareil sur des surfaces souples telles que des tapis, couvertures ou à proximité de rideaux et de tentures, sous peine d’obstruer les orifices de ventilation. La circulation nécessaire de l’air serait alors interrompue. - Page 102 > Assurez-vous que le câble secteur ou le bloc d’alimentation soit toujours facilement accessible, de manière à pouvoir débrancher rapidement l’appareil de l’alimentation électrique ! > La prise secteur doit se situer le plus près possible de l’appareil. Introduisez entièrement la fiche dans la prise secteur.
-
Page 103: Description De L'appareil
Multiroom. Vous pouvez ainsi diffuser des médias en streaming. Connecté à l'application MyDigitRadio-Pro, l'appareil permet une prise en charge du Multiroom (plus d'informations dans votre application MyDigitRadio-Pro et sur le site Internet www.technisat.de). 4.3 Préparation de l'appareil pour le fonctionnement 4.3.1 Branchement du bloc d’alimentation... -
Page 104: Mise En Service De L'appareil/Intégration À Un Réseau Existant
L'appareil est configuré et commandé au moyen d'un smartphone ou d'une tablette via l'application MyDigitRadioPro. Comme l'application prend en charge plusieurs appareils TechniSat, les images de l'application représentées dans les pages suivantes peuvent correspondre à des options de menu qui ne concernent pas l'appareil. -
Page 105: Activation Du Mode Setup (Configuration)
5.1 Activation du mode SETUP (configuration) > Lors de la première installation, l'appareil se trouve en mode SETUP. AUDIOMASTER MR1/MR2/MR3 : L'affichage d'état Marche/Veille sur le dessus de l'appareil clignote en bleu et le symbole de la radio Internet reste allumé (le démarrage de l'appareil dure quelques secondes). TECHNISOUND MR2 : Le symbole de la radio Internet sur le dessus de l'appareil clignote (le démarrage de l'appareil dure quelques secondes). -
Page 106: Établissement De La Connexion Et Intégration Dans Le Réseau Existant
L'appareil est à présent à nouveau en mode SETUP. C'est nécessaire si vous souhaitez intégrer l'appareil à un nouveau réseau Wi-Fi. 5.2 Établissement de la connexion et intégration dans le réseau existant > Ouvrez les réglages Wi-Fi sur votre smartphone ou tablette et connectez-l'appareil au réseau à l'aide du SSID Setup [nom de l'appareil] (les nombres/chiffres à... - Page 107 5.3.1 Établir une connexion à l'AUDIOMASTER MR3...
-
Page 108: Réalisation Des Réglages Réseau
5.3.2 Réalisation des réglages réseau Si vous privilégiez une connexion LAN par câble, à l'étape Connexion réseau, sélectionnez l'entrée LAN (uniquement AUDIOMASTER MR1/MR2/MR3). 6 Commande générale Pour la commande générale de l'appareil, utilisez l'application MyDigitRadio Pro. Vous pouvez également effectuer certains réglages via l'interface Web. Ci-après est décrite la commande à... -
Page 109: Mise En Marche Et Arrêt
6.1 Mise en marche et arrêt 6.1.1 Sur l'appareil > Avec le bouton rotatif de mise en marche/veille/volume +/- (4) de l'appareil, vous pouvez mettre l'appareil en marche puis en veille. Lorsque l'appareil est en marche, l'affichage d'état Marche/Veille (8) est allumé en vert. Lorsque l'appareil est éteint, l'affichage d'état Marche/Veille est allumé... -
Page 110: Sélection Des Sources
6.2 Sélection des sources Dans l'application, ouvrez la vue des sources. > Pour ce faire, cliquez sur le bouton Source à l'écran. ou : > Déplacez votre doigt de gauche à droite sur l'écran pour accéder à l'affichage. > Cliquez à présent sur une des sources pour la sélectionner. Ou la source peut être sélectionnée en appuyant sur la touche MODE (5) sur le dessus de l'appareil. -
Page 111: Écoute De La Radio Internet
6.3 Écoute de la radio Internet Votre appareil est équipé d'un récepteur radio Internet. Pour pouvoir recevoir des stations/émetteurs de radio Internet, l'appareil doit être connecté à Internet. > Dans le choix de la source, cliquez sur l'entrée Radio Internet. Si une station de radio Internet n'a pas été... -
Page 112: Utilisation De Spotify
6.4 Utilisation de Spotify Découvrez Spotify Premium Avec Spotify Premium, vous pouvez écouter des millions de chansons sans publicité. Vos artistes préférés, les hits actuels et des nouveautés - uniquement pour vous ! Il vous suffit d'appuyer sur "Play" (lecture) pour écouter la chanson de votre choix dans un son d'une qualité... -
Page 113: Utilisation D'un Lecteur De Musique/Upnp
6.5 Utilisation d'un lecteur de musique/UPnP Vous avez la possibilité de diffuser sur votre appareil des médias audio qui se trouvent sur un serveur UPnP. Pour ce faire, une connexion à votre réseau domestique est nécessaire (routeur). Le serveur médias UPnP doit se trouver dans le même réseau que votre appareil. -
Page 114: Utilisation De L'entrée Audio
6.6 Utilisation de l'entrée audio Vous avez la possibilité de diffuser le son d'appareils externes grâce à une sortie audio analogique. > Branchez l'appareil externe au port AUX IN (11) (jack de 3,5 mm) à l'arrière de l'appareil. > Dans le choix de la source, cliquez sur l'entrée AUX IN. Pour régler le volume de manière optimale, utilisez aussi bien le réglage du volume sur l'appareil que sur l'appareil externe connecté. -
Page 115: Éléments De Commande De L'affichage "En Cours Actuellement
7 Éléments de commande de l'affichage "En cours actuellement" Choix de l'appareil Réglages Mode Liste de favoris Mode aléatoire Partager Répétition Progression Éléments de commande Volume... -
Page 116: Accès Et Gestion De La Liste Des Favoris
7.1 Accès et gestion de la liste des favoris À l'aide de la liste des favoris, vous pouvez mémoriser facilement vos stations préférées et y accéder rapidement. > Appuyez sur le bouton correspondant (point 7) pour ouvrir la liste des favoris. Accès aux stations : >... -
Page 117: Choix De L'appareil
7.2 Choix de l'appareil Si, dans l'intervalle, vous avez utilisé un autre appareil avec l'application MyDigitRadioPro, vous pouvez à tout moment revenir à l'AUDIOMASTER ou TECHNISOUND MR2. > Pour ce faire, dans l'affichage En cours actuellement cliquez sur la désignation de l'appareil dans la ligne supérieure. - Page 118 Modification du nom de l'appareil : > Cliquez sur le crayon à côté du nom de l'appareil pour le modifier. > Utilisez le clavier à l'écran pour modifier le nom. 7.4.1 Informations réseau Les informations actuelles relatives à votre réseau domestique sont affichées ici, p. ex. le nom du réseau, l'adresse IP de votre appareil ou encore la puissance du signal sur l'emplacement.
-
Page 119: Modification Du Code Pin
7.4.6 Modification du code PIN Dans certaines conditions, il peut être nécessaire de sécuriser la connexion avec votre appareil au moyen d'un code PIN. > Cliquez sur cette option et saisissez un numéro à quatre chiffres. > Confirmez la saisie avec OK. 7.4.7 Mise à... - Page 120 > Cliquez sur la sélection de l'appareil puis sur le crayon sous AUDIOMASTER pour effectuer d'autres réglages. > Sélectionnez à présent l'appareil que vous souhaitez intégrer au groupe. > Vous pouvez attribuer un nom propre au groupe en cliquant sur Renommer. >...
-
Page 121: Réglage Du Volume En Mode Multiroom
8.1 Réglage du volume en mode Multiroom Le réglage du volume s'adapte en mode Multiroom. > Cliquez sur l'icône Volume pour ouvrir le réglage du volume. Vous pouvez à présent régler le volume pour chaque appareil intégré dans le groupe. >... -
Page 122: Bluetooth (Uniquement Audiomaster Mr1/Mr2/Mr3)
> À l'arrière de l'AUDIOMASTER MR1, déterminez quel haut-parleur doit être à droite (R) et à gauche (L) (selon l'emplacement des appareils). Pour ce faire, positionnez le sélecteur Mono/gauche/droite (15) dans la position correspondante. Si vous utilisez un seul AUDIOMASTER MR1, laissez le sélecteur Mono/gauche/droite sur la position Mono. 9 Bluetooth (uniquement AUDIOMASTER MR1/MR2/MR3) Pour diffuser le son d'une source de musique directement sur l'AUDIOMASTER, la source de musique doit être couplée une première fois avec l'AUDIOMASTER. -
Page 123: Nettoyage
10 Nettoyage Afin d’éviter le risque de décharge électrique, vous ne devez pas nettoyer l’appareil avec un chiffon humide, ni sous l’eau courante. Débranchez la fiche secteur avant le nettoyage ! Vous ne devez pas utiliser de tampons à récurer, de poudre à récurer et de solvants tels que de l’alcool, de l’essence, de l’alcool à... -
Page 124: Dépannage
11 Dépannage Si l'appareil ne fonctionne pas comme prévu, vérifiez-en le fonctionnement à l'aide des tableaux suivants. Symptôme Cause possible/résolution L’appareil n’est pas alimenté Impossible de mettre l'appareil en en électricité. Branchez le bloc marche. d’alimentation correctement à la prise secteur et à... -
Page 125: Données Techniques
AUDIOMASTER MR1 : 111 mm x 220 mm x 111 mm AUDIOMASTER MR2 : 288 mm x 126 mm x 185 mm AUDIOMASTER MR3 : 388 mm x 168 mm x 200 mm TECHNISOUND MR2 : 100 mm x 210 mm x 100 mm... -
Page 126: Consignes Pour La Mise Au Rebut
Poids AUDIOMASTER MR1 : 1,33 kg AUDIOMASTER MR2 : 2,84 kg AUDIOMASTER MR3 : 4,65 kg TECHNISOUND MR2 : 1,24 kg Filetage (fixation murale) 1/4” - 20 UNC uniquement AUDIOMASTER MR1/ MR2 et TECHNISOUND MR2 13 Consignes pour la mise au rebut Élimination de l'emballage... - Page 127 Istruzioni per l'uso AUDIOMASTER MR1 AUDIOMASTER MR2 AUDIOMASTER MR3 TECHNISOUND MR2...
- Page 128 1 Immagini Lato superiore AUDIOMASTER MR2 e MR3 Simbolo radio Internet Simbolo Spotify Simbolo riproduzione musica On/Standby/pulsante a rotazione volume alto/basso (TECHNISOUND MR2: solo On/Standby) MODE Selezione della fonte Simbolo di ingresso esterno AUX IN Simbolo Bluetooth (solo AUDIOMASTER MR1, MR2 e MR3) Indicatore di stato On/Standby (solo AUDIOMASTER MR1, MR2 e MR3) Volume + (solo TECHNISOUND MR2) Volume - (solo TECHNISOUND MR2)
- Page 129 Lato superiore dell'apparecchio AUDIOMASTER MR1 TECHNISOUND MR2...
- Page 130 Collegamenti sul lato posteriore dell'apparecchio AUDIOMASTER MR2 e MR3 AUDIOMASTER MR1 TECHNISOUND MR2 AUX IN DC IN Collegamento LAN Possibilità di fissaggio Mono/destra/sinistra Selettore...
- Page 131 Indice Immagini ..................................84 Introduzione .................................. 89 A chi si rivolgono le presenti istruzioni per l’uso ........................89 Note importanti ...................................... 89 Posizionamento dell’apparecchio ........................... 97 Descrizione dell'apparecchio ............................ 99 Entità della fornitura .....................................99 Le funzionalità speciali dell'apparecchio.............................99 Preparare l'apparecchio per il funzionamento .........................99 Messa in funzione / collegamento ad una rete esistente ................100 Attivare la modalità...
- Page 132 Selezione dell'apparecchio ................................113 Elementi di controllo.................................... 113 Impostazioni ......................................113 Multiroom ..................................115 Regolazione del volume nella modalità multiroom ......................117 Modalità mono / stereo (solo AUDIOMASTER MR1) ......................117 Bluetooth (solo AUDIOMASTER MR1/MR2/MR3) ....................118 Pulizia .....................................119 Risoluzione di errori ..............................120 Dati tecnici ..................................121 Note per lo smaltimento ............................
-
Page 133: Introduzione
2 Introduzione Le presenti istruzioni per l’uso illustrano all’utente l’utilizzo conforme e sicuro del sistema audio, di seguito denominato anche apparecchio. 2.1 A chi si rivolgono le presenti istruzioni per l’uso Le istruzioni per l’uso sono rivolte a tutti coloro che collocano, utilizzano, puliscono o smaltiscono l'apparecchio. 2.1.1 Uso conforme alle disposizioni L'apparecchio è... - Page 134 2.2.1 Sicurezza Per la propria sicurezza, leggere attentamente le norme di sicurezza prima di mettere in funzione il nuovo apparecchio. Il produttore declina ogni responsabilità per danni derivanti da un uso non conforme e dalla mancata osservanza delle misure di sicurezza. Non aprire mai l'apparecchio! Il contatto con parti sotto tensione può...
- Page 135 In caso di temporale, staccare l'apparecchio dalla presa di corrente. La sovratensione può danneggiare l'apparecchio. In caso di evidenti difetti all’apparecchio, produzione di odori o fumo, malfunzionamenti gravi, danneggiamenti all’alloggiamento nonché in caso di penetrazione di liquidi, spegnere l’apparecchio e contattare il servizio di assistenza.
- Page 136 Non ascoltare la musica o la radio a volume elevato, può causare danni permanenti all’udito. Questo apparecchio non è progettato per essere utilizzato da persone (ivi compresi i bambini) con capacità fisiche, sensoriali o intellettuali limitate o carenti di esperienza e/o di conoscenze, a meno che non siano sorvegliate da una persona responsabile della loro sicurezza o abbiano ricevuto da quest'ultima indicazioni sul corretto utilizzo dell'apparecchio.
-
Page 137: Smaltimento
2.2.2 Smaltimento L'imballaggio dell'apparecchio è composto esclusivamente da materiali riciclabili. Si prega di consegnarli al sistema di raccolta differenziata "Sistema duale" separandoli correttamente. Al termine del ciclo di vita questo prodotto non può essere smaltito con i normali rifiuti domestici, deve invece essere depositato in un centro di raccolta per il riciclaggio di apparecchi elettrici ed elettronici. -
Page 138: Avvertenze Legali
Internet: AUDIOMASTER MR1 http://konf.tsat.de/?ID=11295 AUDIOMASTER MR2 http://konf.tsat.de/?ID=11296 AUDIOMASTER MR3 http://konf.tsat.de/?ID=11297 TECHNISOUND MR2 http://konf.tsat.de/?ID=11293 TechniSat non è responsabile dei danni del prodotto causati da azioni esterne, usura o da un utilizzo inappropriato, una riparazione non autorizzata, modifiche o incidenti. - Page 139 Questo apparecchio è stato creato per l'utilizzo in tutti i Paesi dell'Unione Europea e inoltre in Svizzera, Norvegia, Liechtenstein e Islanda. Il funzionamento nel campo di frequenza 5150 MHz - 5350 MHz è consentito solo in ambienti chiusi. AUDIOMASTER MR1/MR2/MR3, TECHNISOUND MR2 e TechniSat sono marchi registrati di: TechniSat Digital GmbH Julius-Saxler-Straße 3 54541 Daun www.technisat.de...
- Page 140 Lun. - ven. ore 8.00 - 20.00 al tel.: 03925/9220 1800. Qualora fosse necessario spedire l'apparecchio, utilizzare esclusivamente il seguente indirizzo: TechniSat Digital GmbH Service-Center Nordstr. 4a 39418 Staßfurt I nomi delle aziende, delle istituzioni o dei marchi menzionati sono marchi di fabbrica o marchi registrati...
-
Page 141: Posizionamento Dell'apparecchio
3 Posizionamento dell’apparecchio > Posizionare l’apparecchio su una superficie solida, sicura e orizzontale. Provvedere ad una buona ventilazione. Attenzione! > Non posizionare l’apparecchio su superfici morbide, come tappeti, coperte o in prossimità di tende e tappezzerie. Le aperture di ventilazione non possono essere coperte. La circolazione di aria necessaria può... - Page 142 > Accertarsi che il cavo di alimentazione o l’alimentatore siano sempre facilmente accessibili, in modo che l’apparecchio possa essere rapidamente staccato dall'alimentazione elettrica! > La presa deve essere più vicina possibile all’apparecchio. Per il collegamento alla rete, inserire interamente la spina nella presa. >...
-
Page 143: Descrizione Dell'apparecchio
MR1/MR2/MR3) e un ingresso AUX. Fornisce inoltre Spotify Connect e supporto multiroom. In tal modo è possibile effettuare lo streaming. In collegamento con la app MyDigitRadio Pro l'apparecchio offre supporto multiroom (maggiori informazioni nella app MyDigitRadio Pro e sul sito www.technisat.de). 4.3 Preparare l'apparecchio per il funzionamento 4.3.1 Collegare l’alimentatore >... -
Page 144: Messa In Funzione / Collegamento Ad Una Rete Esistente
L'apparecchio viene configurato e comandato attraverso la app MydigitRadio Pro, mediante cellulare o tablet. Poiché la app supporta più apparecchi TechniSat, nelle prossime pagine potrebbero esserci delle immagini dell'app che mostrano dei punti di menu che non si ritrovano sull'apparecchio. -
Page 145: Attivare La Modalità Setup
5.1 Attivare la modalità SETUP > Alla prima messa in funzione l'apparecchio si trova nella modalità SETUP. AUDIOMASTER MR1/MR2/MR3: L'indicatore di stato On/Standby sul lato superiore dell'apparecchio lampeggia in colore blu e il simbolo di radio Internet resta illuminato a lungo (l'avvio dell'apparecchio richiede alcuni secondi). TECHNISOUND MR2: Il simbolo di radio Internet sul lato superiore dell'apparecchio lampeggia (l'avvio dell'apparecchio richiede alcuni secondi). -
Page 146: Stabilire La Connessione E Integrarla Nella Rete Esistente
L'apparecchio è ora di nuovo in modalità SETUP. L'operazione è necessaria se si desidera registrare l'apparecchio in una nuova rete WLAN. 5.2 Stabilire la connessione e integrarla nella rete esistente > Aprire le impostazioni WLAN sul proprio smartphone o tablet e collegarlo alla rete con la SSID Setup [Nome dell'apparecchio] (I numeri/le cifre alla fine della SSID rappresentano l'indirizzo MAC dell'apparecchio). - Page 147 5.3.1 Creare una connessione con AUDIOMASTER MR3...
-
Page 148: Comando Generale
5.3.2 Eseguire le impostazioni di rete Se si preferisce una connessione LAN con collegamento cavo, nel passaggio connessione di rete selezionare la voce LAN (solo AUDIOMASTER MR1/MR2/MR3). 6 Comando generale Per il comando generale dell'apparecchio utilizzare la app MyDigitRadio Pro. Alcune impostazioni possono essere eseguite anche mediante l'interfaccia web dell'apparecchio. -
Page 149: Accensione E Spegnimento
6.1 Accensione e spegnimento 6.1.1 Sull'apparecchio > Con il pulsante (4) On/Standby/Volume alto/basso dell'apparecchio è possibile accendere l'apparecchio o riportarlo in standby. Quando è accesso, l'indicatore di stato On/Standby (8) si illumina di verde. Quando è spento, l'indicatore di stato On/Standby si illumina di rosso (solo AUDIOMASTER MR1/MR2/MR3). 6.1.2 Mediante app >... -
Page 150: Selezione Fonti
6.2 Selezione fonti Aprire nella app la visualizzazione delle fonti. > Premere sul pulsante Fonte. oppure: > Passare sullo schermo da sinistra verso destra per accedere alla visualizzazione. > Premere su una delle fonti per selezionarla. In alternativa, è possibile selezionare la fonte anche premendo il tasto MODE (5) sul lato superiore dell'apparecchio. -
Page 151: Ascoltare Radio Internet
6.3 Ascoltare radio Internet L'apparecchio è dotato di un ricevitore di radio Internet. Per poter ricevere le stazioni/emittenti di radio Internet l'apparecchio deve essere collegato ad Internet. > Nella selezione della fonte premere la voce Radio Internet. Se nella fase iniziale non è stata selezionata alcuna emittente di radio Internet, comparirà... -
Page 152: Usare Spotify
6.4 Usare Spotify Scopri con noi Spotify Premium Con Spotify Premium puoi ascoltare milioni di brani senza pubblicità. I tuoi artisti preferiti, le hit del momento e le nuove scoperte: solo per te! È semplicissimo: premendo "Play" potrai ascoltare tutti i brani che più ti piacciono, alla migliore qualità... -
Page 153: Utilizzare Il Lettore Musicale / Upnp
6.5 Utilizzare il lettore musicale / UPnP Con il proprio apparecchio l'utente ha la possibilità di riprodurre media audio che si trovano su un server UPnP. A tal fine è necessario avere una connessione alla propria rete domestica (router). Il server media UPnP deve trovarsi nella stessa rete del proprio apparecchio. -
Page 154: Utilizzare L'ingresso Audio
6.6 Utilizzare l'ingresso audio L'utente ha la possibilità di riprodurre il suono di apparecchi esterni con l'uscita audio analogica. > Connettere l'apparecchio esterno al collegamento AUX IN (11), (presa da 3,5 mm) sul lato posteriore dell'apparecchio. > Nella selezione della fonte premere la voce AUX IN. Per impostare il volume in modo ottimale, utilizzare sia il regolatore di volume dell'apparecchio che quello dell'apparecchio esterno collegato. -
Page 155: Elementi Di Comando Della Visualizzazione 'Ora In Corso
7 Elementi di comando della visualizzazione 'Ora in corso' Selezione Impostazioni dell'apparecchio Selezione di visualizzazione Elenco preferiti Modalità casuale Dividere Ripeti Progresso Elementi di controllo Volume... -
Page 156: Aprire E Gestire L'elenco Dei Preferiti
7.1 Aprire e gestire l'elenco dei Preferiti Con l'aiuto dell'Elenco dei Preferiti è possibile inserire con facilità le proprie emittenti preferite e riaprirle velocemente. > Premere il pulsante corrispondente (punto 7) per aprire l'elenco dei Preferiti. Aprire le emittenti: > Per aprire un'emittente di questo elenco premere l'emittente desiderata. -
Page 157: Selezione Dell'apparecchio
7.2 Selezione dell'apparecchio Nel caso in cui l'utente abbia nel frattempo utilizzato un altro apparecchio con la app MyDigitradio Pro, è possibile ritornare in qualsiasi momento ad AUDIOMASTER o a TECHNISOUND MR2. > Nella visualizzazione Ora in corso premere la denominazione dell'apparecchio nella riga superiore. >... - Page 158 Personalizzare il nome dell'apparecchio: > Premere sulla penna accanto al nome dell'apparecchio per modificarlo. > Utilizzare la tastiera che verrà visualizzata per modificare il nome. 7.4.1 Informazioni di rete Qui l'utente può consultare le informazioni attuali riguardo alla propria rete domestica, ad esempio il nome della rete, l'indirizzo IP del proprio apparecchio o anche l'intensità...
-
Page 159: Update Del Software
7.4.6 Cambiare PIN In determinate circostanze può essere necessario rendere sicura la connessione al proprio apparecchio con un PIN. > Premere su questo punto e inserire un numero di quattro cifre. > Confermare l'immissione con OK. 7.4.7 Update del software Vengono periodicamente forniti aggiornamenti del software che possono contenere miglioramenti o rettifiche di errori. - Page 160 > Premere sulla selezione dell'apparecchio e successivamente sulla penna dietro AUDIOMASTER per eseguire ulteriori impostazioni. > Selezionare l'apparecchio che si desidera integrare nel gruppo. > È possibile assegnare al gruppo un nome specifico premendo su Rinomina. > Successivamente premere su Eseguito per creare il gruppo.
-
Page 161: Regolazione Del Volume Nella Modalità Multiroom
8.1 Regolazione del volume nella modalità multiroom Con la modalità multiroom è possibile regolare il volume in modo personalizzato. > Premere sull'icona degli altoparlanti per aprire la regolazione del volume. Qui è possibile personalizzare il volume per ogni apparecchio collegato al gruppo. >... -
Page 162: Bluetooth (Solo Audiomaster Mr1/Mr2/Mr3)
> Selezionare sulla parte posteriore dell'AUDIOMASTER MR1 quale deve essere l'altoparlante destro (R) e quale l'altoparlante sinistro (L) (a seconda del posizionamento degli apparecchi). A tal fine portare il selettore mono/sinistra/destra (15) nella posizione corrispondente. Utilizzare solo un AUDIOMASTER MR1, lasciare il selettore mono/sinistra/destra sulla posizione Mono. 9 Bluetooth (solo AUDIOMASTER MR1/MR2/MR3) Per riprodurre il suono di una fonte musicale direttamente sull'AUDIOMASTER, la fonte musicale deve essere collegata per la prima volta con l'AUDIOMASTER. -
Page 163: Pulizia
10 Pulizia Al fine di evitare il rischio di scossa elettrica, non è consentito pulire l'apparecchio con un panno bagnato o sotto l'acqua corrente. Prima della pulizia togliere la spina dalla presa! Non è consentito l'utilizzo di spugne abrasive, detersivi abrasivi e solventi come alcool, benzina, spirito, diluenti ecc., che potrebbero danneggiare la superficie dell'apparecchio. -
Page 164: Risoluzione Di Errori
11 Risoluzione di errori Se l’apparecchio non funziona come previsto, consultare la seguente tabella. Sintomo Possibile causa/rimedio L’apparecchio non è alimentato con la corrente. Collegare correttamente L'apparecchio non si accende. l'alimentatore alla presa e all’apparecchio. Alzare il volume. Accendere l'apparecchio di riproduzione o Non si sente alcun suono. -
Page 165: Dati Tecnici
AUDIOMASTER MR1: 111 mm x 220 mm x 111 mm AUDIOMASTER MR2: 288 mm x 126 mm x 185 mm AUDIOMASTER MR3: 388 mm x 168 mm x 200 mm TECHNISOUND MR2: 100 mm x 210 mm x 100 mm... -
Page 166: Note Per Lo Smaltimento
Peso AUDIOMASTER MR1: 1,33 kg AUDIOMASTER MR2: 2,84 kg AUDIOMASTER MR3: 4,65 kg TECHNISOUND MR2: 1,24 kg Filettatura (fissaggio alla parete) 1/4” - 20 UNC solo AUDIOMASTER MR1/MR2 e TECHNISOUND MR2 13 Note per lo smaltimento Smaltimento dell'imballaggio Il nuovo apparecchio è protetto durante il tragitto con un imballaggio. Tutti i materiali impiegati sono rispettosi dell'ambiente e riciclabili.