Broan Elite RMDD3004 Mode D'emploi
Table des Matières
Les langues disponibles
Les langues disponibles
Liens rapides
MODEL
WIDTH
RMDD3004
30"
RMDD3604
36"
RMDD4804
48"
RMDD3004EX
30"
RMDD3604EX
36"
RMDD4804EX
48"
WARNING - To reduce the risk of burns or ignition of clothing by reaching across burners, the downdraft remote control MUST
be mounted in the countertop - at least 4" from the burners. See "INSTALL COOKTOP" section on page 8.
READ AND SAVE THESE INSTRUCTIONS
WARNING
TO REDUCE THE RISK OF FIRE, ELECTRIC SHOCK, OR INJURY TO
PERSONS, OBSERVE THE FOLLOWING:
1. Use this unit only in the manner intended by the manufacturer. If you
have questions, contact the manufacturer at the address or telephone
number in the warranty.
2. Before servicing or cleaning unit, switch power off at service panel
and lock the service disconnecting means to prevent power from be-
ing switched on accidentally. When the service disconnecting means
cannot be locked, securely fasten a prominent warning device, such
as a tag, to the service panel.
3. Installation work and electrical wiring must be done by a qualified
person(s) in accordance with all applicable codes and standards,
including fire-rated construction codes and standards.
4. Sufficient air is needed for proper combustion and exhausting of
gases through the flue (chimney) of fuel burning equipment to prevent
backdrafting. Follow the heating equipment manufacturer's guideline
and safety standards such as those published by the National Fire
Protection Association (NFPA), and the American Society for Heating,
Refrigeration and Air Conditioning Engineers (ASHRAE), and the local
code authorities.
5. When cutting or drilling into wall or ceiling, do not damage electrical
wiring and other hidden utilities.
6. Ducted fans must always be vented to the outdoors.
7. To reduce the risk of fire, use only metal ductwork.
8. Do not install this product with the activating switch directly behind
a burner or element. Minimum distance between the switch and the
edge of the burner should be 4 inches.
9. Loose-fitting or hanging clothing should never be worn when operating
this appliance. They may be ignited by burners/elements on cooktop.
10. Children should not be left alone or unattended in the area where this
appliance is in use.
11. This unit must be grounded.
TO REDUCE THE RISK OF A RANGE TOP GREASE FIRE:
a) Never leave surface units unattended at high settings.
Boilovers cause smoking and greasy spillovers that may
ignite. Heat oils slowly on low or medium settings.
b) Always turn hood ON when cooking at high heat or when
cooking flaming foods.
c) Clean ventilating fans frequently. Grease should not be
allowed to accumulate on fan or filter.
d) Use proper pan size. Always use cookware appropriate
for the size of the surface element.
NOTE: Model RMDDRBK Remote Up/Down
Control sold separately.
INSTALLER:
Save this manual for Electrical
Inspector and Homeowner to use.
BLOWER
500 cfm Internal
500 cfm Internal
500 cfm Internal
Models 331H, 332H, 335, 336 HLB3, HLB6, HLB9, and HLB11 External (purchase separately)
Models 331H, 332H, 335, 336 HLB3, HLB6, HLB9, and HLB11 External (purchase separately)
Models 331H, 332H, 335, 336 HLB3, HLB6, HLB9, and HLB11 External (purchase separately)
WARNING
TO REDUCE THE RISK OF INJURY TO PERSONS IN THE EVENT OF
A RANGE TOP GREASE FIRE, OBSERVE THE FOLLOWING
1. SMOTHER FLAMES with a close-fitting lid, cookie sheet,
or metal tray, then turn off the burner. BE CAREFUL TO
PREVENT BURNS. If the flames do not go out immedi
ately, EVACUATE AND CALL THE FIRE DEPARTMENT.
2. NEVER PICK UP A FLAMING PAN - You may be burned.
3. DO NOT USE WATER, including wet dishcloths or towels
- a violent steam explosion will result.
4. Use an extinguisher ONLY if:
A. You know you have a Class ABC extinguisher, and you
already know how to operate it.
B. The fire is small and contained in the area where it
started.
C. The fire department is being called.
D. You can fight the fire with your back to an exit.
a
Based on "Kitchen Firesafety Tips" published by NFPA.
!
CAUTION
1. For indoor use only.
2. For general ventilating use only. Do not use to exhaust hazardous or
explosive materials and vapors.
3. To avoid motor bearing damage and noisy and/or unbalanced impel-
lers, keep drywall spray, construction dust, etc. off power unit.
4. Clean filters and grease-laden surfaces frequently.
5. Do not repair or replace any part of this appliance unless specifically
recommended in this manual. All other servicing should be done by
a qualified technician.
6. Please read specification label on product for further information and
requirements.
7. To reduce the risk of fire and electric shock, install this downdraft only
with Rangemaster blower models shown below. Other blowers cannot
be substituted. (blowers sold separately).
Register your product online at: www.broan.com/register
MODEL
WIDTH
RMDD3004
30"
RMDD3604
36"
RMDD4804
48"
RMDD3004EX
30"
RMDD3604EX
36"
RMDD4804EX
48"
Downdraft Ventilators
BLOWER
500 cfm Internal
500 cfm Internal
500 cfm Internal
External, Model 331H, 332H, 335, 336,
HLB3, HLB6, HLB9, y HLB11 (purchase
separately)
External, Model 331H, 332H, 335, 336,
HLB3, HLB6, HLB9, y HLB11 (purchase
separately)
External, Model 331H, 332H, 335, 336,
HLB3, HLB6, HLB9, y HLB11 (purchase
separately)
Page 1
a
:
Table des Matières

Manuels Connexes pour Broan Elite RMDD3004


Sommaire des Matières pour Broan Elite RMDD3004
-
Page 27: Ventilateurs Séries De Créateur Downdraft Ventilators Encastrés De Conception
7. Afin de diminuer les risquies d'incendie et d'électrocution, installez ce ventilateur 1. Ne jamais laisser sans surveillance des unités de surface réglées à feu vif. En encastré seulement avec ventilateurs des modèles Broan montrés ci-dessous. plus de générer de la fumée, les débordements de graisse peuvent prendre D'autre modèles de ventilateurs ne peuvent pas être substitués. -
Page 28: Préparation
Ventilateurs séries de créateur Downdraft Ventilators encastrés de conception Page 28 PRÉPARATION Installation du ventilateur intérieur Installation du ventilateur extérieur Ce ventilateur encastré est Ce ventilateur encastré est conçu INSTALLATION TYPE INSTALLATION TYPE conçu pour évacuer les conta- pour évacuer les contaminants minants de l’air lors de l’utilisa- BOUCHE DE BOUCHE DE... -
Page 29: Préparation Des Conduits
Ventilateurs séries de créateur Downdraft Ventilators encastrés de conception Page 29 PRISE DES MESURES (SUITE) Installation du ventilateur extérieur Installation du ventilateur intérieur 6.03 cm 0,95 cm 6.03 cm 0,95 cm (2-3/8") (3/8") (2-3/8") (3/8") 7 mm 7 mm (1/4") (1/4") 19,5 cm 19,5 cm... -
Page 30: Préparation Du Découpage De L'armoire
Ventilateurs séries de créateur Downdraft Ventilators encastrés de conception Page 30 PRÉPARATION DU DÉCOUPAGE DE L’ARMOIRE SORTIE À Installation du ventilateur GAUCHE 5 6 , 2 ( 2 2 - 1 / 8 " ) ( 4 8 , 3 ( 1 9 "... -
Page 31: Préparation Du Câblage
Ventilateurs séries de créateur Downdraft Ventilators encastrés de conception Page 31 PRÉPARATION DU CÂBLAGE Installation du ventilateur extérieur Installation du ventilateur intérieur 1. Le ventilateur encastré intérieur consomme 4 AMPÈRES et 1. Le ventilateur encastré extérieur consomme 6 AMPÈRES et nécessite un circuit de 120 VCA, 60 Hz. -
Page 32: Ventilateurs Séries De Créateur Encastrés De Conception
Ventilateurs séries de créateur Downdraft Ventilators encastrés de conception Page 32 DÉCOUPAGE DU COMPTOIR 1. Tracer et découper la forme de la table de cuisson dans le comptoir, suffisamment vers l’ A VANT afin de pouvoir insérer le conduit vertical derrière elle. 2. -
Page 33: Installation De L'unité
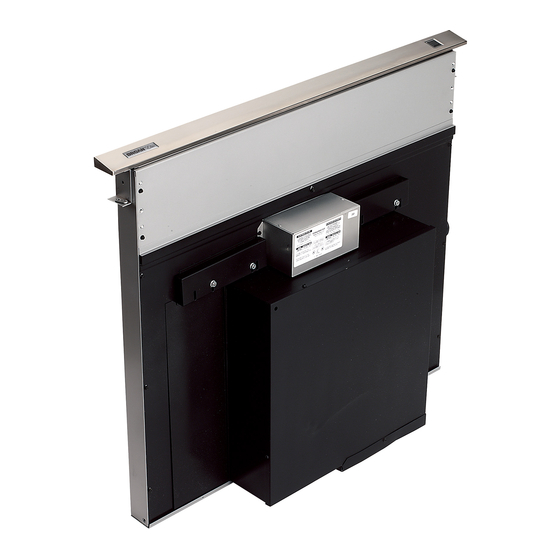
Ventilateurs séries de créateur Downdraft Ventilators encastrés de conception Page 33 INSTALLATION DE L’UNITÉ VIS DE MONTAGE Tous les modèles BRIDE DE NIVELLEMENT – REBORD À L’EXTÉRIEUR 1. Placez la hotte dans l’ouverture. Allongez les brides de nivellement jusqu’au plancher de l’armoire afin que la hotte s’appuie bien droite. -
Page 34: Câblage Électrique
Ventilateurs séries de créateur Downdraft Ventilators encastrés de conception Page 34 CÂBLAGE ÉLECTRIQUE Installation du ventilateur extérieur Installation du ventilateur intérieur ATTENTION : Le câblage doit être effectué par un ATTENTION : Le câblage doit être effectué par un électricien qualifié conformément aux codes et aux électricien qualifié... -
Page 35: Installation De La Télécommande Haut/Bas (Facultatif)
Ventilateurs séries de créateur Downdraft Ventilators encastrés de conception Page 35 INSTALLATION DE LA TÉLÉCOMMANDE HAUT/BAS (FACULTATIF) Tous les modèles Quand utiliser la télécommande HAUT/BAS Vous devez utiliser la télécommande HAUT/BAS si votre surface de cuisson comporte un brûleur situé à moins de 10 cm (4") du bouton HAUT/BAS de la cheminée d’évacuation. -
Page 36: Utilisation Et Entretien
Ventilateurs séries de créateur Downdraft Ventilators encastrés de conception Page 36 UTILISATION ET ENTRETIEN Nettoyage Tous les modèles Nettoyez les surfaces peintes avec un détergent doux. NE PAS UTILISER D’ A BRASIF, DE LAINE D’ A CIER NI DE POUDRES À RÉCURER. -
Page 37: Utilisation
Ventilateurs séries de créateur Downdraft Ventilators encastrés de conception Page 37 UTILISATION Tous les modèles chement encore. La mise à l'air libre descendra et la ventilateur coupera. Allumez le ventilateur encastré en enfonçant sur le commutateur de lancement. La mise à l'air libre montera. Note: Pour la plupart d'opération commode, placez le ventilateur à... -
Page 38: Garantie
98010802 98010803 98010803 CAPOT D’OUVERTURE DE BOÎTE À AIR Pour le service sous garantie, vous devez (a) aviser Broan à 98010804 98010804 98010824 BRIDE DE BOÎTE À AIR l’adresse ou numéro de téléphone mentionnée ci-dessous, 99260488 99260488 99260488 ÉCROU À... - Page 39 Ventilateurs séries de créateur Downdraft Ventilators encastrés de conception Page 39 PIÈCES DE RECHANGE...
- Page 40 99044713D...