Videotec GEKO IRH Manuel D'instructions
Masquer les pouces
Voir aussi pour GEKO IRH:
- Manuel d'instructions (44 pages) ,
- Manuel d'instructions (54 pages)
Table des Matières
Publicité
Les langues disponibles
Les langues disponibles
Liens rapides
Publicité
Chapitres
Table des Matières
Dépannage

Manuels Connexes pour Videotec GEKO IRH

Sommaire des Matières pour Videotec GEKO IRH
- Page 1 GEKO IRH LED illuminator English - Instructions manual Italiano - Manuale di istruzioni Français - Manuel d’instructions Deutsch - Bedienungslanleitung Русский - Руководство по эксплуатации...
- Page 3 GEKO IRH LED illuminator English - Instructions manual...
-
Page 4: Table Des Matières
Contents ENGLISH 1 About this manual ......................3 1.1 Typographical conventions ..........................3 2 Notes on copyright and information on trademarks ..........3 3 Safety rules........................3 4 Identification ........................5 4.1 Product description and type designation..................... 5 4.2 Product markings ..............................5 5 Preparing the product for use .................. -
Page 5: About This Manual
1 About this manual 3 Safety rules Before installing and using this unit, please read this Do not stare at the lamp when on. It can be manual carefully. Be sure to keep it handy for later harmful for eyes. reference. - Page 6 The white light LED illuminator emits CAUTION! The device must be installed high-intensity visible light. In compliance only and exclusively by qualified technical with standard EN62471/IEC62471, the personnel. photobiological safety assessment has • The manufacturer declines all responsibility classified the device in Risk Group 2, where for any damage caused by an improper use it exceeds the values of the Exempt Group.
-
Page 7: Identification
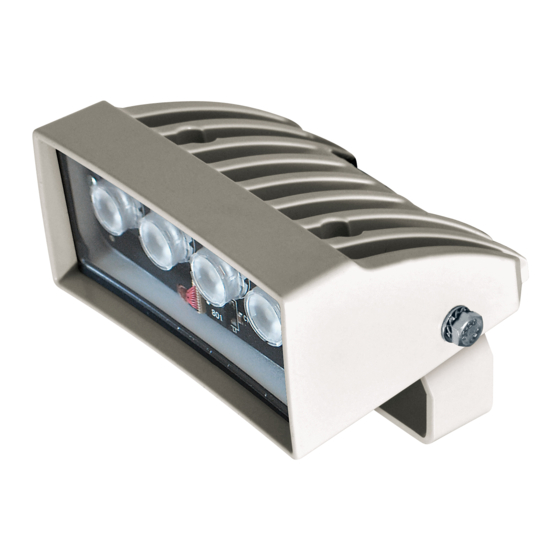
4 Identification 5 Preparing the product for 4.1 Product description and type designation Any change that is not expressly approved by the manufacturer will invalidate the The GEKO lights the entire scene evenly, eliminating guarantee. hotspots and underexposures, for unbeatable night-time images and secure surveillance of the 5.1 Unpacking and contents area. -
Page 8: Assembling And Installing
6 Assembling and installing 6.2 Installation 6.2.1 Installation of wall-mounted During normal operation the surface of the illuminator illuminator can reach high temperatures. Do not allow direct contact and position The illuminator’s position can be decided at the appliance where it is inaccessible to the time of installation. -
Page 9: Installation Of Housing-Fitted Illuminator (Osuppir Kit)
6.2.2 Installation of housing-fitted Fasten the illuminator, complete with its bracket, using the screw, the nut and the washer supplied. illuminator (OSUPPIR kit) Fasten the plate (01) between the bottom of the housing (02) and the bracket (03) using the screws supplied (04). -
Page 10: Twilight Sensor Activation Threshold Adjustment
6.2.4 Twilight sensor activation 6.2.5 Disabling the twilight sensor threshold adjustment To disable the lamp’s automatic switch-on set the brightness to minimum (turn the potentiometer all The illuminator has an integrated twilight sensor that the way anticlockwise). With this setting the lamp can allows its automatic activation and deactivation at only be switched on by closing the telemetry contact, predefined luminous conditions. -
Page 11: Cable Technical Specifications
7 Disposal of waste 6.2.7 Cable technical specifications Depending on the type of illuminator (Low or materials High Power) and on the supply voltage, apply the following maximum lengths for the power cables (to This symbol mark and recycle system are be connected to the black and white wire pair). -
Page 12: Technical Data
Adjustable built-in photocell for automatic activation and deactivation Input for activation by means of external dry contact Supplied with multipole cable: 4xAWG22 (0,34mm²), L=2m 9.2 Illuminators GEKO IRH - BEAM PATTERN AND ACHIEVABLE DISTAN- Horizon- Maximum distance tal/verti- Wave- Wave-... -
Page 13: Technical Drawings
10 Technical drawings The dimensions of the drawings are in millimetres. Ø 6.2 Fig. 12 GEKO IRH. MNVCIRHS_1511_EN... - Page 14 Email: info@videotec.com Tel. +33 1 60491816 - Fax +33 1 69284736 Email: info.fr@videotec.com Asia Pacific Videotec (HK) Ltd Americas Videotec Security, Inc. Flat 8, 19/F. On Dak Industrial Building, No. 2-6 Wah Sing Street Gateway Industrial Park, 35 Gateway Drive, Suite 100 Kwai Chung, New Territories - Hong Kong Plattsburgh, NY 12901 - U.S.A.
- Page 15 GEKO IRH Illuminatore a LED Italiano - Manuale di istruzioni...
- Page 16 Sommario ITALIANO 1 Informazioni sul presente manuale ................3 1.1 Convenzioni tipografiche ............................. 3 2 Note sul copyright e informazioni sui marchi commerciali ........3 3 Norme di sicurezza ......................3 4 Identificazione ....................... 5 4.1 Descrizione e designazione del prodotto ....................... 5 4.2 Marcatura del prodotto ............................
-
Page 17: Informazioni Sul Presente Manuale
1 Informazioni sul presente 3 Norme di sicurezza manuale Non fissare la lampada in funzione. Può essere dannoso per gli occhi. Prima di installare e utilizzare questa unità, leggere attentamente questo manuale. Conservare questo L’illuminatore a LED a luce infrarossa manuale a portata di mano come riferimento futuro. - Page 18 L’illuminatore a LED a luce bianca emette ATTENZIONE! L'installazione e la luce ad alta intensità visibile. La valutazione manutenzione del dispositivo deve foto-biologica di sicurezza, in accordo con essere eseguita solo da personale tecnico la norma EN62471/IEC62471, ha portato qualificato. alla classificazione del dispositivo nel •...
-
Page 19: Identificazione
4 Identificazione 5 Preparazione del prodotto per l'utilizzo 4.1 Descrizione e designazione del prodotto Qualsiasi cambiamento non espressamente approvato dal costruttore fa decadere la GEKO illumina l’intera scena in modo omogeneo garanzia. eliminando macchie di luce e sottoesposizioni per insuperabili immagini notturne e una sicura 5.1 Disimballaggio e contenuto sorveglianza dell’area. -
Page 20: Assemblaggio E Installazione
6 Assemblaggio e 6.2 Installazione installazione 6.2.1 Installazione dell'illuminatore a muro Durante il normale funzionamento la In fase di installazione è possibile decidere la superficie dell'illuminatore può raggiungere posizione dell'illuminatore. temperature elevate. Evitare il contatto diretto e posizionare l’apparecchiatura in luogo non accessibile al personale non autorizzato. -
Page 21: Installazione Dell'illuminatore Su Custodia (Kit Osuppir)
6.2.2 Installazione dell'illuminatore su Fissare l'illuminatore completo di staffa tramite vite, dado e rondelle in dotazione. custodia (kit OSUPPIR) Fissare la piastra (01) tra fondo custodia (02) e staffa (03) tramite le viti in dotazione (04). Fig. 6 Regolare l'inclinazione verticale ed orizzontale dell'illuminatore agendo sulle apposite viti di fissaggio. -
Page 22: Regolazione Della Soglia Di Intervento Del Sensore Crepuscolare
6.2.4 Regolazione della soglia di 6.2.5 Disattivazione del sensore intervento del sensore crepuscolare crepuscolare L'illuminatore ha un sensore crepuscolare integrato Per disabilitare l’accensione automatica che consente l'accensione e lo spegnimento dell'illuminatore impostare la luminosità al minimo automatico a condizioni luminose prestabilite. (regolare il potenziometro in senso antiorario fino a finecorsa). -
Page 23: Specifiche Tecniche Dei Cavi
7 Smaltimento dei rifiuti 6.2.7 Specifiche tecniche dei cavi In relazione al tipo di illuminatore (modello Low Questo simbolo e il sistema di riciclaggio o High power) e alla tensione di alimentazione, sono validi solo nei paesi dell'EU e non attenersi alle seguenti lunghezze massime per i trovano applicazione in altri paesi del mondo. -
Page 24: Dati Tecnici
Fotocellula integrata regolabile per accensione e spegnimento automatico Ingresso per accensione tramite contatto pulito esterno Fornito con cavo multipolare: 4xAWG22 (0,34mm²), L=2m 9.2 Illuminatori GEKO IRH - ANGOLO DI DIFFUSIONE E DISTANZE ILLUMINATORE Angolo di Distanza massima diffusione Lunghez- Lunghez-... -
Page 25: Disegni Tecnici
10 Disegni tecnici Le dimensioni dei disegni sono espresse in millimetri. Ø 6.2 Fig. 12 GEKO IRH. MNVCIRHS_1511_IT... - Page 26 Email: info@videotec.com Tel. +33 1 60491816 - Fax +33 1 69284736 Email: info.fr@videotec.com Asia Pacific Videotec (HK) Ltd Americas Videotec Security, Inc. Flat 8, 19/F. On Dak Industrial Building, No. 2-6 Wah Sing Street Gateway Industrial Park, 35 Gateway Drive, Suite 100 Kwai Chung, New Territories - Hong Kong Plattsburgh, NY 12901 - U.S.A.
- Page 27 GEKO IRH Projecteur à LED Français - Manuel d’instructions...
- Page 28 Sommaire FRANÇAIS 1 À propos de ce mode d’emploi ..................3 1.1 Conventions typographiques ..........................3 2 Notes sur le copyright et informations sur les marques de commerce ..... 3 3 Normes de securité ......................3 4 Identification ........................5 4.1 Description et désignation du produit ......................
-
Page 29: Propos De Ce Mode D'emploi
1 À propos de ce mode 3 Normes de securité d’emploi Ne pas fixer l'ampoule lorsqu'elle est en marche. Peut être dangereux pour les yeux. Avant d’installer et d’utiliser cet appareil, veuillez lire attentivement ce mode d’emploi. Conservez-le à Le projecteur à LED à lumière infrarouge portée de main pour pouvoir vous y reporter en cas émet de la lumière à... - Page 30 Le projecteur à LED à lumière blanche émet ATTENTION! L’installation et l’entretien de la lumière à haute intensité visible. du dispositif doivent être exclusivement L'évaluation photo-biologique de sécurité, être effectués par un personnel technique conformément à la norme EN62471/ qualifié. CEI62471, a donné...
-
Page 31: Identification
4 Identification 5 Préparation du produit en vue de l’utilisation 4.1 Description et désignation du produit Toute modification non approuvée expressément par le fabricant entraînera Le projecteur GEKO éclaire toute la scène de manière l’annulation de la garantie. homogène, éliminant les tâches de lumière et les sous-expositions et obtenant ainsi d'excellentes 5.1 Déballage et contenu images nocturnes et une surveillance sûre de la zone. -
Page 32: Assemblage Et Installation
6 Assemblage et installation 6.2 Installation 6.2.1 Installation du projecteur sur le Durant le fonctionnement normal, la surface du projecteur peut atteindre des températures élevées. Éviter le contact direct On peut décider la position du projecteur lors et positionner l’appareil dans un endroit de la phase d'installation. -
Page 33: Installation Du Projecteur Sur Le Caisson (Kit Osuppir)
6.2.2 Installation du projecteur sur le Fixer le projecteur ainsi que l'étrier avec la vis, l'écrou et les rondelles fournis. caisson (kit OSUPPIR) Fixer la plaque (01) entre le fond du caisson (02) et l'étrier (03) avec les vis fournies (04). Fig. -
Page 34: Réglage Du Seuil D'intervention Du Capteur Crépusculaire
6.2.4 Réglage du seuil d'intervention du 6.2.5 Désactivation du capteur capteur crépusculaire crépusculaire Le projecteur a une capteur crépusculaire intégrée Pour désactiver l'allumage automatique du qui permet un allumage et un arrêt automatique à projecteur, configurer l'éclairage au minimum (régler conditions lumineuses préétablies. -
Page 35: Spécifications Techniques Des Câbles
7 Élimination des déchets 6.2.7 Spécifications techniques des câbles Ce symbole et le système de recyclage ne sont Selon le type de projecteur (modèle Low ou High appliqués que dans les pays UE et non dans power) et la tension d'alimentation, respecter les les autres pays du monde. -
Page 36: Données Techniques
Cellule de détection intégrée et réglable pour allumage et extinction automatique Entrée pour allumage par contact sec externe Fourni avec un câble multipolaire: 4xAWG22 (0,34mm²), L=2m 9.2 Projecteurs GEKO IRH - ANGLE DE DIFFUSION ET DISTANCES Angle de Distance maximale diffusion Longueur Longueur... -
Page 37: Dessins Techniques
10 Dessins techniques Les dimensions des dessins sont exprimées en millimètres. Ø 6.2 Fig. 12 GEKO IRH. MNVCIRHS_1511_FR... - Page 38 Email: info@videotec.com Tel. +33 1 60491816 - Fax +33 1 69284736 Email: info.fr@videotec.com Asia Pacific Videotec (HK) Ltd Americas Videotec Security, Inc. Flat 8, 19/F. On Dak Industrial Building, No. 2-6 Wah Sing Street Gateway Industrial Park, 35 Gateway Drive, Suite 100 Kwai Chung, New Territories - Hong Kong Plattsburgh, NY 12901 - U.S.A.
- Page 39 GEKO IRH LED- Scheinwerfer Deutsch - Bedienungslanleitung...
- Page 40 Inhaltsverzeichnis DEUTSCH 1 Allgemeines ........................3 1.1 Schreibweisen ................................3 2 Anmerkungen zum Copyright und Informationen zu den Handelsmarken ..... 3 3 Sicherheitsnormen ......................3 4 Identifizierung ....................... 5 4.1 Beschreibung und Bezeichnung des Produktes ................... 5 4.2 Kennzeichnung des Produkts..........................5 5 Vorbereitung des Produktes auf den Gebrauch............
-
Page 41: Allgemeines
1 Allgemeines 3 Sicherheitsnormen Lesen Sie bitte vor dem Installieren und dem Die Lampe nicht anfassen, wenn sie in Betrieb Verwenden dieses Gerätes die Bedienungsanleitung ist. Kann zu Verletzungen an den Augen sorgfältig durch. Bewahren Sie sie zum späteren führen. Nachschlagen auf. - Page 42 Der Weißlicht-LED-Schweinwerfer ACHTUNG! Die Installation und Wartung emittiert sichtbares Licht mit hoher der Vorrichtung ist technischen Fachleuten Intensität. Aufgrund der Bewertung vorbehalten. der photobiologischen Sicherheit, in • Der Hersteller lehnt jede Haftung für eventuelle Übereinstimmung mit der Norm EN62471/ Schäden ab, die aufgrund unsachgemäßer IEC62471, wurde das Gerät in der Anwendung der in diesem Handbuch erwähnten Risikogruppe 2 eingestuft, wo die Werte...
-
Page 43: Identifizierung
4 Identifizierung 5 Vorbereitung des Produktes auf den Gebrauch 4.1 Beschreibung und Bezeichnung des Produktes Jede vom Hersteller nicht ausdrücklich genehmigte Veränderung führt zum Verfall Die vom Scheinwerfer GEKO erzeugte Beleuchtung der Gewährleistungsrechte. erhellt gleichmäßig das gesamte Sichtfeld und beseitigt Lichtflecken und Unterbelichtungen 5.1 Entfernen der Verpackung für unübertreffliche Nachtbilder und eine und Inhalt... -
Page 44: Zusammenbau Und Installation
6 Zusammenbau und 6.2 Installation Installation 6.2.1 Wandmontage des Scheinwerfers Während der Installation kann die Position Im normalen Betrieb kann der Scheinwerfer des Scheinwerfers gewählt werden. an der Oberfläche Hohe Temperaturen erreichen. Vermeiden Sie die direkte Berührung und positionieren Sie das Gerät an einem Ort, der für Unbefugte unzugänglich ist. -
Page 45: Installation Des Scheinwerfers Am Gehäuse (Bausatz Osuppir)
6.2.2 Installation des Scheinwerfers am Den mit Bügel versehenen Scheinwerfer mithilfe der in der Lieferung enthaltenen Schraube, Mutter und Gehäuse (Bausatz OSUPPIR) Unterlegscheiben befestigen. Die Platte (01) zwischen Gehäuse (02) und Bügel (03) mithilfe der mitgelieferten Schrauben (04) befestigen. Abb. 6 Die vertikale und horizontale Neigung des Scheinwerfers wird eingestellt, indem die Abb. -
Page 46: Einstellen Der Schwelle Für Die Auslösung Des Dämmerungssensors
6.2.4 Einstellen der Schwelle für die 6.2.5 Deaktivierung des Auslösung des Dämmerungssensors Dämmerungssensors Der Scheinwerfer besitzt einen integrierten Zur Deaktivierung der automatischen Einschaltung Dämmerungssensor, der eine automatische des Scheinwerfers Helligkeit auf das Minimum Ein- und Ausschaltung unter vorher festgelegten einstellen (Potenziometer entgegen Uhrzeigersinn Lichtverhältnissen ermöglicht. -
Page 47: Technische Spezifikationen Der Kabel
7 Müllentsorgungsstellen 6.2.7 Technische Spezifikationen der Kabel Dieses Symbol und das entsprechende Je nach Scheiwerfertyp (Modell Low oder High Recycling-System gelten nur für EULänder Power) und Versorgungsspannung, sich an folgende und finden in den anderen Ländern der Welt Maximallängen für die Versorgungskabel (Anschluss keine Anwendung. -
Page 48: Technische Daten
Einstellbare integrierte Fotozelle für eine automatische Ein- und Ausschaltung Eingang für die Einschaltung über einen externen Trockenkontakt Geliefert mit mehrpoligem Kabel: 4xAWG22 (0,34mm²), L=2m 9.2 Scheinwerfer GEKO IRH - ÖFFNUNGSWINKEL UND REICHWEITEN Streuwin- Höchstentfernung kel hori- Wel- Wel- Wel- Weißlicht zontal / lenlänge... -
Page 49: Technische Zeichnungen
10 Technische Zeichnungen Die Abmessungen der Zeichnungen sind in Millimeter angegeben. Ø 6.2 Abb. 12 GEKO IRH. MNVCIRHS_1511_DE... - Page 50 Email: info@videotec.com Tel. +33 1 60491816 - Fax +33 1 69284736 Email: info.fr@videotec.com Asia Pacific Videotec (HK) Ltd Americas Videotec Security, Inc. Flat 8, 19/F. On Dak Industrial Building, No. 2-6 Wah Sing Street Gateway Industrial Park, 35 Gateway Drive, Suite 100 Kwai Chung, New Territories - Hong Kong Plattsburgh, NY 12901 - U.S.A.
- Page 51 GEKO IRH Прожектор со LED Русский - Руководство по эксплуатации...
- Page 52 Индекс РУССКИЙ 1 Информация о настоящем руководстве ..............3 1.1 Типографские обозначения ..........................3 2 Примечания по авторскому праву и торговым маркам ........3 3 Правила безопасности ....................3 4 Идентификация ......................5 4.1 Описание и назначение изделия........................5 4.2 Маркировка изделия ............................5 5 Подготовка...
-
Page 53: Информация О Настоящем Руководстве
1 Информация о 3 Правила безопасности настоящем руководстве Не фиксировать функционирующую лампу. Может быть вредно для глаз. Перед монтажом и использованием настоящего блока, внимательно прочитать настоящее Светодиодный (LED) осветитель руководство. Хранить данное руководство под инфракрасного излучения испускает рукой для будущих консультаций. видимый... - Page 54 Светодиодный (LED) осветитель ПРЕДУПРЕЖДЕНИЕ! Следует использовать белого света испускает видимый только кронштейны или принадлежности, свет высокой интенсивности. Оценка рекомендуемые для монтажа. фотобиологической безопасности в • Производитель снимает с себя какую-либо соответствии с нормативом EN62471/ ответственность за возможный ущерб, IEC62471 отнесла устройство к группе вызванный...
-
Page 55: Идентификация
4 Идентификация 5 Подготовка изделия к использованию 4.1 Описание и назначение изделия Любое изменение, выполненное без разрешения изготовителя, ведёт к потери GEKO освещает всю зону равномерно, устраняя гарантии. световые пятна и недодержки, обеспечивая непревзойденность ночных изображений и 5.1 Распаковка и содержание надежное... -
Page 56: Сборка И Установка
6 Сборка и установка 6.2 Монтаж 6.2.1 Установка настенного Во время нормального функционирования осветителя поверхность осветителя может нагреваться до высоких температур. В фазу установки можно выбрать Избегайте прямого контакта и положение осветителя. расположите аппаратуру в месте, недоступном для неуполномоченного персонала. Для выполнение любых работ... -
Page 57: Установка Осветителя На Футляре (Комплект Osuppir)
6.2.2 Установка осветителя на Прикрепите осветитель, оснащенный скобой, с помощью прилагающихся винта, гайки и шайб. футляре (комплект OSUPPIR) Прикрепите пластину (01) между днищем футляра (02) и скобой (03) с помощью прилагающихся винтов (04). Рис. 6 Отрегулируйте вертикальный и горизонтальный наклон осветителя с помощью соответствующих крепежных... -
Page 58: Регулировка Порога Срабатывания Сумеречного Датчика
6.2.4 Регулировка порога 6.2.5 Деактивирование сумеречного срабатывания сумеречного датчика датчика Осветитель представляет собой встроенный Для деактивации функции автоматического сумеречный датчик, обеспечивающий включения прожектора установите освещенность автоматическое включение и выключение при на минимум (регулируйте потенциометр против заданных условиях освещенности. часовой стрелки до ограничителя хода). Этим способом... -
Page 59: Технические Специфики Кабелей
7 Вывоз в отходы 6.2.7 Технические специфики кабелей В зависимости от типа осветителя (модель Этот символ и система утилизации имеют Low или High power) и напряжения питания значение только в странах ЕС и не находят соблюдайте следующие максимальные длины применения в других странах мира. кабелей... -
Page 60: Технические Параметры
LED SMD по высшему разряду Интегрированный регулируемый фотоэлемент для автоматического включения и выключения Вход для включения посредством свободного внешнего контакта Поставляется с многожильным кабелем: 4xAWG22 (0,34mm²), L=2m 9.2 Прожекторы GEKO IRH - УГОЛ ИЗЛУЧЕНИЯ И ДЛИНЫ Вертикальный/ Максимальная дистанция горизонтальный Длина Длина Длина Белый... -
Page 61: Технические Чертежи
10 Технические чертежи Размеры в чертежах выражены в миллиметрах. Ø 6.2 Рис. 12 GEKO IRH. MNVCIRHS_1511_RU... - Page 62 Email: info@videotec.com Tel. +33 1 60491816 - Fax +33 1 69284736 Email: info.fr@videotec.com Asia Pacific Videotec (HK) Ltd Americas Videotec Security, Inc. Flat 8, 19/F. On Dak Industrial Building, No. 2-6 Wah Sing Street Gateway Industrial Park, 35 Gateway Drive, Suite 100 Kwai Chung, New Territories - Hong Kong Plattsburgh, NY 12901 - U.S.A.
- Page 64 Email: info@videotec.com Tel. +33 1 60491816 - Fax +33 1 69284736 Email: info.fr@videotec.com Asia Pacific Videotec (HK) Ltd Americas Videotec Security, Inc. Flat 8, 19/F. On Dak Industrial Building, No. 2-6 Wah Sing Street Gateway Industrial Park, 35 Gateway Drive, Suite 100 Kwai Chung, New Territories - Hong Kong Plattsburgh, NY 12901 - U.S.A.