V7 42U Guide D'utilisation
Liens rapides
42U ENCLOSURE USER MANUAL
GUIDE D'UTILISATION DE L'ARMOIRE 42U
ARMADIO DA 42U - MANUALE UTENTE
42U-GEHÄUSE BENUTZERHANDBUCH
MANUAL DEL USUARIO DEL ARMARIO 42U
42U BEHUIZING HANDLEIDING
RMEC42U
42U ENCLOSURE USER MANUAL • GUIDE D'UTILISATION DE L'ARMOIRE 42U • ARMADIO DA 42U - MANUALE UTENTE
42U-GEHÄUSE BENUTZERHANDBUCH • MANUAL DEL USUARIO DEL ARMARIO 42U • 42U BEHUIZING HANDLEIDING

Sommaire des Matières pour V7 42U
- Page 1 MANUAL DEL USUARIO DEL ARMARIO 42U 42U BEHUIZING HANDLEIDING RMEC42U 42U ENCLOSURE USER MANUAL • GUIDE D'UTILISATION DE L'ARMOIRE 42U • ARMADIO DA 42U - MANUALE UTENTE 42U-GEHÄUSE BENUTZERHANDBUCH • MANUAL DEL USUARIO DEL ARMARIO 42U • 42U BEHUIZING HANDLEIDING...
- Page 2 Enclosure Armoire Installazione Gehäuse Armario Behuizing • • • • • Installation Installation dell’armadio Installation Instalación Installatie Caution! Read All Instructions and Warnings Attention ! Veuillez lire tous les avertissements Attenzione! Leggere integralmente le istruzioni e Achtung! Vor der Installation alle Anleitungen ¡Precaución! Lea todas las instrucciones Voorzichtig! Lees alle aanwijzingen Before Installation...
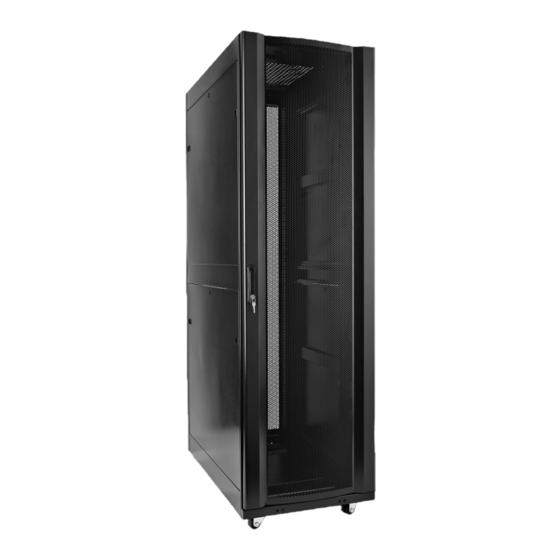
- Page 3 Overview • Présentation • Panoramica • Überblick • Vista general • Overzicht 1. Roof panel 1. Panneau du haut 1. Pannello superiore 2. Locking split rear doors 2. Portes arrières verrouillables 2. Sportelli doppi posteriori con serratura 3. Locking side panels 3.
- Page 4 Unpacking • Déballage • Disimballaggio • Auspacken • Desembalaje • Uitpakken Use wrench to raise leveling feet higher than the casters before moving enclosure off pallet Servez-vous d'une clé pour soulever les pieds de mise à niveau au-dessus des roulettes avant de Once the enclosure is close to the installation space and upright and stable –...
- Page 5 Placement • Positionnement • Posizionamento • Platzierung • Colocación • Plaatsing WARNING: Enclosure must be level before installing equipment. Use the levelers to provide long-term support, casters are not designed for this. Install the enclosure in an area with a level floor that is structurally able to handle the weight. AVERTISSEMENT : L'armoire doit être à...
- Page 6 Optional • Facultatif • Opzionale • Optional • Opcional • Optie Optional: Reversing Front Door • Facultatif : Inversion de la porte avant • Opzionale: Sportello anteriore apribile a destra o sinistra • Optional: Vordertür umkehren • Opcional: Invertir la puerta frontal • Optie: Omkeerbare voordeur Warning –...
- Page 7 Optional • Facultatif • Opzionale • Optional • Opcional • Optie Remove Roof Panel 1. Pull the 2 pins near the back of roof panel, and while holding push the roof panel upwards. Remove Side Panels 2. Remove the roof panel from slots in the enclosures frame and lift to remove 1.
-
Page 8: Parte Inferiore
Enclosure Armoire Configurazione Gehäuse- Configuración Behuizing • • • • • Configuration Configuration Dell’armadio Konfiguration del armario Configuratie Montage- und Kabelführungsschienen anpassen. Adjust Mounting and Cable Management Rails. Warnung: Warnung - Nicht ohne Hilfe einer weiteren Person versuchen Die Schienen dürfen nicht angepasst werden, Warning: Do not attempt without assistance. - Page 9 Equipment Équipements Installazione Einschübe Instalación Apparatuur • • • • • Installation Installation dell’apparecchiatura Installation del equipo Installatie Warning: Do not install equipment until you have stabilized the enclosure. Install heavier equipment first towards the bottom of the enclosure. Install Note: The square holes in the middle of each rack unit are numbered and also include a small notch to aid identification.
- Page 10 The enclosure comes with mounting rails that have square holes for mounting rack equipment. To install equipment, use the included cage nuts and other hardware. Locate the numbered square openings in the mounting rails where you plan to install your equipment. Install cage nuts (included) into the square openings by pressing it in. This provides an attachment point for the cage bolts (included) L'armoire est livrée avec des rails de montage disposant d'orifices carrés pour le montage en rack des équipements.
- Page 11 Equipment Équipements Installazione Einschübe Instalación Apparatuur • • • • • Installation Installation dell’apparecchiatura Installation del equipo Installatie When the cage nut is properly installed, both flanges will protrude through the square opening and will be visible on the outer surface of the mounting rail. Repeat until all required cage nuts are installed.
- Page 12 Safety Instructions Istruzioni Sicherheit Instrucciones Veiligheid • • • • • Instructions de sécurité di sicurezza Anleitung de seguridad Instructies • Das Gehäuse muss in einem Innenraum aufgestellt werden und darf nicht Staub, Feuchtigkeit, direktem Sonnenlicht und extremen Temperaturen ausgesetzt werden. •...
- Page 13 www.V7-world.com...