Publicité
Les langues disponibles
Les langues disponibles
Liens rapides
HAIKU WALL CONTROL INSTALLATION
!
WARNING: Disconnect power to the wall control location before installing or
servicing the wall control!
!
WARNING: A licensed electrician must install the wall control if required by
your local electrical code.
!
CAUTION: Do not install the wall control outdoors or in a location where it may
come into contact with water.
!
A readily accessible disconnect device shall be incorporated external to the
equipment.
!
Verify minimum wiring compartment size required in accordance to local
electrical codes.
!
Ground screw is not intended for conductors larger than 10 AWG (5.3 mm
Do not use above 2,000 m (6,561 ft) above sea level.
≤
2000
m
2000
m
≤
Safe for use in non-tropical climate conditions.
READ AND SAVE THESE INSTRUCTIONS
Disconnect Power
1
Contact a licensed electrician if you are uncomfortable performing
electrical work or if legally required in your area.
Circuit breakers
Disconnect power to all circuits wired to the outlet box at the fuse or
circuit breaker before installing the wall control!
3
Wire Wall Control
Lift the levers on the wall control wire connectors. Push the supply
1
Hot wire and the Haiku product Load/Hot wire into the wall control
Hot (black) connector [A]. Push the supply Neutral wire and the Haiku
product Neutral wire into the wall control Neutral (white) connector [A].
Close the levers and visually verify the connections.
• If you need to insert more than two wires into a connector:
Secure a jumper wire to the extra supply wiring with a wire nut or
connector that complies with local code [B]. Insert the loose end of
the jumper wire into the connector.
Attach the supply Earth/PE wire to the green ground screw on the back
2
of the wall control [C].
Jumper wire
(optional)
[A]
Mount Wall Control
4
Single gang outlet box shown. Your outlet box may differ.
Wall Control
Wallplate
(not supplied)
Mount the wall control to the outlet box so that the word TOP is oriented
1
upward. Do not overtighten the screws.
Install a wallplate using the screws provided with the wallplate.
2
A wallplate may not be supplied with your wall control. Haiku Home
recommends using a plastic Decora-style wallplate. Metal wallplates
may interfere with Wi-Fi signals.
Revision F 09/27/17
©2017 Haiku Home. The information contained in this document is subject to change without notice.
May be protected by one or more patents listed at www.bigasssolutions.com/patents
Haiku is a trademark of Delta T Corporation, registered in the U.S. and/or other countries.
www.haikuhome.com/warranties
or
Fuse panel
Ground
screw
[B]
[C]
Outlet box
(in wall)
HKU-INST-78-MUL-01
Before Installing the Wall Control
☐ Install your Haiku
☐ Contact a licensed electrician if you are uncomfortable performing
electrical work or if legally required in your area.
☐ Check your home Wi-Fi signal strength at the wall control location. Two or
more bars are recommended.
Parts and Hardware
•
Wall Control
1
•
(2) #6-32 x 3/4" Screws
•
Wi-Fi Module
3
2
).
Wallplates are not supplied with most wall controls. Haiku
1.
using a plastic Decora
®
-style wallplate. Metal wallplates may interfere with
Wi-Fi signals.
Pre-attached to wall control
2.
L Series fans only. One module is required for each fan connected to the wall
3.
control. See the installation guide provided with the L Series fan for instructions.
Prepare Outlet Box
2
0.5" (11 mm)
[A]
Remove the switch from the outlet box.
1
Make sure the outlet box contains a neutral wire. See step 3 below for
2
a wire color chart. Neutral wires may be hidden or tucked into the back
of the outlet box. If there is not a neutral wire in the outlet box, the wall
control is not compatible.
3
Make sure 0.5" (11 mm) of insulation is stripped from each supply wire [A].
Wire Color Chart
North America
100–120 V
Australia
240 V
All other regions
* Neutral wire (white) on wall control is labeled "N"
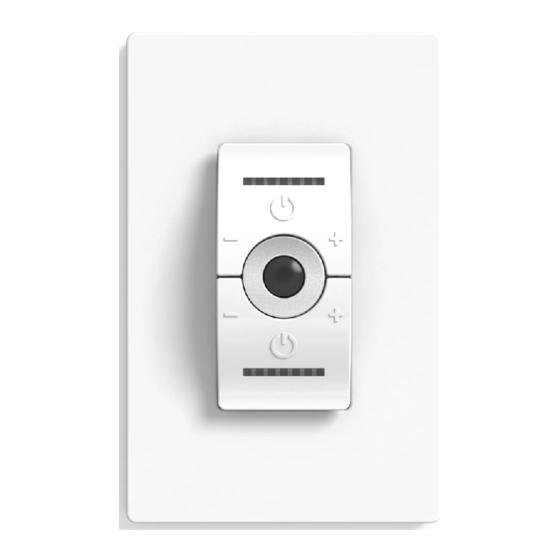
Test Wall Control
5
Press between
+ and – buttons
to turn products
on and off
Turn on power to the wall control and Haiku product locations.
1
Follow the steps in the Quick Setup guide provided with the wall control
2
to set up the Haiku Home app. For detailed setup instructions, visit
resources.haikuhome.com/help
Test fan speed and light brightness using the wall control. Press the
3
areas between the + and – buttons to turn your products on and off. Be
careful not to touch the sensor. The wall control button functions vary
depending on the types of Haiku products you are controlling.
For wall control operation and troubleshooting information, visit
resources.haikuhome.com/help
Conforms to UL STD 60950-1
5004870
Certified to CSA STD C22.2 No. 60950-1
®
products according to their installation guides.
Tools Needed
•
Phillips and Flat Head Screwdrivers
2
•
Wire Strippers
Home recommends
®
Load/Hot
to Haiku
product
Hot
AC Hot (L1)
AC Neutral (L2/N)
Black
White*
Black
White
Black or Light
Brown or Red
Blue
Brown
Blue
Sensor
(do not touch)
resources.haikuhome.com/help
Neutral wire
(required)
Neutral to
Haiku product
Neutral
Earth/PE
Earth/PE
Green or Bare
Copper
Green with Yellow
Tracer
resources.haikuhome.com/help
Publicité

Manuels Connexes pour BIG ASS FANS HAIKU

Sommaire des Matières pour BIG ASS FANS HAIKU
- Page 1 Revision F 09/27/17 ©2017 Haiku Home. The information contained in this document is subject to change without notice. May be protected by one or more patents listed at www.bigasssolutions.com/patents Haiku is a trademark of Delta T Corporation, registered in the U.S. and/or other countries.
- Page 2 Révision F 09/27/17 ©2017 Haiku Home. Les informations contenues dans ce document sont susceptibles d’être modifiées sans préavis. Ce produit peut être protégé par un ou plusieurs brevets dont la liste figure sur : www.bigasssolutions.com/patents Haiku est une marque déposée de Delta T Corporation, enregistrée aux États-Unis et/ou dans d’autres pays.