Table des Matières

Publicité

Les langues disponibles
  • FR

Les langues disponibles

  • FRANÇAIS, page 52

Liens rapides

Original-Bedienungsanleitung
DryAged Master 380 Pro (691)
1

Publicité

Table des Matières
loading

Sommaire des Matières pour CASO DESIGN DryAged Master 380 Pro

  • Page 1 Original-Bedienungsanleitung DryAged Master 380 Pro (691)
  • Page 2: Table Des Matières

    Braukmann GmbH Raiffeisenstraße 9 D-59757 Arnsberg Service-Hotline International: Tel.: +49 (0) 29 32 / 80 55 4 – 99 Fax: +49 (0) 29 32 / 80 55 4 – 77 eMail: kundenservice@caso-design.de Sie finden die aktuellste Version der Bedienungsanleitung auch auf unserer Homepage: www.caso-design.de Dokument-Nr.: 00691 16-11-2020 Druck- und Satzfehler vorbehalten.
  • Page 3 3.6 Elektrischer Anschluss ..................18 Aufbau und Funktion ..................19 4.1 Gesamtübersicht ....................19 4.1.1 Herausnehmen der Edelstahlroste ..............20 Bedienelemente und Betrieb ................20 5.1 Bedienelemente und Anzeige ................20 5.2 Bedienung ......................20 5.3 Typenschild ......................22 Dry-Aging ......................22 6.1 Sicherheitshinweise ....................
  • Page 4 14.2 Delivery scope and transport inspection ............37 14.3 Unpacking ......................37 14.4 Disposal of the packaging .................. 37 14.5 Setup ........................38 14.5.1 Setup location requirements:................38 14.5.2 Feet ........................38 14.5.1 The handle installing ..................39 14.6 Electrical connection ..................39 Design and Function ...................
  • Page 5 24.3 Sources de danger ....................55 24.3.1 Danger d’incendie/Danger dû à des matériaux inflammables. Danger d'incendie et d'explosion ......................... 55 24.3.2 Dangers du courant électrique ................56 Mise en service ....................57 25.1 Consignes de sécurité ..................57 25.2 Inventaire et contrôle de transport ..............57 25.3 Déballage ......................
  • Page 6 33.2 Informazioni su queste istruzioni d’uso ............73 33.3 Indicazioni d’avvertenza ..................73 33.4 Limitazione della responsabilità ................ 74 33.5 Tutela dei diritti d’autore ..................74 Sicurezza ......................74 34.1 Utilizzo conforme alle disposizioni ..............74 34.2 Indicazioni generali di sicurezza ................ 75 34.3 Fonti di pericolo ....................
  • Page 7 40.1 Indicazioni di sicurezza..................90 40.2 Cause malfunzionamenti e risoluzione ............. 90 Smaltimento dell’apparecchio obsoleto ............91 Garanzia ....................... 92 Dati tecnici ......................92 Manual del usuario ....................94 44.1 Generalidades ...................... 94 44.2 Información acerca de este manual ..............94 44.3 Advertencias ......................
  • Page 8 49.3 Información sobre el curado ................106 Limpieza y conservación .................. 106 50.1 Instrucciones de seguridad ................106 50.2 Limpieza ......................107 50.3 Sustitución de la bombilla de la lámpara de luz ultravioleta ......109 50.4 Transporte del aparato..................110 Resolución de fallas ..................
  • Page 9 Bediening en gebruik ..................124 59.1 Bedieningselementen en display: ..............124 59.2 Bediening: ......................124 59.3 Typeplaatje ......................126 Dry-Aging ......................126 60.1 Veiligheidstips ....................126 60.2 Afwijzing van aansprakelijkheid: ..............127 60.3 Informatie over dry-aging ................. 127 Reiniging en onderhoud ................... 127 61.1 Veiligheidsvoorschriften ...................
  • Page 10 68.5.1 Требования к месту установки: ..............142 68.5.2 Опорные ножки ....................142 68.5.3 Установка ручки ..................... 143 68.6 Электрическое подключение ................ 143 Конструкция и работа ..................143 69.1 Общий обзор ....................144 69.1.1 Удаление металлических полок ..............145 Эксплуатация и работа ................... 145 70.1 Элементы...
  • Page 11: Bedienungsanleitung: Allgemeines

    Wir wünschen Ihnen viel Freude beim Gebrauch. 1.1 Informationen zu dieser Anleitung Diese Bedienungsanleitung ist Bestandteil des DryAged Master 380 Pro (nachfolgend als Gerät bezeichnet) und gibt Ihnen wichtige Hinweise für die Inbetriebnahme, die Sicherheit, den bestimmungsgemäßen Gebrauch und die Pflege des Gerätes. Die Bedienungsanleitung muss ständig am Gerät verfügbar sein.
  • Page 12: Haftungsbeschränkung

    1.3 Haftungsbeschränkung Alle in dieser Anleitung enthaltenen technischen Informationen, Daten und Hinweise für die Installation, Betrieb und Pflege entsprechen dem letzten Stand bei Drucklegung und erfolgen unter Berücksichtigung unserer bisherigen Erfahrungen und Erkenntnisse nach bestem Wissen. Aus den Angaben, Abbildungen und Beschreibungen in dieser Anleitung können keine Ansprüche hergeleitet werden.
  • Page 13: Allgemeine Sicherheitshinweise

    2.2 Allgemeine Sicherheitshinweise Beachten Sie für einen sicheren Umgang mit dem Gerät die folgenden allgemeinen Sicherheitshinweise: ► Kontrollieren Sie das Gerät vor der Verwendung auf äußere sichtbare Schäden. Nehmen Sie ein beschädigtes Gerät nicht in Betrieb. ► Bei Beschädigung der Anschlussleitung oder des Steckers, müssen diese durch den Hersteller oder dessen Servicebeauftragten ersetzt werden, um Gefahren vorzubeugen.
  • Page 14: Gefahrenquellen

    ► Defekte Bauteile dürfen nur gegen Original-Ersatzteile ausgetauscht werden. Nur bei diesen Teilen ist gewährleistet, dass sie die Sicherheitsanforderungen erfüllen werden. ► Das Gerät ist nicht zum Räuchern geeignet. ► Das Gerät reguliert die gewünschte Luftfeuchtigkeit aktiv. Im Gerät dürfen keine Salzblöcke zur Regulierung der Luftfeuchtigkeit eingesetzt werden.
  • Page 15: Gefahr Durch Elektrischen Strom

    ► Verwenden Sie keine mechanischen Vorrichtungen, um den Abtauvorgang zu beschleunigen. ► Reinigen Sie Gerät und Geräteteile nie mit leicht entzündbaren Flüssigkeiten. Die daraus entstehenden Gase können eine Brandgefahr darstellen oder explodieren. ► Lagern oder verwenden Sie kein Benzin oder andere feuergefährliche Gase und Flüssigkeiten in der Nähe von diesem oder anderen Gerät(en).
  • Page 16: Inbetriebnahme

    • Schließen Sie das Gerät erst nach 24 Stunden Wartezeit an das Stromnetz an und schalten Sie es ein, legen Sie erst dann Fleisch in den DryAged Master 380 Pro. ► Entfernen Sie die Schutzfolie erst kurz bevor das Gerät am Einsatzort aufgestellt wird,...
  • Page 17: Entsorgung Der Verpackung

    3.4 Entsorgung der Verpackung Die Verpackung schützt das Gerät vor Transportschäden. Die Verpackungsmaterialien sind nach umweltverträglichen und entsorgungstechnischen Gesichtspunkten ausgewählt und deshalb recycelbar. Die Rückführung der Verpackung in den Materialkreislauf spart Rohstoffe und verringert das Abfallaufkommen. Entsorgen Sie nicht mehr benötigte Verpackungsmaterialien an den Sammelstellen für das Verwertungssystem »Grüner Punkt«.
  • Page 18: Anbringung Des Griffes

    3.5.1 Anbringung des Griffes Bitte beachten Sie , dass Sie den mitgelieferten Edelstahlgriff vor dem ersten Gebrauch an die Tür des Gerätes anschrauben müssen. Dazu schieben Sie das Dichtungsgummie an der Rückseite der Tür zur Seite, um die vorgebohrten Löcher freizulegen. Mithilfe der beiliegenden Schrauben können Sie den Griff an der Tür montieren.
  • Page 19: Aufbau Und Funktion

    4 Aufbau und Funktion In diesem Kapitel erhalten Sie wichtige Hinweise zum Aufbau und Funktion des Gerätes. Gesamtübersicht 1 Aktivkohlefilter (2 Stück) 2 H2OSpeicher (2 Stück) 3 Edelstahlroste (7 Stück) 4 Hängegestell 5 Bedienfeld 6 Scharnier 7 Haken (6 Stück) 8 Türrahmen (abschließbar) 9 Auffangblech 10 UV-Lampe (Noch hinter dem...
  • Page 20: Herausnehmen Der Edelstahlroste

    4.1.1 Herausnehmen der Edelstahlroste Um einen Edelstahlrost herauszunehmen, nehmen Sie zuerst das Fleisch heraus. Verwenden Sie Handschuhe, die für den Kontakt mit Lebensmitteln geeignet sind. Dann heben Sie den Edelstahlrost leicht an und ziehen ihn dann heraus. ► Achten Sie sorgfältig darauf, dass die Edelstahlroste bzw. das Hängegestell für die Fleischer-Haken richtig eingerastet sind, bevor Sie Fleisch darauflegen bzw.
  • Page 21 2. Taste betätigen, um das Gerät einzuschalten 3. Schalten Sie anschließend das UV Licht für mindestens 2 Stunden ein, um den Innenraum zu entkeimen. Dafür die Taste drücken. (Weitere Einstellungen können Sie beliebig wählen). 4. H2O Speicher 300 ml Trinkwasser je H2O Speicher einfüllen bevor Sie Fleisch ins Gerät geben. Entfernen Sie vorher die Plastik-Verpackung.
  • Page 22: Typenschild

    ► Tipp: Sie können durch gleichzeitiges Drücken der beiden Tasten für 3 sec. zwischen der Temperaturanzeige in °C und °F wechseln. 6. LED-Licht- und UV-Licht-Einstellung Drücken Sie , um das LED-Licht einzuschalten, dieses schalten sich automatisch nach 4 Stunden aus. Die Taste drücken, um das UV-Licht einzuschalten.
  • Page 23: Haftungsausschluss

    ► Die Gefahr beim Dry-Aging ist das Auftreten von sogenanntem „Wildschimmel“. Dieser kann im Gegensatz zum „guten Edelschimmel“ das Fleisch verderben und zu toxischen und allergischen Reaktionen führen. Achten Sie aus diesem Grunde auf eine einwandfreie Hygiene im Umgang mit Gerät und Fleisch und informieren Sie sich umfassend beim Fleischer/Experten Ihres Vertrauens über das Dry-Aging.
  • Page 24: Sicherheitshinweise

    7.1 Sicherheitshinweise Beachten Sie die folgenden Sicherheitshinweise, bevor Sie mit der Reinigung des Gerätes beginnen: ► Reinigen Sie das Gerät gründlich, bevor Sie es in Betrieb nehmen. ► Reinigen Sie das Gerät nach jedem Reife-Prozess gründlich. ► Schalten Sie das Gerät vor dem Reinigen aus und ziehen Sie den Stecker aus der Wandsteckdose und entnehmen Sie das gesamte Fleisch.
  • Page 25 ◆ Gehäuse Verwenden Sie Außen zur Reinigung der Glasflächen einen Glasreiniger, für Edelstahlflächen einen handelsüblichen Edelstahlreiniger Wischen Sie das Gerät danach gründlich mit einem weichen Tuch trocken. ◆ Kondenswasser-Auffangbehälter/Auffangschale (K) Wenn es zu größeren Temperaturschwankungen im Gerät gekommen ist oder Sie das Gerät für längere Zeit außer Betrieb nehmen wollen, dann empfehlen wir den...
  • Page 26: Wechsel Der Uv-Lampe

    ◆ Edelstahlroste, Hängegestell, Auffangblech, und Fleischer-Haken Entnehmen Sie die Edelstahlroste, Hängegestell, Auffangblech, und Fleischer-Haken aus dem Gerät und reinigen Sie diese aus Hygienegründen mit warmem Wasser und Spülmittel. Trocknen Sie die Komponenten richtig ab. ◆ Aktivkohlefilter Tauschen Sie die Aktivkohlefilter einmal im Jahr aus. Dafür (wenn notwendig) das Fleisch entnehmen, Filter herausschrauben und austauschen.
  • Page 27: Bewegen Ihres Gerätes

    Einbau entsprechend rückwärts. 7.4 Bewegen Ihres Gerätes Wenn Sie das Gerät an einen anderen Platz stellen wollen: Schalten Sie das Gerät aus. Räumen Sie den Inhalt heraus. Kleben Sie sicherheitshalber alle losen Elemente im Innenraum fest. Kleben Sie die Tür zu. Das Gerät sollte nur aufrecht transportiert werden.
  • Page 28 Das LED-Licht/UV-Licht Wenden Sie sich an den Kundendienst. funktioniert nicht. Vibrationen & Gerät ist zu Prüfen Sie, ob das Gerät eben steht. laut & Tür schließt nicht Prüfen Sie den Ventilator. Bauteile sind lose. Gerät richtig berührt die Wand. Die Türen wurden verkehrt herum oder nicht richtig angebracht.
  • Page 29: Entsorgung Des Altgerätes

    9 Entsorgung des Altgerätes Elektrische und elektronische Altgeräte enthalten vielfach noch wertvolle Materialien. Sie enthalten aber auch schädliche Stoffe, die für ihre Funktion und Sicherheit notwendig waren. Im Restmüll oder bei falscher Behandlung können diese der menschlichen Gesundheit und der Umwelt schaden. Geben Sie Ihr Altgerät deshalb auf keinen Fall in den Restmüll.
  • Page 30: Technische Daten

    11 Technische Daten Name DryAged Master 380 Pro Artikelnr. Leistung 240 W Spannung 220 V - 240 V; 50 Hz Maße außen (B/H/T) 600 x 1860 x 735 mm Gewicht 104,20 kg Klimaklasse Traglast pro Rost 20 kg Traglast pro Hängegestell 80 kg www.caso-design.de...
  • Page 31 Original Operating Manual DryAged Master 380 Pro (691)
  • Page 32: Operating Manual

    12.2 Information on this manual These Operating Instructions are a component of the DryAged Master 380 Pro (referred to hereafter as the device) and provide you with important information for the initial commissioning, safety, intended use and care of the device.
  • Page 33: Limitation Of Liability

    12.4 Limitation of liability All the technical information, data and notices with regard to the installation, operation and care are completely up-to-date at the time of printing and are compiled to the best of our knowledge and belief, taking our past experience and findings into consideration. No claims can be derived from the information provided, the illustrations or descriptions in this manual.
  • Page 34: General Safety Information

    13.2 General Safety information PLEASE NOTE Please observe the following general safety notices with regard to the safe handling of the device. ► Examine the device for any visible external damages prior to using it. Never put a damaged device into operation. ►...
  • Page 35: Sources Of Danger

    PLEASE NOTE ► Defective components must always be replaced with original replacement parts. Only such parts will guarantee that the safety requirements are fulfilled. ► The device actively regulates the desired humidity. Do not use salt blocks for regulation of humidity in the device. The device could be damaged.
  • Page 36: Dangers Due To Electrical Power

    DANGER ► Do not store or use gasoline or any other flammable vapours and liquids in the vicinity of this or any other appliance. The fumes can create a fire hazard or explosion. 13.3.2 Dangers due to electrical power Mortal danger due to electrical power! Mortal danger exists when coming into contact with live wires or subassemblies! Observe the following safety notices to avoid dangers due to...
  • Page 37: Delivery Scope And Transport Inspection

    14.2 Delivery scope and transport inspection As a rule, the device is delivered with the following components: • DryAged Master 380 Pro • 7 stainless steel shelves • 2 H2O-reservoir +2 replacement reservoir • holders for the reservoirs with drip tray •...
  • Page 38: Setup

    14.5 Setup 14.5.1 Setup location requirements: In order to ensure the safe and trouble-free operation of the device, the setup location must fulfil the following prerequisites: • Place your appliance on a floor that is strong enough to support the appliance when it is fully loaded.
  • Page 39: The Handle Installing

    14.5.1 The handle installing The device comes with one metal stainless steel handle. To install simply screw them to the door with the supplied screws. To do this, slide the rubber seal on the back of the door to the side to lay open the predrilled holes.
  • Page 40: Complete Overview

    15.1 Complete overview 1 activated carbon filter (2 pieces) 2 H2O-reservoir (2 pieces) 3 stainless steel shelves (7 pieces) 4 hanging rack 5 touch control panel 6 hinge 7 butcher hooks (6 pieces) 8 door frame (lockable) 9 drip tray 10 UV lamp (behind the hanging rack)
  • Page 41: Removal Of Stainless Steel Shelves

    15.1.1 Removal of stainless steel shelves To remove a stainless stell shelf, first remove the meat. Use gloves which are suitable for contact with food. Lift the stainless steel shelf upwards and the gently pull it out PLEASE NOTE ► Carefully ensure that the stainless steel shelves and/or hanging rack for the butcher hooks is correctly locked into position before you place meat on it or suspend meat from 16 Operation and Handing This chapter provides you with important notices with regard to operating the device.
  • Page 42 3. Switch on the UV light for at least 2 hours to sterilize the interior. To do this, press the button. (Other settings can be chosen as desired). 4. H2O reservoir Fill 300 ml of drinking water into each H2O reservoir before placing meat into the device.
  • Page 43: Rating Plate

    6. LED light and UV light setting Press , to switch on the LED light, this switches off automatically after 4 hours. Press to switch the UV light on. Please note ► The door has a safety switch. When you open the door of the device, the UV light switches off automatically.
  • Page 44: Exemption From Liability

    17.2 Exemption from liability: The manufacturer will not assume any liability for damage to refrigerated products, not even in the event of a fault in the equipment during the guarantee period. The manufacturer will also not accept liability for injury to individuals resulting from improperly stored products which are subsequently consumed.
  • Page 45: Cleaning

    Attention ► If you do not use the equipment for a fairly long period of time, you should remove all the metal shelves, the metal suspension system and the meat hooks and you should clean the equipment thoroughly. ► If the maturing process has failed and the meat is spoiled or wild fungi has developed, then please contact our customer service to coordinate the further steps.
  • Page 46 If necessary remove the condensed water with a sponge from the container for condensed water. The container is located on the back side of the device at the right bottom. Please remove the metal cover and then screw it back on. ◆...
  • Page 47: Changing The Uv Lamp

    18.3 Changing the UV lamp Carefully loosen the screws. Remove the cover Hold the UV lamp firmly and turn it at a 45 ° angle, then pull it out and replace it. Installation backwards accordingly.
  • Page 48: Moving The Appliance

    18.4 Moving the appliance Turn off the appliance first. Remove all content. Shurely tape down all lose items inside your appliance. Tape doors shut. Be sure the device stays in the upright position during transportation. 19 Troubleshooting This chapter provides you with important notices with regard to operating the device. Observe the following notices to avoid dangers and damages: 19.1 Safety notices Attention...
  • Page 49: Disposal Of The Old Device

    Liquid sound 1 The sound of compressor when starts or stops working 2 The flowing sound of refrigerant in the refrigeration system 3 The evaporating sound of refrigerant in the evaporator Condensation formed Under the environment with high level of humidity or the door inside the cabinet of device has been left open for a long period or opened frequently, wipe off the door and walls and leave the door...
  • Page 50: Guarantee

    Any pending faults must be reported within 14 days of delivery. All further claims are excluded. To enforce a guarantee claim, please contact us prior to returning the device (always provide us with proof of purchase). 22 Technical Data Name DryAged Master 380 Pro Article No. Power 240 W Connection 220 V - 240 V;...
  • Page 51 Mode d'emploi original DryAged Master 380 Pro (691)
  • Page 52: Mode D´emploi : Généralités

    Nous vous souhaitons beaucoup de plaisir lors de son utilisation. 23.1 Informations relatives à ce manuel Ce mode d'emploi appartient au DryAged Master 380 Pro (nommé par la suite l'appareil) et vous donne des indications importantes pour la mise en service, la sécurité, l'utilisation conforme et l'entretien de l'appareil.
  • Page 53: Limite De Responsabilités

    23.3 Limite de responsabilités Tous les renseignements techniques, données et instructions d'installation, de fonctionnement et d'entretien contenus dans ce manuel sont parfaitement actuels au moment de la publication et tiennent compte de notre expérience réalisée jusqu'ici et de nos connaissances actuelles en toute bonne foi. Les indications, illustrations et descriptions contenues dans ce manuel ne peuvent donner lieu à...
  • Page 54: Consignes De Sécurités Générales

    24.2 Consignes de sécurités générales Remarque Pour une utilisation en toute sécurité de l'appareil veuillez observer les consignes générales de sécurités suivantes : ► Avant son utilisation s'assurer qu'il ne comporte pas de défauts visuels. Ne jamais mettre en marche un appareil détérioré.
  • Page 55: Sources De Danger

    Remarque ► Les pièces défectueuses doivent être remplacées uniquement par des rechanges d'origine. Ces pièces sont seules capables de répondre aux exigences de sécurité. ► L’appareil régule activement l’humidité de l’air souhaitée. Il ne faut pas introduire des blocs de sel dans l’appareil pour réguler l’humidité...
  • Page 56: Dangers Du Courant Électrique

    Danger ► Ne nettoyez pas l’appareil ni ses pièces avec des liquides inflammables. Les gaz qu’ils dégagent peuvent provoquer un incendie ou exploser. ► Ne stockez pas et n’utilisez pas d’essence ou autres liquides risquant de s’enflammer à proximité de cet appareil ou d’autres.
  • Page 57: Mise En Service

    25.2 Inventaire et contrôle de transport Le DryAged Master 380 Pro est livré de façon standard avec les composants suivants : • DryAged Master 380 Pro • 7 grilles en acier inoxydable 2 réservoirs H2O + 2 réservoirs de rechange •...
  • Page 58: Elimination Des Emballages

    25.4 Elimination des emballages L'emballage protège l'appareil contre les dégâts de transport. Les matériaux d'emballage ont été choisis selon des critères environnementaux et de techniques d'élimination, c'est pourquoi ils sont recyclables. Le retour des emballages dans le circuit des matières épargne les matières premières et restreint le volume des déchets.
  • Page 59: Les Pieds

    25.5.2 Les pieds Láppareil est livré avec tres pieds et un pied separate. Pour niveler votre appareil, ajustez les pieds frontaux qui se trouvent sous l’appareil. L’installation de la 25.5.1 poignée Veuillez noter que, avant la première utilisation, vous devez visser la poignée en inox jointe à...
  • Page 60: Structure Et Fonctionnement

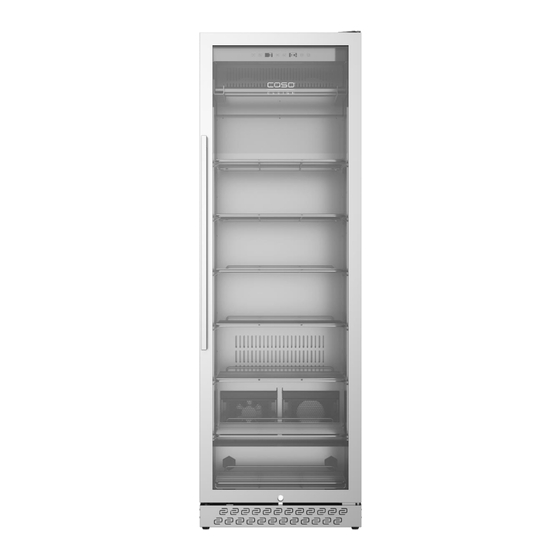
    26 Structure et fonctionnement Ce chapitre est consacré à des indications importantes sur la structure et le fonctionnement de l'appareil. 26.1 Vue d'ensemble 1 Filtre à charbon actif (2 pièces) 2 Réservoir H2O (2 pièces) 3 Grille en acier inoxydable (7 pièces) 4 Support de suspension 5 Panneau de contrôle tactile 6 Charnière...
  • Page 61: Retrait Des Grilles En Acier Inoxydable

    26.1.1 Retrait des grilles en acier inoxydable Pour retirer une grille en acier inoxydable, il faut d'abord sortir la viande. Utilisez des gants adaptés au contact avec les aliments. Soulevez ensuite légèrement la grille en acier inoxydable, puis tirez-la. REMARQUE ►...
  • Page 62 Ensuite, allumez la lumière UV pendant au moins 2 heures pour désinfecter l'intérieur. Pour ce faire, appuyez sur la touche .(Vous pouvez choisir tous les autres paramètres que vous souhaitez). 3. Réservoir H2O Ajoutez 300 ml d'eau potable par réservoir H2O avant de mettre la viande dans la machine.
  • Page 63: Plaque Signalétique

    5. Réglage de la lumière LED et de la lumière UV Appuyez une fois sur la touche pour allumer la lumière LED, qui s'éteindra automatiquement après 4 heures. Appuyez sur pour allumer la lumière UV. REMARQUE ► La porte est munie d'un interrupteur de sécurité. Lorsque vous ouvrez la porte de l'appareil, la lumière UV est automatiquement éteinte.
  • Page 64: Exclusion De Responsabilité

    27.2 Exclusion de responsabilité : Le fabricant décline toute responsabilité pour les dommages subis par les produits stockés, même en cas de défaut de l'appareil pendant la période de garantie. Le fabricant décline également toute responsabilité pour les dommages aux personnes dus à...
  • Page 65: Nettoyage

    Prudence ► Si vous n'utilisez pas l'appareil pendant une longue période, sortez tous les rayonnages métalliques, la suspension métallique et le crochet à viande et nettoyez l'appareil à fond. ► Si le processus de maturation n’a pas fonctionné, veuillez contacter notre service clients pour définir la marche à...
  • Page 66 ◆ Collecteur de condensation (K) Si l'appareil a subi de fortes variations de température ou si vous souhaitez le mettre hors service pendant une période prolongée, nous vous recommandons de vérifier le conteneur/collecteur de condensation. Les fluctuations de température peuvent être causées, par exemple, par une panne de courant, une ouverture plus longue/fréquente de la porte lorsque l'appareil est mis en marche ou des...
  • Page 67: Changer La Lampe Uv

    ◆ Filtre à charbon actif Remplacez les filtres à charbon actif une fois par an. Pour ce faire (si nécessaire), retirez la viande, dévissez le filtre et replacez-le. Vous pouvez commander chez nous des filtres à charbon actif de remplacement, article numéro 692.
  • Page 68: Déplacement De Votre Appareil

    Installation en conséquence à l'envers. 28.4 Déplacement de votre appareil Si vous voulez mettre l’appareil à un autre endroit : Arrêtez l’appareil. Sortez le contenu. Par mesure de sécurité, scotchez tous les éléments en vrac à l'intérieur. Scotchez la porte. Assurez-vous que l’appareil reste bien droite pendant le transport. 29 Réparation des pannes Ce chapitre est consacré...
  • Page 69 Vibrations & L’appareil faire Vérifiez que l’appareil est bien nivelée. beaucoup de bruit & La Vérifiez le ventilateur. Eléments détachés. porte ne se ferme pas L’appareil touche le mur. Les portes ont été inversées et correctement. n’ont pas été correctement installées. Le joint est en mauvais état.
  • Page 70: Elimination Des Appareils Usés

    Remarque ► Nettoyez les grilles en acier inoxydable, bac de récupération et crochets à viande avec du désinfectant et éliminez tous les restes alimentaires dans l'appareil avant de l'expédier. 30 Elimination des appareils usés Les appareils électriques et électroniques contiennent de nombreux matériaux recyclables.
  • Page 71: Caractéristiques Techniques

    Pour tout recours en garantie nous vous prions d'entrer en contact avec nos services avant de nous retourner l'appareil (toujours avec le bon d'achat!). 32 Caractéristiques techniques Désignation DryAged Master 380 Pro N° d’article Puissance 240 W Tension 220 V - 240 V;...
  • Page 72 Istruzioni d’uso originali DryAged Master 380 Pro (691)
  • Page 73: Istruzioni D´uso

    33 Istruzioni d´uso 33.1 In generale Legga le informazioni qui contenute, affinché acquisti rapidamente familiarità con il suo apparecchio e affinché possa utilizzare appieno le sue funzioni. Il Suo l´apparecchio Le renderà un buon servizio per molti anni, se lo tratterà e lo curerà in modo adeguato.
  • Page 74: Limitazione Della Responsabilità

    Indicazione Un indicazione contrassegna inoltre delle informazioni, che facilitano l’utilizzo della macchina. 33.4 Limitazione della responsabilità Tutte le informazioni tecniche, tutti i dati e le indicazioni per l’installazione, il funzionamento e la cura, contenute in queste istruzioni d’uso, corrispondono all’ultimo stato dell’arte al momento della messa in stampa e sono forniti in considerazione delle nostre attuali esperienze e conoscenze, secondo scienza e coscienza.
  • Page 75: Indicazioni Generali Di Sicurezza

    Avviso Pericolo per un utilizzo non conforme alle disposizioni! Dall’apparecchio possono derivare pericoli, nel caso di un utilizzo non conforme alle disposizioni e/o nel caso di un utilizzo differente. ► Utilizzare l’apparecchio esclusivamente in conformità alle disposizioni. ► Rispettare le procedure descritte in queste istruzioni d’uso. Pretese di qualsiasi genere, per danni dovuti ad un utilizzo non conforme alle disposizioni, sono escluse.
  • Page 76: Fonti Di Pericolo

    Indicazione ► L’apparecchio non è un frigorifero. Non conservare nell’apparecchio nessun genere alimentare che quello indicato al capitolo „Impiego conforme alla destinazione“. ► Una riparazione dell’apparecchio dovrà essere effettuata soltanto da un servizio Clienti autorizzato dal produttore, altrimenti decade ogni diritto di garanzia per danni che ne conseguono.
  • Page 77: Pericolo Di Vita Dovuto A Corrente Elettrica

    Pericolo ► Non conservare sostanze esplosive, come bombolette spray con propellenti infiammabili in questa unità. ► Il propellente all'interno dell'unità è combustibile. ► Non danneggiare il circuito di raffreddamento. ► Non utilizzare nessun apparecchio elettrico all interno dell apparecchio. ► Non utilizzare nessun dispositivo meccanico per accelerare la procedura di sbrinamento.
  • Page 78: Messa In Funzione

    ► A causa dell’elevato peso dell’apparecchio, si consiglia di effettuare in due persone il trasporto, il disimballaggio ed il posizionamento. 35.2 Insieme della fornitura ed ispezione trasporto Il DryAged Master 380 Pro viene fornito standard con le seguenti componenti: • DryAged Master 380 Pro • 7 griglie d’acciaio inox •...
  • Page 79: Disimballaggio

    • Assicurarsi che l’apparecchio sia in posizione dritta durante il trasporto. • Pulire l’interno con acqua tiepida e un panno morbido. • Collegare l’apparecchio solo dopo 24 ore di attesa alla rete elettrica e accenderlo, solo poi mettere della carne dentro al DryAged Master 380 Pro (refrigeratore a secco). Indicazione ►...
  • Page 80: Piedini

    • Non elimini i piedini dell’apparecchio. • La presa dovrà essere facilmente accessibile, in modo tale che il cavo elettrico possa essere facilmente estratto, in casi d'emergenza. • Il montaggio di questo apparecchio in luoghi di posizionamento non stazionari (per esempio navi) dovrà...
  • Page 81: Costruzione E Funzione

    • La sicurezza elettrica dell’apparecchio viene garantita solo se ci si connette ad un conduttore di terra installato in conformità alle disposizioni. In caso di dubbio, faccia controllare l’installazione di casa mediante un tecnico elettricista specializzato. Il produttore non può essere considerato responsabile per danni, provocati da una conduttura di terra mancante o interrotta.
  • Page 82: Estrazione Delle Griglie D'acciaio Inox

    Estrazione delle griglie d’acciaio inox 36.1.1 Per estrarre una griglia d’acciaio inox, togliere dapprima la carne. Utilizzare dei guanti adatti al contatto con generi alimentari. Poi alzare leggermente la griglia d’acciaio inox ed estrarla. Indicazione ► Prima di metterci sopra ovvero appendere la carne, fare accuratamente attenzione che le griglie d’acciaio inox ovvero la sospensione per i ganci da macellaio siano correttamente innestati.
  • Page 83: Uso

    37.2 Uso: 1. Pulire l'apparecchio prima di usarlo (vedi «Pulizia e Cura») per accendere l’apparecchio 2. Premere il tasto 3. Quindi accendere la luce UV per almeno 2 ore per sterilizzare l'interno. A tal proposito, premere il tasto . (Altre impostazioni possono essere selezionate a scelta).
  • Page 84: Targhetta Di Omologazione

    Indicazione ► Consiglio: Per ottenere un risultato di stagionatura ottimale consigliamo l’impostazione seguente: temperatura 3 °C / umidità dell’aria 75 %. ► Consiglio: Premendo contemporaneamente i due tasti per 3 secondi potete cambiare tra la visualizzazione della temperatura in °C e °F. 5.
  • Page 85: Esclusione Dalla Responsabilità

    Pericolo ► Il pericolo durante il Dry-Aging è la formazione della cosiddetta „muffa selvaggia“. Al contrario della „muffa nobile“, questa può deperire la carne e causare reazioni tossiche o allergiche. Per questo motivo, fare assolutamente attenzione che vi sia un’igiene perfetta nell’uso dell’apparecchio e della carne e informarsi completamente sul Dry- Aging presso il macellaio / esperto di fiducia.
  • Page 86: Indicazioni Di Sicurezza

    39.1 Indicazioni di sicurezza Attenzione Osservi le seguenti indicazioni di sicurezza, prima di procedere con la pulizia dell’apparecchio: ► Pulire a fondo l’apparecchio prima di metterlo in funzione. ► Pulire accuratamente l’apparecchio dopo ogni processo di maturazione. ► Spegnere il DryAged Master (refrigeratore a secco) prima della pulizia ed estrarre la spina dalla presa a muro e togliere tutta la carne dall’apparecchio.
  • Page 87 ◆ Vano interno e pareti esterne Pulire il vano interno e le pareti esterne con acqua tiepida e un po' di detersivo. In nessun caso utilizzare detergenti o solventi chimici contenenti sabbia o acido. Asciugare poi accuratamente l’apparecchio con un panno morbido. Accendere la luce UV per 24 ore dopo ogni operazione di maturazione.
  • Page 88: Cambio Della Lampada Uv

    ► Maneggiare cautamente la pentola scottante. Il vapore acqueo scioglierà il ghiaccio che si è creato entro un'ora circa. L'acqua disciolta si raccoglie all'interno ed eventualmente nella vaschetta di raccolta (K). Rimuovere la pentola e il panno dall’apparecchio. Asciugare l'acqua dall'interno e svuotare la vaschetta di raccolta (K).
  • Page 89: Muovere L'apparecchio

    Rimuovere la copertura. Tenere ferma la lampada UV e ruotarla in angolo di 45°, poi estrarla e sostituirla. Eseguire il rimontaggio all’inverso. Muovere l’apparecchio 39.3.1 Quando volete installare l’apparecchio in un altro luogo: Spegnere l’apparecchio e. Svuotare il contenuto. Fissare tutte le parti interne con del nastro adesivo, per cautela. Fissare la porta con del nastro adesivo.
  • Page 90: Indicazioni Di Sicurezza

    40.1 Indicazioni di sicurezza Attenzione ► Riparazioni su apparecchi elettrici dovranno essere eseguiti soltanto da personale specializzato, addestrato dal produttore. ► Con riparazioni inadeguate possono verificarsi gravi pericoli per l’utilizzatore e danni sull’apparecchio. 40.2 Cause malfunzionamenti e risoluzione La seguente tabella aiuta a localizzare e a risolvere malfunzionamenti più lievi. Malfunzionamento Possibile causa La capacidad de enfriado es...
  • Page 91: Smaltimento Dell'apparecchio Obsoleto

    Codice errore Problema Rimedio La porta è stata troppo a Chiudere la porta. lungo aperta. Contattare il Servizio Problema con il contattore clienti. della porta Errore del sensore Contattare il Servizio H2, H5 clienti. Problema con il Contattare il Servizio raffreddamento clienti.
  • Page 92: Garanzia

    Altre pretese sono escluse. Per far valere una pretesa di garanzia, La preghiamo di mettersi in contatto con noi, prima di reinviarci l’apparecchio (sempre con scontrino d’acquisto!). 43 Dati tecnici Nome DryAged Master 380 Pro Nr. articolo Potenza 240 W Tensione 220 V - 240 V;...
  • Page 93 Manual del usuario DryAged Master 380 Pro (691)
  • Page 94: Manual Del Usuario

    44 Manual del usuario 44.1 Generalidades Lea atentamente la información contenida en este manual para familiarizarse rápidamente con el aparato y poder utilizar sus funciones en toda su capacidad. Su DryAged Master 380 le servirá durante muchos años si lo trata y conserva adecuadamente.
  • Page 95: Limitación De Responsabilidad

    44.4 Limitación de responsabilidad La información técnica contenida, datos e indicaciones contenidos en el presente manual para la instalación, operación y conservación se corresponden con los últimos avances técnicos en el momento de la impresión y se publican teniendo en cuenta nuestra experiencia y conocimientos hasta ese momento.
  • Page 96: Instrucciones Generales De Seguridad

    45.2 Instrucciones generales de seguridad Nota Para una manipulación segura del aparato, observe las siguientes instrucciones generales de seguridad: Antes de utilizar el aparato debe revisarlo para detectar ► posibles daños. Si el aparato presenta daños, no lo ponga en marcha.
  • Page 97: Fuentes De Peligro

    Nota Este aparato no es apto para ahumar. ► El aparato regula activamente la humedad deseada. No se ► deben utilizar bloques de sal en el aparato con el fin de regular la humedad. El aparato podría resultar dañado. Si se usan bloques de sal, la garantía del aparato quedará...
  • Page 98: Peligro De Electrocución

    Peligro No almacene gasolina ni cualquier otro gas o fluido ► inflamable cerca de éste u otro aparato(s). Los vapores constituyen peligro de incendio o explosión. 45.3.2 Peligro de electrocución Peligro Peligro de muerte por electrocución El contacto con cables o componentes energizados implica peligro de muerte.
  • Page 99: Ámbito De Suministro E Inspección De Transporte

    46.2 Ámbito de suministro e inspección de transporte El DryAged Master 380 Pro incluye los siguientes componentes de fábrica • DryAged Master 380 Pro • 7 parrillas de acero inoxidable • 2 acumuladores H2O + 2 acumuladores de repuesto • soportes de acumulador con bandeja de goteo •...
  • Page 100: Colocación

    46.5 Colocación 46.5.1 Requisitos que debe reunir el lugar de montaje Para garantizar el funcionamiento seguro y correcto del aparato, el lugar de colocación debe cumplir los siguientes requisitos: • El aparato debe colocarse sobre una superficie sólida, plana, horizontal y resistente al calor, con suficiente capacidad portante para el aparato y los alimentos más pesados que podrían ser preparados en el aparato.
  • Page 101: Fijación De Las Agarraderas

    46.5.3 Fijación de las agarraderas Por favor, tenga en cuenta que las agarraderas que se entregan se deben atornillar a la puerta del aparato antes del primer uso. Para ello, aparte la goma de la parte trasera de la puerta de manera que queden a la vista los agujeros para las agarraderas.
  • Page 102: Descripción General

    47.1 Descripción general 1 Filtro de carbón activo (2 unidades) 2 Acumulador H2O (2 unidades) 3 Parrilla de acero inoxidable (7 unidades) 4 Bastidor para colgar 5 Panel táctil 6 Bisagra 7 Ganchos para carne (6 unidades) 8 Marco de puerta (con posibilidad de cierre) 9 Bandeja recogedora 10 Lámpara UV (detrás del bastidor para...
  • Page 103: Extracción De La Parrilla De Acero Inoxidable

    47.1.1 Extracción de la parrilla de acero inoxidable Para quitar una rejilla de acero inoxidable, primero saque la carne. Usar guantes que sean adecuados para el contacto con la comida. A continuación, levante la rejilla de acero inoxidable ligeramente y luego tire de ella. Nota ►...
  • Page 104 2. Pulse la tecla para encender el aparato Luego, encienda la luz ultravioleta por lo menos 2 horas para desinfectar el interior. Para ello, pulse el botón . (Seleccionar libremente los demás ajustes). 3. Acumulador H2O Rellenar 300 ml de agua del grifo (agua dulce) en cada acumulador H2O antes de introducir la carne en el aparato.
  • Page 105: Placa De Especificaciones

    Nota ► Consejo: Puede cambiar entre la visualización de la temperatura en °C y °F pulsando simultáneamente los dos botones durante 3 segundos. 5. Ajuste de la luz LED y UV Presione una vez para encender la luz LED, que se apagará automáticamente después de 4 horas.
  • Page 106: Descargo De Responsabilidad

    Peligro ► Si nota un olor ácido, esto podría ser una indicación de moho salvaje. ► Después de que el proceso de maduración se haya completado, las áreas oscuras y secas deben ser retiradas generosamente. ► No consuma ningún alimento superpuesto, pueden conducir a una intoxicación alimentaria.
  • Page 107: Limpieza

    Precaución ► Antes de limpiar, apague el aparato, desenchúfelo de la toma de alimentación eléctrica y retire toda la carne. ► No utilice limpiadores o disolventes agresivos o abrasivos. ► Debe usar un limpiador adecuado para su uso en alimentos y que no sea demasiado agresivo para las superficies del aparato.
  • Page 108 ◆ Carcasa Use un limpiacristales en el exterior para limpiar las superficies de vidrio, y para las superficies de acero inoxidable, use un limpiador convencional para acero inoxidable Después, limpie el aparato a fondo y séquelo con un paño suave. ◆...
  • Page 109: Sustitución De La Bombilla De La Lámpara De Luz Ultravioleta

    ◆ Parrilla de acero inoxidable, bastidor para colgar, bandeja recogedora y ganchos de carnicería. Retire la parrilla de acero inoxidable, el bastidor de colgar, la bandeja recogedora y los ganchos de carnicería del aparato y límpielos con agua caliente y lavavajillas por razones de higiene.
  • Page 110: Transporte Del Aparato

    Retire la cubierta. Sostenga la bombilla de luz ultravioleta y gírela a un ángulo de 45°, luego extráigala y recámbiela. Para volver a colocarla, siga los pasos en orden inverso al desmontaje. 50.4 Transporte del aparato Cuando quiera cambiar de sitio el aparato: Desenchufe el aparato y desconecte el cable del punto de red.
  • Page 111: Instrucciones De Seguridad

    51.1 Instrucciones de seguridad Precaución ► Las reparaciones de aparatos eléctricos y electrónicos sólo deben realizarse por personal técnico autorizado e instruido por el fabricante. ► Una reparación indebida podría poner en grave peligro al usuario y causar daños en el aparato.
  • Page 112: Eliminación Del Aparato Usado

    Código de error Problema Solución La puerta ha estado abierta durante Cerrar la puerta. demasiado tiempo. Acudir al servicio Problema con el contacto de la técnico. puerta Fallo del sensor. Acudir al servicio H2, H5 técnico. Problema con el sistema de frío. Acudir al servicio técnico.
  • Page 113: Garantia

    Queda excluida cualquier otra reclamación de garantía. Para hacer valer una declaración de garantía, antes de devolver el aparato (siempre con presentación del recibo de compra), póngase en contacto con nosotros. 54 Datos técnicos Denominación DryAged Master 380 Pro Nº de art. Potencia 240 W Conexión 220 V - 240 V;...
  • Page 114 Originele Gebruiksaanwijzing DryAged Master 380 Pro (691)
  • Page 115: Gebruiksaanwijzing

    55.2 Informatie over deze gebruiksaanwijzing Deze gebruiksaanwijzing is onderdeel van de DryAged Master 380 Pro (vanaf hier ‘apparaat’ genoemd) en geeft u belangrijke aanwijzingen voor de ingebruikname, de veiligheid, het doelgerichte gebruik en het onderhoud van het apparaat. De gebruiksaanwijzing moet altijd bij het apparaat voorhanden zijn en voor iedereen te ...
  • Page 116: Aansprakelijkheid

    55.4 Aansprakelijkheid Alle in deze gebruiksaanwijzing aanwezige technische informatie, gegevens en instructies voor installatie, ingebruikname en onderhoud beantwoorden aan de laatste stand bij het in druk gaan en vinden plaats met inachtneming van onze tot nu toe opgedane ervaringen en kennis naar eer en geweten. Aan de informatie, afbeeldingen en beschrijvingen in deze gebruiksaanwijzingen kunnen geen rechten worden ontleend.
  • Page 117: Algemene Veiligheidsinstructies

    56.2 Algemene veiligheidsinstructies Houdt u zich voor een veilige omgang met het apparaat aan de volgende algemene veiligheidsinstructies: Controleer het apparaat voor de ingebruikname op aan de ► buitenkant zichtbare schaden. Neem een beschadigd apparaat niet in gebruik. Indien de aansluiting of de stekker beschadigd is, moet deze ►...
  • Page 118: Bronnen Van Gevaar

    Het apparaaat is geen koelkast. Beweer geen andere ► levensmiddelen in het apparaat dan onder „bedoeld gebruik“ vermeld. Het apparaat is niet geschikt voor roken. ► Het apparaat reguleert de gewenste luchtvochtigheid actief. In ► het apparaat mogen geen blokken zout voor regeling van de luchtvochtigheid worden gebruikt.
  • Page 119: Gevaar Door Elektrische Stroom

    GEVAAR Bewaar of gebruik geen benzine of andere vuurgevaarlijke ► gassen en vloeistoffen in de buurt van dit apparaat of andere apparaten. De gassen kunnen brandgevaar opleveren of ontploffen. Gebruik geen mechanische inrichtingen om het ontdooien te ► versnellen. Gebruik geen elektrische apparaten in het toestel. ►...
  • Page 120: Veiligheidsvoorschriften

    ► Vanwege het hoge gewicht van het apparaat het transport als ook het uitpakken en plaatsen met twee personen uitvoeren. 57.2 Leveringsomvang en transportinspectie De DryAged Master 380 Pro wordt met de volgende onderdelen geleverd: • DryAged Master 380 Pro • 7 Roestvrijstalen roosters •...
  • Page 121: Verwijderen Van De Verpakking

    57.4 Verwijderen van de verpakking De verpakking beschermt het apparaat tegen transportschade. De verpakkingsmaterialen zijn uitgezocht vanuit milieuvriendelijke en verwijderingtechnische gezichtspunten en daarom recyclebaar. Het terugbrengen van de verpakking in de materiaalkringloop bespaart grondstoffen en verkleint de afvalhoop. Lever niet meer benodigd verpakkingsmateriaal in bij een afvalbrengstation, dat zorgdraagt voor de recycling.
  • Page 122: Stelpoten

    57.5.2 Stelpoten Het apparaat wordt met 3 grote stelpoten en een kleine stelpoot geleverd. Stel de stelvoet zo in, dat het apparaat waterpas staat en niet kantelt. 57.5.1 Handvat bevestigen Let u er a.u.b. op dat u het meegeleverde roestvrijstalen handvat voor de eerste ingebruikname aan de deur van het apparaat vastschroeft.
  • Page 123: Opbouw En Functie

    58 Opbouw en functie In dit hoofdstuk krijgt u belangrijke aanwijzingen m.b.t. de opbouw en het functioneren van het apparaat. 58.1 Algemeen overzicht 1 Actief koolfilter (2 stuks) 2 H2O-opslagtank (2 stuks) 3 Roestvrijstalen roosters (7 stuks) 4 Ophanging 5 Touch bedieningsveld 6 Scharnier 7 Vleeshaken (6 stuks) 8 Deurlijst (afsluitbaar)
  • Page 124: Verwijderen Van Het Roestvrijstalen Rooster

    58.1.1 Verwijderen van het roestvrijstalen rooster Om een roestvrijstalen rooster te verwijderen, haalt u eerst het vlees eruit. Gebruik handschoenen die geschikt zijn voor werken met voedsel. Til vervolgens het roestvrijstalen rooster een beetje op en trek het er dan uit. ►...
  • Page 125 3. Schakel vervolgens het UV-licht minstens 2 uur lang in, om de binnenruimte kiemvrij te maken. Daarvoor op de knop drukken (indien gewenst kunnen andere instellingen worden gekozen). 4. H2O-opslagtank Voeg 300 ml drinkwater per H2O-opslagtank toe voordat u het vlees in de machine doet.
  • Page 126: Typeplaatje

    6. LED-Licht- en UV-Licht-instelling Druk 1x op , om het LED-licht in te schakelen, deze worden na 4 uur automatisch uitgeschakeld. Druk 5 seconden op en het UV-licht wordt ingeschakeld. ► De deur beschikt over een veiligheidsschakelaar. Wanneer u de deur van het apparaat ►...
  • Page 127: Afwijzing Van Aansprakelijkheid

    60.2 Afwijzing van aansprakelijkheid: De producent is niet aansprakelijk voor schade aan het gekoelde product, ook niet bij defecte van het apparaat binnen de garantieperiode. De fabrikant is ook niet aansprakelijk voor persoonlijk letsel, door incorrect bewaard voedsel dat wordt geconsumeerd.
  • Page 128: Reiniging

    VOORZICHTIG ► Wanneer u het apparaat niet langer gebruikt, moeten allen metalen bodems, de metalen ophanging en vleeshaken verwijderen en het apparaat grondig reinigen. ► Wanneer het rijpingsproces niet is gelukt, neemt u dan a.u.b. contact op met onze klantenservice, om te bespreken wat u verder kunt doen. ►...
  • Page 129 ◆ opvangbak voor condensatievocht (K) Als er grote temperatuurschommelingen in het apparaat zijn geweest of als u het apparaat voor langere tijd niet gebruikt, raden wij u aan de opvangbak voor condensatievocht te controleren. Temperatuurschommelingen kunnen bijvoorbeeld worden veroorzaakt door een stroomstoring, het langer/vaker openen van de deur terwijl het apparaat is ingeschakeld of...
  • Page 130: Vervanging Van De Uv-Lamp

    61.1 Vervanging van de UV-lamp Schroeven voorzichtig losdraaien. Afdekking verwijderen. UV-lamp vasthouden en in een hoek van 45° draaien, vervolgens eruit trekken en vervangen. Inbouw in omgekeerde volgorde.
  • Page 131: Bewegen Van Het Apparaat

    61.2 Bewegen van het apparaat Wanneer u het apparaat op een andere plaats wilt neerzetten: Schakel het apparaat uit. Maak de binnenkant leeg. Plak voor de zekerheid alle losse elementen aan de binnenkant vast.Plak de deur vast. De koelkast dient rechtop getransporteerd te worden.
  • Page 132: Afvoer Van Het Oude Apparaat

    Compressor start niet De compressor start niet als de ruimtetemperatuur lager is dan de gewenste temperatuur. Condens op de oppervlakte Met name als het apparaat in een vochtige omgeving van de apparaat staat, ontstaat er condens op het glas aan de voorkant. Dit komt door de vochtige lucht die met de apparaat in contact komt.
  • Page 133: Garantie

    Stelt u zich voor het indienen van een garantieclaim en het terugsturen van uw apparaat via onderstaand adres (altijd met bewijs van koop!) met ons in verbinding. 65 Technische gegevens Apparaat DryAged Master 380 Pro Artikelnr. 240 W Vermogens 220 V - 240 V; 50 Hz...
  • Page 134 Инструкция по эксплуатации DryAged Master 380 Pro (691) Холодильник для сухого вызревания мяса...
  • Page 135: Инструкция По Эксплуатации

    использовании прибора! 66.2 Информация о данной инструкции Эта инструкция по эксплуатации является составной частью холодильника для сухой выдержки DryAged Master 380 Pro (называемого далее прибор) и дает важные указания по введению в эксплуатацию, безопасности, надлежащему применению прибора и уходу за ним. Инструкция по эксплуатации должна быть всегда поблизости...
  • Page 136: Ограничение Ответственности

    ПРИМЕЧАНИЕ Указание означает дополнительную информацию, которая облегчает работу с прибором. 66.4 Ограничение ответственности Вся техническая информация, все данные и указания по установке, эксплуатации и уходу, содержащиеся в данной инструкции, соответствуют актуальному уровню по состоянию на день сдачи в набор и даются с учетом нашего прежнего опыта и знаний с...
  • Page 137: Общие Указания По Безопасности

    ПРЕДУПРЕЖДЕНИЕ Опасность из-за ненадлежащего применения! При ненадлежащем применении и\или использовании другого рода от прибора может исходить опасность. ► Прибор следует использоваться только в соответствии с назначением. ► Следует соблюдать порядок выполнения действий, описанный в данном руководстве по эксплуатации. Претензии любого вида, связанные с повреждениями вследствие ненадлежащего применения, исключены.
  • Page 138 ПРИМЕЧАНИЕ ► Прибор не является холодильником. Не храните в приборе никакие другие продукты питания, кроме тех, которые указаны в разделе "Применение по назначению". ► Прибор не предназначен для копчения мяса. ► Только квалифицированный перонал, прошедший обучение у изготовителя может выполнять ремонт прибора, в...
  • Page 139: Источники Опасности

    67.3 Источники опасности Риск возгорания / использование 67.3.1 легковоспламеняющихся материалов. Опасность ожога или взрыва ОПАСНОСТЬ При ненадлежащем применении прибора существует опасность возгорания или взрыва из-за воспламенения его содержимого. Соблюдайте следующие указания по технике безопасности, чтобы избежать опасности возгорания: Предупреждение: риск возгорания / использование легковоспламеняющихся...
  • Page 140: Опасность, Связанная С Электрическим Током

    ОПАСНОСТЬ ► Не храните или не используйте бензин или другие пожароопасные газы и жидкости поблизости от этого и других приборов. Газы могут представлять собой опасность возникновения пожара или взрыва. Опасность, связанная с электрическим током 67.3.2 Опасность для жизни от электрического тока! При...
  • Page 141: Указания По Безопасности

    следует выполнять вдвоем. 68.2 Объем поставки и осмотр после транспортировки Как правило, в комплект поставки прибора входят: • DryAged Master 380 Pro (холодильник для сухой выдержки) • 7 металлические полки  2 угольных фильтра • 2 резервуара для воды + 2 запасных резервуара...
  • Page 142: Установка

    Возврат упаковки в круговорот материалов экономит сырье и сокращает отходы. Утилизируйте упаковочные материалы, которые больше не используются, в сборных пунктах для системы утилизации "Зеленая точка". ПРИМЕЧАНИЕ ► Если возможно, сохраняйте оригинальную упаковку в течение гарантийного периода прибора, чтобы в гарантийном случае снова можно было упаковать прибор надлежащим...
  • Page 143: Установка Ручки

    Установка ручки 68.5.3 Прибор поставляется с одной металлической ручкой из нержавеющей стали. Для установки просто прикрутите ее к двери прилагаемыми винтами. Для этого сдвиньте резиновую прокладку с обратной стороны дверцы в сторону, чтобы открыть просверленные отверстия. Используйте прилагаемые винты, чтобы установить ручку на дверь. 68.6 Электрическое...
  • Page 144: Общий Обзор

    69.1 Общий обзор 1 фильтр с активированным углем (2 штуки) 2 резервуар для воды (2 штуки) 3 металлические полки (7 штуки) 4 подвесная стойка 5 сенсорная панель управления 6 дверная петля 7 крючки для мяса (6 штуки) 8 рама двери (запираемая) 9 поддон...
  • Page 145: Удаление Металлических Полок

    69.1.1 Удаление металлических полок Чтобы вынуть металлические полки, сначала выньте мясо. Используйте перчатки, которые подходят для контакта с продуктами питания. Потом слегка приподнимите полку, а потом вытащите ее. ПРИМЕЧАНИЕ ► Внимательно следите за тем, чтобы металлические полки / и металлический подвес для...
  • Page 146 2. Нажмите кнопку , чтобы включить прибор. 3. Включите ультрафиолетовую лампу минимум на 2 часа, чтобы стерилизовать внутреннюю часть. Для этого нажмите кнопку . (По желанию можно выбрать другие настройки). 4. Резурвуар для воды Перед помещением мяса в прибор налейте 300 мл питьевой воды в каждую емкость...
  • Page 147: Паспортная Табличка

    ПРИМЕЧАНИЕ ► Совет: вы можете переключаться между отображением температуры в ° C и ° F, нажимая кнопки ► и одновременно в течение 3 секунд. 6. Светодиодный свет и настройка УФ-излучения Нажмите один раз кнопку , чтобы включить подсветку, она автоматически выключится...
  • Page 148: Исключение Ответственности

    Опасность ► Опасность при сухой выдержке заключается в появлении так называемой "дикой плесени". Она в отличие от "хорошей благородной плесени" может испортить мясо и привести к токсичным и аллергическим реакциям. По этой причине соблюдайте безупречную гигиену при обращении с прибором и мясом и получите подробную информацию...
  • Page 149: Указания По Безопасности

    72.1 Указания по безопасности Осторожно Обратите внимание на следующие указания по технике безопасности, прежде чем Вы начнете чистить прибор: ► Тщательно вымойте прибор, прежде чем вводить его в эксплуатацию. ► Тщательно очищайте прибор после каждого процесса выдержки. ► Перед очисткой выключите холодильник, вытащите вилку из стенной розетки и выньте...
  • Page 150 Затем тщательно протрите прибор мягкой тканью. Включайте УФ-лампу на 24 часа после каждого процесса созревания. ◆ Корпус Используйте средство для чистки стекла для очистки стеклянных поверхностей и имеющееся в продаже средство для чистки нержавеющей стали для поверхностей из нержавеющей стали. Затем...
  • Page 151: Замена Уф Лампы

    ◆ Металлические вставные полки, металлический подвес и крюки для мяса Металлические вставные полки, металлический подвес и крюки для мяса выньте из прибора и по соображениям гигиены промойте их теплой водой с моющим средством. Тщательно просушите. ◆ Фильтр с активированным углем Заменяйте...
  • Page 152: Перемещение Прибора

    Соберите в обратном порядке. 72.4 Перемещение прибора Сначала выключите прибор. Удалите все содержимое. Для безопасности приклейте все свободные предметы внутри вашего прибора. Закройте двери. Убедитесь, что прибор остается в вертикальном положении во время транспортировки. 73 Устранение неисправностей В этой главе содержатся важные указания по локализации и устранению неисправностей.
  • Page 153 Светодиодная Сообщите об этом в сервисный центр. подсветка / УФ-лампа не работают Вибрация и слишком Убедитесь, что прибор стоит ровно. Проверьте сильный шум, дверь не вентилятор. Ослаблено крепление деталей. закрывается должным Прибор касается стены. Дверь перевернута и образом неправильно установлена. Уплотнение...
  • Page 154: Утилизация Старого Прибора

    Техническая Обратитесь в службу неисправность поддержки Примечание ► Если вы не можете решить проблему с помощью описанных выше шагов, обратитесь в службу поддержки. ► Очистите металлические полки, подвес и крючки для мяса с помощью дезинфицирующего средства и удалите остатки мяса с прибора, прежде чем отправлять...
  • Page 155: Технические Характеристики

    В случае обоснованных претензий мы по своему усмотрению отремонтируем неисправный прибор или заменим его исправным. 76 Технические характеристики Наименование DryAged Master 380 Pro Артикульный номер Мощность 240 Вт Параметры подключения 220 В - 240 В; 50 Гц 600 x 1860 x 735 мм...

Ce manuel est également adapté pour:

691

Table des Matières