Nice Nemo SRT Instructions Et Avertissements Pour L'installation Et L'utilisation

Table des Matières

Publicité

Les langues disponibles
  • FR

Les langues disponibles

  • FRANÇAIS, page 18

Liens rapides

Nemo
SRT
SRT
WSRT
Climatic sensor
WSRT
0682
EN -
Instructions and warnings for installation and use
IT -
Istruzioni ed avvertenze per l'installazione e l'uso
FR -
Instructions et avertissements pour l'installation et l'utilisation
ES -
Instrucciones y advertencias para la instalación y el uso
DE -
Installierungs-und Gebrauchsanleitungen und Hinweise
PL -
Instrukcje i ostrzeżenia do instalacji i użytkowania
NL -
Aanwijzingen en aanbevelingen voor installatie en gebruik

Publicité

Table des Matières
loading

Sommaire des Matières pour Nice Nemo SRT

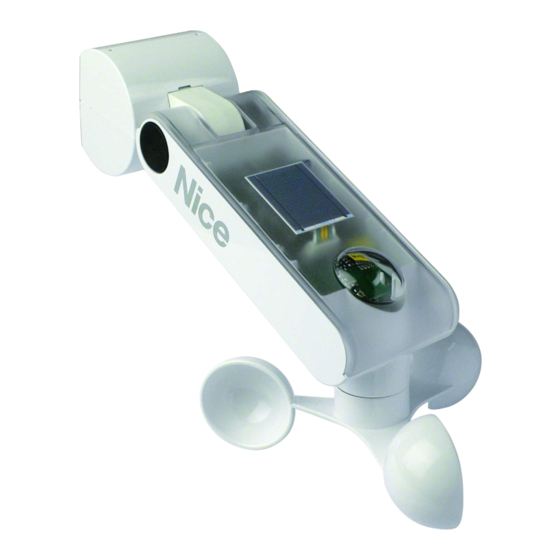
  • Page 1 Nemo WSRT Climatic sensor WSRT 0682 EN - Instructions and warnings for installation and use IT - Istruzioni ed avvertenze per l’installazione e l’uso FR - Instructions et avertissements pour l’installation et l’utilisation ES - Instrucciones y advertencias para la instalación y el uso DE - Installierungs-und Gebrauchsanleitungen und Hinweise PL -...
  • Page 2 Quick reference guide Note • The numbering of the figures in this Guide does not correspond to that used in the full Instruction Manual. • This Guide does not substitute the full Nemo WSRT / SRT Climatic Instruction Manual. sensor Step 1 - Installation and connections 60°...
  • Page 3 SRT model only 10 cm Fig. A “Rain” sensor “Sun” sensor “Wind” sensor (WSRT only) button “P1” Wind (WSRT only) Led “L1” Step 2 - Memorizing the sensor and confirming memorization “P1” “P1” “P1” sec. Hold down Wait Release Press 3 times Press 1 time IST275R01_17-05-2013...
  • Page 4 (confirming memorization) “P1” sec.  Movements (3) /  Sounds (3 beeps) Press 1 time ( Up) Press 1 time ( Stop) Step 3 - Calibrating the “Sun” sensor “L1” (green) ≥ 1Klux sec. fast flashing  Turn the trimmer to “Test” Illuminate the sensor Wait ...
  • Page 5 “L1” (orange) “L1” (green-red-) sec. fast flashing fast flashing  Series of flashes Release Wait  Series of flashes Uncover sensor wind  Turn the trimmers to other values Step 5 - Calibrating the “Wind” sensor (WSRT only) wind “L1” (red) sec.
  • Page 6: Product Description And Intend- Ed Use

    Nice to the motor. • The sensor is not a safety device capable of elimi- tubular motors and control units.
  • Page 7: Product Installation

    3 - PRODUCT INSTALLATION 01. Caution! – Make sure that the “Sun” and “Wind” 04. Now obscure the sun sensor with a hand or a black cloth which lets no light through, and check: trimmers (if the latter is present) are not set to For installation, fix the various parts of the product in a) the Led must flash alternately red and green “Test”.
  • Page 8: Basic Troubleshooting

    (thus protecting the awning against the wind); sends the Up command to the motor (factory setting: Table A - Led diagnostics signals c) the Led must flash red briefly several times (= for some motors this can be changed to Down. Refer threshold exceeded).
  • Page 9: Product Disposal

    20° C (± 5° C). PRODUCT directly form Nice S.p.A. – Nice S.p.A. reserves the right to apply modifications to the product at any time when deemed necessary, ■ Power supply: 120 / 230 V~; 50 / 60 Hz Mr.
  • Page 10: Guida Rapida

    Guida rapida Nota alla consultazione • In questa Guida rapida la numerazione delle fig- ure è autonoma e non corrisponde alla nu merazione citata nel testo del Manu- Nemo WSRT / SRT Climatic ale completo. • Questa guida non sos- sensor tituisce il Manuale completo.
  • Page 11 solo per il modello SRT 10 cm Fig. A sensore Pioggia sensore Sole sensore Vento (solo per WSRT) tasto “P1” Vento (solo per WSRT) Sole Led “L1” Passo 2 - Memorizzazione del sensore e verifica della memorizzazione “P1” “P1” “P1” sec.
  • Page 12 (verifica della memorizzazione) “P1” sec. Movimenti (3) / Suoni (3 beep) Premere 1 volta ( Salita) Premere 1 volta ( Stop manovra) Passo 3 - Taratura del sensore “Sole” “L1” (verde) ≥ 1Klux sec. lampeggi veloci  Ruotare trimmer su “Test” Illuminare il sensore Attendere ...
  • Page 13 “L1” (arancione) “L1” (verde-rosso-) sec. lampeggi veloci lampeggi veloci  Serie di lampeggi Rimuovere il dito Attendere  Serie di lampeggi Scoprire il sensore wind  Ruotare i trimmer su altro valore Passo 5 - Taratura del sensore “Vento” (solo per il modello WSRT) wind “L1”...
  • Page 14: Avvertenze Generali

    • Accertarsi che il luogo prescelto per l’installazione guardia della tenda e al confort per il suo uso. Nice. Ogni altro uso è da considerarsi improprio e del sensore abbia i seguenti requisiti: • Il produttore declina ogni responsabilità per i danni vietato! Nice non risponde dei danni risultanti da –...
  • Page 15: Installazione Del Prodotto

    ne sia di materiale solido e possa garantire un fissag- possibile usare anche la seguente procedura di me- del sensore al minimo, in modo che quest’ultimo rea- gio stabile. morizzazione. gisca agli eventi in tempo reale, senza rispettare i tem- •...
  • Page 16 (*) - Questo valore è modificabile in un secondo mo- Procedura per impostare la soglia di intervento quest’ultimo è presente) in senso antiorario, fino a raggiungere la posizione “Test”. mento utilizzando la procedura e le informazioni ripor- del sensore “Sole” e “Vento” (fig. 8) 03.
  • Page 17: Smaltimento Del Prodotto

    20°C (± 5°C). Led rosso lampeggiante(*) (intervalli di 0,5 – Nice S.p.a. si riserva il diritto di apportare modifiche al ■ Alimentazione: 120 / 230 V~; 50 / 60 Hz secondi, per 3 secondi) = Auto-diagnostica: ■...
  • Page 18: Étape 1 - Installation Et Câblage

    Guide rapide Note pour la consultation • Dans ce guide rapide, le numérotage des figures est autonome et ne correspondent pas au numérotage cité dans le texte du Nemo WSRT / SRT Climatic manuel complet. • Ce guide ne rem- sensor place pas le manuel complet.
  • Page 19: Étape 2 - Mémorisation Du Capteur Et Vérification De La Mémorisation

    uniquement pour le mo- dèle SRT 10 cm Fig. A capteur pluie capteur soleil capteur vent (uniquement pour touche « P1 » Vent WSRT) (uniquement pour WSRT) Soleil Led « L1 » Étape 2 - Mémorisation du capteur et vérification de la mémorisation “P1”...
  • Page 20 (vérification de la mémorisation) “P1” sec. Mouvements (3) /  Sons (3 bips) Appuyez 1 fois ( Montée) Appuyez 1 fois ( Arrêt manœuvre) Étape 3 - Étalonnage du capteur « Soleil » « L1 » (vert) ≥ 1Klux sec. clignotements rapides ...
  • Page 21 « L1 » (orange) « L1 » (vert-rouge-) sec. clignotements rapides clignotements rapides  Série de clignotements Retirer le doigt Attendre  Série de clignotements Découvrir le capteur wind  Tourner les trimmers sur une autre valeur Étape 5 - Étalonnage du capteur « Vent » (uniquement modèle WSRT) wind «...
  • Page 22: Recommandations Générales

    être considérée comme impropre et inter- jets à maintenance. • Contrôler que l'endroit choisi pour l'installation du dite ! Nice ne répond pas des dommages résul- capteur possède les conditions requises suivantes : • Ne pas effectuer de modifications sur une partie tant d’une utilisation impropre des produits, dif-...
  • Page 23: Installation Du Produit

    5 - MÉMORISATION DU CAPTEUR DANS LE pluie à l'action directe de la pluie. teur. Puis, s'assurer que le moteur s'arrête immé- diatement la manœuvre (= capteur mémorisé). • Puisque le corps du capteur est articulé et orien- RÉCEPTEUR DU MOTEUR table, il est également possible de fixer le produit sur Comme avec n'importe quel émetteur, même pour ce 6 - ÉTALONNAGE DES CAPTEURS...
  • Page 24: Configuration Des Seuils D'inter- Vention Des Capteurs

    • Étalonnage du capteur pluie ( Guide rapide - couleur rouge (= seuil dépassé). la valeur configurée, après 15 minutes le capteur trans- 03. Puis, arrêter les pales et s'assurer que : a) la Led Étape 4) met au moteur la commande de montée. émet une série de brefs clignotements rouges Avertissement - Durant la détection de la pluie le cap- •...
  • Page 25: Mise Au Rebut Du Produit

    : panne du capteur « vent ». Le capteur ■ Alimentation : 120/230 V ~, 50/60 Hz – Nice S.p.A. se réserve le droit d’apporter des modifi- n'a pas détecté les variations de la vitesse du ■ Fréquence : 433,92 MHz avec antenne intégrée cations au produit à...
  • Page 26 Guía rápida Nota sobre la consulta • En esta guía rápida la numeración de las figuras es autónoma y no coincide con la numer- ación del texto del manual completo. • Nemo WSRT / SRT Climatic Esta guía no sustituye el manual com- sensor pleto.
  • Page 27 solo para el modelo SRT 10 cm Fig. A sensor Lluvia sensor Sol sensor Viento (sólo para WSRT) tecla “P1“ Viento (sólo para WSRT) Led “L1“ Paso 2 - Memorización del sensor y verificación de la memorización “P1” “P1” “P1” sec.
  • Page 28 (verificación de la memorización) “P1” sec. Movimientos (3) / Sonidos (3 señales) Pulsar 1 vez ( Subida) Pulsar 1 vez ( Parada maniobra) Paso 3 - Calibración del sensor “Sol” “L1” (verde) ≥ 1Klux sec. parpadeos rápidos  Girar el regulador a “Test” Iluminar el sensor Esperar ...
  • Page 29 “L1” (naranja) “L1” (verde-rojo-) sec. parpadeos rápidos parpadeos rápidos  Serie de parpadeos Sacar el dedo Esperar  Serie de parpadeos Descubrir el sensor wind  Girar los reguladores a otro valor Paso 5 - Calibración del sensor “Viento” (sólo para el modelo WSRT) wind “L1”...
  • Page 30: Advertencias Generales

    • Asegurarse de que el lugar elegido para instalar el en caso de daños materiales causados por fenóme- está prohibida! Nice no responde de los daños sensor cumpla con los siguientes requisitos: nos atmosféricos no detectados por los sensores que pudieran surgir si el producto se utilizara de –...
  • Page 31: Instalación Del Producto

    Guía rápida (Paso 1 - fase 1). de que el sensor pueda enviar los mandos “vía radio”. dor está en “Test” el sistema pone el umbral del sen- sor en el mínimo para que éste reaccione a los even- • Asegurarse de que la superficie escogida para la ins- Para memorizar el sensor hay que seguir el procedi- tos en tiempo real, sin respetar los tiempos de espera talación sea de material sólido y garantice una fija-...
  • Page 32: Eliminación Del Producto

    parpadeos breves en naranja. • Funcionamiento del umbral “VIENTO” (fig. 5) – El 06. Para terminar el procedimiento esperar que deje 04. Sacar el dedo del sensor Lluvia y asegurarse de sensor Viento, presente sólo en el mod. WSRT, detec- de parpadear.
  • Page 33: Características Técnicas Del Pro- Ducto

    – Todas las características técnicas indicadas se refie- ren a una temperatura de 20°C (± 5°C). CARACTERÍSTICAS TÉCNICAS DEL PRO- – Nice S.p.a. se reserva el derecho de modificar el pro- DUCTO ducto en cualquier momento, manteniendo la misma ■ Alimentación: 120 / 230 V~; 50 / 60 Hz función y el mismo uso previsto.
  • Page 34 Kurzanleitung Hinweis zum Gebrauch • In dieser Kurzanleitung entspricht die Nummerie- rung nicht der Nummerierung der voll- ständigen Gebrauchsanweisung. • Die- Nemo WSRT / SRT Climatic se Kurzanleitung ersetzt nicht die voll- sensor ständige Gebrauchsanleitung. Schritt 1 - Installation und elektrische Anschlüsse 60°...
  • Page 35 nur für das Modell SRT 10 cm Abb. A Regensensor Sonnensensor Windsensor (nur für WSRT) Taste „P1“ Wind (nur für WSRT) Sonne Led „L1“ Schritt 2 - Speicherung des Sensors und Überprüfung der Speicherung “P1” “P1” “P1” sec. Gedrückt halten Warten Loslassen 3 Mal drücken...
  • Page 36 (Überprüfung der Speicherung) “P1” sec. Bewegungen (3) / Töne (3 Signaltöne) 1 Mal drücken (Hochfahren) 1 Mal drücken (Anhalten) Schritt 3 - Eichung des Sensors „Sonne“ “L1” (grün) ≥ 1Klux sec. Schnelles Blinken Den Trimmer auf „Test“ drehen den Sensor anleuchten Warten Mehrmaliges Blinken Absenken...
  • Page 37 “L1” (orange) “L1” (grün-rot-) sec. Schnelles Blinken Schnelles Blinken Mehrmaliges Blinken Finger entfernen Warten Mehrmaliges Blinken Sensor aufdecken wind Den Trimmer auf den anderen Wert drehen Schritt 5 - Eichung des Sensors „Wind“ (nur für das Modell WSRT) wind “L1” (rot) sec.
  • Page 38: Allgemeine Hinweise

    Nice verwenden. Jede andere Verwendung munikation zwischen Sensor und Motor stören. Schaltkreise enthält, die keiner Instandhaltung unter- ist als falsch anzusehen und somit verboten! Nice • Überprüfen, dass der für die Installation des Sensors liegen. ist nicht für Schäden durch eine falsche Anwen- gewählte Ort folgende Voraussetzungen erfüllt:...
  • Page 39: Installation Des Produktes

    Anmerkung zu den Vorgehensweisen – Wenn der • Da der Sensorkörper ein Gelenk besitzt und schwenk- Sensor die Befehle „per Funk“ senden kann. Zur Spei- bar ist, kann das Produkt auch auf einer schrägen Flä- cherung des Sensors muss das Verfahren „Modus I“ Trimmer auf der Funktion „Test“...
  • Page 40 03. Einen Finger auf den Regensensor legen und dort 7 - EINSTELLUNG DER EINSATZGRENZ- Vorgehensweise zum Einstellen des Einsatz- lassen. Dann prüfen, ob: a) der Motor nach zwei grenzwertes des Sensors “Sonne” und “Wind” WERTE DER KLIMASENSOREN Sekunden den Befehl zum Hochfahren sendet (Abb.
  • Page 41: Entsorgung Des Produkts

    Temperatur von 20°C (± 5°C). TECHNISCHE EIGENSCHAFTEN DES PRO- Rote LED blinkt (*) (Intervalle von 0,5 – Nice S.p.a. behält sich das Recht vor, jederzeit als DUKTS Sekunden, für 3 Sekunden) = Selbstdiagnose: nötig betrachtete Änderungen am Produkt vorzuneh- Sensor „Wind“...
  • Page 42 Szybkie wprowadzenie Uwaga na temat konsultacji instruk- cji • Numeracja rysunków w niniejszym, szybkim wprowadzeniu, jest swobodna i nie odpowiada numeracji zamieszczo- Nemo WSRT / SRT Climatic nej w tekście kompletnej instrukcji. • Ni- niejsze szybkie wprowadzenie NIE za- sensor stępuje kompletnej instrukcji.
  • Page 43 tylko dla modelu SRT 10 cm Rys. A Czujnik “deszczu” Czujnik “słońca” Czujnik “wiatru” (tylko dla WSRT) przycisk “P1“ Wiatr (tylko dla WSRT) Słońce Dioda “L1“ Krok 2 - Wczytywanie czujnika i kontrola wczytywania “P1” “P1” “P1” sec. Przytrzymać wciśnięty Odczekać...
  • Page 44 (kontrola wczytywania) “P1” sec. Ruchy (3) / Dźwięki (3 sygnały) Nacisnąć 1 raz (Podnoszenie) Nacisnąć 1 raz (Zatrzymanie manewru) Krok 3 - Kalibracja czujnika “słońca” “L1” (zielona) ≥ 1Klux sec. szybkie mignięcia Obrócić kondensator dostrojczy na “Test” Oświetlić czujnik Odczekać Seria mignięć...
  • Page 45 “L1” “L1” (pomarańczowa) (zielona-czerwona-) sec. szybkie mignięcia szybkie mignięcia Seria mignięć Wyjąć palec Odczekać Seria mignięć Odsłonić czujnik wind Obrócić kondensator dostrojczy na inną wartość Krok 5 - Kalibracja czujnika “wiatru” (tylko dla modelu WSRT) wind “L1” (czerwona) sec. szybkie mignięcia Obrócić...
  • Page 46: Opis Produktu I Jego Przeznaczenie

    świetlików i podobnych zastosowań, w których wyko- kiem i silnikiem. • Nie otwierać pokrywy ochronnej urządzenia, ponie- rzystywane są centrale oraz silniki rurowe Nice. Każde • Upewnić się, że miejsce wybrane wstępnie do mon- waż zawiera obwody elektryczne niepodlegające inne zastosowanie jest niewłaściwe i zabronione! tażu czujnika spełnia następujące wymogi:...
  • Page 47 5 - WCZYTYWANIE CZUJNIKA DO ODBIOR- 6 - KALIBRACJA CZUJNIKÓW wy i ruchomy, możliwe jest przytwierdzenie produk- tu również do nachylonej powierzchni. Ograniczenia NIKA SILNIKA Po zakończeniu procedury wczytywania, należy wyka- nachylenia zostały zamieszczone w Szybkim wpro- librować czujniki, wykonując następujące procedury. Tak, jak w przypadku każdego innego nadajnika, tak wadzeniu (Krok 1 - faza 1).
  • Page 48 Ostrzeżenie – Podczas wykrywania deszczu czujnik 03. Następnie, zatrzymać łopatki i upewnić się, że: a) • Działanie progu ”DESZCZ” (rys. 7) – Czujnik desz- jest ogrzewany i dlatego ciepło wyczuwane podczas dioda wykona serię krótkich naprzemiennych mi- czu działa na zasadzie ON /OFF i nie posiada żadnej gnięć...
  • Page 49: Utylizacja Urządzenia

    Niniejszym, spółka Nice S.p.A. deklaruje, że pro- Autodiagnostyka: uszkodzenie czujnika ”słońca”. ■ Wymiary mm: (objętość) 125 x 250 x 100 (H) dukty: Nemo WSRT i Nemo SRT są zgodne z Czujnik nie wykrył zmian natężenia światła ■ Masa: WSRT: 400 g; SRT: 380 g podstawowymi wymogami i innymi postanowie- słonecznego w ciągu ostatnich 24 godzin...
  • Page 50: Snelstartgids

    Snelstartgids Opmerking bij de raadpleging • De af- beeldingen in deze Snelstartgids volgen een eigen nummering die niet overeenstemt met de vermelde nummering in de volledige Nemo WSRT / SRT Climatic handleiding. • Deze Snelstartgids vervangt sensor geenszins de volledige handleiding. Stap 1 - Installatie en elektrische aansluitingen 60°...
  • Page 51 alleen voor het model 10 cm Afb. A ‘Regen’-sensor ‘Zon’-sensor ‘Wind’-sensor (alleen voor WSRT) toets “P1” Wind (alleen voor WSRT) Led “L1” Passo 2 - Memorizzazione del sensore e verifica della memorizzazione “P1” “P1” “P1” sec. Ingedrukt houden Wachten Loslaten 3 maal indrukken 1 maal indrukken IST275R01_17-05-2013...
  • Page 52 (opslagcontrole) “P1” sec. Bewegingen (3) / Geluiden (3 pieptonen) 1 maal indrukken (Omhoog) 1 maal indrukken (manoeuvre stoppen) Stap 3 - IJken van de ‘Zon’-sensor “L1” (groen) ≥ 1Klux sec. snel knipperend Trimmer naar “Test” draaien De sensor verlichten Wachten Achtereenvolgens knipperen Omlaag “L1”...
  • Page 53 “L1” (oranje) “L1” (groen-rood-) sec. snel knipperend snel knipperend Achtereenvolgens knipperen Vinger verwijderen Wachten Achtereenvolgens knipperen De sensor onthullen wind Trimmer naar andere waarde draaien Stap 5 - IJken van de ‘Wind’-sensor (alleen voor het model WSRT) wind “L1” (rood) sec.
  • Page 54: Algemene Aanbevelingen

    Dergelijke den en buismotoren van Nice gebruiken. Ieder ander • De producent aanvaardt geen aansprakelijkheid voor inrichtingen zouden het bereik nog verder kunnen ver- gebruik dient als oneigenlijk en dus als verboden materiële schade die zou kunnen optreden als gevolg...
  • Page 55: Installatie Van Het Product

    5 - OPSLAG VAN DE SENSOR IN DE ONTVAN- 6 - IJKEN VAN DE SENSOREN blootstelling van de regensensor aan de regen toe- staan. GER VAN DE MOTOR Na de opslagprocedure moeten de sensoren geijkt wor- • Doordat het sensorlichaam soepel en richtbaar is, kan Net als voor eender welke andere ontvanger is het ook den;...
  • Page 56 01. Verduister de zonsensor met de hand of met een 04. Draai de trimmer “Wind” tot slot met de wijzers van ment mogelijk om handmatige instructies te versturen. zwarte ondoorzichtige doek. de klok mee tot de gewenste waarde(*), buiten de Procedure voor de instelling van de activerings- 02.
  • Page 57: Afdanken Van Het Product

    20°C (± 5°C). Rode Led knippert (*) (iedere 0,5 seconde, – Nice S.p.A. behoudt zich het recht voor om, op elk TECHNISCHE GEGEVENS VAN HET PRODUCT gedurende 3 seconden) = Autodiagnose: sto- moment dat dit noodzakelijk wordt geacht, wijzigingen ring van de “wind”-sensor.
  • Page 58 - Appendix - Appendice - Appendice - Apéndice - Anhang - Załącznik - Bijlage...
  • Page 60 hysteresis threshold: set threshold value: e.g. positioned automatically gust of wind 30 Klux at half the set threshold Km/h value instantaneous wind speed over-threshold momentary drops in speed, within the hysteresis hysteresis values drops in speed lasting under-threshold less than 10 minutes “0”...
  • Page 61 sunrise daytime dusk night-time Klux set threshold light value: e.g. 30 Klux intensity over-threshold momentary drops in light, within the hyste- hysteresis resis values drops in light, within the under-threshold under-threshold values hysteresis threshold: positioned automatically at half the set threshold value “1”...
  • Page 62 Not raining presence/ absence of rain Yes raining “0” “1” sensor dry system active automatic operation system deactivated after 3 seconds after 15 minutes system deactivated manual manual commands deactivated operation...
  • Page 63 wind “L1” (green-red-) sec. fast flashing Km/h Wait Turn trimmer on the desired value Turn trimmer... (only for WSRT model)  Series of flashes...
  • Page 64 Nice SpA Oderzo TV Italia www.niceforyou.com info@niceforyou.com...

Ce manuel est également adapté pour:

Nemo wsrt

Table des Matières