JUKI TL-2200QVP Manuel D'instructions
Masquer les pouces
Voir aussi pour TL-2200QVP:
- Manuel d'instructions (104 pages) ,
- Manuel de montage et d'utilisation (23 pages) ,
- Guide d'utilisation (12 pages)
Table des Matières
Publicité
Liens rapides
Lockstitch machine with a long arm and a thread trimmer
Máquina pespunteadora con brazo largo y cortahilos
Machine à coudre à point noué, avec long bras et coupe-fil
TL-2200QVP
INSTRUCTION MANUAL
MANUAL DE INSTRUCCIONES
MANUEL D'INSTRUCTIONS
NOTE:
Congratulations on your purchase of a JUKI sewing machine.
Please be sure to read this Instruction Manual before operating the sewing machine
to ensure safe operation. Please be sure to keep the Instruction Manual so that you
can read it whenever necessary.
NOTA:
Felicitaciones por haber adquirido una máquina de coser JUKI.
Para garantizar un funcionamiento seguro, asegúrese de leer este Manual de
instrucciones antes de accionar la máquina de coser.
Asegúrese de guardar el Manual de instrucciones de modo que pueda consultarlo
siempre que sea necesario.
NOTE:
Merci d'avoir fait l'achat d'une machine à coudre JUKI.
Veuillez lire le présent Manuel d'instructions avant d'utiliser la machine à coudre,
afin d'en faire une utilisation sécuritaire.
Veuillez conserver ce Manuel d'instructions, de façon à pouvoir le consulter en tout
temps.
Publicité
Table des Matières

Manuels Connexes pour JUKI TL-2200QVP


Sommaire des Matières pour JUKI TL-2200QVP
- Page 1 MANUEL D’INSTRUCTIONS NOTE: Congratulations on your purchase of a JUKI sewing machine. Please be sure to read this Instruction Manual before operating the sewing machine to ensure safe operation. Please be sure to keep the Instruction Manual so that you can read it whenever necessary.
-
Page 2: Important Safety Instructions
Sure Stitch for JUKI TL2200 In order to use your machine safely, be sure to read the Instruction Manual for the Sure Stitch for JUKI TL2200 provided by Grace Company for how to install the machine on the frame, how to connect the stitch regulator and how to operate the machine. -
Page 3: Other Precautions
Congratulations on your purchase of a JUKI sewing machine. Please be sure to read safety precautions in “To use the sewing machine safely” in the Instruction Manual before use to fully understand the functions and operating procedures of the sewing machine so as to use the sewing machine for a long time. -
Page 4: Normas De Seguridad
Para utilizar su máquina de coser en condiciones de seguridad, asegúrese de leer el Manual de Instrucciones de “Sure Stitch for JUKI TL2200” provisto por la compañía Grace, para la forma de instalar la máquina en la estructura, conectar el regulador del puntada, y operar la máquina. -
Page 5: Uso Seguro De La Máquina De Coser
Felicitaciones por haber adquirido una máquina de coser JUKI. Asegúrese de leer las precauciones de seguridad indicadas en el apartado “Uso seguro de la máquina de coser” del Manual de instrucciones antes del uso para comprender plenamente las funciones y procedimientos de operación de la máquina de coser de modo que pueda utilizarla durante mucho tiempo. -
Page 6: Retenez Ces Instructions
Sure Stitch for JUKI TL2200 Pour utiliser votre machine à coudre en toute sécurité, vous devez lire le Manuel d’instructions de la “Sure Stitch for JUKI TL2200” fourni par la compagnie Grace, lequel explique comment installer la machine sur le cadre, comment connecter le dispositif de réglage du point, et comment utiliser la machine. -
Page 7: Pour Utiliser La Machine À Coudre En Toute Sécurité
Consignes de sécurité Merci d’avoir fait l’achat d’une machine à coudre JUKI. Avant l’utilisation, veuillez lire les consignes de sécurité sous la section « Pour utiliser la machine à coudre en toute sécurité » du Manuel d’instructions, afin de comprendre parfaitement les fonctions et procédures d’utilisation de la ma- chine à... -
Page 8: How To Carry The Sewing Machine
How to carry the sewing machine / Modo de transportar la máquina de coser / Comment transportar la machine à coudre How to take out the sewing machine CAUTION If you pull up the sewing machine by holding presser regulating screw section A , the sewing machine can break. -
Page 9: Grounding Instructions
GROUNDING INSTRUCTIONS This product must be grounded. In the event of malfunction or breakdown, grounding provides a path of least resistance for electric current to reduce the risk of electric shock. This product is equipped with a cord having an equipment-ground- ing conductor and a grounding plug. -
Page 10: Instrucciones Para Conexión A Tierra
INSTRUCCIONES PARA CONEXIÓN A TIERRA Esta máquina de coser debe conectarse a tierra. En caso de malfuncionamiento o avería, la conexión a tierra provee una vía de menor resistencia para la corriente eléctrica, reduciéndose así el riesgo de electrochoques. Esta máquina de co- ser está... -
Page 11: Instructions De Mise À La Masse
INSTRUCTIONS DE MISE À LA MASSE Ce produit doit être mis à la masse. En cas de dysfonctionnement ou de panne, la mise à la masse fournit une voie de moindre résistance au courant électrique pour réduire le risque de choc électrique. Ce produit est équipé d’un cordon doté d’un conducteur mis à... -
Page 12: Table Des Matières
CONTENTS Safety regulations ······································································· 1,2 How to carry the sewing machine ······················································ 7 GROUNDING INSTRUCTIONS ······················································· 8 Specifications ············································································· 12 Accessories ··············································································· 13 Principal Parts ············································································· 14 Name and Function of each component ········································ 15-22 Winding the bobbin ································································· 23-26 Threading the machine (needle thread) ·········································... -
Page 13: Specifications
Specifications / Especificaciones / Caractéristiques Description Specification Sewing speed Max. 2,200 sti/min Needle bar stroke 35mm Lift of presser foot 5.5mm Needle GB 134R Lubricating oil New Defrix Oil No.1 Dimensions of sewing machine 22.2W x 46.0H x 73.0L (cm) Weight of sewing machine 26 kg Rated power supply / Power consumption... -
Page 14: Accessories
Accessories / Accesorios / Accessoires 1. Power cord 2. Exclusive screwdriver 3. Screwdriver (small) 4. Cleaning brush 5. Bobbins (4pcs.) 6. Oilcan 7. Needles (GB 134R #18) 8. Spool cap 9. Thread stand components (spool holder, thread stand thread guide, bobbin winder spool pin, bobbin winder seat, anti-vibration cone (2 pcs.), setscrew large, setscrews small (2 pcs.)) 10. -
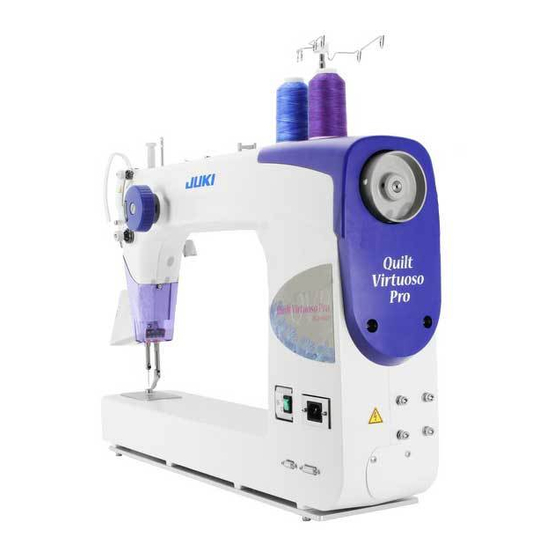
Page 15: Principal Parts
Principal Parts / Piezas principales / Pièces principales 1. Thread trimmer retaining 11. Bobbin thread winding plate shaft 2. Bobbin winder guide 12. Power switch 3. Presser foot pressure 13. Inlet of electric power regulator cord 4. Thread tension dial 14. -
Page 16: Name And Function Of Each Component
Name and Function of each component / Nombre y función de cada componente / Nomenclature et fonction des pièces Power cord Insert the electric power cord plug into the corresponding inlet. CAUTION Turn OFF the power switch before insertion/removal of any cords and any plugs. -
Page 17: Installing The Thread Stand
Installing the thread stand CAUTION Turn OFF the power switch. Always must be disconnected plug from socket-outlet. 1. Insert bobbin winder spool pin 2 into spool holder 1 . Fix the for- mer with setscrew 3 . 2. Set bobbin winder seat 4 and two anti-vibration cones 5 on spool holder 1 . -
Page 18: Installing The Thread Guide
Installing the thread guide CAUTION Turn OFF the power switch. Always must be disconnected plug from socket-outlet. Insert thread guide pin 1 into the frame with the holes in the pin faced to tension controller No. 1 2 . Pat the top of the thread guide pin with the handle of screwdriver to prevent the pin from slipping off easily. -
Page 19: Procédure De Fixation Du Cordon De Panneau
Panel cord binding procedure CAUTION Turn OFF the power switch. Always must be disconnected plug from socket-outlet. 1 Remove two setscrews from the presser regulator cover. Remove the presser regulator cover. 2 Place the panel cord as illustrated in the figure. It is necessary to place the panel cord at a position where the cord does not come in contact with the mechanical parts. -
Page 20: Installation Du Couvercle De Protection Des Yeux
Installing the eye protection cover CAUTION Turn OFF the power switch. Always must be disconnected plug from socket-outlet. DANGER Be sure to install the eye protection cover since the cover protects eyes from being injured by a fragment of a broken needle. 1. -
Page 21: Adjusting The Presser Foot Height
Adjusting the presser foot height CAUTION Turn OFF the power switch. Always must be disconnected plug from socket-outlet. If the sewing machine does not smoothly run because of the material thickness, it is necessary to change the presser foot height. Bring needle bar 1 to the lowest point end. -
Page 22: Réglage De La Course Du Pied Presseur
Adjusting the presser foot stroke It is possible to adjust the presser foot stroke. Remove presser regulator cover. Loosen nut 1 . Shift block 2 upward to increase the stroke, or downward to decrease it. To increase the stroke more, change the position of setscrew 3 of the link arm to the lower position (stroke: 3 to 5 mm). -
Page 23: Handwheel
Handwheel CAUTION Keep hand away from the handwheel while the sewing machine is running. 1 Push and turn the Hand pulley to turn the main shaft. 2 Turn on the power switch. White marker dot (A) on the handwheel is brought to the right front as observed from just beside. White marker dot (A) is in the front side: The thread take-up lever comes up to its upper end. -
Page 24: Winding The Bobbin
Winding the bobbin / Modo de bobinar la bobina / Bobinage de la canette Positioning latches Posicionamiento de sujetadores Loquets de positionnement Bobbin winder guide Guía del bobinador de bobina Bobbin presser Guide du bobineur Dedo posicionador Doigt de positionnement Bobbin thread winding shaft Eje del bobinador de bobina Tige du bobineur... - Page 25 CAUTION Turn OFF the power switch. AVISO Desconecte el interruptor de la corriente eléctrica. AVERTISSEMENT Mettre la machine hors tension. Take out the bobbin case. Bring up the needle. Open the hook cover. Take out the bobbin case. Extraiga el portabobina. Eleve la aguja.
- Page 26 Upon completion of winding the bobbin. Return the bobbin presser to its home position. Take out the bobbin. Trim the thread with the thread cutting knife. Al completar el bobinado de la bobina. Haga que el prensador de bobina vuelva a su posición original. Extraiga la bobina. Corte el hilo con la cuchilla cortahilos.
- Page 27 Adjusting the bobbin winder guide Para ajustar la guía del bobinador de bobina Réglage du guide de bobineur Good Correcto Thread unevenly wound around the bobbin would badly affect the bobbin thread tension. Correct Un bobinado de hilo enrollado en la bobina afectará adversamente la tensión del hilo de bobina.
-
Page 28: Threading The Machine (Needle Thread)
Threading the machine / Modo de enhebrar la máquina / Enfilage de la machine CAUTION Turn OFF the power switch before threading or passing thread. AVISO Desconecte el interruptor de la corriente eléctrica antes de realizar el enhebrado o pasar el hilo. AVERTISSEMENT Mettre la machine hors tension avant d’enfiler le fil ou de le faire passer. -
Page 29: Adjusting The Thread Tension
* Régler la tension du fil d’aiguille en fonction de la tension du fil de canette. * La boîte à canette pour la TL-2200QVP est une pièce spéciale JUKI. S’adresser à un revendeur JUKI pour la commander. Proper thread tension ·... -
Page 30: Tabulated Relationship Between Material, Thread And Needle
Tension controller No. 1 When tension nut No. 1 1 is turned to the right A, the remaining length of thread after thread trimming is shortened. When it is turned to the left B, the remaining length of thread is lengthened. * Be sure to carry out back tacking by several stitches at the beginning of sewing. -
Page 31: Presser Foot Lifting Lever
Presser foot lifting lever / Palanca de elevación del prensatelas / Levier relève pied presseur Presser foot lifting lever The presser foot can be brought to its upper position or to its lower position by lifting/lowering the presser foot lifting lever. 1 Lowered position ……... -
Page 32: Attaching The Needle
Attaching the needle / Modo de colocar la aguja / Pose de l’aiguille Attaching the needle Needle clamp screw 1. Turn OFF the power switch. Tornillo sujetador de la aguja Vis du pince-aiguille 2. Lower the presser foot. 3. Move the needle bar up to the highest position of Tightens its stroke. -
Page 33: Remplacement De L'autocollant De Masquage
Maintenance / Mantenimiento / Entretien Replacing the masking seal CAUTION Turn OFF the power switch. Always must be disconnected plug from socket-outlet. 1. Remove two setscrews 2 and 3 from LED cover 1 . Then, the LED cover can be lowered. 2. - Page 34 Maintenance and lubrication / Mantenimiento y lubricación / Entretien et lubrification Always must be disconnected plug from socket-outlet before cleaning or lubricat- CAUTION ing the sewing machine. Asegúrese de retirar el enchufe del tomacorriente antes de limpiar o lubricar la má- AVISO quina de coser.
- Page 35 Lubricating the machine / Modo de lubricar la máquina / Lubrification de la machine Bring the red marker dot to the right front. CAUTION Sitúe el punto marcador rojo en el frontal 1. If oil gets in eyes, immediately rinse the oil derecho.
-
Page 36: Troubles And Corrective Measures
Troubles and Corrective Measures If sewing difficulties occur, make sure the instructions are correctly followed. If a problem still exists, the reminders below help to solve it. Troubles Case Corrective measures Page Stitches are 1. The needle is bent or the needle point ·... -
Page 37: Problemas Y Medidas Correctivas
Problemas y Medidas Correctivas Si se presentan dificultades en el cosido, consulte sin falta las instrucciones para cerciorarse de que las ha entendido co- rrectamente. Si se presenta algún problema, le ayudarán a resolverlos leyendo las precauciones que damos a continua- ción. -
Page 38: Problèmes Et Remèdes
Problèmes et remèdes En cas de difficultés de couture, s’assurer que les instructions sont correctement suivies. Si un problème persiste, les rap- pels suivants aideront à le résoudre. Problème Causes Remèdes Page Saut de point 1. L’aiguille est tordue ou est ée. ·...