Table des Matières
Publicité
Les langues disponibles
Les langues disponibles
Liens rapides
SEPARATIONS JOB INFO
PROCESS
BLACK
This file is the property of Kingfisher Group Plc. No copying, alteration or amendment is permitted without
written authorisation from the Kingfisher Brand Team.
195279_s1_s1_3663602437277_GOODHOME_A5_IM_Multi_V09.indb 1
195279_s1_s1_3663602437277_GOODHOME_A5_IM_Multi_V09.indb 1
DO NOT PRINT THIS PAGE -
IT IS FOR INFORMATION ONLY
PID #: 195279_s1_s1
Agency Job #: PRJ15441
Product Description:
Electrical Heating
VERSION #
1
2
27/12/19
06/01/20
Sonia
Alphai
Artwork done by Impala Services Ltd
info@impala-tech.com
Brand: GoodHome
Brand Contact:
Barcode: 3663602437277
Vendor: Grand Merit
No. of New Line Drawings: 0
Page Size: A5 / No. of Pages:
3
4
16/01/20
17/01/20
Deepak
Sonia
9
11/05/20
Deepak
V1.1
13-05-2020 12:55:31
13-05-2020 12:55:31
Publicité
Table des Matières

Manuels Connexes pour Kingfisher GoodHome Florya


Sommaire des Matières pour Kingfisher GoodHome Florya
- Page 1 17/01/20 11/05/20 Sonia Alphai Deepak Sonia Deepak This file is the property of Kingfisher Group Plc. No copying, alteration or amendment is permitted without written authorisation from the Kingfisher Brand Team. V1.1 195279_s1_s1_3663602437277_GOODHOME_A5_IM_Multi_V09.indb 1 195279_s1_s1_3663602437277_GOODHOME_A5_IM_Multi_V09.indb 1 13-05-2020 12:55:31 13-05-2020 12:55:31...
- Page 2 Florya 3663602437277 3663602437260 3663602437253 3663602437284 3663602437291 V10520 195279_s1_s1_3663602437277_GOODHOME_A5_IM_Multi_V09.indb 2 195279_s1_s1_3663602437277_GOODHOME_A5_IM_Multi_V09.indb 2 13-05-2020 12:55:31 13-05-2020 12:55:31...
- Page 3 Contenu Contents Sécurité Safety Installation Installation Utilisation Entretien et Maintenance Care and Maintenance Garantie Guarantee 195279_s1_s1_3663602437277_GOODHOME_A5_IM_Multi_V09.indb 3 195279_s1_s1_3663602437277_GOODHOME_A5_IM_Multi_V09.indb 3 13-05-2020 12:55:31 13-05-2020 12:55:31...
- Page 4 FR IMPORTANT - Veuillez lire attentivement les instructions suivantes avant d’utiliser l’appareil et les conserver pour référence. EN IMPORTANT - Please read the following instructions carefully before using the appliance and retain for further reference. 3663602437277 3663602437260 3663602437253 3663602437284 3663602437291 195279_s1_s1_3663602437277_GOODHOME_A5_IM_Multi_V09.indb 4 195279_s1_s1_3663602437277_GOODHOME_A5_IM_Multi_V09.indb 4 13-05-2020 12:55:32...
-
Page 5: Sécurité
Sécurité ou mentales réduites ou FR Avant de commencer dénuées d’expérience • Cet appareil a été conçu ou de connaissance, s’ils et fabriqué avec soin (si elles) sont correctement pour vous donner entière surveillé(e)s ou si des satisfaction. instructions relatives à •... -
Page 6: Sécurité Reçu Des Instructions
Sécurité reçu des instructions les entrées et les sorties quant à l’utilisation de d’air, car cela risque de l’appareil en toute sécurité provoquer des accidents ou et en comprennent bien d’endommager l’appareil. les dangers potentiels. Les enfants âgés entre 3 ans et 8 ans ne doivent ni brancher, ni régler ni nettoyer l’appareil, et ni réaliser l’entretien de... - Page 7 Sécurité • L’installation doit être remplacé par le fabricant, munie d’un disjoncteur son service après vente omnipolaire avec une ou des personnes de distance d’ouverture de qualification similaire afin contact d’au moins 3 mm. d’éviter un danger. • Respecter les distances ATTENTION - Afin d’éviter minimales d’installation par tout danger dû...
- Page 8 Sécurité • L’appareil peut être installé • Éviter d’installer l’appareil dans un volume 2 ou dans dans un courant d’air une zone hors volume dans susceptible de pertuber une salle de bains (Fig. B). sa régulation. • Cet appareil électrique Fig. B de chauffage direct est conçu pour le chauffage Hors volume...
-
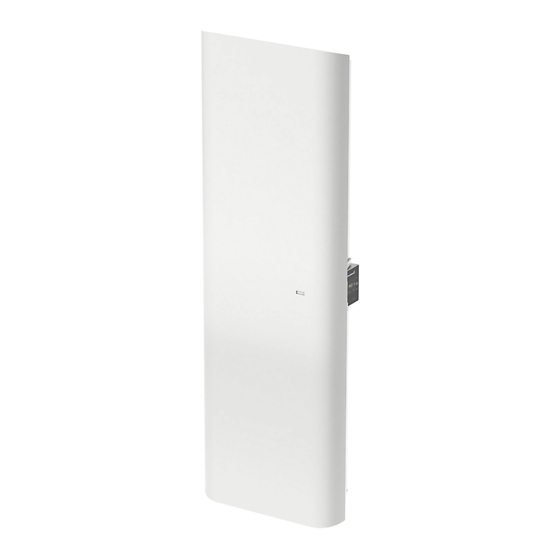
Page 9: Installation
Installation Modèle horizontal Détecteur de présence Support mural Modèle vertical Détecteur de présence Support mural 195279_s1_s1_3663602437277_GOODHOME_A5_IM_Multi_V09.indb 9 195279_s1_s1_3663602437277_GOODHOME_A5_IM_Multi_V09.indb 9 13-05-2020 12:55:32 13-05-2020 12:55:32... - Page 10 Installation Modèle horizontal Étape 3 Support Trous de mural fixation verrouillable Empreinte Trous de l'appareil fixation Étape 2 Hauteur Élément C l’appareil Étape 1 Élément D Élément A Élément B Bas de l'appareil Fig. C Alimentation 1 000 W 1 500 W 2 000 W L1 (mm) 1. Démonter le support mural en desserrant la vis (ne pas la retirer, la desserrer uniquement) et faire glisser la plaque métallique hors du trou.
- Page 11 Installation S’assurer que le support est de niveau à l’aide d’un niveau à bulle. Marquer les 4 trous de fixation et commencer le perçage. Fixer le support en H au mur en utilisant les fixations adaptées au mur (non incluses). Ne pas utiliser d’adhésif comme moyen de fixation.
-
Page 12: Raccordement Électrique
Installation 1. Démonter le support mural en desserrant la vis (ne pas la retirer, la desserrer uniquement) et faire glisser la plaque métallique hors du trou. Retirer le support en le tirant vers le bas. 2. Afin d’obtenir facilement une distance minimale de 150 mm (entre la base de l’appareil et le sol), il suffit de placer le support mural contre le mur, en veillant à... -
Page 13: Installation
Installation AVEC UTILISATION DU FIL PILOTE N (bleu ou gris) Neutre Câble de Secteur connexion 230 V~ P (marron) Phase Fil pilote (noir) Fil pilote (central) l’appareil SANS UTILISATION DU FIL PILOTE N (bleu ou gris) Neutre Câble de Secteur connexion 230 V~ P (marron) Phase... -
Page 14: Utilisation
Utilisation Introduction Nous avons conçu ce produit pour qu’il soit simple et facile à utiliser. Grâce aux fonctions intégrées ci- dessous, ce radiateur permet d’économiser de l’énergie en chauffant en cas de réelle nécessité uniquement. • Mode d’apprentissage automatique : le radiateur détecte les périodes d’absence de l’utilisateur et crée un programme d’économie d’énergie efficace tout en maintenant le niveau de confort. -
Page 15: Sélectionnez Votre Langage
Utilisation Guide de démarrage rapide • Lors de la toute première configuration du radiateur, utiliser le Guide de démarrage rapide intégré et suivre les instructions à l’écran. • Parcourir le menu en utilisant les commandes décrites ci-dessous. CONFIGURATION Revenir à l’étape précédente Sélectionnez votre langage Annuler et revenir au menu principal... -
Page 16: Radiateurs Connectés
Utilisation Radiateurs connectés Grâce à la solution connectée, il est possible d’appliquer la configuration de chauffage à vos radiateurs GoodHome, et ce, par zone ou pour toute la maison. Écran principal Définir la température Emplacement du produit Icône(s) du mode activé SALLE À... -
Page 17: Modes De Fonctionnement
Utilisation Icônes du mode activé Icône Mode Radiateur en chauffe Mode d’apprentissage automatique Mode d’économie d’énergie (mode absence avec une température plus basse) Mode de protection contre le gel Mode télécommande externe (tous les paramètres sont gérés par une télécommande externe [non fournie]) Vérifier la température ambiante et l'humidité... -
Page 18: Paramètres Généraux
Utilisation Paramètres généraux • Appuyer sur pour accéder au menu Paramètres. • Appuyer sur pour accéder au menu Paramètres généraux. GÉNÉRALITÉS Température Pièce Date & Expert Heure Régler la date et l’heure • Appuyer sur pour régler la date et l’heure. RÉGLER LA DATE RÉGLER L’HEURE nov. - Page 19 Utilisation Définir la température par défaut pour différents modes de fonctionnement • Appuyer sur , puis sur + ou - pour régler la température idéale pour les différents modes de fonctionnement. AJUSTER LA TEMPÉRATURE 20.5 °C Mode Confort 18.5 Mode d’économie °C d’énergie (absence) Mode de protection...
-
Page 20: Menu D'économie D'énergie
Utilisation Menu d’économie d’énergie • Appuyer sur pour accéder au menu Paramètres. • Appuyer sur pour accéder au menu Économie d’énergie. ÉCONOMIE D’ÉNERGIE Périodes Auto-learning d’économie Détection Détection de de présence fenêtre ouverte Dans le menu d’économie d’énergie, les icônes de menu peuvent être marquées d’une autre icône qui permet d’afficher des informations supplémentaires. - Page 21 Utilisation Pour la première programmation Si un programme est déjà défini PROGRAMMATION PROGRAMMATION SEMAINE Quel est votre choix de pro- grammation pour planifiez votre mode d'économie d’énergie Programmation simplifiée Programmation manuelle Pas de programmation MODIFIER VALIDER • Il existe 2 façons de définir les paramètres : –...
-
Page 22: Mode D'apprentissage Automatique
Utilisation Programmation manuelle • À partir du lundi, il est possible de définir jusqu’à 4 plages horaires par jour pour le mode confort. comfort period En dehors de ces plages horaires, le mode Économie d’énergie est activé automatiquement. MONDAY • Appuyer sur SUIVANT pour modifier les paramètres du ou des jours suivants. période de confort du LUNDI Appuyer ici pour... -
Page 23: Portée De Détection
Utilisation  Le capteur est un élément clé du mode d'apprentissage automatique.  Les informations relatives aux capteurs de tous les radiateurs installés dans la même pièce sont partagées entre chaque radiateur.  Le capteur détecte également les mouvements des animaux domestiques les plus grands. Si un animal est susceptible d’entrer dans une pièce donnée pendant votre absence, fermer la porte de cette pièce ou désactiver la fonction de détection. -
Page 24: Connexion Sans Fil
Utilisation Connexion sans fil • Appuyer sur pour accéder au menu Paramètres. • Appuyer sur pour accéder au menu Connexion. CONNEXION Ajouter Réseaux un appareil Wifi Paramètres avancés Remarque : La fonction Wi-Fi n’est pas disponible si aucun appareil externe n’est connecté au réseau. Ajouter un appareil externe à... -
Page 25: Autres Fonctions
Utilisation • La phrase d’avertissement s’affiche à en cas de : – Problème de connexion entre les radiateurs. – Problème de connexion au système Wi-Fi (quand le même symbole d’avertissement s’affiche également sur l’icône Wi-Fi). Se connecter à Internet Remarque : – Pour utiliser cette fonction, au moins un appareil doit être connecté au réseau du radiateur. –... - Page 26 Utilisation • Choisir la durée de votre absence (courte ou longue) et suivre les instructions à l’écran. Mode activé pendant Durée d’absence Durée Emplacement l’absence 1, 2, 3, 4, 5, 6, 12 heures Une seule pièce Courte Mode Économie d’énergie 1, 2, 3 jours toute la maison Mode de protection Longue...
- Page 27 Utilisation Mises à jour Les mises à jour du système sont effectuées automatiquement lorsque le radiateur est connecté à un réseau Wi-Fi où la connexion Internet est activée. FÉLICITATIONS Votre radiateur a été mis à jour. Mise à jour de votre radiateur en cours.
-
Page 28: Assistance Supplémentaire
Utilisation Assistance supplémentaire Pour obtenir une assistance supplémentaire : • Appuyer sur pour accéder au menu Paramètres. • Appuyer sur pour afficher le code QR. • Scanner le code QR avec votre appareil externe. AIDE Scanner ce code QR avec votre mobile. RETOUR Caractéristiques Références... -
Page 29: Exigences D'informations Applicables Aux Dispositifs De Chauffage Décentralisés Électriques
Utilisation Exigences d’informations applicables aux dispositifs de chauffage décentralisés électriques Référence(s) du modèle : HT10SB Caractéristique Symbole Valeur Unité Caractéristique Unité Puissance thermique Type d’apport de chaleur, pour les dispositifs de chauffage décentralisés électriques à accumulation uniquement (sélectionner un seul type) Contrôle thermique manuel de la charge Puissance thermique... - Page 30 Option contrôle à distance Contrôle adaptatif de l’activation Limitation de la durée d’activation Capteur à globe noir Coordonnées de Kingfisher International Products B. V ., contact Rapenburgerstraat 175E, 1011 VM, Amsterdam, The Netherlands 195279_s1_s1_3663602437277_GOODHOME_A5_IM_Multi_V09.indb 30 195279_s1_s1_3663602437277_GOODHOME_A5_IM_Multi_V09.indb 30 13-05-2020 12:55:34...
- Page 31 Option contrôle à distance Contrôle adaptatif de l’activation Limitation de la durée d’activation Capteur à globe noir Kingfisher International Products B. V ., Coordonnées de contact Rapenburgerstraat 175E, 1011 VM, Amsterdam, The Netherlands 195279_s1_s1_3663602437277_GOODHOME_A5_IM_Multi_V09.indb 31 195279_s1_s1_3663602437277_GOODHOME_A5_IM_Multi_V09.indb 31...
- Page 32 Option contrôle à distance Contrôle adaptatif de l’activation Limitation de la durée d’activation Capteur à globe noir Coordonnées de Kingfisher International Products B. V ., contact Rapenburgerstraat 175E, 1011 VM, Amsterdam, The Netherlands 195279_s1_s1_3663602437277_GOODHOME_A5_IM_Multi_V09.indb 32 195279_s1_s1_3663602437277_GOODHOME_A5_IM_Multi_V09.indb 32 13-05-2020 12:55:35...
- Page 33 Option contrôle à distance Contrôle adaptatif de l’activation Limitation de la durée d’activation Capteur à globe noir Coordonnées de Kingfisher International Products B. V ., contact Rapenburgerstraat 175E, 1011 VM, Amsterdam, The Netherlands 195279_s1_s1_3663602437277_GOODHOME_A5_IM_Multi_V09.indb 33 195279_s1_s1_3663602437277_GOODHOME_A5_IM_Multi_V09.indb 33 13-05-2020 12:55:35...
- Page 34 Option contrôle à distance Contrôle adaptatif de l’activation Limitation de la durée d’activation Capteur à globe noir Coordonnées de Kingfisher International Products B. V ., contact Rapenburgerstraat 175E, 1011 VM, Amsterdam, The Netherlands 195279_s1_s1_3663602437277_GOODHOME_A5_IM_Multi_V09.indb 34 195279_s1_s1_3663602437277_GOODHOME_A5_IM_Multi_V09.indb 34 13-05-2020 12:55:35...
-
Page 35: Entretien Et Maintenance
Entretien et maintenance • Pour conserver les performances de l’appareil, il est nécessaire de nettoyer régulièrement, à l’aide d’un aspirateur, toute la poussière déposée à l’intérieur en le positionant aux entrées et aux sorties d’air. • Utiliser de préférence des produits de nettoyage universels à... -
Page 36: Garantie
Entretien et maintenance TOUTES LES INTERVENTIONS SUR NOTRE APPAREIL DOIVENT ÊTRE EFFECTUÉES HORS TENSION ET PAR UN PERSONNEL QUALIFIÉ ET AGRÉÉ. Garantie • Nous veillons tout particulièrement à sélectionner des matériaux de haute qualité et à utiliser des techniques de fabrication qui nous permettent de créer des produits à la fois design et durables. Notre produit GoodHome bénéficie d’une garantie fabricant de 3 ans couvrant les défauts de fabrication à... - Page 37 Garantie réparation d'un bien meuble, une remise en état couverte par la garantie, toute période d'immobilisation d'au moins sept jours vient s'ajouter à la durée de la garantie qui reste à courir. Cette période court à compter de la demande d'intervention de l'acheteur ou de la mise à disposition pour réparation du bien en cause, si cette mise à...
- Page 38 Safety supervision or instruction EN Before you start concerning use of the • This appliance has been appliance in a safe way and designed and manufactured understand the hazards with care to give you involved. Children shall not complete satisfaction. play with the appliance.
- Page 39 Safety performed by a qualified WARNING: To person with the power prenvent overheating, disconnected. do not cover the appliance. • All work on these appliances must be • If the supply cord performed by qualified and is damaged, it must approved personnel with be replaced by the the power disconnected.
- Page 40 Safety • The appliance should not Fig. A-2 No obstacles above be installed under a power the appliance socket. • The power supply must be protected by a dedicated Residual Current Device of 30 mA maximum, especially if it is installed in a room containing a bath or shower.
- Page 41 Safety • Avoid installing the appliance in a draught that could affect its regulation. • This electric direct heating appliance is designed for room heating in living accommodation or equivalent, whether individual or collective, new or existing. Conformity with all relevant EC Directive requirements. Waste electrical products should not be disposed of with household waste.
-
Page 42: Wall Bracket
Installation Horizontal model Sensor “eye” Wall bracket Vertical model Sensor “eye” Wall bracket 195279_s1_s1_3663602437277_GOODHOME_A5_IM_Multi_V09.indb 42 195279_s1_s1_3663602437277_GOODHOME_A5_IM_Multi_V09.indb 42 13-05-2020 12:55:35 13-05-2020 12:55:35... - Page 43 Installation Horizontal model Step. 3 Wall Fixation bracket holes lock Footprint of the Mounting appliance holes Step. 2 Appliance Item C height Step. 1 Item D Item A Item B Floor Appliance Bottom Fig. C Power 1000 W 1500 W 2000 W L1 (mm) 1. Disassemble the wall bracket by loosening the screw (do not remove, only loosen) and slide the metal plate out of the hole.
- Page 44 Installation 3. Position the appliance on the bottom lugs of the wall bracket and straighten it up until it fits in the wall bracket. 4. Slide the metal plate into the hole, and fasten the screw to lock the wall mount bracket. Vertical model Fig. D Step 2...
- Page 45 Installation 1. Disassemble the wall bracket by loosening the screw (do not remove, only loosen) and slide the metal plate out of the hole. Take out the bracket by pulling down. 2. To faciliate obtaining the minimum dimension of 150 mm (from the bottom of the appliance to the floor), simply position the wall bracket against the wall, taking care to fit it in the right direction, with the bottom lugs on the floor,...
- Page 46 Installation Electrical connection READ THE SAFETY RULES CAREFULLY BEFORE CONNECTING THE APPLIANCE. THE INSTALLATION MUST COMPLY WITH THE STANDARDS IN FORCE IN THE COUNTRY OF INSTALLATION (THE CURRENT IET WIRING REGULATIONS (BS7671) FOR UK). CHECK THAT ALL THE WIRES IN THE TERMINALS IN THE WALL CONNECTION BOX ARE CORRECTLY CONNECTED.
-
Page 47: Switching On/Off
Introduction We have designed this product to be simple and easy to use. Thanks to the below built-in features, this radiator helps to save energy by heating only when it is really needed. • Auto learning mode: The radiator detects periods of user absence and creates an effective energy- saving programme with no loss of comfort. -
Page 48: Select Your Language
Quick Start Guide • When setting up the radiator for the first time, use the built-in Quick Start Guide and follow the instructions on the display. • Navigate the menu using the controls described below. SETUP Return to previous step Select your language Cancel and return to main menu... -
Page 49: Main Display
Connected radiators Thanks to the connected solution, share your heating set between your GoodHome radiators per area or for the entire house. Main display Set temperature Product location Activated mode icon(s) DINING ROOM Return to previous step 18.5 Decrease desired °C temperature Cancel and return to main... -
Page 50: Operating Modes
Activated mode icons Icon Mode Heating Auto learning mode Energy-saving mode (absence mode with lower temperature) Frost protection mode External remote control mode [all settings are managed by an external remote control (not provided)] Check status / change active mode / manually set absence period Indicator Option <... -
Page 51: General Settings
General settings • Tap to enter the settings menu. • Tap to enter the general settings menu. GENERAL Temperature Room Date & Expert Time Set date and time • Tap to set the date and time. SET THE DATE SET TIME nov. -
Page 52: Product Information
Set the default temperature for different operating modes • Tap and then + or - to set the target temperature for different operating modes. ADJUST THE TEMPERATURE 20.5 °C Comfort mode 18.5 °C Energy-saving (absence) mode °C Frost protection mode BACK VALIDATE Advanced settings (general) - Page 53 Energy-saving menu • Tap to enter the settings menu. • Tap to enter the energy-saving menu. ENERGY SAVING Energy Auto learning saving periods Presence Open window detection detection In the energy-saving menu, the menu icons might be marked with an additional icon to display additional information.
- Page 54 For first programming If a programme is already set PROGRAMMING WEEKLY PROGRAMMING What is your programming choice for planning your energy saving periods Simplified programming Manual programming No programming MODIFY VALIDATE • There are 2 ways to make the settings: –...
- Page 55 Manual programming • Beginning with Monday, you can set up to 4 periods per day for comfort mode. In the time between, energy-saving mode is automatically set. • Press NEXT to change settings for the next day(s). MONDAY comfort period Tap to add/remove 07:00 09:00 period setting...
-
Page 56: Detection Range
 The sensor is a key component of auto learning mode.  The sensor information of all radiators in the same room is shared among each radiator.  The sensor also detects the movement of larger pets. If you expect your pet to enter a given room when you are away, either close the door to that room or deactivate the sensor function. - Page 57 Wireless connections • Tap to enter the settings menu. • Tap to enter the connection menu. CONNECTION Add a device Networks Wifi Advanced settings Note: The WiFi function is not available if there is no external device connected to the network. Add external device to a network Several external devices (e.g.
-
Page 58: Connect To The Internet
Connect to the Internet Note: – For using this feature, at least one device must be connected to the radiator’s network. – An existing wireless network (WLAN or WiFi) is required. • Launch the app on your device. Advanced settings menu (connection) •... -
Page 59: Child Lock
• Choose the duration of your absence (short or long) and follow the instructions on the display. Mode activated during Absence duration Duration Location absence 1, 2, 3, 4, 5, 6, 12 hours Single room Short Energy-saving mode 1, 2, 3 days Entire house Long Unlimited... -
Page 60: Additional Support
Updates System updates are made automatically when the radiator is connected to a WiFi network with an active Internet connection. CONGRATULATIONS Your radiator has been updated. Update your radiator in progress. DONE Additional support To get additional support: • Tap to enter the settings menu. - Page 61 Characteristics References Power Current Width Height Thickness (mm) (mm) (mm) HORIZONTAL 3663602437253 HT10SB 1000 3663602437260 HT15SB 1500 3663602437277 HT20SB 2000 WiFi: 802.11b / 802.11g / 802.11n Appliance + wall bracket Frequency range: 2400 MHz - 2483,5 MHz Power: <20 dbm BLE: 2400 MHz - 2483,5 MHz Power: <0 dbm References...
-
Page 62: Information Requirements For Electric Local Space Heaters
Room temperature control, with open window detection With distance control option With adaptive start control With working time limitation With black bulb sensor Kingfisher International Products B. V . Contact details Rapenburgerstraat 175E, 1011 VM, Amsterdam, The Netherlands 195279_s1_s1_3663602437277_GOODHOME_A5_IM_Multi_V09.indb 62 195279_s1_s1_3663602437277_GOODHOME_A5_IM_Multi_V09.indb 62 13-05-2020 12:55:38... - Page 63 Room temperature control, with open window detection With distance control option With adaptive start control With working time limitation With black bulb sensor Kingfisher International Products B. V . Contact details Rapenburgerstraat 175E, 1011 VM, Amsterdam, The Netherlands 195279_s1_s1_3663602437277_GOODHOME_A5_IM_Multi_V09.indb 63 195279_s1_s1_3663602437277_GOODHOME_A5_IM_Multi_V09.indb 63 13-05-2020 12:55:38...
- Page 64 Room temperature control, with open window detection With distance control option With adaptive start control With working time limitation With black bulb sensor Kingfisher International Products B. V . Contact details Rapenburgerstraat 175E, 1011 VM, Amsterdam, The Netherlands 195279_s1_s1_3663602437277_GOODHOME_A5_IM_Multi_V09.indb 64 195279_s1_s1_3663602437277_GOODHOME_A5_IM_Multi_V09.indb 64 13-05-2020 12:55:38...
- Page 65 Room temperature control, with open window detection With distance control option With adaptive start control With working time limitation With black bulb sensor Kingfisher International Products B. V . Contact details Rapenburgerstraat 175E, 1011 VM, Amsterdam, The Netherlands 195279_s1_s1_3663602437277_GOODHOME_A5_IM_Multi_V09.indb 65 195279_s1_s1_3663602437277_GOODHOME_A5_IM_Multi_V09.indb 65 13-05-2020 12:55:38...
- Page 66 Room temperature control, with open window detection With distance control option With adaptive start control With working time limitation With black bulb sensor Kingfisher International Products B. V . Contact details Rapenburgerstraat 175E, 1011 VM, Amsterdam, The Netherlands 195279_s1_s1_3663602437277_GOODHOME_A5_IM_Multi_V09.indb 66 195279_s1_s1_3663602437277_GOODHOME_A5_IM_Multi_V09.indb 66 13-05-2020 12:55:38...
-
Page 67: Care And Maintenance
Care and Maintenance • To maintain the performance of the appliance, it is necessary to clean all the dust out from the inside regularly by applying the vacuum cleaner to the air inlets and outlets. • Preferably use universal cleaning products with a base of surface-active agents (soap, etc.) and a microfibre cloth. - Page 68 Guarantee • We take special care to select high quality materials and use manufacturing techniques that allow us to create products incorporating design and durability. This product GoodHome has a manufacturer’s guarantee of 3 years against manufacturing defects, from the date of purchase (if bought in store) or date of delivery (if bought online), at no additional cost for normal (non-professional or commercial) household use.
-
Page 69: Declaration Of Conformity
Product RADIATOR FLORYA-DRY INERTIA HT10SB / HT15SB / HT20SB / HT10SBV / HT15SBV Name and address of the manufacturer or his authorised representative: Kingfisher International Products Limited, 3 Sheldon Square London W2 6PX United Kingdom This declaration of conformity is issued under the sole responsibility of the manufacturer. - Page 70 Nombre y dirección del fabricante o de su representante autorizado: Nome e endereço do fabricante ou do respetivo mandatário: Kingfisher International Products B. V ., Rapenburgerstraat 175E, 1011 VM Amsterdam, The Netherlands This declaration of conformity is issued under the sole responsibility of the manufacturer.
- Page 71 Declaration of Conformity 2014/53/EU Radio Equipment Directive 2011/65/EC Directive RoHS Restriction of the use of certain hazardous substances in electrical and electronic equipment 2009/125/EC Directive on Ecodesign Requirements for Energy-Related Products (EU) 2015/1188 (EU) 2015/863 2014/53/EU Directive relative aux équipements radio électriques 2011/65/EC Directive Limitation de l’utilisation de certaines substances dangereuses dans les équipements électriques et électroniques 2009/125/CE Directive fixant les exigences en matière d’écoconception applicables aux produits liés à...
- Page 72 Signed for and on behalf of/Signé par et au nom de/Podpisano w imieniu/Semnat pentru și în numele/ Unterzeichnet für und im Namen von/ Firmado en nombre de/Assinado por e em nome de: Kingfisher International Products B. V ., Rapenburgerstraat 175E,...
- Page 73 Fabricant • Manufacturer: UK Manufacturer: Kingfisher International Products Limited, 3 Sheldon Square, London, W2 6PX, United Kingdom EU Manufacturer: Kingfisher International Products B. V ., Rapenburgerstraat 175E, 1011 VM Amsterdam, The Netherlands FR Distributeur: Castorama France C.S., 50101 Templemars, 59637 Wattignies CEDEX www.castorama.fr...