Publicité
Liens rapides
86400
Modell: FZ-003
Fahrradlift
D
– Gebrauchsanweisung –
Cycle Lift
GB
– Instruction manual –
Porte-vélos
F
– Mode d'emploi –
Ascensore per bicicletta
I
– Istruzioni d'uso –
Podnośnik rowerowy
PL
– Instrukcja obsługi –
20
PAP
Instruction manual
Stand: 10/2014
Mode d'emploi
D
INTER-UNION
Istruzioni d'uso
Klaus-v.-Klitzing-Str. 2
76829 Landau
Instrukcja obsługi
PL
Intertec Polska SP. zo.o.
Stara Wiés, ul. Grodziska 22
PL-05-830 Nadarzyn
86400_BA_A4_FISCHER_141006.indd 2-5
D
Montageanleitung
Das beste Montageergebnis erhalten Sie, wenn sich die Haltekrallen direkt über Sattel und Lenkstange
befinden. Achten Sie bitte ebenfalls auf genügend Abstand zu Seitenwänden etc.
1. Messen Sie bitte den Abstand zwischen Lenkstange und Sattel Ihres
Fahrrades. Dieser Abstand ist das Maß, welches Sie an die Decke
zur Befestigung der Grundträger übertragen. Zur Montage bohren Sie
mittels einer Bohrmaschine Löcher in die Decke und schrauben die
Grundträger an die Decke. Achtung: verwenden Sie unbedingt Dübel für
die Deckenlöcher bei Bohrungen in Betondecken, um einen dauerhaften
Halt sicher zu stellen.
b
a
d
d
2. Jetzt verbinden Sie die Grundträger und die Haltekrallen nach dem Flaschenzugprinzip. Machen Sie
dafür einen stabilen Doppelknoten an einem Seilende und führen dann das nicht verknotete Seilende in
eines der äußeren, rechteckigen Löcher des Grundträgers a. Danach führen Sie das Seil in folgender
Reihenfolge: Rolle der Haltekralle a -> Rolle des Grundträgers a -> Rolle des Grundträgers b -> Rolle
der Haltekralle -> Sicherheitsklemme an Grundträger d.
3. Abschließend befestigen Sie den Seilhalter e an einer geeigneten Stelle
einer Wand.
4. Hängen Sie den Lenker und den Sitz auf die Haken. Stellen Sie sicher,
dass das Seil nicht verklemmt. Ziehen Sie am Seil, um das Fahrrad an
die Decke zu heben. Wenn sich das Fahrrad auf der gewünschten Höhe
e
befindet, wickeln Sie das Seil mehrfach um den Seilhalter. Sollte das
Seil vorher losgelassen werden, verhindert die Sicherheitsklemme ein
Herunterfallen des Fahrrads.
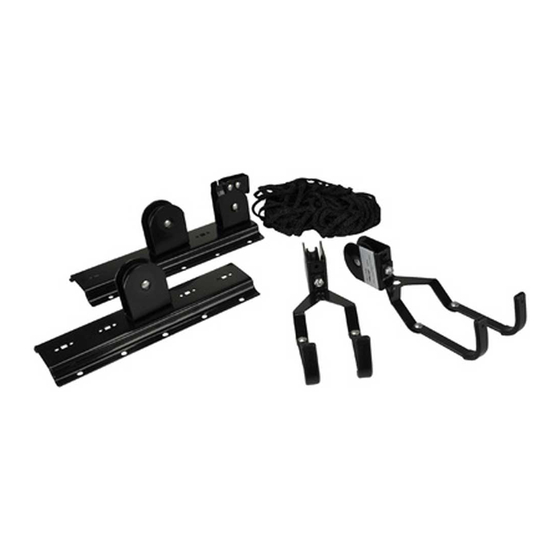
Stückliste: 2 Grundträger mit Rollen, 2 Haltekrallen mit Rollen, 1 Nylonseil,
1 Seilhalter, 10 Schrauben (Dübel nicht enthalten).
Technische Daten: Belastung: max. 20 kg; Lifthöhe: max. 4 Meter.
Entsorgungshinweis: Bitte nicht über den Hausmüll entsorgen.
Nähere Informationen erhalten Sie bei Ihrem lokalen Entsorgungsträger.
Reinigungshinweis: Nur lösungsmittelfreie, nicht ätzende Reinigungsmittel verwenden.
Warnung/Sicherheitshinweise: Nur für den Innenbereich.
Zum Aufhängen von Fahrrädern. Die Montage darf nur in Holz- oder Betondecken erfolgen.
Bei Benutzung von Dübeln darauf achten, dass diese passend sind zu den mitgelieferten Schrauben.
Lassen Sie sich ggf. im Fachhandel beraten.
Vor Beginn der Bohrarbeiten muss überprüft werden, dass die Bohrlöcher in sicherem Abstand liegen zu
elektrischen Kabeln und Versorgungsrohren, Gas- oder Wasserleitungen.
Das Erzeugnis darf nicht für Dreiräder oder Fahrräder mit Hilfsantrieb verwendet werden.
Wenn das Fahrrad am Bügel befestigt ist, ist eine Bedienung oder Wartung nicht gestattet.
GB
D
Mounting instructions
The best results are obtained if the claws are located directly over the saddle and the handlebars.
Please also ensure sufficient distance is kept from the side walls etc..
1. Please measure the distance between the handlebars and the saddle
of your bike. This distance is the measurement you transfer to the
ceiling so as to mount the base. For mounting, use a drill to drill holes
in the ceiling and screw the base plate to the ceiling. Attention: it is
essential that you use dowels for the ceiling holes when drilling into
concrete ceilings, in order to ensure a secure hold.
b
a
d
d
e
2. Now connect the base plate and the claws using the block and tackle principle. To do this, tie a secure
double knot in one end of the rope and feed the untied end of the rope into one of the outside, square
holes in the base plate a. Then feed the rope in the following sequence: Roller of the claws a -> roller
of the base plate a -> roller of the base plate b -> roller of the claws -> safety clamp on the base
plate d.
3. Finally fix the rope holder e to a suitable point on a wall.
4. Hang the handlebars and the seat on the hooks. Make sure that the
cord does not jam. Pull on the cord to raise the cycle up towards the
ceiling. When the cycle has been raised to the desired height, wrap the
cord around the cord support several times. If you let go of the cord
e
before doing so, the safety clamp will prevent the cycle from falling.
Parts List: 2 base plates with rollers, 2 claws with rollers, 1 nylon rope,
1 rope holder, 10 screws/bolts (dowels not included).
Technical data: Load: max. 20 kg; lift height max. 4 metres.
Waste-disposal tip: Please do not dispose of the waste via the
domestic refuse. You can obtain more detailed information from your
local waste-disposal contractor.
Cleaning tip: Only use solvent-free, non-corrosive detergents.
Warning/Safety instructions: Only for indoor use.
For suspending cycles. It may only be installed in wooden or concrete ceilings.
If you use rawlplugs, make sure that these are the correct size for the screws supplied.
If in doubt, seek advice from your specialist dealer.
Before starting drilling work you must check that the drill holes are a safe distance from electrical cables,
gas and water pipes and other supply pipes.
This product may not be used for tricycles or cycles with an auxiliary drive.
You must not operate or maintain the cycle when it is attached to the bracket.
e
13.10.14 12:04
Publicité

Manuels Connexes pour FISCHER FZ-003

Sommaire des Matières pour FISCHER FZ-003
- Page 1 86400 Modell: FZ-003 Montageanleitung Mounting instructions Das beste Montageergebnis erhalten Sie, wenn sich die Haltekrallen direkt über Sattel und Lenkstange The best results are obtained if the claws are located directly over the saddle and the handlebars. Fahrradlift befinden. Achten Sie bitte ebenfalls auf genügend Abstand zu Seitenwänden etc.
- Page 2 Instructions de montage Istruzioni per il montaggio Instrukcja montażu Vous obtiendrez le meilleur résultat de montage si les mâchoires de fixation se trouvent directement Il miglior risultato di montaggio si ottiene quando le graffe di supporto si trovano direttamente su sella e Podnośnik jest zamontowany prawidłowo, kiedy haki podtrzymujące znajdują...