Télécharger Imprimer la page

Publicité

Les langues disponibles
  • FR

Les langues disponibles

  • FRANÇAIS, page 15

Liens rapides

Module - Pro
Lock
Start/Stop
SET
Manual

Publicité

loading

Sommaire des Matières pour Hahnel CAPTUR Module - Pro

  • Page 1 Module - Pro Lock Start/Stop Manual...
  • Page 2 Connecting your Captur Module - Pro Wireless: Requires Captur (sold separately) APTUR Receiver APTUR Receiver Transmitter Note: Push in fully. P1 Cable receiver end plug is grey in colour. Transmitter Note: Push in fully. P1 Cable receiver end plug is grey in colour.
  • Page 3 Captur Module - Pro Controls Rubber Housing Cable Micro USB power in Release Button Off/On Lock Start/Stop Lock Start/Stop Lock Start/Stop Tripod Mount Tripod Mount AA x 2 Battery Compartment Rubber Housing Off/On APTUR APTUR Module - Pro Module - Timer...
  • Page 4 Interval timed photography chart =3 x INTVL1 =3 shots =3 shots =3 shots DELAY INTVL1 INTVL2 INTVL1 INTVL2 INTVL1 Example: Delay 1 hour No long 10 sec interval 1 3 shots interval 1 1 min interval 2 Repeat 3 x interval 1 Manual Remote Control Green Full...
  • Page 5 Interval Timer Toggle Button Captur Module - Pro...
  • Page 6 Sensor Toggle Button Captur Module - Pro...
  • Page 7 Captur Module - Pro Beeper ON/OFF Button Lock Delay before shooting starts Duration of burst/exposure with continuous/bulb 1st Interval time Number of shots at 1st Interval Number of times program is repeated 2nd Interval time Low battery indicator Hours Minutes...
  • Page 8: Release Button

    The Captur and the Captur Module - Pro must be channel matched using DCM. Alternatively you can also connect the Captur Module - Pro directly to a DSLR camera with a camera cable (sold separately).
  • Page 9 Refer to www.hahnel.ie for Triggered by external sensor more info connected to AUX socket Note: • More information available on www.hahnel.ie • Wrong connection of external AUX sensors may damage the Captur Module –Pro. Captur Module - Pro...
  • Page 10 • Observe correct battery polarity • Dispose in accordance with appropriate environmental regulations • Take battery out of unit if stored for an extended period of time Scan QR code for more information on the Captur Module Pro Captur Module - Pro...
  • Page 11 0 bis 999, -t—(Zeitraffer), --- (unendlich) Geräusch-Auslöser Infrarot-Auslöser Licht-Auslöser Laser-Auslöser Aux-Auslöser Integrierter Licht- und Laser-Sensor Light/Laser Integrierter Mikrophon-Sensor Sound Integrierter IR-Sensor Auslösebestätigung durch die LED Aux-Sensor Buchse SET Taste zum Bestätigen Navigationskreuz IR-Signal-Erzeuger Module – IR Captur Module - Pro...
  • Page 12 Taste . Die Einstellungen können nach Ihren Navigationskreuz Vorstellungen eingestellt werden. Mit dem können Sie zwischen den Einstellmöglichkeiten < oder > wechseln. Um Einstellungen zu ändern und zu bestätigen drücken Sie die SET Taste Captur Module - Pro...
  • Page 13: Beschreibung

    Auslösen durch externe Weitere Infos auf www. Sensoren, die mit der AUX- hahnel.ie Buchse verbunden sind Hinweis: • Mehr Informationen finden Sie auf www.hahnel.ie • Falsche Verbindungen mit externen AUX-Sensoren können das Captur Module –Pro schädigen. Captur Module - Pro...
  • Page 14 • Achten Sie auf die Batteriepolarität • Die Entsorgung muss entsprechend der geltenden Vorschriften erfolgen. • Entnehmen Sie die Batterien aus den Geräten, bei längerer Nichtbenutzung oder Lagerung. Scannen Sie den QR-Code, um weitere Informationen zum Captur Module Pro zu erhalten Captur Module - Pro...
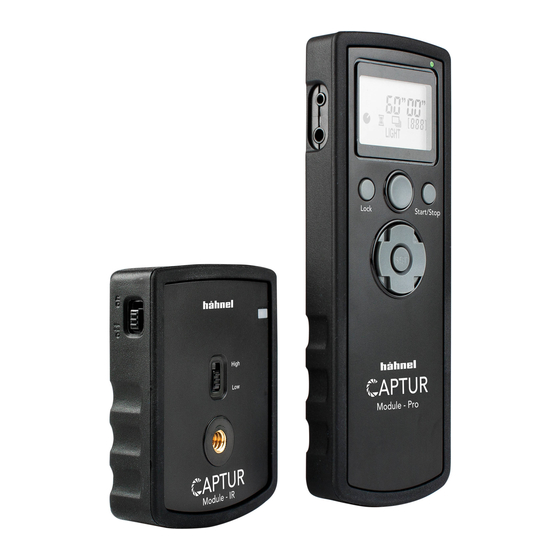
  • Page 15 Captur Module - Pro Beeper ON/OFF Verrouillage Délai avant déclenchement Temps d’exposition Temps du 1er intervalle Nombre de prises de vue au 1er Intervalle Nombre de répétitions du programme « » Temps du 2ème intervalle Indicateur de batterie Heures Minutes Secondes 0 à...
  • Page 16 Le Captur Module - Pro est un accessoire compatible avec le Captur (vendu séparément) qui permet de contrôler l’appareil photo à distance. Le Capture et le Captur Module - Pro doivent être réglés sur le même canal en utilisant le DCM. Il est toutefois également possible de connecter directement le Captur Module - Pro à...
  • Page 17 Déclencher grâce à un capteur Plus d’information sur www. connecté à une prise d’entrée hahnel.ie Note: • Informations complémentaires disponibles sur www.hahnel.ie • Une mauvaise connection à une source AUX externe peut endommager le Module Pro Captur Captur Module - Pro...
  • Page 18 • Respecter le bon positionnement des batteries. • Utiliser le produit dans le respect des réglementations environnementales • Retirer les batteries de l’appareil en cas de non utilisation prolongée. Pour plus d’information sur Le Module Pro Captur, scanner le QR code Captur Module - Pro...
  • Page 19 Dźwięk wyzwalania Wyzwalanie podczerwieni Światło Laser Wbudowany sensor światła i lasera Light/Laser Wbudowany sensor mikrofonu Sound Wbudowany sensor IR Dioda spustu migawki Wejście czujnika AUX Przycisk “SET” Przycisk do nawigacji Generator wiązki IR Module – IR Captur Module - Pro...
  • Page 20 Użyj lub > prawo by przechodzić do parametrów, które chcemy dostosowywać. Przycisk do nawigacji Naciśnij przycisk SET by zmieniać parametry. poprzez + lub – służy do ustawienia odpowiedniej wartości. Naciśnij ponownie przycisk SET by potwierdzić zmiany. Captur Module - Pro...
  • Page 21 Odwiedź www.hahnel.ie po zewnętrznego podłączonego więcej informacji do gniazda AUX Note: • Więcej informacji znajdziesz na stronie www.hahnel.ie • Nieprawidłowe podłączenie zewnętrznych czujników AUX może uszkodzić moduł -PRO Captur. Regulowane ustawienia sensora Istnieje kilka parametrów, które mogą być regulowane w każdym czujniku...
  • Page 22 • Urządzenie należy usuwać zgodnie z odpowiednimi przepisami dotyczącymi ochrony środowiska • Jeśli urządzenie ma być przechowywane przez dłuższy okres czasu, należy wyjąc z niego baterie Zeskanuj kod QR, aby uzyskać więcej informacji na temat modułu Captur Pro Captur Module - Pro...
  • Page 23 Geluids Trigger Infrarood Trigger Licht Trigger Laser Trigger Externe Trigger ingebouwde Licht en Laser sensor Light/Laser ingebouwde Microfoon sensor Sound ingebouwde IR (infrarood) sensor Indicatie-LED onstpanknop Aansluiting externe sensor SET-knop Tuimelschakelaar generator IR-straal Module – IR Captur Module - Pro...
  • Page 24 De Captur Module - Pro instellen De Captur Module - Pro is een accessoire voor de Captur (wordt apart verkocht) om uw Camera draadloos te bedienen. De Captur en de Captur Module - Pro moeten op het correcte kanaal gezet worden met DCM.
  • Page 25 Wordt door een externe Zie: www.hahnel.ie voor meer sensor via de AUX-aansluiting info geactiveerd Noot: • Voor meer informatie zie: www.hahnel.ie • Verkeerde aansluiting van externe AUX-sensors kan de Captur Module –Pro beschadigen. Captur Module - Pro...
  • Page 26 • Gooi de unit / batterijen weg conform de wettelijk toegestane milieuregels. • Haal de batterijen uit de unit als deze langere tijd niet gebruikt word Scan de QR code voor meer informatie over de Captur Module Pro Captur Module - Pro...
  • Page 27 Senor de luz y laser incorporado Light/Laser Sensor microfono incorporado. Sound Senso IR incorporado LED del disparador Toma de entrada del sensor auxiliar Botón de ajuste Palanca de botón Generador de destellos IR Module – IR Captur Module - Pro...
  • Page 28 Start/Stop el botón a ‘Start’ el ‘Intervalo temporizado Fotografía’. El Captur Module - Pro tomará ahora una foto de forma continua en la Start/Stop fábrica de establecer el tiempo de intervalo. Pulse nuevo para ‘Stop’ el intervalo programado fotografía. Los valores de los siguientes parámetros se pueden ajustar según sea necesario.
  • Page 29 Ahora presione el botón para iniciar el sensor de disparo. El Captur Module - Pro ya está listo para disparar la cámara y el LED se muestra en verde. Cuando el Módulo Captur - Pro se desencadena por el sensor, se activará la cámara para tomar una foto y LED se muestra momentáneamente en rojo fijo (por ejemplo, con “SOUND”...
  • Page 30 Advertencia • No modifique producto • Mantenga Captur Module - Pro y el módulo de Captur - IR y seco en todo momento • No utilizar en presencia de gas inflamable • Mantener fuera del alcance de los niños •...
  • Page 31 Laser spouštění Pomocné spouštění Vestavěné světelné čidlo a laser senzor Light/Laser Vestavěné čidlo mikrofonu Sound Vestavěné IR čidlo LED dioda spouště Vstup pro zapojení přídavného čidla Tlačítko SET (nastavení) Přepínací (ovládací) tlačítko Generátor IR paprsku Module–IR Captur Module - Pro...
  • Page 32: Release Button

    Vysílač – stiskněte a držte tlačítko + zapněte vypínač do polohy “ON”. LED dioda začne blikat zeleně b. Captur Module - Pro - stiskněte a držte tlačítko SET + zapněte vypínač do polohy “ON”. LED dioda začne svítit nepřerušovaně červeně.
  • Page 33 Spoušť spustí přídavné externí Více informací najdete na čidlo připojené do AUX vstupu www.hahnel.ie Poznámka: • Více informací najdete na www.hahnel.ie • Špatně zapojený či vadný externí sensor může poškodit Captur Module –Pro. Captur Module - Pro...
  • Page 34 • Dbejte na správnou polaritu baterií • Likvidujte v souladu s příslušnými předpisy v oblasti životního prostředí • Vyjměte baterie z přístroje, pokud je skladován po delší dobu Naskenujte QR kód pro více informací o Captur Pro modulu Captur Module - Pro...
  • Page 35 Som de disparo Infra-Red Laser Disparo auxiliary Sensor incorporado de Luz e Laser Light/Laser Sensor do microfone incorporado Sound Sensor incorporado IR LED do obturador Sensor auxiliar Botão SET Botão de alternancia Modulo IR de gerador Module–IR Captur Module - Pro...
  • Page 36 Canal Digital Matching - DCM (requer o transmissor Captur) a. Transmissor - Pressione e botão + Ligue e mantenha ‘ON’. O LED pisca verde rapidamente b. Captur Module - Pro - Pressione e masntenha (SET) + Ligue ‘ON’ – o Timer. O LED pisca vermelho constante c.
  • Page 37 Provocado pelo sensor externo Para mais informações www. ligado à fiche AUX hahnel.ie Nota: • Mais informações disponíveis sobre www.hahnel.ie • Ligação errada de sensores AUX externos podem danificar o Captur Módulo -Pro. Captur Module - Pro...
  • Page 38 (botão Release) permanecerá sempre ativo Aviso • Não modifique produto • Mantenha Captur Module - Pro e Captur Module - IR, seco em todos os momentos • Não utilizar na presença de gás inflamável • Manter fora do alcance das crianças •...
  • Page 39 0 till 999, -t – (time lapse), -- (obegränsad) Ljud-sensor IR-sensor Ljus-sensor Laser -sensor AUX-sensor Ljus / Laser-sensor Light/Laser Mikrofonsensor Sound IR-sensor LED för indikering av pågående exponering AUX sensoringång “SET” Knapp Växlingsknapp IR-enhet Module–IR Captur Module - Pro...
  • Page 40 Digital Kanal Matching – DCM (Kräver Captur sändare) a. Sändaren (Transmitter) - Håll ner knappen + “PÅ” knappen samtidigt. LED-lampan börjar blinka grönt. b. Captur Module - Pro - Håll ner knappen (SET) + “PÅ” knappen samtidigt. LED-lampan övergår till ett rött fast läge.
  • Page 41 Captur Module - Pro är nu redo att utlösa kameran och LED övergår till ett fast grönt läge. När Captur Module - Pro utlöses av sensorn, kommer enheten att trigga kameran för att ta ett foto och LED indikerar med ett fast rött läge för ett ögonblick (t.ex.
  • Page 42 • Överhettning kan leda till läckage, brand eller explosion • Kontroller korrekt batteri polaritet • Återvinning enligt miljöbestämmelser • Ta ut batteriet ur enheten om den förvaras under en längre tid Skanna QR-koden för mer information om Captur Module Pro Captur Module - Pro...
  • Page 43 Wifi. Il Captur ed il Captur Module – Pro devono essere sincronizzati sullo stesso canale tramite DCM, in alternative si può connettere il Captur Module - Pro direttamente alla reflex via cavo (venduto a parte).
  • Page 44 Start/Stop Premere il pulsante per iniziare la programmazione ‘intervallo di tempo Fotografia’. Il Captur Module - Pro farà a questo punto degli scatti continuati e ripetuti secondo i settaggi del produttore. Premere Start/Stop per fermare questa funzione. I valori dei seguenti parametri Toggle button possono essere regolati come si desidera.
  • Page 45 Attivazione via sensore esterno maggiori informazioni collegato alla presa AUX Note: • Vai su www.hahnel.ie per maggiori informazioni • Il collegamento errato di un AUX esterno può danneggiare il Captur Module –Pro. Settaggi del sensore modificabili Ci sono molti parametri per ogni sensore che possono essere modificati,...
  • Page 46 ) ( Time Lapse /0, 999 ( IR ) Light/Laser Sound Module–IR Captur Module - Pro...
  • Page 47 Captur Module - Pro Captur Module - Pro Captur Module - Pro < > Captur Module - Pro...
  • Page 48 ---, < > Captur Module - Pro...
  • Page 49 < > Lock Lock Captur Module - Pro...