Table des Matières

Publicité

Les langues disponibles
  • FR

Les langues disponibles

  • FRANÇAIS, page 22

Liens rapides

FM/AM
Compact Disc Player
CDX-HS70MW/CDX-HS70MS
FM/MW/LW
Compact Disc Player
CDX-HR70MW/CDX-HR70MS
Operating Instructions
Mode d'emploi
Manual de instrucciones
Bedienungsanleitung
Gebruiksaanwijzing
Istruzioni per l'uso
To cancel the demonstration (DEMO) display, see page 12.
Pour annuler la démonstration (DEMO), reportez-vous à la page 13.
Para cancelar la pantalla de demostración (DEMO), consulte la página 13.
Zum Deaktivieren der Demo-Anzeige (DEMO) schlagen Sie bitte auf Seite 13 nach.
Om de demonstratie (DEMO) te annuleren, zie pagina 13.
Per annullare la dimostrazione (DEMO), vedere pagina 13.
© 2006 Sony Corporation
A-CN5-100-11 (1)
US
FR
ES
DE
NL
IT

Publicité

Table des Matières
loading

Sommaire des Matières pour Sony CDX-HS70MW

  • Page 1 Para cancelar la pantalla de demostración (DEMO), consulte la página 13. Zum Deaktivieren der Demo-Anzeige (DEMO) schlagen Sie bitte auf Seite 13 nach. Om de demonstratie (DEMO) te annuleren, zie pagina 13. Per annullare la dimostrazione (DEMO), vedere pagina 13. © 2006 Sony Corporation...
  • Page 2 Radio Inc. and XM Satellite Radio Inc. The use of optical instruments with this product will increase eye hazard. SonicStage and its logo are trademarks of Sony Corporation. “ATRAC” and its logo are trademarks of Sony For the state of california, USA only Corporation.
  • Page 3: Table Des Matières

    Table of Contents Other functions Welcome ! ......4 Changing the sound settings ....12 Getting Started Adjusting the sound characteristics —...
  • Page 4: Welcome

    This unit is designed for use in a marine environment. To protect the unit from water spray, Thank you for purchasing this Sony Compact waves, rain, moisture, ultraviolet rays, etc., the unit Disc Player. You can enjoy your sailing with the has undergone the following tests to ensure following functions.
  • Page 5: Getting Started

    • Do not put anything on the inner surface of the front panel. • Be sure to close the front panel during operation. Setting the clock CDX-HS70MW/HS70MS: Ejecting the disc 12-hour indication Slide the OPEN switch and open the CDX-HR70MW/HR70MS: front panel.
  • Page 6: Location Of Controls And Basic Operations

    Location of controls and basic operations Main unit DSPL GP/ALBM SHUF PAUSE SOURCE MODE CDX-HS70MW CDX-HS70MS CDX-HR70MW CDX-HR70MS Front panel opened RESET...
  • Page 7 (press and hold). B OFF button M SELECT button To power off; stop the source. To select setup items. C SCRL (scroll) button (CDX-HS70MW/ N SOURCE button HS70MS) 9 To power on; change the source (Radio/CD/ To scroll the display item.
  • Page 8: Card Remote Commander Rm-X151

    Card remote commander *1 When an MD changer is connected. *2 When an ATRAC CD is played. RM-X151 *3 When an MP3/WMA/AAC is played. *4 If the changer is connected, the operation is different, see page 13. *5 When playing back on this unit. *6 When the SAT tuner is connected.
  • Page 9: Display Items

    To change display items B, press (DSPL); Storing by the BTM button scroll display items B, press (SCRL) or set (CDX-HS70MW/HS70MS only) “A.SCRL-ON” (page 13). Press and hold (BTM) until “BTM” flashes, instead of steps 2 to 4.
  • Page 10: Tuning Automatically

    TA (Traffic Announcement)/TP (Traffic Tuning automatically Program) Provides current traffic information/programs. Select the band, then press (SEEK) –/+ Any information/program received, will to search for the station. interrupt the currently selected source. Scanning stops when the unit receives a station. Repeat this procedure until the PTY (Program Types) desired station is received.
  • Page 11: Selecting Pty

    Staying with one regional program Type of programs — REG NEWS (News), AFFAIRS (Current Affairs), When the AF function is on: this unit’s factory INFO (Information), SPORT (Sports), setting restricts reception to a specific region, so EDUCATE (Education), DRAMA (Drama), you will not be switched to another regional CULTURE (Culture), SCIENCE (Science), station with a stronger frequency.
  • Page 12: Other Functions

    After 3 seconds, the setting is complete and Other functions the display returns to normal play/reception mode. Changing the sound settings Other equalizer types are also adjustable. With the card remote commander Adjusting the sound In step 3, to adjust the selected item, press <, M, , characteristics —...
  • Page 13: Using Optional Equipment

    DIM (Dimmer) Using optional equipment To change the brightness of the display. – “DIM-AT” ( ): to dim the display automatically when you turn lights on. CD/MD changer – “DIM-OFF”: to deactivate the dimmer. – “DIM-ON”: to dim the display. Selecting the changer CONTRAST 1 Press (SOURCE) repeatedly until “CD”...
  • Page 14: Marine Remote Commander Rm-X55M

    To return to normal play mode, select “ OFF” Rotary commander RM-X4S or “SHUF OFF.” Attaching the label “SHUF ALL” will not shuffle tracks between CD units Attach the indication label depending on how and MD changers. you mount the rotary commander. Marine remote commander RM-X55M Location of controls...
  • Page 15: Auxiliary Audio Equipment

    1 While pushing the VOL control, press and Additional Information hold (SEL). Precautions • If your boat has been moored in direct sunlight, allow the unit to cool off before operating it. • Power antenna (aerial) will extend automatically while the unit is operating. Moisture condensation On a rainy day or in a very damp area, moisture condensation may occur inside the lenses and...
  • Page 16: Playback Order Of Mp3/Wma/Aac Files

    • Before playing, clean the discs Playback order of MP3/WMA/AAC with a commercially available files cleaning cloth. Wipe each disc from the center out. Do not use Folder solvents such as benzine, MP3/WMA/AAC (album) thinner, commercially available cleaners, or antistatic spray MP3/WMA/ intended for analog discs.
  • Page 17: About Aac Files

    If you have any questions or problems concerning malfunction. In such a case, your unit that are not covered in this manual, consult Fuse (10A) consult your nearest Sony your nearest Sony dealer. dealer.
  • Page 18: Specifications

    Power amplifier section Outputs: Speaker outputs (sure seal connectors) Tuner section Speaker impedance: 4 – 8 ohms Maximum power output: 52 W × 4 (at 4 ohms) CDX-HS70MW/HS70MS: General Tuning range: Outputs: 87.5 – 108.0 MHz (at 50 kHz step) Audio outputs terminal (front, rear/sub switchable) 87.5 –...
  • Page 19: Troubleshooting

    Note This unit cannot be connected to a digital preamplifier The leads are not matched correctly with the boat’s or an equalizer which is Sony BUS system compatible. accessory power connector. The display disappears from/does not appear Design and specifications are subject to change in the display window.
  • Page 20: Error Displays/Messages

    (only when the boat has built-in antenna (aerial)). FAILURE (Illuminates for about 1 second.) • Check the connection of the boat antenna (aerial). (CDX-HS70MW/HS70MS only) • The auto antenna (aerial) will not go up. When the XM tuner is connected, storing an XM radio t Check the connection of the power antenna channel into a preset failed.
  • Page 21 *2 The disc number of the disc causing the error appears in the display. If these solutions do not help improve the situation, consult your nearest Sony dealer. If you take the unit to be repaired because of CD playback trouble, bring the disc that was used at the...
  • Page 22 (vendu séparément). Consultez votre détaillant agréé ATTENTION Sony le plus proche pour en savoir plus sur le L’utilisation d’instruments optiques avec ce fonctionnement du module tuner radio satellite. produit augmente les risques pour les yeux.
  • Page 23 Table des matières Autres fonctions Félicitations ! ......4 Modification des caractéristiques du son ..12 Préparation Réglage des caractéristiques du son —...
  • Page 24: Félicitations

    Nous vous remercions d’avoir fait l’acquisition A propos de la résistance à l’eau de ce lecteur de disques compacts Sony. Vous Cet appareil est conçu pour être utilisé en milieu pouvez profiter de la navigation grâce aux marin.
  • Page 25: Préparation

    Retirez la feuille isolante avant d’utiliser la mini- Ouvrez la façade. télécommande pour la première fois. Insérez le disque (côté imprimé vers le haut). Réglage de l’horloge CDX-HS70MW/HS70MS : Cycle de 12 heures Fermez la façade. CDX-HR70MW/HR70MS : La lecture commence automatiquement. Cycle de 24 heures...
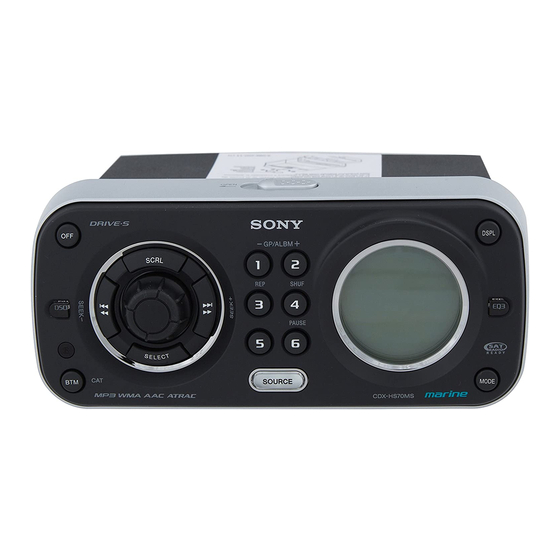
  • Page 26: Emplacement Des Commandes Et Opérations De Base

    Emplacement des commandes et opérations de base Appareil principal DSPL GP/ALBM SHUF PAUSE SOURCE MODE CDX-HS70MW CDX-HS70MS CDX-HR70MW CDX-HR70MS Façade ouverte RESET...
  • Page 27 1 seconde et maintenez-la C Touche SCRL (défilement) enfoncée) ; d’avancer ou de reculer (CDX-HS70MW/HS70MS) 9 rapidement dans une plage (appuyez sur la Permet de faire défiler les rubriques touche et maintenez-la enfoncée). d’affichage.
  • Page 28: Mini-Télécommande Rm-X151

    Mini-télécommande RM-X151 *1 Lorsqu’un changeur MD est raccordé. *2 Lors de la lecture d’un CD ATRAC. *3 Lors de la lecture d’un fichier MP3/WMA/AAC. *4 Lorsque le changeur est raccordé, le fonctionnement est différent, reportez-vous à la page 14. *5 Lors de la lecture sur cet appareil. *6 Lors du raccordement du récepteur SAT.
  • Page 29: Rubriques D'affichage

    Lecture répétée et aléatoire En cours de lecture, appuyez Pour obtenir des informations détaillées sur la plusieurs fois sur (3) (REP) ou sélection d’un à un changeur CD/MD, reportez- (4) (SHUF) jusqu’à ce que le réglage vous à la page 14. souhaité...
  • Page 30: Radio

    Mémorisation à l’aide de la touche de leurs émissions radio. Rubriques d’affichage (CDX-HS70MW/HS70MS uniquement) Appuyez sur (BTM) et maintenez la touche enfoncée jusqu’à ce que « BTM » clignote au lieu d’effectuer les étapes 2 à 4.
  • Page 31: Réglage De Af Et Ta

    Services RDS Préréglage du volume sonore des Cet appareil propose automatiquement les messages de radioguidage services RDS, comme suit : Vous pouvez prérégler le niveau de volume des messages de radioguidage de façon à ne manquer AF (Fréquences alternatives) aucune information. Permet de sélectionner et de régler de nouveau 1 Tournez la molette de réglage du volume pour la station ayant le signal le plus fort sur un...
  • Page 32: Sélection De Pty

    Autres fonctions Sélection de PTY Appuyez sur (PTY) en cours de Modification des réception FM. caractéristiques du son Réglage des caractéristiques du son — BAL/FAD/SUB Vous pouvez régler la balance gauche/droite, l’équilibre avant/arrière, ainsi que le volume du Le nom du type d’émission diffusé apparaît si caisson de graves.
  • Page 33: Réglage Des Paramètres De Configuration

    Tournez la molette de réglage du Les paramètres suivants peuvent être réglés volume pour régler le paramètre (reportez-vous à la page indiquée pour plus de sélectionné. détails) : Le niveau de volume peut être réglé par « » indique les réglages par défaut. incréments de 1 dB, de –10 dB à...
  • Page 34: Utilisation D'un Appareil En Option

    A.SCRL (Défilement automatique) Utilisation d’un appareil en Pour faire défiler automatiquement les rubriques option d’affichage longues lorsque le disque, l’album, le groupe ou la plage est modifié(e). – « A.SCRL-ON » ( ) : pour faire défiler les Changeur CD/MD rubriques.
  • Page 35: Télécommande Marine Rm-X55M

    Lecture répétée et aléatoire Satellite de commande RM-X4S 1 En cours de lecture, appuyez plusieurs fois sur (3) (REP) ou (4) (SHUF) jusqu’à ce que le Apposition de l’étiquette réglage souhaité apparaisse. Apposez l’étiquette comportant les indications en fonction de la position de montage du satellite Sélectionnez Pour lire de commande.
  • Page 36: Appareil Audio Auxiliaire

    Modification du sens de Informations complémentaires fonctionnement Le sens de fonctionnement des commandes est Précautions réglé par défaut comme indiqué sur l’illustration ci-dessous. • Si votre bateau est resté amarré en plein soleil, laissez l’appareil refroidir avant de l’utiliser. Pour augmenter •...
  • Page 37: Remarques Sur Les Disques Cd-R

    Disques de musique encodés à l’aide • Les disques de forme non standard (p. ex. en forme de cœur, de carré ou d’étoile) ne peuvent d’une technologie de protection des pas être lus avec cet appareil. Vous risquez droits d’auteur d’endommager votre appareil si vous essayez de le Cet appareil est conçu pour la lecture des disques faire.
  • Page 38: A Propos Des Fichiers Wma

    Si vous avez des questions ou des problèmes inexact. concernant cet appareil qui ne sont pas abordés dans ce mode d’emploi, contactez votre revendeur Sony. * uniquement pour 64 kbit/s Remarque sur le format WMA Les fichiers WMA suivants ne peuvent pas être lus : Entretien –...
  • Page 39: Remplacement Du Fusible

    Sensibilité : MW (PO) : 30 µV, LW (GO) : 40 µV également, il est possible que l’appareil soit défectueux. Dans ce cas, consultez Amplificateur de puissance votre revendeur Sony le plus proche. Sorties : sorties de haut-parleurs (connecteurs de sécurité) Impédance des haut-parleurs : 4 à 8 ohms Spécifications...
  • Page 40: Dépannage

    Cet appareil ne peut pas être raccordé à un effacées. préamplificateur numérique ou à un égaliseur Le fusible a fondu. compatible avec le système BUS de Sony. Emission de bruit lorsque la position de la clé La conception et les spécifications sont sujettes à de contact est modifiée.
  • Page 41: Affichage Des Erreurs Et Messages

    Réglez le mode DSO sur « OFF » (page 7). FAILURE (S’allume pendant environ 1 seconde.) Impossible de capter une présélection. (CDX-HS70MW/HS70MS uniquement) • Enregistrez la fréquence correcte dans la mémoire. Si le syntoniseur XM est raccordé, la mémorisation •...
  • Page 42 Si ces solutions ne permettent pas d’améliorer la (PI) (l’indication « PI SEEK » apparaît). situation, contactez votre revendeur Sony le plus NO DISC proche. Le disque n’est pas inséré dans le changeur CD ou Si vous portez l’appareil à...
  • Page 44 Sólo para el modelo CDX-HS70MW/ Para obtener información sobre la instalación HS70MS y las conexiones, consulte el manual de El logotipo “SAT Radio instalación/conexiones suministrado. Ready” indica que este producto controla un módulo de sintonizador de radio por Advertencia si el encendido del barco satélite (se vende por separado).
  • Page 45 Tabla de contenido Otras funciones Bienvenido......4 Cambio de los ajustes de sonido ... 12 Procedimientos iniciales Ajuste de las características del sonido —...
  • Page 46: Bienvenido

    Para garantizar la protección de la Le agradecemos que haya adquirido este unidad contra la espuma del mar, las olas, la lluvia, reproductor de discos compactos Sony. Mientras la humedad, los rayos ultravioleta, etc., y la navega puede disfrutar de las funciones fiabilidad y funcionalidad de ésta, se ha sometido la...
  • Page 47: Procedimientos Iniciales

    Abra el panel frontal. distancia de tarjeta, extraiga la película de aislamiento. Introduzca el disco (con la etiqueta hacia arriba). Ajuste del reloj CDX-HS70MW/HS70MS: Cierre el panel frontal. Indicación de 12 horas La reproducción se inicia automáticamente. CDX-HR70MW/HR70MS: Notas Indicación de 24 horas •...
  • Page 48: Ubicación De Los Controles Y Operaciones Básicas

    Ubicación de los controles y operaciones básicas Unidad principal DSPL GP/ALBM SHUF PAUSE SOURCE MODE CDX-HS70MW CDX-HS70MS CDX-HR70MW CDX-HR70MS Panel frontal abierto RESET...
  • Page 49 /ALBM* –/+ Para omitir álbumes (pulsar); para O Selector de frecuencias (modelo omitir álbumes continuamente CDX-HS70MW/HS70MS) (ubicado en la (mantener pulsado).* parte inferior de la unidad) (3): REP 9, 14 Consulte “Selector de frecuencias” en el (4): SHUF 9, 14 manual de instalación/conexiones...
  • Page 50: Mando A Distancia De Tarjeta Rm-X151

    Mando a distancia de tarjeta *1 Si se conecta un cambiador de MD. *2 Si se reproduce un CD de ATRAC. RM-X151 *3 Si se reproduce un archivo MP3/WMA/AAC. *4 Si se conecta el cambiador, la operación es diferente, consulte la página 14. *5 Si se reproduce en esta unidad.
  • Page 51: Elementos De La Pantalla

    Reproducción repetida y aleatoria Durante la reproducción, pulse Para obtener más información sobre cómo (3) (REP) o (4) (SHUF) varias veces seleccionar un cambiador de CD/MD, consulte la hasta que aparezca el ajuste deseado. página 14. Seleccione Para reproducir Elementos de la pantalla TRACK pistas de forma repetida.
  • Page 52: Radio

    Almacenamiento mediante el botón Las emisoras FM con servicio de sistema de datos de radio (RDS) envían información digital (sólo en el modelo CDX-HS70MW/HS70MS) inaudible junto con la señal de programa de radio Mantenga pulsado (BTM) hasta que “BTM” normal.
  • Page 53: Ajuste De Af Y Ta

    Servicios RDS Preajuste del volumen de los Esta unidad proporciona servicios RDS anuncios de tráfico automáticamente como se indica a continuación: Es posible preestablecer el volumen de los anuncios de tráfico para oírlos correctamente. AF (frecuencias alternativas) 1 Gire el selector de control de volumen para Selecciona y vuelve a sintonizar la emisora que ajustar el nivel de volumen.
  • Page 54: Selección De Pty

    Otras funciones Selección de PTY Pulse (PTY) durante la recepción FM. Cambio de los ajustes de sonido Ajuste de las características del sonido — BAL/FAD/SUB Puede ajustar el balance, el equilibrio y el El nombre del tipo de programa actual volumen del altavoz potenciador de graves.
  • Page 55: Definición De Los Elementos De Configuración

    Gire el selector de control de volumen BEEP para ajustar el elemento seleccionado. Permite ajustar “BEEP-ON” ( ) o “BEEP- El nivel de volumen puede ajustarse en OFF”. intervalos de 1 dB entre –10 dB y +10 dB. AUX-A* (AUX Audio) Permite ajustar la pantalla de la fuente auxiliar en “AUX-A-ON”...
  • Page 56: Uso De Un Equipo Opcional

    Omisión de álbumes y discos MONO* (modo monoaural) Permite mejorar una recepción de FM 1 Durante la reproducción, pulse (1)/(2) defectuosa, seleccione el modo de recepción (GP/ALBM –/+). monoaural. – “MONO-OFF” ( ): para escuchar las Pulse (1)/(2) (GP/ALBM Para omitir emisiones estéreo en estéreo.
  • Page 57: Mando A Distancia Subacuático Rm-X55M

    Los siguientes controles del mando rotatorio Mando a distancia subacuático requieren una operación diferente a los de la RM-X55M unidad. • Control PRESET/DISC Ubicación de los controles Igual que (1)/(2) (GP/ALBM –/+) en la Los botones correspondientes del mando a unidad (pulsar y girar).
  • Page 58: Equipo De Audio Auxiliar

    Información adicional Equipo de audio auxiliar Si conecta un dispositivo de audio portátil Precauciones opcional a la toma de entrada AUX IN de la unidad y simplemente selecciona la fuente, podrá escuchar el sonido por los altavoces del barco. • Si el barco se ha amarrado bajo la luz directa del Puede ajustar cualquier diferencia en el nivel de sol, deje que la unidad se enfríe antes de utilizarla.
  • Page 59: Orden De Reproducción De Los Archivos Mp3/Wma/Aac

    Discos de música codificados con • Antes de reproducir los discos, límpielos con un paño de tecnologías de protección de los limpieza disponible en el derechos de autor mercado. Hágalo desde el Este producto ha sido diseñado para reproducir centro hacia los bordes. No discos que cumplen con el estándar Compact Disc utilice disolventes como (CD).
  • Page 60: Acerca De Los Archivos Wma

    * sólo de los 64 kbps problema relativo a la unidad que no se trate en este manual, póngase en contacto con el distribuidor Nota sobre WMA Sony más cercano. La reproducción de los siguientes archivos WMA no es compatible. – compresión sin pérdidas Mantenimiento –...
  • Page 61: Cambio Del Fusible

    En este caso, póngase Impedancia de altavoz: de 4 a 8 ohmios en contacto con su distribuidor Máxima potencia de salida: 52 W × 4 (a 4 ohmios) de Sony. General Salidas: Especificaciones Terminal de salidas de audio (intercambiable entre frontal y posterior) Sección del reproductor de CD...
  • Page 62: Solución De Problemas

    El fusible se ha fundido. preamplificador digital ni a un ecualizador que sea Se escucha ruido cuando se cambia la compatible con el sistema BUS de Sony. posición del interruptor de la llave de El diseño y las especificaciones pueden variar sin encendido.
  • Page 63: Mensajes/Indicaciones De Error

    FAILURE (Se ilumina un segundo.) (sólo en el modelo • Revise la frecuencia. CDX-HS70MW/HS70MS) • Cuando el modo DSO está activado, es posible que el Con el sintonizador XM conectado, no se ha podido sonido se vea interrumpido por ruido.
  • Page 64 *2 La pantalla muestra el número del disco que causa el error. Si estas soluciones no ayudan a mejorar la situación, póngase en contacto con el distribuidor Sony más cercano. Si entrega la unidad para su reparación a causa de problemas en la reproducción de CD, lleve el disco...
  • Page 66 SonicStage und das entsprechende Logo sind Wichtig! Markenzeichen der Sony Corporation. Bitte nehmen Sie sich etwas Zeit, um „ATRAC“ und das entsprechende Logo sind den Geräte-Pass vollständig Markenzeichen der Sony Corporation. auszufüllen. Dieser befindet sich auf Microsoft, Windows Media der hinteren Umschlagseite dieser und das Windows-Logo sind Bedienungsanleitung.
  • Page 67 Inhalt Weitere Funktionen Willkommen!......4 Ändern der Klangeinstellungen ... 12 Vorbereitungen Einstellen der Klangeigenschaften —...
  • Page 68: Willkommen

    Interpreten und die Namen der Titel enthält. Danke, dass Sie sich für diesen CD-Player von Hinweis zur Wasserfestigkeit Sony entschieden haben. Mit diesem Gerät Dieses Gerät ist auf den Einsatz in stehen Ihnen im Boot die folgenden Funktionen Wasserfahrzeugen ausgelegt. Um die zur Verfügung.
  • Page 69: Vorbereitungen

    Mal verwenden, müssen Sie die Isolierfolie beschrifteten Seite nach oben). herausziehen. Einstellen der Uhr Schließen Sie die Frontplatte. Die Wiedergabe beginnt automatisch. CDX-HS70MW/HS70MS: Hinweise 12-Stunden-Format • Legen Sie auf der Innenseite der Frontplatte nichts CDX-HR70MW/HR70MS: 24-Stunden-Format • Halten Sie die Frontplatte im Betrieb unbedingt geschlossen.
  • Page 70: Lage Und Grundfunktionen Der Teile Und Bedienelemente

    Lage und Grundfunktionen der Teile und Bedienelemente Hauptgerät DSPL GP/ALBM SHUF PAUSE SOURCE MODE CDX-HS70MW CDX-HS70MS CDX-HR70MW CDX-HR70MS Mit geöffneter Frontplatte RESET...
  • Page 71 B Taste OFF Überspringen von Titeln (drücken), Ausschalten bzw. Stoppen der Tonquelle. Überspringen mehrerer Titel hintereinander C Bildlauftaste SCRL (CDX-HS70MW/ (drücken, dann innerhalb von 1 Sekunde HS70MS) 9 erneut drücken und gedrückt halten) bzw. Hiermit lassen Sie die Informationen im Rückwärts-/Vorwärtssuchen in einem Titel...
  • Page 72: Kartenfernbedienung Rm-X151

    Kartenfernbedienung RM-X151 *1 Wenn ein MD-Wechsler angeschlossen ist. *2 Bei Wiedergabe einer ATRAC-CD. *3 Bei Wiedergabe einer MP3-/WMA-/AAC-Datei. *4 Wenn ein Wechsler angeschlossen ist, funktionieren die Tasten anders (siehe Seite 14). *5 Bei der Wiedergabe mit diesem Gerät. *6 Wenn ein SAT-Tuner angeschlossen ist. *7 Wenn ein CD/MD-Wechsler angeschlossen ist.
  • Page 73: Informationen Im Display

    Repeat und Shuffle Play Drücken Sie während der Wiedergabe Einzelheiten zum Auswählen eines CD/MD- so oft (3) (REP) oder (4) (SHUF), bis Wechslers finden Sie auf Seite 14. die gewünschte Einstellung im Display angezeigt wird. Informationen im Display Einstellung Funktion TRACK Wiederholtes Wiedergeben eines...
  • Page 74: Radio

    Radioprogrammsignalen nicht hörbare, digitale Informationen. Speichern von Sendern mit der Taste Informationen im Display BTM (nur CDX-HS70MW/HS70MS) Halten Sie (BTM) gedrückt, bis „BTM“ blinkt, statt Schritt 2 bis 4 auszuführen. Manuelles Speichern von Sendern Während des Empfangs des zu...
  • Page 75: Einstellen Von Af Und Ta

    RDS-Funktionen Beim manuellen Speichern von Sendern können Sie RDS- und Nicht-RDS-Sender mit Mit diesem Gerät stehen folgende RDS- unterschiedlicher AF/TA-Einstellung speichern. Funktionen automatisch zur Verfügung: 1 Stellen Sie AF/TA ein und speichern Sie die AF (Alternativfrequenzen) Sender dann mit BTM oder manuell ab. In einem Netzwerk wird der Sender mit den stärksten Signalen ausgewählt und neu Speichern der Lautstärke von...
  • Page 76: Auswählen Des Programmtyps (Pty)

    Weitere Funktionen Auswählen des Programmtyps (PTY) Ändern der Klangeinstellungen Drücken Sie während des UKW- Empfangs (PTY). Einstellen der Klangeigenschaften — BAL/FAD/SUB Sie können die Balance, den Fader und die Lautstärke des Tiefsttonlautsprechers einstellen. Drücken Sie (SELECT) so oft, bis „BAL“, „FAD“ oder „SUB“ angezeigt Der Name des aktuellen Programmtyps wird.
  • Page 77: Einstellen Von Konfigurationsoptionen

    Stellen Sie durch Drehen des CLOCK-ADJ (Uhr einstellen) (Seite 5) Lautstärkereglers die ausgewählte (Uhrzeit) Option ein. Zum Einstellen von „CT-ON“ oder „CT-OFF“ Die Lautstärke lässt sich in Schritten von ) (Seite 11, 12). 1 dB auf einen Wert zwischen –10 dB und +10 dB einstellen.
  • Page 78: Verwenden Gesondert Erhältlicher Geräte

    Überspringen von Alben und CDs LOCAL (Lokaler Suchmodus) – „LOCAL-OFF“ ( ): Normaler Empfang wird 1 Drücken Sie während der Wiedergabe (1)/ eingestellt. (2) (GP/ALBM –/+). – „LOCAL-ON“: Es werden nur Sender mit starken Signalen eingestellt. Drücken Sie (1)/(2) (GP/ Überspringen ALBM –/+) MONO*...
  • Page 79: Bootsfernbedienung Rm-X55M

    Bei folgenden Reglern auf dem Joystick müssen Bootsfernbedienung RM-X55M Sie anders als mit dem Gerät vorgehen. • Regler PRESET/DISC Lage und Funktion der Entspricht der Taste (1)/(2) (GP/ALBM –/+) Bedienelemente am Gerät (drücken und drehen). Die entsprechenden Tasten auf der •...
  • Page 80: Zusätzliche Audiogeräte

    Weitere Informationen Zusätzliche Audiogeräte Wenn Sie ein gesondert erhältliches tragbares Sicherheitsmaßnahmen Audiogerät an die Buchse AUX IN am Gerät anschließen und dann einfach die Tonquelle auswählen, können Sie den Ton über die • Wenn das Boot längere Zeit in direktem Lautsprecher des Boots wiedergeben lassen.
  • Page 81: Wiedergabereihenfolge Von Mp3-/Wma-/Aac-Dateien

    Musik-CDs mit • CDs mit außergewöhnlichen Formen (z. B. herzförmige, quadratische oder sternförmige CDs) Urheberrechtsschutzcodierung können mit diesem Gerät nicht wiedergegeben Dieses Gerät ist auf die Wiedergabe von CDs werden. Falls Sie es doch versuchen, kann das ausgelegt, die dem Compact Disc-Standard (CD) Gerät beschädigt werden.
  • Page 82: Wma-Dateien

    Sie Fragen haben, auf die in dieser Anleitung AAC-Dateien nicht eingegangen wird, wenden Sie sich bitte an Ihren Sony-Händler. • AAC steht für Advanced Audio Coding. Dabei handelt es sich um einen Formatstandard zum Komprimieren von Musikdateien. Hierbei werden...
  • Page 83: Austauschen Der Sicherung

    Maximale Ausgangsleistung: 52 W × 4 (an 4 Ohm) tauschen die Sicherung aus. Brennt die neue Sicherung ebenfalls durch, kann eine interne Allgemeines Fehlfunktion vorliegen. Wenden Sie sich in einem solchen Fall an Ihren Sony-Händler. Ausgänge: Audioausgangsanschluss (vorne, hinten/ Tiefsttonlautsprecher umschaltbar) Technische Daten Motorantennen-Steueranschluss Steueranschluss für Endverstärker...
  • Page 84: Störungsbehebung

    Dieses Gerät kann nicht an einen digitalen • Der Fader-Regler „FAD“ ist nicht für ein 2- Vorverstärker oder an einen Equalizer, der mit dem Lautsprecher-System eingestellt. Sony-BUS-System kompatibel ist, angeschlossen • Der CD-Wechsler unterstützt das CD-Format (MP3-/ werden. WMA-/AAC-/ATRAC-CD) nicht.
  • Page 85 Die Abschaltautomatik funktioniert nicht. Radioempfang Das Gerät ist eingeschaltet. Die Abschaltautomatik Sender lassen sich nicht empfangen. wird nach dem Ausschalten des Geräts aktiviert. Der Ton ist stark gestört. t Schalten Sie das Gerät aus. • Schließen Sie eine Motorantennen-Steuerleitung Die Kartenfernbedienung funktioniert nicht. (blau) oder eine Stromversorgungsleitung für Vergewissern Sie sich, dass die Isolierfolie Zubehörgeräte (rot) an die Stromversorgungsleitung...
  • Page 86: Fehleranzeigen/Meldungen

    Überprüfen Sie die Kabelverbindungen. Wenn die Die Lautsprecher-/Verstärkeranschlüsse sind nicht Fehleranzeige weiterhin im Display angezeigt wird, korrekt. wenden Sie sich an einen Sony-Händler. t Schlagen Sie in der Installationsanleitung nach, wie READ die Anschlüsse korrekt vorgenommen werden Das Gerät liest gerade alle Titel- und Gruppen-/ müssen.
  • Page 88 SonicStage en het bijbehorende logo zijn Zie voor het monteren en aansluiten van het handelsmerken van Sony Corporation. apparaat de bijgeleverde handleiding "ATRAC" en het bijbehorende logo zijn "Installatie en aansluitingen". handelsmerken van Sony Corporation. Microsoft, Windows Media Waarschuwing als het contactslot van...
  • Page 89 Inhoudsopgave Andere functies Welkom! ......4 De geluidsinstellingen wijzigen ... 12 Aan de slag De geluidskenmerken aanpassen —...
  • Page 90: Welkom

    Welkom! Dit apparaat is ontworpen voor gebruik in een waterrijke omgeving. Om het apparaat te Dank u voor de aankoop van deze Sony Compact beschermen tegen waterdruppels, golven, regen, Disc Player. U kunt tijdens het zeilen genieten vocht, ultraviolette straling, enzovoort, zijn de van de volgende functies.
  • Page 91: Aan De Slag

    Voordat u de kaartafstandsbediening voor het eerst gebruikt, moet u het isolatievel verwijderen. Open het voorpaneel. Plaats de disc (met het label naar boven). De klok instellen CDX-HS70MW/HS70MS: 12-uurs systeem Sluit het voorpaneel. CDX-HR70MW/HR70MS: Het afspelen wordt automatisch gestart. 24-uurs systeem Opmerkingen Houd (SELECT) ingedrukt.
  • Page 92: Bedieningselementen En Algemene Handelingen

    Bedieningselementen en algemene handelingen Hoofdeenheid DSPL GP/ALBM SHUF PAUSE SOURCE MODE CDX-HS70MW CDX-HS70MS CDX-HR70MW CDX-HR70MS Voorpaneel geopend RESET...
  • Page 93 Automatisch afstemmen op zenders B OFF toets (indrukken); handmatig zoeken naar zenders (ingedrukt houden). Uitschakelen; de bron stoppen. M SELECT toets C SCRL (rollen) toets (CDX-HS70MW/ Instelitems selecteren. HS70MS) 9 Het displayitem rollen. N SOURCE toets AF (alternatieve frequenties)/TA Inschakelen; de bron wijzigen (Radio/CD/ (verkeersinformatie) toets (CDX- /AUX).
  • Page 94: Kaartafstandsbediening Rm-X151

    Kaartafstandsbediening *1 Als een MD-wisselaar is aangesloten. *2 Bij het afspelen van een ATRAC CD. RM-X151 *3 Bij het afspelen van een MP3-/WMA-/AAC- bestand. *4 Als de wisselaar is aangesloten, is de werking anders. Zie pagina 14 voor meer informatie. *5 Wanneer met dit apparaat wordt afgespeeld.
  • Page 95: Displayitems

    Herhaaldelijk en willekeurig afspelen Zie pagina 14 voor meer informatie over het selecteren van een CD/MD-wisselaar. Druk tijdens het afspelen herhaaldelijk op (3) (REP) of (4) (SHUF) tot de gewenste instelling wordt Displayitems weergegeven. Selecteer Actie TRACK Track herhaaldelijk afspelen. ALBUM* Album herhaaldelijk afspelen.
  • Page 96: Radio

    Displayitems Er klinkt een pieptoon wanneer de instelling is opgeslagen. Opslaan met de BTM toets (alleen CDX-HS70MW/HS70MS) Houd (BTM) ingedrukt tot "BTM" gaat knipperen in plaats van stap 2 tot en met 4 uit te voeren. A Radioband, functie...
  • Page 97: Af En Ta Instellen

    Noodberichten ontvangen TA (verkeersinformatie)/ Als AF of TA is ingeschakeld, wordt de TP (verkeersprogramma) geselecteerde bron automatisch onderbroken Hiermee ontvangt u de huidige door de noodberichten. verkeersinformatie/-programma's. De huidige bron wordt onderbroken door eventuele Een regionaal programma verkeersinformatie/-programma's. beluisteren — REG PTY (programmatypen) Wanneer de AF-functie is ingeschakeld: de Hiermee geeft u het ontvangen programmatype...
  • Page 98: Ct Instellen

    Programmatypen Andere functies NEWS (Nieuws), AFFAIRS (Actualiteiten), De geluidsinstellingen wijzigen INFO (Informatie), SPORT (Sport), EDUCATE (Educatieve programma's), DRAMA (Toneel), CULTURE (Cultuur), SCIENCE (Wetenschap), VARIED (Diversen), De geluidskenmerken aanpassen POP M (Populaire muziek), ROCK M (Rock- — BAL/FAD/SUB muziek), EASY M (Easy Listening), LIGHT M U kunt de balans, de fader en het (Licht klassiek), CLASSICS (Klassiek), subwoofervolume regelen.
  • Page 99: Instelitems Aanpassen - Set

    Als u de fabrieksinstelling voor de REAR/SUB* equalizercurve wilt herstellen, houdt u De audio-uitvoer wijzigen. (SELECT) ingedrukt voordat het instellen is – "REAR-OUT" ( ): het geluid via een voltooid. versterker weergeven. Na 3 seconden is het instellen voltooid en –...
  • Page 100: Optionele Apparaten Gebruiken

    Als u wilt terugkeren naar de normale Optionele apparaten gebruiken weergavestand, selecteert u " OFF" of "SHUF OFF". CD/MD-wisselaar Met "SHUF ALL" kunt u tracks niet in willekeurige volgorde afspelen tussen CD-apparaten en MD- De wisselaar selecteren wisselaars. 1 Druk herhaaldelijk op (SOURCE) tot "CD" of "MD"...
  • Page 101: Bedieningssatelliet Rm-X4S

    1 Terwijl u de VOL regelaar indrukt, houdt u Bedieningssatelliet RM-X4S (SEL) ingedrukt. Het label bevestigen Houd bij het bevestigen van het label rekening met de positie waarin de bedieningssatelliet wordt gemonteerd. D S P L SE L M O D E M O D E Randapparatuur voor audio D SP L...
  • Page 102: Aanvullende Informatie

    • Reinig een disc voor het Aanvullende informatie afspelen altijd met een in de handel verkrijgbare Voorzorgsmaatregelen reinigingsdoek. Veeg de disc van binnen naar buiten schoon. Gebruik geen oplosmiddelen • Wanneer uw boot afgemeerd heeft gelegen in de zoals benzine, thinner en in de volle zon, moet u eerst het apparaat laten afkoelen handel verkrijgbare voordat u het gebruikt.
  • Page 103: Afspeelvolgorde Van Mp3-/Wma-/ Aac-Bestanden

    Met alle vragen of problemen met betrekking tot dit Het afspelen van de volgende WMA-bestanden wordt apparaat die niet aan bod komen in deze niet ondersteund. gebruiksaanwijzing, kunt u terecht bij uw Sony- – compressie zonder gegevensverlies (lossless) handelaar. – auteursrechtelijk beveiligd...
  • Page 104: Onderhoud

    1 jaar mee. (Afhankelijk van de gebruiksomstandigheden kan de levensduur korter Tuner zijn.) Wanneer de batterij verzwakt, wordt het bereik van CDX-HS70MW/HS70MS: de kaartafstandsbediening kleiner. Vervang de batterij door een nieuwe CR2025 lithiumbatterij. Bij Afstembereik: een andere batterij bestaat er brand- of 87,5 –...
  • Page 105: Problemen Oplossen

    ATT-kabel) is ingeschakeld. verkrijgbaar zijn bij uw Sony-handelaar. Neem • De positie van de faderregelaar "FAD" is niet contact op met uw Sony-handelaar voor meer ingesteld op een systeem met 2 luidsprekers. informatie. • De CD-wisselaar is niet compatibel met de discindeling (MP3/WMA/AAC/ATRAC CD).
  • Page 106 Het display verdwijnt van/verschijnt niet in het Radio-ontvangst weergavevenster. Radiozenders kunnen niet worden ontvangen. • De dimmer is ingesteld op "DIM-ON" (pagina 13). Het geluid is gestoord. • Het display verdwijnt als u op (OFF) drukt en deze • Sluit de bedieningskabel van de elektrische antenne toets ingedrukt houdt.
  • Page 107: Foutmeldingen/Berichten

    De CD-speler en CD/MD-wisselaar kunnen niet FAILURE (Gaat ongeveer 1 seconde branden.) worden bediend vanwege een probleem. (alleen CDX-HS70MW/HS70MS) t Druk op de RESET toets (pagina 5). Wanneer de XM-tuner is aangesloten, is het opslaan "...
  • Page 108 Solo CDX-HR70MW/HR70MS SonicStage e il relativo logo sono marchi di fabbrica di Sony Corporation. Si dichiara che l’apparecchio è stato fabbricato in “ATRAC” e il relativo logo sono marchi di conformità all’art.2, Comma l del D.M.28.08.1995 fabbrica di Sony Corporation.
  • Page 109 Indice Altre funzioni Congratulazioni! ......4 Modifica delle impostazioni audio ..12 Operazioni preliminari Regolazione delle caratteristiche dell’audio —...
  • Page 110: Congratulazioni

    Per Complimenti per l’acquisto del presente lettore proteggerlo da spruzzi d’acqua, onde, pioggia, CD Sony. Durante la navigazione, è possibile umidità, raggi ultravioletti e così via, l’apparecchio utilizzare le funzioni riportate di seguito. è stato sottoposto ai test riportati di seguito per •...
  • Page 111: Operazioni Preliminari

    Prima di utilizzare il telecomando a scheda per la Inserire il disco (lato etichetta verso prima volta, rimuovere la pellicola di protezione. l’alto). Impostazione dell’orologio Chiudere il pannello anteriore. CDX-HS70MW/HS70MS: La riproduzione viene avviata Indicazione in base al sistema delle 12 ore automaticamente. CDX-HR70MW/HR70MS: Note Indicazione in base al sistema delle 24 ore •...
  • Page 112: Posizione Dei Comandi E Operazioni Di Base

    Posizione dei comandi e operazioni di base Unità principale DSPL GP/ALBM SHUF PAUSE SOURCE MODE CDX-HS70MW CDX-HS70MS CDX-HR70MW CDX-HR70MS Pannello anteriore aperto RESET...
  • Page 113 (premere, quindi riproduzione della sorgente. premere di nuovo entro 1 secondo e tenere C Tasto SCRL (scorrimento) premuto); per fare retrocedere/avanzare (CDX-HS70MW/HS70MS) 9 rapidamente un brano (tenere premuto). Per scorrere le voci del display. Radio: Per sintonizzare le stazioni in modo Tasto AF (frequenze alternative)/TA automatico (premere);...
  • Page 114: Telecomando A Scheda Rm-X151

    Telecomando a scheda *1 Se è collegato un cambia MD. *2 Durante la riproduzione di CD ATRAC. RM-X151 *3 Durante la riproduzione di MP3/WMA/AAC. *4 Se è collegato un cambia dischi, l’operazione è differente. Vedere a pagina 14. *5 Durante la riproduzione mediante il presente apparecchio.
  • Page 115: Voci Del Display

    Riproduzione ripetuta e in ordine casuale Per ulteriori informazioni sulla selezione di un cambia CD/MD, vedere pagina 14. Durante la riproduzione, premere più volte (3) (REP) o (4) (SHUF) fino a visualizzare l’impostazione desiderata. Voci del display Selezionare Per riprodurre TRACK un brano in modo ripetuto.
  • Page 116: Radio

    Quando l’impostazione è stata memorizzata, segnale in radiofrequenza. viene emesso un segnale acustico. Voci del display Memorizzazione mediante il tasto (solo CDX-HS70MW/HS70MS) Tenere premuto (BTM) fino a quando “BTM” non lampeggia, piuttosto che eseguire i punti da 2 a 4. Memorizzazione manuale...
  • Page 117: Impostazione Dei Modi Af E Ta

    Servizi RDS 1 Impostare AF/TA, quindi memorizzare la stazione mediante la funzione BTM o Il presente apparecchio fornisce i servizi RDS in manualmente. modo automatico come segue: AF (frequenze alternative) Preimpostazione del volume dei Consente di selezionare e sintonizzare di nuovo notiziari sul traffico la stazione con il segnale più...
  • Page 118: Selezione Del Modo Pty

    Altre funzioni Selezione del modo PTY Premere (PTY) durante la ricezione Modifica delle impostazioni audio Regolazione delle caratteristiche dell’audio — BAL/FAD/SUB È possibile regolare il bilanciamento, l’attenuazione e il volume del subwoofer. Se la stazione sta trasmettendo dati PTY, viene visualizzato il nome del tipo di Premere più...
  • Page 119: Regolazione Delle Voci Di Impostazione

    Ruotare la manopola di controllo del BEEP volume per regolare la voce Consente di impostare “BEEP-ON” ( desiderata. “BEEP-OFF”. Il livello del volume può essere regolato per AUX-A* (audio AUX) unità di 1 dB da –10 dB a +10 dB. Consente di impostare il display della sorgente AUX su “AUX-A-ON”...
  • Page 120: Uso Di Apparecchi Opzionali

    LOCAL (modo di ricerca locale) Uso di apparecchi opzionali – “LOCAL-OFF” ( ): per eseguire la ricezione normale. – “LOCAL-ON”: per sintonizzare solo le Cambia CD/MD stazioni con segnali più forti. MONO* (modo monofonico) Selezione del cambia dischi Per migliorare la qualità di ricezione FM, 1 Premere più...
  • Page 121: Telecomando Per Uso In Ambiente Marino Rm-X55M

    Per tornare al modo di riproduzione normale, Telecomando a rotazione RM-X4S selezionare “ OFF” o “SHUF OFF”. Suggerimento Applicazione dell’etichetta Mediante la funzione “SHUF ALL”, non è possibile Applicare l’etichetta delle indicazioni in base al riprodurre in ordine casuale i brani nei cambia CD modo in cui si desidera montare il telecomando a insieme a quelli nei cambia MD.
  • Page 122: Apparecchio Audio Ausiliare

    Modifica della direzione operativa Informazioni aggiuntive La direzione operativa dei comandi è impostata in fabbrica come illustrato di seguito. Precauzioni Per aumentare • Se l’imbarcazione è stata ormeggiata in un luogo esposto a luce solare diretta, attendere che l’apparecchio si raffreddi prima di utilizzarlo. •...
  • Page 123: Ordine Di Riproduzione Dei File Mp3/Wma/Aac

    Dischi audio codificati mediante • Non riprodurre dischi dalla forma irregolare (ad esempio a forma di cuore, quadrato o stella) con tecnologie di protezione dei diritti questo apparecchio, onde evitare problemi di d’autore funzionamento all’apparecchio stesso. Non Questo prodotto è stato progettato per la utilizzare questo genere di dischi.
  • Page 124: Informazioni Sui File Wma

    Per eventuali domande o problemi riguardanti * Solo per 64 kbps l’apparecchio non trattati nel presente manuale, Nota sul formato WMA rivolgersi al più vicino rivenditore Sony. La riproduzione dei seguenti file WMA non è supportata: – file a compressione senza perdita di dati Manutenzione –...
  • Page 125: Sostituzione Del Fusibile

    è possibile che si tratti di un problema Risposta in frequenza: 30 – 15.000 Hz interno. In tal caso, rivolgersi al più vicino MW/LW rivenditore Sony. Gamma di frequenze: MW: 531 – 1.602 kHz LW: 153 – 279 kHz Caratteristiche tecniche Terminale dell’antenna:...
  • Page 126: Guida Alla Soluzione Dei Problemi

    Reinserire i dati in memoria. preamplificatore digitale o a un equalizzatore • Il cavo di alimentazione o la batteria sono stati compatibili con il sistema BUS Sony. scollegati. • Il cavo di alimentazione non è collegato Il design e le caratteristiche tecniche sono soggetti a correttamente.
  • Page 127: Messaggi E Indicazioni Di Errore

    Riproduzione di CD/MD Non è possibile effettuare la sintonizzazione preselezionata. Non è possibile inserire un disco. • Memorizzare la frequenza corretta. • Nell’alloggiamento è presente un altro disco. • Il segnale di trasmissione è eccessivamente debole. • Il disco è stato inserito forzatamente in senso La sintonizzazione automatica non funziona.
  • Page 128 PI (identificativo programma) (viene Se le soluzioni riportate non risolvono il problema, visualizzato “PI SEEK”). rivolgersi al più vicino rivenditore Sony. NO DISC Se l’apparecchio viene portato in un centro di Nel cambia CD/MD non sono inseriti dischi.
  • Page 132 Geräte-Pass anschließend unbedingt aus der Bedienungsanleitung Modellbezeichnung heraus, falls Sie diese im Fahrzeug aufbewahren möchten. Bitte bewahren s CDX-HS70MW Sie den Geräte-Pass an einem sicheren s CDX-HS70MS Ort auf. Er kann im Falle eines s CDX-HR70MW Diebstahls zur ldentifikation lhres s CDX-HR70MS Eigentums dienen.

Ce manuel est également adapté pour:

Cdx-hs70msCdx-hr70mwCdx-hr70ms

Table des Matières