Table des Matières

Publicité

Les langues disponibles

Les langues disponibles

Liens rapides

installation manual
SMS/GSM Alarm
wireless starter kit
www.techly.com
wireless
gsm/app
up to 159
accessories

Publicité

Table des Matières
loading

Sommaire des Matières pour Techly I-ALARM-KIT001

  • Page 1 SMS/GSM Alarm wireless starter kit www.techly.com wireless gsm/app up to 159 accessories...
  • Page 2 SMS alerts for power failure, power recovery and low battery Audio surveillance of the site from distance 2 x 800mAh lithium batteries included (8h battery life in standby mode) Specifications Product name Alarm current I-ALARM-KIT001 300mA Backup batteries I-ALARM-KIT001 Lithium Batteries: 3.7V / 800 mAh x 2 (BL-5B)
  • Page 3 Zone sensor 2: "Living room PIR" Zone sensor 3: "Entrance window" Zone sensor 4: "Terrace Window" Zone sensor 5: "Terrace door" Zone sensor 6: "Bedroom Window" Zone sensor 7: "Bedroom PIR" Zone sensor 8: "Gas kitchen" Zona sensor 9: "Bath water" www.techly.com www.techly.com...
  • Page 4: Quick Start-Up Guide

    Quick Start-up Guide Connect your System Using the GSM transmitter (SIM card) Open the battery compartment at the back of the control panel and insert a SIM card in the control panel. Important Before using the Alarm System in GSM mode, you need to purchase a SIM card that works on the GSM network with 850 / 900 / 1800 / 1900 MHz frequency.
  • Page 5 All the sensors assigned to the Normal zone are armed. The sensors assigned to the Home zone are disarmed. Emergency Mode Hold the “# ” button for 3 seconds. The alarm is triggered immediately and the siren rings out. At the same time, the control panel dials the stored phone numbers. www.techly.com...
  • Page 6: Speed Dial

    Speed Dial Press the Call button “ ” on the control panel for 3 seconds: the panel auto-dials the first stored phone number. Press the Call button “ ” to end the call. Hands-free Phone Call from the Panel Through GSM Press the Call button“...
  • Page 7 “ ” = move backward “Enter” = select / confirm “Esc” = back / previous step in the menu / cancel The tables on the next pages summarize all the settings that can be accessed and modified on the control panel. www.techly.com...
  • Page 8 Main Menu Sub Menu 1 Sub Menu 2 Sub Menu 3 Phone [1~5] is: Phone numbers SMS Num [1~5] Is: Add a new 01/10 Accessories Remote & Keypad Delete All 1=YES 0=NO Delete a Remote Input 01-10: Add a new 01/50 Accessories RFID Tag...
  • Page 9 LCD screen displays the signals that have been respectively sent by each sensor triggered. Make sure all the sensors you have triggered are mentioned on the LCD screen. Press “Esc” to exit the test mode. This mode enables you to test if the sensors have been connected successfully to the control panel. www.techly.com...
  • Page 10 Main Menu Sub Menu 1 Sub Menu 2 Sub Menu 3 Date and Time System Setting YYYY-MM-DD TIME System Setting Date Format Entry Delay 000-300 Entry Exit Delay System Setting Exit Delay 000-300 Auto Arm Time <00:00> Auto Arm / Disarm System Setting Auto Disarm Time <00:00>...
  • Page 11 Duress Code. The panel will silently dial the stored phone numbers. Default duress code: 1111 You can open electronic doors using this code. The door must be wired to the [LOCK] interface on the back of the control panel. www.techly.com...
  • Page 12 Main Menu Sub Menu 1 Sub Menu 2 Sub Menu 3 System Settings Ring Times <1-9>: 5 System Settings Siren Alert Time <1-9Min>: 3 System Settings Backlight Time <0-120s>: 30 Siren Switch ON/OFF Wired Siren Arm/Disarm Tone ON/OFF Siren Switch ON/OFF System Settings Siren Setup...
  • Page 13 All system settings will be restored to default setting. Stored phone numbers and connected accessories will be cleared. The control panel keeps in Choose the event log you need to track, press “Enter”. record the latest 150 event logs. www.techly.com...
  • Page 14: Control By Phone Call

    Zone setup of accessories Every detector can be assigned to 4 different categories of zones: Home Zone, Delay Zone, Normal Zone and 24-H Zone. To assign a detector to a zone, follow the instructions on page 8 of this manual (the zone will be assigned at the time of connection of the accessory).
  • Page 15 - Turns the wireless siren on (if connected to the control panel) - Turns all sirens off Press “#” - Exits control by phone call - Stops call recycles Note In GSM mode, the audio monitoring is not limited in time. www.techly.com...
  • Page 16 Setup by SMS IMPORTANT: BEFORE USING FOR THE FIRST TIME Insert a SIM card in the control panel before starting SMS operations. Make sure the SIM card does not require any PIN code. SAVE A SMS NUMBER IN THE CONTROL PANEL (using the control panel). Only stored numbers can control and configure the system.
  • Page 17 Disarm the System Setting Enquiry Send: Send: System disarmed. System:Disarmed AC power:on Arm the System Note Send: The values indicated hereinabove will change after having set up the system. System armed. Home Mode Send: System in home mode. www.techly.com...
  • Page 18 Store Phone Numbers Store Phone Numbers for SMS Notifications Send: Send: Phone numbers: SMS numbers: Copy, paste, then edit (case sensitive): Copy, paste, then edit (case sensitive): Phone numbers: 1. 067890033 SMS numbers: 2. 067890022 1. 067890033 3. 067890011 2. 067890022 4.
  • Page 19 “Zone name 10 to 99 cannot be renamed. tamper alarm”. Bedroom PIR tamper alarm. For accessories assigned to zones that have not been renamed, an SMS will be sent under the format “Zone number tamper alarm”. Zone 10 tamper alarm. www.techly.com...
  • Page 20: Entry And Exit Delay Time

    Rename RFID Tag Entry and Exit Delay Time Send: Send: Rename RFID tag names: Entry delay time(0-300sec):0 Exit delay time(0-300sec):0 Copy, paste, then edit (case sensitive): Copy, paste, then edit (case sensitive): Entry delay time(0-300sec):10 Exit delay time(0-300sec):20 Rename RFID tag names: 1.
  • Page 21 Siren Volume and Ringing Time Disarm Password Send: Send: Siren volume(0=Mute,1=High):1 Disarm password (4 digits): Siren ringing time(1-9min):3 1234 Copy, paste, then edit Copy, paste, then edit (case sensitive): (case sensitive): Siren volume(0=Mute,1=High):0 Disarm password (4 digits): Siren ringing time(1-9min):5 4321 www.techly.com...
  • Page 22 Change System Language Restore System to Factory Settings by SMS Send the code corresponding to the language you want to set. For Send: example, for English, send “0001”. 0000 0001 The settings will be restored to Refer to the table below for the full default values.
  • Page 23: Accessories

    The system state LED is on. All the sensors in regular zones are armed except those in the Home Mode zone. The sensors in the Home Mode zone are disarmed so that users can move inside their home. www.techly.com...
  • Page 24 Mute Mode Press the Home Mode button " " and then the Arm " " or Disarm " " button immediately after. Doing so, the control panel does not beep when you arm or disarm your system. Emergency Mode Regardless the status of the system, the alarm is triggered when the SOS button "SOS"...
  • Page 25 *Tamper switch When the alarm system is armed, the tamper switch will trigger the alarm if the case is opened. **Infrared sensor Detects the infrared rays released by human body motion. Do not touch the surface. Keep the surface clean. www.techly.com...
  • Page 26 Usage Open the case and remove the battery activation strip. Self-testing will start for 30 seconds. When the sensor is in operation, if it is triggered more than twice within 3 Connect Button minutes, it will switch to standby mode to save power.
  • Page 27 Housing material ABS plastic Operating conditions Temperature: -10°C~55°C Relative humidity: ≤ (non- condensing) Detector dimensions (L x W x H) 107 x 53 x 32 mm Bracket dimensions (L x W x H) 52 x 30 x 26.5 mm www.techly.com...
  • Page 28: Wireless Door / Window Contact

    Wireless Door / Window Contact Features This Door / Window Contact can be installed on doors, windows, and any other objects that open and close. The sensor sends a signal to the control panel when the magnet is separated from the transmitter. Thanks to the tamper switch, any attempt to remove the cover of the Door / Window Contact will trigger the alarm.
  • Page 29 ≤80 m (in open area) Radio-frequency 433 MHz (±75 KHz) Housing material ABS plastic Operating conditions Temperature: -10°C~55°C Relative humidity: ≤ 80% (non-condensing) Transmitter dimensions (LxWxH) 71 x 35 x 17.5 mm Magnet dimensions (LxWxH) 51 x 12 x 13.5 mm www.techly.com...
  • Page 30 RFID Tag Features The RFID tag enables you to disarm your system or unlock electronic door locks. Register in the control panel Refer to the instructions in the table page 8 of this manual (“RFID TAG”). Specifications Dimensions 45 x 30 x 7 mm...
  • Page 31: Troubleshooting And Maintenance

    RFID tag to system the control panel panel Impossible access You are not in the setup Enter your admin code followed by settings from the control menu of the LCD display “Enter“ to enter the setup menu panel www.techly.com...
  • Page 32 Precautions For a safer use of the product and to optimize the lifespan of the product, we recommend you to follow the precautions below: The wireless accessories must be connected to the control panel. Low power voltage may affect transmission distance. Do not press the SOS key on the remote control if it is unnecessary to avoid disturbing neighborhood.
  • Page 33 There is a separate collections system for these products in compliance with WEEE directive, otherwise contaminative and hazardous substances can pollute the environment. With the CE sign, Techly® ensures that the product is conformed to the basic European standards and directives. www.techly.com...
  • Page 34: Contenuto Della Confezione

    Sorveglianza audio del sito da distanza Con 2 batterie al litio da 800mAh incluse (garantiscono 8 ore di durata in stand-by) Specifiche Nome prodotto Corrente allarme attivo I-ALARM-KIT001 300mA Batterie tampone I-ALARM-KIT001 Batteria al litio: 3.7V /800mAh x 2 (BL-5B) Alimentazione pannello di controllo 8 ore di durata in modalità...
  • Page 35 2: “PIR salotto” sensore zona 3: “Finestra ingresso” sensore zona 4: "Finestra terrazzo" sensore zona 5: “Porta terrazzo" sensore zona 6: “Finestra camera” sensore zona 7: “PIR camera” sensore zona 8: “Gas cucina” sensore zona 9: “Acqua bagno” www.techly.com www.techly.com...
  • Page 36: Guida Rapida

    Guida rapida Connettere il sistema Usando il trasmettitore GSM (scheda SIM) Aprire il comparto batterie sul retro del pannello di controllo ed inserire la scheda SIM nel pannello. Importante Prima di utilizzare il dispositivo nella modalità GSM, è necessario acquistare una scheda SIM che lavori con la rete GSM con frequenza 850 / 900 / 1800 / 1900 MHz.
  • Page 37: Modalità Emergenza

    Tutti i sensori assegnati alla zona Normal sono attivati. I sensori assegnati alla zona Home sono disattivati. Modalità emergenza Premere questo tasto “# ” per 3 secondi. L’allarme viene innescato immediatamente e la sirena suona. Allo stesso tempo, il pannello di controllo compone i numeri telefonici memorizzati. www.techly.com...
  • Page 38: Hard Reset

    Chiamata urgente Premere il tasto di chiamata “ ” sul pannello di controllo per 3 secondi: il pannello auto-compone il primo numero di telefono memorizzato. Premere nuovamente questo tasto “ ” per concludere la chiamata. Telefonata in viva-voce dal pannello Attraverso il GSM Premere il tasto di chiamata “...
  • Page 39 “ ” = muovi avanti “ ” = muovi indietro “Enter” = seleziona/conferma “Esc” = indietro/ ritorna al passaggio precedente / cancella Le tabelle delle pagine successive schematizzano tutte le impostazioni che possono essere accessibili e modificate tramite il pannello di controllo. www.techly.com...
  • Page 40 Menu principale Sotto menu 1 Sotto menu 2 Sotto menu 3 Numeri di telefono (1~5): Numeri di telefono Numeri per SMS (1~5): Aggiungere un 01/10 nuovo telecomando Telecomando e Accessori Tastierino Eliminare tutti 1= SI 0=NO Eliminare Inserire 01-10: un telecomando Aggiungere 01/50 30 un nuovo RFID tag...
  • Page 41 Assicurarsi che tutti i sensori che sono stati attivati vengano citati sullo schermo LCD. Premere "Esc" per uscire dalla modalità prova. Questa modalità permette di verificare la corretta funzionalità dei sensori che sono stati abbinati al pannello di controllo. www.techly.com...
  • Page 42 Menu principale Sotto menu 1 Sotto menu 2 Sotto menu 3 Configurazione sistema Data e ora AAAA-MM-GG ORA Configurazione sistema Formato data Entrata differita 000-300 Inserimento tempo differito Configurazione sistema entrata/uscita Uscita differita 000-300 Inserimento automatico <00:00> Inserimento/ Configurazione sistema Disinserimento Disinserimento automatico <00:00>...
  • Page 43 Codice di coercizione predefinito: 1111 E' possibile aprire una porta con elettronica usando questo codice. La porta deve essere cablata con l'interfaccia (LOCK) sul retro del pannello di controllo. Codice di apertura porta predefinito: 8888 www.techly.com...
  • Page 44 Menu principale Sotto menu 1 Sotto menu 2 Sotto menu 3 Configurazione Numero di squilli <1-9>: 5 sistema Configurazione Durata sirena di <1-9Min>:3 sistema allerta Durata retro- Configurazione <0-120s>:30 sistema illuminazione Interruttore sirena Acceso / Spento Sirena cablata Attiva/Disattiva tono Acceso/ Spento Interruttore sirena Acceso / Spento...
  • Page 45 Tutte le impostazioni del sistema verranno riportati alla configurazione iniziale di fabbirca. I numeri di telefono memorizzati e gli accessori connessi verranno cancellati. Il pannello di controllo tiene in Scegliere l'evento che si desidera tracciare, premere "Enter". memoria gli ultimi 150 eventi. www.techly.com...
  • Page 46 Impostazione delle zone degli accessori Qualsiasi rilevatore può essere assegnato a 4 differenti categorie di zone: Zona Home, Zona Delay, Zona Normal, Zona 24-H. Per assegnare un rilevatore ad una zona, seguire le istruzioni a pagina 40 di questo manuale (la zona sarà assegnata al momento della connessione degli accessori).
  • Page 47 - Spegne tutte le sirene - Permette l’uscita dalla funzione Premere “#” controllo tramite telefonata - Interrompe ripetizione delle chiamate Nota Nella modalità GSM, il monitoraggio audio non è limitato nel tempo. www.techly.com...
  • Page 48 Configurazione tramite SMS IMPORTANTE: PRIMA DI METTERE IN FUNZIONE Inserire la scheda SIM nel pannello di controllo prima di avviare le operazioni di SMS. Assicurarsi che la scheda SIM non richieda alcun codice PIN. SALVARE UN NUMERO DI SMS NEL PANNELLO DI CONTROLLO (usando il pannello di controllo).
  • Page 49 Disattivare il sistema Richiesta impostazioni Inviare: Inviare: Sistema disattivato Sistema: Disattivato Alimentazione AC: Attiva Attivare il sistema Nota Inviare: I valori indicati qui sopra cambieranno dopo aver impostato il sistema. Sistema attivato Modalità Home Inviare: Sistema in modalità home www.techly.com...
  • Page 50 Memorizzazione numeri Memorizza numeri di telefono di telefono per le notifiche SMS Inviare: Inviare: Numeri di telefono: Numeri di telefono: Copia, incolla quindi modifica Copia, incolla quindi modifica (maiuscole e minuscole): (maiuscole e minuscole): Numeri di telefono: Numeri di telefono: 1.067.890.033 1.067.890.033 2.067.890.022...
  • Page 51: Rinominare Le Zone

    Le zone da 10 a 99 non possono essere manomesso”. rinominate. PIR camera da letto allarme manomesso Per gli accessori assegnati alle zone che non sono state rinominate, verrà inviato un SMS con il seguente formato “Numero della zona allarme manomesso”. Zona 10 allarme manomesso www.techly.com...
  • Page 52 Rinominare RFID tag Entrata/ Uscita differite Inviare: Inviare: Tempo di entrata differito Rinominare RFID tag: (0-300sec):0 Tempo di uscita differito (0-300sec):0 Copiare, incollare, quindi modificare (maiuscole e minuscole): Copiare, incollare, quindi modificare (maiuscole e minuscole): Tempo di entrata differito (0-300sec):10 Tempo di uscita differito Rinominare RFID tag (0-300sec):20...
  • Page 53 Disattivare password (4 cifre): 1=alto):1 1234 Durata dello squillo della sirena (1-9min):3 Copiare, incollare, quindi modificare (maiuscole e minuscole): Copiare, incollare, quindi modificare (maiuscole e minuscole): Disattivare password (4 cifre): Volume sirena 4321 (0= muto, 1=alto):0 Durata dello squillo della sirena (1-9min):5 www.techly.com...
  • Page 54 Cambia linguaggio del sistema Ripristino delle impostazioni di fabbrica tramite SMS Inviare il codice corrispondente al Inviare: linguaggio che si desidera impostare. Per esempio, per l’inglese, inviare “0001”. 0000 0001 Le impostazioni verranno riportate alla configurazione iniziale. I numeri di telefono memorizzati e gli accessori riferimento alla tabella...
  • Page 55 Il LED dello stato di sistema è acceso. Tutti i sensori nelle zone regolari sono attivi eccetto quelli nella zona della modalità Home. I sensori della zona della modalità Home sono disattivati così l’utente può muoversi liberamente all’interno della propria abitazione. www.techly.com...
  • Page 56 Attivare / Disattivare silenzio Premere il tasto modalità Home " " e quindi il tasto di attivazione " " o disattivazione " " immediatamente dopo. Così facendo, il pannello di controllo non emetterà alcun suono quando viene attivato o disattivato il sistema.
  • Page 57 Tamper switch * Quando il sistema di allarme è abilitato, il tamper switch attiverà l’allarme nel caso in cui l’alloggiamento viene aperto. Sensore infrarossi ** Rileva i raggi infrarossi rilasciati dal corpo umano. Non toccare la superficie. Mantenere la superficie pulita. www.techly.com...
  • Page 58 Aprire l’alloggiamento e rimuovere la striscia protettiva per attivare la batteria. L’auto-test partirà per 30 secondi. Quando il sensore è in funzione, se viene attivato più di due volte entro 3 minuti, passerà alla modalità standby Tasto Connessione per risparmiare energia. Se nessun movimento viene rilevato...
  • Page 59 Plastica ABS Condizioni operative Temperatura: -10°C~+55°C Umidità relativa: ≤ 80% (senza condensa) Dimensioni del sensore (L x P x H) 107 x 53 x 32 mm Dimensioni della staffa (L x P x H) 52 x 30 x 26.5 mm www.techly.com...
  • Page 60 Contatto porta / finestra wireless Caratteristiche Questo contatto porta / finestra può essere installato su porte, finestre e qualsiasi altro oggetto che viene aperto e chiuso. Il sensore invia segnali al pannello di controllo quando il magnete viene separato dal trasmettitore. Grazie all’interruttore anti-manomissione, qualsiasi tentativo di rimuovere il coperchio del contatto porta / finestra determinerà...
  • Page 61 Plastica ABS Condizioni climatiche Temperatura: -10°C~+55°C Umidità relativa: ≤ 80% (senza condensa) Dimensioni del trasmettitore (L x P x H) 71 x 35 x 17.5 mm Dimensioni del magnete (L x P x H) 51 x 12 x 13.5 mm www.techly.com...
  • Page 62 RFID tag Caratteristiche L’RFID tag permette di disabilitare il sistema o sbloccare una porta con serratura elettronica. Registrazione nel pannello di controllo Fare riferimento alle istruzioni nella tabella di pagina 8 di questo manuale (“RFID TAG”). Specifiche Dimensioni 45 x 30 x 7 mm...
  • Page 63 I m p o s s i b i l e L’utente non è nel menu Inserire il codice di amministratore l’accesso alle configurazione dello seguito da “Enter” per accedere al menu impostazioni schermo LCD di configurazione pannello di controllo www.techly.com...
  • Page 64 Precauzioni Per un uso sicuro del prodotto e per ottimizzare la durata del prodotto, si raccomanda di rispettare le seguenti prescrizioni: Gli accessori wireless devono essere connessi al pannello di controllo Una tensione di alimentazione bassa può avere effetti sulla distanza di trasmissione Non premere il tasto SOS sul telecomando se non è...
  • Page 65 Contattate le autorità locali competenti per ottenere informazioni in merito allo smaltimento corretto della presente apparecchiatura. Con il marchio CE, Techly® garantisce che il prodotto è conforme alle norme e direttive europee richieste. www.techly.com...
  • Page 66 SMS mit Mitteilung der Unterbrechung und Wiederherstellung der Netzversorgung und schwache Batterien des Bedienpanels. Audio-Überwachung aus der Ferne Mit 2 Lithium-Batterien zu 800mAh (garantieren 8 Stunden Betrieb in Standby) Spezifikationen Produktname Stromstärke Alarm I-ALARM-KIT001 300mA Pufferbatterien I-ALARM-KIT001 Lithium-Batterie: 3.7V /800mAh x 2 (BL-5B) Versorgung des Bedienpanels...
  • Page 67 Zone 2: “PIR Wohnzimmer” sensor Zone 3: “Fenster Eingang” sensor Zone 4: "Fenster Terrasse” sensor Zone 5: “Tür Terrasse” sensor Zone 6: “Fenster Schlafzimmer” sensor Zone 7: “PIR Schlafzimmer” sensor Zone 8: “Gas Küche” sensor Zone 9: “Wasser Badezimmer” www.techly.com www.techly.com...
  • Page 68: System Einschalten

    Kurzanleitung System anschließen Gebrauch des GSM Senders (SIM Karte) Das Batteriefach an der Rückseite des Bedienpanels öffnen und die SIM Karte einlegen. Wichtig Bevor das Gerät in der Modalität GSM benutzt wird muss eine SIM Karte erworben werden, die mit dem GSM Netz mit Frequenz 850 / 900 / 1800 / 1900 MHz funktioniert.
  • Page 69: Installation Des Bedienpanels

    Anwesenheits-Modus aktiviert. Alle Sensoren der „Normal-Zone“ sind aktiviert. Die der Home-Zone zugeordneten Sensoren sind deaktiviert. Notfall-Modus Diese Taste “# ” 3 Sekunden lang drücken. Der Alarm wird umgehend ausgelöst und die Sirene ertönt. Gleichzeitig wählt das Bedienpanel die gespeicherten Telefonnummern. www.techly.com...
  • Page 70: Hard Reset

    Kurzwahl Die Ruftaste “ ” am Bedienpanel 3 Sekunden lang drücken: das Bedienpanel wählt automatisch die erste gespeicherte Telefonnummer. Durch erneutes Drücken der Taste “ ” wird der Anruf beendet. Freisprechanruf vom Bedienpanel Über GSM Die Ruftaste “ ” am Bedienpanel drücken, die gewünschte Telefonnummer eintippen und noch einmal die Ruftaste “...
  • Page 71: Konfiguration Des Bedienpanels

    “ ” = Lösche “ ” = vorwärts “ ” = rückwärts “Enter” = Wählen/Bestätigen “Esc” = zurück/kehrt zum vorherigen Schritt zurück / Löschen Die Tabellen der folgenden Seiten fassen alle Einstellungen zusammen, die über das Bedienpanel zugänglich und veränderbar sind. www.techly.com...
  • Page 72 Haupt-Menü Untermenü 1 Untermenü 2 Untermenü 3 Telefonnummern (1~5): Telefonnummern Nummern für SMS (1~5): Eine neue Fernbedienung 01/10 30 hinzufügen Fernbedienung und Zubehör Tastenfeld Alle entfernen 1= JA 0=NEIN Eine Fernbedienung 01-10 eingeben: entfernen Neues RFID Tag 01/50 30 hinzufügen Zubehör RFID Tag Alle entfernen...
  • Page 73 Display erscheinen die Signale, die von den einzelnen aktivierten Sensoren gesendet wurden. Sicherstellen, dass alle aktivierten Sensoren am LCD Display angezeigt werden. Durch Drücken von „Esc“ den Probe-Modus verlassen. Mit diesem Modus kann die korrekte Funktion der dem Bedienpanel zugeordneten Sensoren kontrolliert werden. www.techly.com...
  • Page 74 Haupt-Menü Untermenü 1 Untermenü 2 Untermenü 3 System-Konfiguration Datum und Uhrzeit JJJJ-MM-TT UHRZEIT System-Konfiguration Datenformat Verzögerter Eingang 000-300 Eingabe der Delay-Time System-Konfiguration Eingang/Ausgang Verzögerter Ausgang 000-300 Automatische Aktivierung <00:00> Automatische System-Konfiguration Aktivierung / Automatische Deaktivierung <00:00> Deaktivierung Ein oder aus? Kontrolle mittels System-Konfiguration Ein oder aus?
  • Page 75 Zwangscode erfolgen. Das Bedienpanel wählt die gespeicherten Telefonnummern lautlos. Voreingestellter Zwangscode: 1111 Mit diesem Code kann eine elektronisch verriegelte Tür geöffnet werden. Die betreffende Tür muss mit der Schnittstelle (LOCK) an der Rückseite des Bedienpanels verdrahtet sein. Voreingestellter Türöffner-Code: 8888 www.techly.com...
  • Page 76 Haupt-Menü Untermenü 1 Untermenü 2 Untermenü 3 System-Konfiguration Zahl der Klingeltöne <1-9>: 5 System-Konfiguration Dauer Warnsirene <1-9Min>:3 Dauer der System-Konfiguration <0-120s>:30 Hintergrundbeleuchtung Sirenenschalter Eingeschaltet/ Ausgeschaltet Verdrahtete Sirene Ton Aktivieren/Deaktivieren Eingeschaltet/ Ausgeschaltet Sirenenschalter Eingeschaltet/ Einstellung der Sirene Ausgeschaltet System-Konfiguration Eingebaute Sirene Ton Aktivieren/Deaktivieren Eingeschaltet/ Ausgeschaltet...
  • Page 77 Produktversion variieren. Alle Systemeinstellungen werden wieder auf die anfängliche Werkskonfiguration gebracht. Die gespeicherten Telefonnummern und die angeschlossenen Zubehöre werden gelöscht. Bedienpanel kann Das zu verfolgende Ereignis wählen und mit „Enter“ bestätigen. die letzten 150 Ereignisse speichern. www.techly.com...
  • Page 78 Einstellung der Zubehör-Zonen Jeder Detektor kann 4 verschiedenen Zonenkategorien zugeordnet werden: Home-Zone, Delay-Zone, Normal-Zone, 24h-Zone. Um einen Detektor einer Zone zuzuordnen sind die Anweisungen der Seite dieses Handbuchs zu befolgen (die Zone wird bei Anschluss der Zubehörteile zugeordnet). Normal-Zone Wenn bei eingeschaltetem System ein Sensor ausgelöst wird, ertönt die Sirene. Bei deaktiviertem Alarm lösen die Sensoren keinen Alarm aus.
  • Page 79 On oder Off gestellt sind) - Stellt die drahtlose Sirene an (wenn mit dem Bedienpanel verbunden) - Stellt alle Sirenen ab - Ermöglicht Verlassen „#“ drücken Kontrollfunktion mittels Telefonat - Bricht die Rufwiederholung ab Im GSM Modus ist die Audio-Überwachung ohne zeitliche Begrenzung. www.techly.com...
  • Page 80 Konfiguration mittels SMS WICHTIG: VOR DER INBETRIEBSETZUNG Die SIM Karte in das Bedienpanel einsetzen, bevor die SMS Operationen begonnen werden. Sicherstellen, dass die SIM nicht mit PIN Code gesichert ist. EINE SMS NUMMER IM BEDIENPANEL SPEICHERN (über das Bedienpanel). Nur die gespeicherten Nummern können das System kontrollieren und konfigurieren.
  • Page 81 Das System deaktivieren Einstellungsanforderung Senden: Senden: System deaktiviert System: Deaktiviert AC Versorgung: Aktiviert Das System aktivieren Senden: oben angegebenen Werte verändern sich nach der Einstellung des Systems. System aktiviert Home-Modus Senden: System in Home-Modus www.techly.com...
  • Page 82 Speichern der Telefonnummern für SMS Telefonnummern Mitteilungen speichern Senden: Senden: Telefonnummern: Telefonnummern: Kopieren, Einfügen und Bearbeiten Kopieren, Einfügen und Bearbeiten (Groß-/Kleinschreibung beachten): (Groß-/Kleinschreibung beachten): Telefonnummern: Telefonnummern: 1.067.890.033 1.067.890.033 2.067.890.022 2.067.890.022 3.067.890.011 3.067.890.011 4.067.890.000 4.067.890.000 Die erste SMS Nummer wird die SMS Mitteilung erhalten, wenn das System mittels RFID Tag deaktiviert ist.
  • Page 83 + Sabotage-Alarm“. Zeichen bestehen. Die Zonen von 10 bis 99 können nicht umbenannt PIR Bewegungsmelder werden. Schlafzimmer Sabotage-Alarm Zubehörteilen, Zonen zugeordnet sind, die nicht umbenannt wurden, wird eine SMS im folgenden Format zugesandt: „Name der Zone Sabotage-Alarm“. Zone 10 Sabotage-Alarm www.techly.com...
  • Page 84 RFID Tag umbenennen Delay-Time Ein-/Ausgang Senden: Senden: Delay-Time Eingang RFID Tag umbenennen: (0-300sec):0 Delay-Time Ausgang (0-300sec):0 Kopieren, Einfügen und Bearbeiten (Groß-/Kleinschreibung beachten): Kopieren, Einfügen und Bearbeiten (Groß-/Kleinschreibung beachten): Delay-Time Eingang (0-300sec):10 Delay-Time Ausgang RFID Tag umbenennen (0-300sec):20 1. Tom 2. Pfleger/in 3.
  • Page 85 (4 Ziffern): 1234 Lautstärke der Sirene (0= stumm, 1=hoch):1 Dauer des Sirenentons Kopieren, Einfügen und Bearbeiten (1-9min):3 (Groß-/Kleinschreibung beachten): Kopieren, Einfügen und Bearbeiten (Groß-/Kleinschreibung beachten): Password deaktivieren (4 Ziffern): 4321 Lautstärke der Sirene (0= stumm, 1=hoch):0 Dauer des Sirenentons (1-9min):5 www.techly.com...
  • Page 86 Wechseln der System-Sprache Wiederherstellung der Werkseinstellungen mittels Den Code der gewünschten Sprache senden. Zum Beispiel für englisch Senden: „0001“ senden. 0000 0001 Die Einstellungen werden auf die Die Liste aller Sprachen kann der ursprünglichen Werte zurückgesetzt. folgenden Tabelle entnommen Die gespeicherten Telefonnummern werden: angeschlossenen Zubehörteile werden gelöscht.
  • Page 87: Drahtlose Fernbedienung

    Fernbedienung drücken. Die LED für den Systemstatus geht an. Alle Sensoren der regulären Zonen sind aktiv, mit Ausnahme der Sensoren der Zone des Home-Modus. Die Sensoren in der Zone des Home-Modus sind deaktiviert, so dass der Benutzer sich frei in seiner Wohnung bewegen kann. www.techly.com...
  • Page 88 Stummschaltung aktivieren / deaktivieren Taste für Home-Modus " " sofort danach die Einschalttaste " " oder Ausschalttaste " " drücken. Auf diese Weise gibt das Bedienpanel beim Aktivieren oder Deaktivieren des Systems keinerlei Ton von sich. Notfall-Modus Unabhängig vom Status des Systems kann im Notfall der Alarm durch Drücken der Notfalltaste „SOS“...
  • Page 89: Drahtloser Bewegungsmelder

    Betriebsanzeige Antenne Infrarotsensor ** AA 1.5V LR6 Sabotage-Kontakt* Wenn das Alarmsystem eingeschaltet ist, aktiviert der Sabotage-Kontakt den Alarm, sobald das Gehäuse geöffnet wird. Infrarotsensor ** Detektiert menschlichen Körper Bewegung ausgehenden Infrarotstrahlen. Nicht die Oberfläche berühren. Die Oberfläche sauber halten. www.techly.com...
  • Page 90 Gebrauch Das Gehäuse öffnen und den Batterie- Aktivierungsstrip abziehen. Es startet ein Selbsttest von 30 Sekunden. Wenn der Sensor in Betrieb ist, wird er bei mehr als zweimaligem Aktivieren innerhalb von 3 Minuten in Standby Verbindungstaste versetzt, um Energie einzusparen. Wird während der folgenden 3 Minuten keine Bewegung detektiert, kehrt der Sensor zum normalen Betriebsmodus zurück.
  • Page 91 433MHz (±75kHz) Seitenansicht Gehäusematerial Betriebsbedingungen Temperatur: -10°C~+55°C Relative Feuchte: ≤80% (ohne Kondensat) Abmessungen des Sensors (L x B x H) 107 x 53 x 32 mm Abmessungen der Halterung (L x B x H) 52 x 30 x 26.5 mm www.techly.com...
  • Page 92: Drahtloser Tür-/Fensterkontakt

    Drahtloser Tür-/Fensterkontakt Charakteristiken Dieser Tür-/Fensterkontakt kann an Türen, Fenstern und jedem anderen Gegenstand installiert werden, der geöffnet und geschlossen wird. Wenn der Magnet vom Sender getrennt wird, sendet der Sensor Signale an das Bedienpanel. Dank der Sabotage-Schutzvorrichtung wird bei jedem Versuch, den Deckel des Tür-/Fensterkontakts zu entfernen, der Alarm ausgelöst.
  • Page 93 ≤ 80 m (Freifeld) Funkfrequenz 433MHz (±75kHz) Gehäusematerial Betriebsbedingungen Temperatur: -10°C~+55°C Relative Feuchte: ≤80% (ohne Kondensat) Senderabmessungen (L x B x H) 71 x 35 x 17.5 mm Magnetgröße (L x B x H) 51 x 12 x 13.5 mm www.techly.com...
  • Page 94 RFID tag Charakteristiken Das RFID Tag ermöglicht das System zu deaktivieren oder eine Tür mit elektronischer Verriegelung zu entriegeln. Registrierung des Bedienpanels Die Anweisungen der Tabelle auf Seite 8 in diesem Handbuch befolgen („RFID TAG“). Spezifikationen Abmessungen 45 x 30 x 7 mm...
  • Page 95 Handbuchs an das Bedienpanel Deaktivierung des angeschlossen anschließen Systems Zugriff auf die Der Benutzer befindet Für Zugriff Einstellungen des sich nicht im Menü der Konfigurationsmenü den Administrator- Bedienpanels nicht Konfiguration des LCD Code, gefolgt von „Enter“ eingeben möglich Displays www.techly.com...
  • Page 96 Vorsichtsmaßnahmen Für die sichere Verwendung und lange Haltbarkeit des Produktes sollten die folgenden Vorschriften befolgt werden: Die Funk-Zubehörteile müssen mit dem Bedienpanel verbunden sein Eine niedrige Versorgungsspannung kann sich ungünstig Übertragungsdistanz auswirken Nie sinnlos die SOS Taste an der Fernbedienung drücken, damit die Nachbarschaft nicht gestört wird Das System regelmäßig überprüfen, damit sein korrekter Betrieb sichergestellt wird...
  • Page 97 Hausmüll gelangen. Dieses Produkt muss bei den für Entsorgung und Recycling zuständigen Sammelstellen für Elektro- und Elektronik-Altgeräte abgegeben werden. Für weitere Informationen zur korrekten Entsorgung dieses Gerätes die lokalen Behörden kontaktieren. Mit der CE-Kennzeichnung garantiert Techly® für die Konformität des Produktes mit den geforderten Vorschriften und Richtlinien. www.techly.com...
  • Page 98: Caractéristiques

    Surveillance audio du site à distance. Avec 2 batteries au lithium de 800 mAh comprises (garantissant 8 heures de durée en stand-by). Spécifications Nom du produit Courant alarme actif I-ALARM-KIT001 300 mA Batteries tampon I-ALARM-KIT001 Batterie au lithium: 3,7 V /800 mAh x 2 (BL-5B) Alimentation panneau de contrôle...
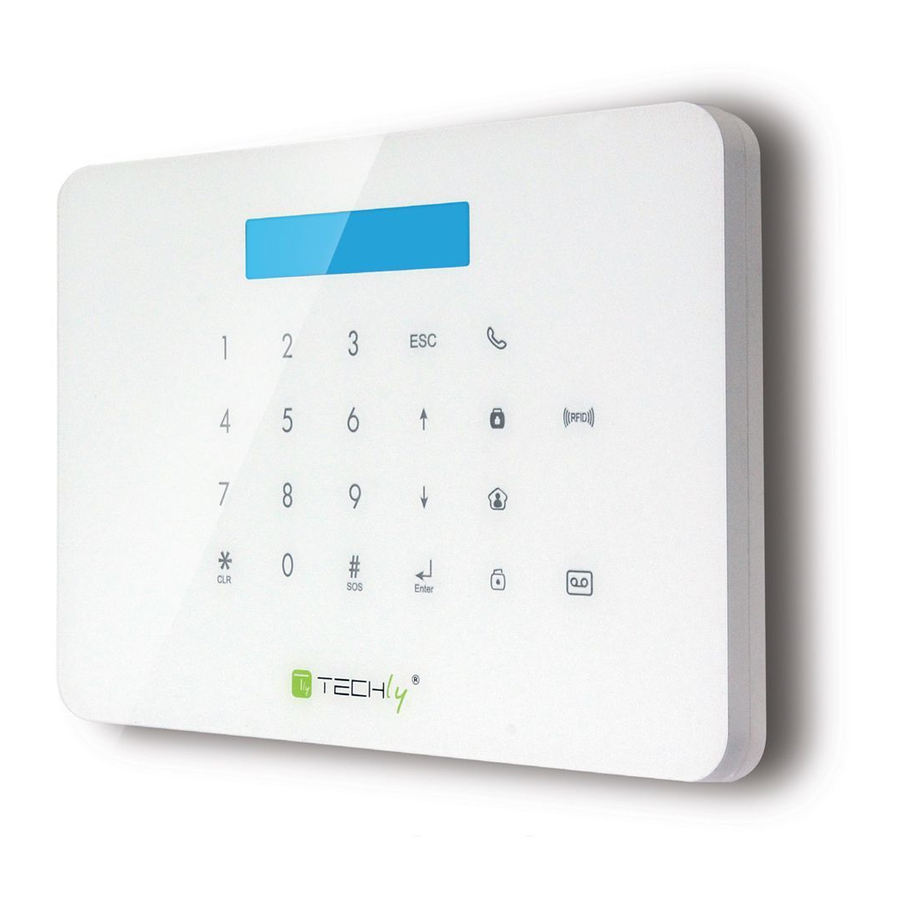
  • Page 99: Panneau De Contrôle (Avant)

    2: “PIR salon” capteur zone 3: “Fenêtre entrée” capteur zone 4: “Fenêtre terrasse” capteur zone 5: “Porte terrasse” capteur zone 6: “Fenêtre chambre” capteur zone 7: “PIR chambre” capteur zone 8: “Gaz cuisine” capteur zone 9: “Eau salle de bain” www.techly.com www.techly.com...
  • Page 100: Connecter Le Système

    Guide rapide Connecter le système En utilisant l'émetteur GSM (carte SIM) Ouvrir le compartiment des batteries à l'arrière du panneau de contrôle et introduire la carte SIM dans le panneau. Important Avant d'utiliser le dispositif en modalité GSM, il est nécessaire d'acheter une carte SIM compatible avec le réseau GSM à...
  • Page 101: Montage Du Panneau De Contrôle

    Tous les capteurs dédiés à la zone Normal sont activés. Les capteurs dédiés à la zone Home sont désactivés. Modalité d'urgence Appuyer sur cette touche “# ” pendant 3 secondes. L’alarme se déclenche immédiatement et la sirène sonne. Simultanément, le panneau de contrôle compose les numéros de téléphone mémorisés. www.techly.com...
  • Page 102: Appel Urgent

    Appel urgent Appuyer sur la touche d'appel “ ” du panneau de contrôle pendant 3 secondes: le panneau compose le premier numéro de téléphone mémorisé. Rappuyer sur cette touche “ ” pour terminer l'appel. Appel téléphonique avec haut-parleur depuis le panneau A travers le GSM Appuyer sur la touche d'appel “...
  • Page 103: Configuration Du Panneau De Contrôle

    “ ” = en arrière “Enter” = sélectionner/confirmer “Esc” = en arrière / retourner au passage précédent / effacer Les tableaux des pages suivantes schématisent tous les paramétrages qui peuvent être accessibles et modifiés par le panneau de contrôle. www.techly.com...
  • Page 104 Menu principal Sous menu 1 Sous menu 2 Sous menu 3 Numéros de téléphone (1~5): Numéros de téléphone Numéros pour SMS (1~5): Ajouter une nouvelle 01/10 30 télécommande Accessoires Contrôle à distance et clavier Éliminer tout 1= OUI 0=NON Éliminer une Saisir 01-10: télécommande Ajouter un nouveau...
  • Page 105 S'assurer que tous les capteurs qui ont été activés soient cités sur l'écran LCD. Appuyer sur "Esc" pour sortir de la modalité essai. Cette modalité permet de vérifier le bon fonctionnement des capteurs qui ont été associés au panneau de contrôle. www.techly.com...
  • Page 106 Menu principal Sous menu 1 Sous menu 2 Sous menu 3 Configuration système Date et heure AAAA-MM-JJ HEURE Configuration système Format date Entrée différée 000-300 Saisie temps Configuration système différé entrée/ sortie Sortie différée 000-300 Activation automatique <00:00> Activation / Configuration système Désactivation Désactivation automatique...
  • Page 107 Code sous contrainte prédéfini: 1111 Il est possible d'ouvrir une porte avec électronique en utilisant ce code. La porte doit être câblée avec l'interface (LOCK) à l'arrière du panneau de contrôle. Code d'ouverture porte prédéfini: 8888 www.techly.com...
  • Page 108 Menu principal Sous menu 1 Sous menu 2 Sous menu 3 Nombre de Configuration <1-9>: 5 système sonneries Configuration Durée sirène <1-9Min>:3 d'alerte système Configuration Durée <0-120s>:30 système rétro-éclairage Interrupteur sirène Allumé / Éteint Sirène câblée Activer/Désactiver Allumé / Éteint Paramétrage sirène Interrupteur sirène Allumé...
  • Page 109 Tous les paramétrages du système seront reportés à la configuration initiale de l'usine. Les numéros de téléphone mémorisés et les accessoires connectés seront effacés. panneau contrôle Choisir l'événement que l'on souhaite tracer, appuyer sur mémorise les 150 derniers "Enter". événements. www.techly.com...
  • Page 110: Paramétrage Des Zones Des Accessoires

    Paramétrage des zones des accessoires Tout détecteur peut être attribué à 4 différentes catégories de zones: Zone Home, Zone Delay, Zone Normal, Zone 24-H. Pour attribuer un détecteur à une zone, suivre les instructions page 104 de ce manuel (la zone sera attribuée au moment de la connexion des accessoires).
  • Page 111 - Éteint toutes les sirènes - Permet la sortie de la fonction Appuyer sur “#” contrôle par appel téléphonique - Interrompt la répétition des appels Note Dans la modalité GSM, la surveillance audio n'est pas limitée dans le temps. www.techly.com...
  • Page 112: Configuration Par Sms

    Configuration par SMS IMPORTANT: AVANT LA MISE EN MARCHE Installer la carte SIM dans le panneau de contrôle avant de lancer les opérations de SMS. S'assurer que la carte SIM ne requiert aucun code PIN. SAUVEGARDER UN NUMÉRO DE SMS DANS LE PANNEAU DE CONTRÔLE (en utilisant le panneau de contrôle).
  • Page 113: Désactiver Le Système

    Désactiver le système Demande de paramétrages Envoyer: Envoyer: Système désactivé Système: Désactivé Alimentation AC: Active Activer le système Note Envoyer: Les valeurs indiquées changeront après avoir paramétré le système. Système activé Modalité Home Envoyer: Système en modalité Home www.techly.com...
  • Page 114: Mémorisation Des Numéros De Téléphone

    Mémorisation des numéros Mémoriser les numéros de téléphone de téléphone pour les notifications SMS Envoyer: Envoyer: Numéros de téléphone: Numéros de téléphone: Copier, coller puis modifier (majuscules et minuscules): Copier, coller puis modifier (majuscules et minuscules): Numéros de téléphone: 1.067.890.033 Numéros de téléphone: 2.067.890.022 1.067.890.033...
  • Page 115: Renommer Les Zones

    PIR chambre à coucher avec alarme manipulée. Pour les accessoires attribués aux zones qui n'ont pas été renommées, un SMS sera envoyé avec le format suivant "Numéro de la zone alarme manipulée". Zone 10 alarme manipulée www.techly.com...
  • Page 116: Entrée / Sortie Différée

    Renommer RFID tag Entrée / Sortie différée Envoyer: Envoyer: Renommer RFID tag: Temps d'entrée différé (0-300 sec.): 0 Temps de sortie différé (0-300 sec.): 0 Copier, coller puis modifier (majuscules et minuscules): Copier, coller puis modifier (majuscules et minuscules): Temps d'entrée différé (0-300 sec.): 10 Temps de sortie différé...
  • Page 117: Volume Et Durée De L'émission Sonore De La Sirène

    (1-9 mn): 3 Copier, coller puis modifier (majuscules et minuscules): Copier, coller puis modifier (majuscules et minuscules): Désactiver mot de passe (4 chiffres): 4321 Volume sirène (0= muet, 1=fort): 0 Durée de l'émission sonore de la sirène (1-9 mn): 5 www.techly.com...
  • Page 118: Changer Langue Du Système

    Changer langue du système Rétablissement des paramétrages d'usine par SMS Envoyer le code correspondant à la Envoyer: langue que l'on souhaite programmer. Par exemple, pour l'anglais, envoyer “0001”. 0000 0001 Les périmétrages seront reportés à la configuration initiale. Les numéros de téléphone mémorisés et les Se référer au tableau ci-après pour la accessoires connectés seront effacés.
  • Page 119: Accessoires

    éclairée. Tous les capteurs dans les zones régulières sont activés, à l'exception de ceux de la zone en modalité Home. Les capteurs de la zone en modalité Home sont désactivés pour que l'utilisateur puisse se déplacer librement à l'intérieur de l'habitation. www.techly.com...
  • Page 120: Spécifications

    Activer / Désactiver silence Appuyer sur la touche modalité Home " " puis sur la touche d'activation " " ou désactivation " " immédiatement après. Ce faisant, le panneau de contrôle n'émettra aucun son lorsque le système est activé ou désactivé.
  • Page 121: Détecteur De Mouvements Sans Fil

    Tamper switch * Lorsque le système d'alarme est habilité, le tamper switch activera l'alarme si le compartiment est ouvert. Capteur infrarouges ** Détecte les rayons infrarouges émis par le corps humain. Ne pas toucher la surface Garder la surface propre. www.techly.com...
  • Page 122: Utilisation

    Utilisation Ouvrir le compartiment et ôter la bande de protection pour activer de la batterie. L’auto-test partira pendant 30 secondes. Avec capteur en fonction, s'il est activé plus de deux fois en 3 minutes, il passera Bouton en modalité standby pour économiser de connexion de l'énergie.
  • Page 123 Conditions opérationnelles Température: -10°C~+55°C Humidité relative: ≤ 80 % (sans condensats) Dimensions du capteur (L x P x H) 107 x 53 x 32 mm Dimensions de l'étrier (L x P x H) 52 x 30 x 26,5 mm www.techly.com...
  • Page 124: Contact Porte / Fenêtre Sans Fil

    Contact porte / fenêtre sans fil Caractéristiques Ce contact porte / fenêtre peut être installé sur les portes, les fenêtres et tout autre point d'accès qui peut être ouvert et fermé. Le capteur envoie des signaux au panneau de contrôle lorsque le contact magnétique est séparé de l'émetteur. Grâce à...
  • Page 125 Conditions climatiques Température: -10°C~+55°C Humidité relative: ≤ 80 % (sans condensats) Dimensions de l'émetteur (L x P x H) 71 x 35 x 17.5 mm Dimensions du contact magnétique (L x P x H) 51 x 12 x 13.5 mm www.techly.com...
  • Page 126 RFID tag Caractéristiques Le RFID tag permet de désactiver le système ou de débloquer une porte avec serrure électronique. Enregistrement dans le panneau de contrôle Faire référence aux instructions du tableau page 8 de ce manuel (“RFID TAG”). Specifiche Dimensions 45 x 30 x 7 mm...
  • Page 127: Solution Des Problèmes Et De Maintenance

    RFID tag au panneau de désactivation contrôle. contrôle. système. Accès impossible L’utilisateur n'est pas dans Saisir le code d'administrateur suivi paramétrages le menu de configuration de “Enter” pour accéder au menu de panneau de l'écran LCD. configuration. contrôle. www.techly.com...
  • Page 128 Précautions Pour une utilisation sécurité du produit et optimiser la durée du produit, nous recommandons de respecter les prescriptions suivantes: Les accessoires sans fil doivent être connectés au panneau de contrôle; Une faible tension de courant électrique peut avoir des effets sur la distance d'émission;...
  • Page 129 à l'écoulement et au recyclage des appareils électriques et électroniques. Contacter les autorités locales compétentes pour de plus amples informations en matière d'écoulement correct des présents appareils.. Avec le marquage CE, Techly® garantit que le produit est conforme aux normes et aux directives européennes requises. www.techly.com...
  • Page 131 Easy to use. Powerful. Smart. TECHLY is committed to providing customers with high quality products that are in compliance with regulatory laws, standards and requirements. Products are accordingly marked and in compliance with European Union Directives (CE Mark) standards, Federal Communication Commission (FCC), Restriction of Hazardous Substances (RoHS) and others countries marking’s requirements.
  • Page 132 www.techly.com...

Table des Matières