Publicité

Les langues disponibles

Les langues disponibles

O
PERATING
AIR CONDITIONER
REMOTE CONTROLLER
(WIRED TYPE)
Remote Controller
UTB-UUB
KEEP THIS MANUAL
FOR FUTURE REFERENCE
FUJITSU GENERAL LIMITED
M
ANUAL
SU MO TU WE TH FR SA
OPERATING MANUAL
MODE D'EMPLOI
MANUAL DE FUNCIONAMIENTO
AM
PM
3 6 9 12 15 18 21
P/N9373329039-03

Publicité

Table des Matières
loading

Sommaire des Matières pour Fujitsu UTB-UUB

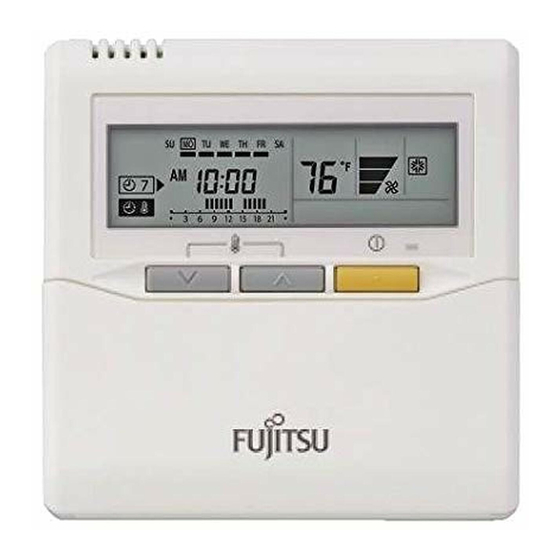
  • Page 1 MODE D’EMPLOI MANUAL DE FUNCIONAMIENTO PERATING ANUAL AIR CONDITIONER REMOTE CONTROLLER (WIRED TYPE) Remote Controller UTB-UUB SU MO TU WE TH FR SA 3 6 9 12 15 18 21 KEEP THIS MANUAL FOR FUTURE REFERENCE FUJITSU GENERAL LIMITED P/N9373329039-03...
  • Page 2: Table Des Matières

    CONTENTS SAFETY PRECAUTIONS ..........1 WEEKLY TIMER ............. 6 NAME OF PARTS ............1 TEMPERATURE SET BACK TIMER ....... 8 FUNCTION INFORMATION ........... 2 SELF-DIAGNOSIS ............9 PREPARATORY OPERATION ......... 3 OPERATING TIPS ............9 OPERATION ..............3 SPECIFICATIONS ............10 ON/OFF TIMER ...............
  • Page 3: Function Information

    FUNCTION INFORMATION Depending on the indoor unit model, some buttons on this remote controller cannot be used and some functions are re- stricted. Refer to the following table for the buttons that can be used for each model. : Button can be operated : Button cannot be operated Button numbers (refer to page 1) Model...
  • Page 4: Preparatory Operation

    PREPARATORY OPERATION To set the current day and time Press the DAY button and select the current day. appears around the selected day. CLOCK ADJUST DAY OFF Press the TIMER MODE button for 2 seconds or more. The time display on the remote controller will flash.
  • Page 5 OPERATION To set the operation mode G Vertical air direction adjustment (Swing operation) * Press the START/STOP button to start the air conditioner, and then proceed as follows. Press the VERTICAL AIRFLOW DIRECTION button to adjust the direction of the verti- cal airflow.
  • Page 6: On/Off Timer

    OPERATION Room temperature sensor selection THERMO SENSOR Indoor unit Press the THERMO SENSOR button to select whether the room temperature is detected at the indoor unit (remote sensor) or the remote controller. When the thermo sensor display appears, the room temperature is detected at the remote controller.
  • Page 7: Weekly Timer

    WEEKLY TIMER Instructions related to heating are applicable to “HEAT PUMP MODELS” and “HEAT RECOVERY MODELS” only. The timer function is not available depending on the model. To set the WEEKLY timer SU MO TU WE TH FR SA CLOCK ADJUST 3 6 9 12 15 18 21 Press the SET button for 2 seconds or Press the TIMER MODE button to select the weekly timer.
  • Page 8 WEEKLY TIMER To start/cancal the WEEKLY timer operation G To start G To cancel SU MO TU WE TH FR SA DELETE 3 6 9 12 15 18 21 CLOCK ADJUST • Press the DELETE button to cancel 3 6 9 12 15 18 21 the timer mode.
  • Page 9: Temperature Set Back Timer

    TEMPERATURE SET BACK TIMER Instructions related to heating are applicable to “HEAT PUMP MODELS” and “HEAT RECOVERY MODELS” only. The timer function is not available depending on the model. To set the temperature SET BACK timer SET BACK SU MO TU WE TH FR SA If there is no existing SET BACK tempera- ture setting, “- -”...
  • Page 10: Self-Diagnosis

    SELF-DIAGNOSIS When the error indication “E:EE” is displayed, inspection of the air conditioning system is necessary. Please consult author- ized service personnel. (1) Stop the air conditioner operation. Faulty unit number (remote controller address) Error code SU MO TU WE TH FR SA SU MO TU WE TH FR SA ex.
  • Page 11: Specifications

    SPECIFICATIONS REMOTE CONTROLLER (WIRED TYPE) DIMENSIONS & WEIGHT MODEL POWER HEIGHT in. (mm) WIDTH in. (mm) DEPTH in. (mm) WEIGHT lbs. (g) UTB-UUB DC 12 V 4-3/4 (120) 4-3/4 (120) 5/8 (17) 0.35 (160) En-10...
  • Page 12: Precautions De Securite

    SOMMAIRE PRECAUTIONS DE SECURITE ........1 MINUTERIE HEBDOMADAIRE ........6 NOMENCLATURE DES ORGANES ....... 1 MINUTERIE D’ABAISSEMENT DE LA TEMPERATURE .. 8 INFORMATIONS RELATIVES AU AUTO-DIAGNOSTIC ............9 FONCTIONNEMENT DE L’APPAREIL ......2 CONSEILS D’UTILISATION ........... 9 PREPARATIFS ..............3 DEPANNAGE ..............
  • Page 13: Informations Relatives Au Fonctionnement De L'appareil

    INFORMATIONS RELATIVES AU FONCTIONNEMENT DE L’APPAREIL Selon le modèle de l’appareil intérieur, certains boutons de la télécommande ne peuvent pas être utilisés et certaines fonc- tions sont limitées. Consultez le tableau suivant pour connaître les boutons valides pour chaque modèle. : Le bouton est valide : Le bouton est invalide Numéros des boutons (consultez la page 1)
  • Page 14: Preparatifs

    PREPARATIFS Réglage du jour et de l’heure actuels Appuyez sur le bouton DAY (JOUR) et sélectionnez le jour actuel. CLOCK ADJUST DAY OFF apparaît autour du jour sélectionné. Appuyez sur le bouton MODE MINU- TERIE pendant 2 secondes minimum. L’affichage de l’heure sur la télécom- mande clignote.
  • Page 15: Réglage Du Mode De Fonctionnement

    FONCTIONNEMENT Réglage du mode de fonctionnement G Réglage de la direction du flux d’air vertical (opération d’oscillation) * Appuyez sur le bouton MISE EN MARCHE/ARRET pour démarrer le climatiseur, puis procéder comme suit : Appuyez sur le bouton REGLAGE DE LA DIRECTION DU FLUX D’AIR VERTICAL pour régler la direction du flux d’air vertical.
  • Page 16: Minuterie De Mise En Marche/Arret

    FONCTIONNEMENT Sélection du capteur de la température de la pièce THERMO SENSOR Unité d’intérieur Appuyez sur le bouton THERMO SENSOR (CAPTEUR THERMI- QUE) pour indiquer si la température de la pièce doit être dé- tectée sur l’unité d’intérieur (capteur distant) ou sur la télécom- mande.
  • Page 17: Minuterie Hebdomadaire

    MINUTERIE HEBDOMADAIRE Les instructions relatives au chauffage ne s’appliquent qu’aux “MODELES AVEC POMPE À CHALEUR” et aux “MODELES A RÉCUPÉRATION DE CHALEUR”. Selon les modèles, la fonction de minuterie n’est pas disponible. Programmation de la minuterie HEBDOMADAIRE SU MO TU WE TH FR SA CLOCK ADJUST 3 6 9 12 15 18 21 Appuyez sur le bouton SET (REGLER)
  • Page 18 MINUTERIE HEBDOMADAIRE Mise en marche/annulation du fonctionnement par minuterie hebdomadaire G Mise en marche G Annulation SU MO TU WE TH FR SA DELETE 3 6 9 12 15 18 21 CLOCK ADJUST • Appuyez sur le bouton DELETE (SUPPRIMER) pour annuler le 3 6 9 12 15 18 21 Lorsque la minuterie hebdomadaire mode minuterie.
  • Page 19: Minuterie D'abaissement De La Temperature

    MINUTERIE D’ABAISSEMENT DE LA TEMPERATURE Les instructions relatives au chauffage ne s’appliquent qu’aux “MODELES AVEC POMPE À CHALEUR” et aux “MODELES A RÉCUPÉRATION DE CHALEUR”. Selon les modèles, la fonction de minuterie n’est pas disponible. Programmation de la minuterie d’ABAISSEMENT de la température SET BACK SU MO TU WE TH FR SA En l’absence de...
  • Page 20: Auto-Diagnostic

    AUTO-DIAGNOSTIC Lorsque l’erreur “E:EE” apparaît, vous devez examiner le climatiseur. Veuillez consulter le personnel de service agréé. (1) Arrêtez le climatiseur. Numéro de l’unité défectueuse (adresse de la télécommande.) Code d’erreur SU MO TU WE TH FR SA SU MO TU WE TH FR SA par ex.
  • Page 21: Depannage

    électrique et consultez le personnel de service agréé. FICHE TECHNIQUE TELECOMMANDE (MODELE CABLE) DIMENSIONS ET POIDS (NET) MODELE ALIMENTATION HAUTEUR po [mm] LARGEUR po [mm] PROFONDEUR po [mm] POIDS lb [g] UTB-UUB DC 12 V 4-3/4 (120) 4-3/4 (120) 5/8 (17) 0.35 (160) Fr-10...
  • Page 22: Precauciones De Seguridad

    ÍNDICE PRECAUCIONES DE SEGURIDAD ........ 1 TEMPORIZADOR DE CAMBIO DE LA DENOMINACIÓN DE LOS COMPONENTES ....1 TEMPERATURA ............. 8 INFORMACIÓN SOBRE LAS FUNCIONES ....2 AUTODIAGNÓSTICO ............ 9 PREPARATIVOS ............. 3 CONSEJOS PARA EL FUNCIONAMIENTO ....9 FUNCIONAMIENTO............3 LOCALIZACIÓN DE AVERÍAS ........
  • Page 23 INFORMACIÓN SOBRE LAS FUNCIONES Según el modelo de unidad interior, ciertos botones del mando a distancia no se podrán utilizar y ciertas funciones estarán restringidas. Para saber qué botones se pueden utilizar con cada modelo, consulte la siguiente tabla. : El botón se puede utilizar. : El botón no se puede utilizar.
  • Page 24: Preparativos

    PREPARATIVOS Para fijar el día y hora actuales Pulse el botón del día (DAY) y seleccione el día en curso. Aparecerá alrededor del día seleccionado. CLOCK ADJUST DAY OFF Pulse el botón MODO DEL TEMPORI- ZADOR durante 2 segundos o más. El indicador de la hora en el mando a distancia parpadeará.
  • Page 25 FUNCIONAMIENTO Para ajustar el modo de funcionamiento G Ajuste de la dirección vertical del aire (Funcionamiento de vaivén) * Pulse el botón de marcha/paro para poner en funcionamiento el acondicionador de aire y después lleve a cabo los siguientes pasos. Pulse el botón de dirección vertical del flujo de aire para ajustar la dirección del flujo de aire vertical.
  • Page 26: Temporizador De Conexión/De Desconexión

    FUNCIONAMIENTO Selección del sensor de temperatura de la habitación THERMO SENSOR Unidad interior Pulse el botón de sensor térmico (THERMO SENSOR) para seleccionar si la temperatura de la sala se detecta en la uni- dad interior (sensor remoto) o en el mando a distancia. Cuando aparece la pantalla del sensor térmico , la tem- peratura de la habitación se detecta en el mando a dis-...
  • Page 27: Temporizador Semanal

    TEMPORIZADOR SEMANAL Las instrucciones relacionadas con el calentamiento sólo son aplicables a los “MODELOS DE BOMBA DE CALOR” y “MODE- LOS DE RECUPERACIÓN DE CALOR”. La función de temporizador puede no estar disponible dependiendo del modelo. Para ajustar el temporizador SEMANAL SU MO TU WE TH FR SA CLOCK ADJUST 3 6 9 12 15 18 21...
  • Page 28 TEMPORIZADOR SEMANAL Activación/cancelación del funcionamiento del temporizador semanal G Para comenzar G Para cancelar DELETE SU MO TU WE TH FR SA CLOCK ADJUST 3 6 9 12 15 18 21 • Pulse el botón de borrado (DELETE) para cancelar el modo del tempo- Cuando selecciona el temporizador 3 6 9 12 15 18 21 rizador.
  • Page 29: Temporizador De Cambio De La Temperatura

    TEMPORIZADOR DE CAMBIO DE LA TEMPERATURA Las instrucciones relacionadas con el calentamiento sólo son aplicables a los “MODELOS DE BOMBA DE CALOR” y “MODE- LOS DE RECUPERACIÓN DE CALOR”. La función de temporizador puede no estar disponible dependiendo del modelo. Para ajustar el temporizador de cambio de temperatura SET BACK Si no existe ningún...
  • Page 30: Autodiagnóstico

    AUTODIAGNÓSTICO Cuando aparece la indicación de error “E:EE”, se requiere una inspección del sistema acondicionador de aire. Póngase en contacto con el personal de servicio autorizado. (1) Detenga el funcionamiento del acondicionador de aire. Número de la unidad defec- tuosa (dirección del mando Código de error a distancia.) SU MO TU WE TH FR SA...
  • Page 31: Localización De Averías

    ESPECIFICACIONES MANDO A DISTANCIA (DE TIPO CON CABLE) DIMENSIONES Y PESO MODELO POTENCIA ALTURA pulg. (mm) ANCHO pulg. (mm) PROFUNDIDAD pulg. (mm) PESO lbs. (g) UTB-UUB CC 12 V 4-3/4 (120) 4-3/4 (120) 5/8 (17) 0.35 (160) Sp-10...

Table des Matières