Whale Onboard Tank Fill Mode D'emploi
Table des Matières
Les langues disponibles
Les langues disponibles
Liens rapides
Easi-Slide
Exterior Utilities Sockets
Onboard Tank Fill,
Onboard Tank Fill + 12V,
and Water Out Sockets
Installation and
Operating Instructions
Easi-Slide
DE
Außen-Anschlussdosen
Stromanschlussdose,
Wassertank Füllstutzen, Wassertank
Füllstutzen + 12-V-Stromanschluss und
Wasserauslassanschlüsse
Montage- und Betriebsanleitung
FR
Easi-Slide
Prises de courant utilitaires extérieures
Bouchon de remplissage du réservoir
embarqué, Bouchon de remplissage du
réservoir embarqué +12V et Water Out
Consignes d'installation et d'utilisation
IT
Easi-Slide
Prese esterne per utilità
Bocchettone acqua, Bocchettone acqua
+ prese 12V e prese esterne per acqua
Istruzioni per l'installazione e per l'uso
ES
Easi-Slide
Tomas de corriente para utilidades exteriores
Llenado del depósito de a bordo,
Llenado del depósito de a bordo +12V y para
salida de agua
Instalación e instrucciones de servicio
NL
Easi-Slide
externe aansluiting
An boord tank vulling, An boord tank
vulling +12V, en watertappunten
Instructies voor installatie en gebruik
Easi-Slide
SE
Externa försörjningsuttag
Påfyllning av tanken, Påfyllning av
tanken+12V, samt vattenuttag
Installations-och driftsanvisningar
Table des Matières

Manuels Connexes pour Whale Onboard Tank Fill

Sommaire des Matières pour Whale Onboard Tank Fill
- Page 1 Easi-Slide Exterior Utilities Sockets Onboard Tank Fill, Onboard Tank Fill + 12V, and Water Out Sockets Installation and Operating Instructions Easi-Slide Außen-Anschlussdosen Stromanschlussdose, Wassertank Füllstutzen, Wassertank Füllstutzen + 12-V-Stromanschluss und Wasserauslassanschlüsse Montage- und Betriebsanleitung Easi-Slide Prises de courant utilitaires extérieures Bouchon de remplissage du réservoir...
- Page 8 En outre, vous aurez besoin de la douche Whale Compact SO4100B (conditionnement en vrac), SO4100C (détail) - disponible séparément. En plus des 3 packs, vous aurez besoin de ce qui suit : 1 x couvercle Easi-Slide Whale Table des matières Installation de la prise 1.
-
Page 9: Avant De Commencer
• ( 1) Veillez à disposez suffisamment d’espace libre sur le mur pour l’installation ainsi que suffisamment de place pour le couvercle Easi-Slide Whale pour l’installation et l’ouverture. • ( 2) Utilisez le profil de montage de prise à la page 39 comme modèle de coupe et fixez-le à la paroi du véhicule avec du ruban adhésif. -
Page 10: Installation Des Raccords
Installation des raccords • Bouchon de remplissage du réservoir embarqué ( 18 -19) • Bouchon de remplissage du réservoir embarqué + 12v ( 25 -27) • Prise Water Out ( 35 -36) Attache du couvercle 20 -21) ou ( 28 -29) •... - Page 24 -24-...
- Page 25 -25-...
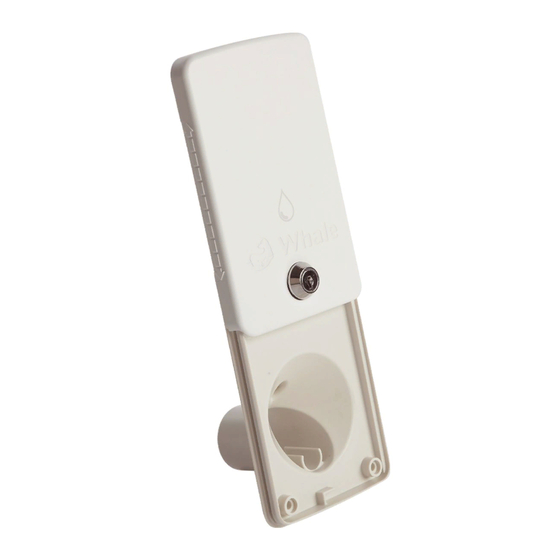
- Page 26 24). The tank fill design incorporates a lock to protect your water supply and a vent pipe to prevent airlocks. The Onboard Tank Fill Socket is suitable for use with any standard hose and should be used with cold freshwater only.
-
Page 27: Technical Data
Dati tecnici Datos técnicos Technische gegevens Tekniska data Figure 5. Onboard Tank Fill Socket Dimensional Drawings Abbildung 5. Maßzeichnungen für Wassertank Füllstutzen Figure 5. Schémas de principe de la bouchon de remplissage du réservoir embarqué Figura 5. Disegni dimensionali bocchettone acqua Fig. - Page 28 Fittings Installation Armaturen-Installation Installation des raccords Installazione dei raccordi Instalación de elementos Het installeren van de fittingen Anslutningsinstallation Lid attachment Befestigung der Abeckkappe Attache du couvercle Attacco coperchio Fijación de la tapa Het aanbrengen van de deksel Lockfastsättning -28-...
- Page 29 Operation Betrieb Fonctionnement Funzionamento Funcionamiento Gebruik Drift -29-...
-
Page 30: Bouchon De Remplissage Du Réservoir Embarqué + 12V
2. Onboard Tank Fill + 12V Socket Unique 2 in 1 design includes a 12V pump power supply and Onboard Tank Fill all in one socket. The secure hose clip keeps the pump in place during filling ( 34). The Onboard Tank Fill + 12v Power Socket incorporates a lock to protect your water supply and a vent pipe ensuring the tank is vented at all times, preventing airlocks. - Page 31 Datos técnicos Technische gegevens Tekniska data Figure 6. Onboard Tank Fill + 12V Socket Dimensional Drawings Abbildung 6: Maßzeichnungen für Wassertank Füllstutzen + 12-V-Anschlussdose Figure 6. Schémas de principe de la bouchon de remplissage du réservoir embarqué + 12V Figura 6. Disegni dimensionali bocchettone acqua + presa da 12V Fig.
- Page 32 Fittings Installation Armaturen-Installation Instalación de elementos Installation des raccords Het installeren van de fittingen Installazione dei raccordi Anslutningsinstallation Lid attachment Befestigung der Abeckkappe Fijación de la tapa Attache du couvercle Het aanbrengen van de deksel Attacco coperchio Lockfastsättning -32-...
- Page 33 Operation Betrieb Fonctionnement Funzionamento Funcionamiento Gebruik Drift -33-...
- Page 34 Süßwasser. 3. PriseWater Out Pour un lavage sans problème, raccordez simplement la douche compacte d’extérieur amovible Whale au déclencheur facile d’utilisation. Utilisez avec de l’eau fraîche et froide uniquement. 3. Presa esterna per acqua Per lavarsi senza problemi, basta collegare la doccia compatta esterna staccabile Whale con innesco facile da usare.
- Page 35 Technical Data Technische Daten Données techniques Dati tecnici Datos técnicos Technische gegevens Tekniska data Figure 7. Water Out Socket Dimensional Drawings Abbildung 7. Maßzeichnungen für den Wasserauslassanschluss Figure 7. Schémas de principe de la prise Water Out Figura 7. Disegni dimensionali presa esterna per acqua Fig.
- Page 36 Fittings Installation Armaturen-Installation Installation des raccords Installazione dei raccordi Instalación de elementos Het installeren van de fittingen Anslutningsinstallation -36-...
- Page 37 Operation Betrieb Fonctionnement Funzionamento Funcionamiento Gebruik Drift -37-...
- Page 38 IP55-code als de deksel gesloten is Klassat som IP55 med stängt lock This Whale product is covered by a 2 year warranty. Please see the enclosed document for details of our Statement of Limited Warranty. © Copyright Whale 2018 – All rights reserved.
- Page 39 External Socket Mounting Profile Montageschablone für den Außenanschluss Profil de montage de prise extérieure Profilo di montaggio presa esterna Perfil de montaje externo para toma de corriente Externe aansluiting montageprofiel Monteringsprofil, externt uttag Do not copy or resize DE: Nicht photokopieren oder vergrößern/verkleinern FR: Ne pas copier ou redimensionner 125mm IT: Non copiare o ridimensionare ES: No copiar ni modificar el tamaño NL: Een kopie of het aanpassen van de grootte zijn niet toegestaan SE: Får ej kopieras eller storleksändras -39-...