Airphone JF-2MED Manuel D'installation Et D'utilisation

Interphone vidéo couleur mains libres

Publicité

Les langues disponibles

Les langues disponibles

Liens rapides

JF-2MED, JF-2HD
HANDS-FREE COLOR VIDEO INTERCOM
INTERPHONE VIDEO COULEUR MAINS LIBRES
HANDENVRIJE KLEURENVIDEOFONIE
JF-2MED
Master monitor station
Moniteur maître
Monitor-hoofdpost
INSTALLATION & OPERATION MANUAL
MANUEL D'INSTALLATION ET D'UTILISATION
INSTALLATIE- EN BEDIENINGSHANDLEIDING
- 1 -
FK1260 1006 B
JF-2HD
Sub monitor station
Moniteur secondaire
Monitor-bijpost

Publicité

Table des Matières
loading

Sommaire des Matières pour Airphone JF-2MED

  • Page 1 FK1260 1006 B JF-2MED, JF-2HD HANDS-FREE COLOR VIDEO INTERCOM INTERPHONE VIDEO COULEUR MAINS LIBRES HANDENVRIJE KLEURENVIDEOFONIE JF-2MED JF-2HD Master monitor station Sub monitor station Moniteur maître Moniteur secondaire Monitor-hoofdpost Monitor-bijpost INSTALLATION & OPERATION MANUAL MANUEL D'INSTALLATION ET D'UTILISATION INSTALLATIE- EN BEDIENINGSHANDLEIDING...
  • Page 2: General Precautions

    6. If the unit is down or does not operate properly, unplug the power supply or turn off 6. Do not use power supply with a voltage other than specified. Fire or electric shock the JF-2MED and JF-2HD Power switches. could result.
  • Page 3: Mounting Locations

    Allow at least 5 cm (2") of open space on monitor station. either side. JF-2MED / JF-2HD + 15 cm + 5 cm + 5 cm (6") (2") (2") Wiring method, Wiring distance Wire the units from station-to-station (daisy-chained).
  • Page 4 WIRING Insert wires securely into each terminal as shown. DOOR 1 Video door station JF-2MED Master monitor station AIPH ONE JF-D A JF-DA AIPHON JF-DVF AIPHO JF-DV JF-DV JF-DVF A1 A2 DOOR 2 AIPH ONE JF-D A JF-DA AIPHON JF-DVF...
  • Page 5 Not used. Call-in from door station 2 Not used. Optional long distance adaptor JBW-BA Use JBW-BA when the wiring distance between the JF-DA video door station and JF-2MED is within the distance JF-DV JBW-BA JF-2MED AIPH ONE JF-DA range shown in the table.
  • Page 6 2. The volume of chime tone and the notification sound will not change while they POWER switch are operating even if the volume control is adjusted. The adjusted volume will MONITOR button apply from the next call-in or notification. (JF-2MED only) Speaker [15] Call-in setting switch [10] Transmit LED (red) "1": Call-in from door station 1 only.
  • Page 7: Operating Method

    To reverse the play screen frame by frame. SETTING UP Setting screens and display methods JF-2MED In the standby mode, press the MENU/MEMO button until the Press PLAY button or REC button to select the item you want to set setting screen is displayed (approx.
  • Page 8: Set The Date/Time

    SET THE DATE/TIME JF-2MED After performing steps 1 and 2 in section 7-1, select "SET Press CALL button to set the "Year" and move the cursor to "Month". THE DATE/TIME" and press CALL button. 2006 01 JAN 00:00 2006 01 JAN 00 : 00...
  • Page 9 SET DOOR2 JF-2MED When connecting door station 2, set "Video", "Audio" or "None In the "SET DOOR2" screen, press PLAY button or REC button to (door station 2 not connected)". select the type of door station that is connected. These operations must be performed by an installer. Please Video door station do not change these settings yourself.
  • Page 10 OPERATIONS Answering a door call (HANDS-FREE mode, PTT mode) Press CALL button. Instant voice call function Even without answering, door area can be seen and heard with video and audio (for approx. 45 seconds). Inside sound is not heard outside. Chime tone sounds, caller is seen on video monitor, and outside sound is heard.
  • Page 11 Message for entrance During communication, instant voice call or entrance Press either CALL button or PLAY button. The selected Message changes to yellow, "SENDING MESSAGE" is displayed, and the selected message monitoring, press MENU/MEMO button to display the menu screen. is played from door station.
  • Page 12: Manual Recording

    If a call is received from video door station, the unit starts recording automatically. The record LED (red) flashes during recording (JF-2MED only). • The recording starts approx. 2 seconds after CALL button of video door station is pressed. A maximum length of approx.
  • Page 13 Play recorded picture If there are automatically recorded pictures, such as those taken while you were out, the play LED (red) flashes. ∗ In addition, the operations shown below are also possible in the play screen. • CALL button: To display the previous (more recent date) picture. When the button is pressed for 1 second or more, during the time that the button is pressed the first picture only of the dates can be checked in succession, from older to more recent dates.
  • Page 14 18 : 45 DO YOU WANT TO ERASE PICTURE? 8-12 Recording Voice memos JF-2MED Voice memos for internal use can be recorded. Press CALL button to end the recording. A maximum of 3 memos can be recorded (maximum of approx. 15 Alternatively, it ends automatically after approx.
  • Page 15: Technical Precautions

    DC power supply and contact a qualified technician for service. SPECIFICATIONS • Power: DC 18 V (JF-2MED, JF-2HD) • Current consumption: (Max.) 400 mA (JF-2MED) (Max.) 220 mA (JF-2HD) • Calling: Chime and image, approx. 45 seconds • Communication: (HANDS-FREE mode) Approx.
  • Page 16: Precautions Generales

    PRECAUTIONS Mesures générales d'interdiction Interdiction de démonter l'appareil Interdiction d'exposer l'appareil à l'eau Précautions générales AVERTISSEMENT PRECAUTIONS GENERALES 1. Maintenez l'appareil à une distance de plus d'1 mètre d'un poste de radio ou de (Le non-respect de cet avertissement risque d'entraîner des blessures graves, voire mortelles.) télévision.
  • Page 17: Emplacements De Montage

    écrans ne sont pas directement côté. fixer le moniteur maître et le moniteur secondaire. exposés aux rayons du soleil. Prévoyez un espace d'au moins 5 cm de chaque côté. JF-2MED / JF-2HD + 15 cm + 5 cm + 5 cm (6") (2") (2")
  • Page 18 CABLAGE Insérez correctement les câbles dans chaque borne, comme indiqué sur le schéma. DOOR 1 Portier vidéo JF-2MED Moniteur maître AIPH ONE JF-D A JF-DA AIPHON JF-DVF AIPHO JF-DV JF-DV JF-DVF A1 A2 DOOR 2 AIPH ONE JF-D A JF-DA...
  • Page 19 Pour empêcher les courts-circuits, assurez-vous d'avoir coupé les fils inutilisés dans le fond et isolez les extrémités. 1ère unité 2ème unité 1ère unité 2ème unité 3ème unité JF-2MED JF-2HD JF-2MED JF-2HD JF-2HD NP: non polarisé • Contacteur d'impédance (2ème unité) Position ON lorsqu'aucune 3ème unité...
  • Page 20: Montage

    MONTAGE Câblage arrière Vis de montage x 2 Boîte simple JF-2MED JF-2HD 83,5 mm Otez le film protecteur des (3-5/16") écrans du JF2MED et JF2HD. Support de montage 1. Appuyez sur le bornier (pour insérer ou retirer le câble) 2. Introduire le câble dans la borne.
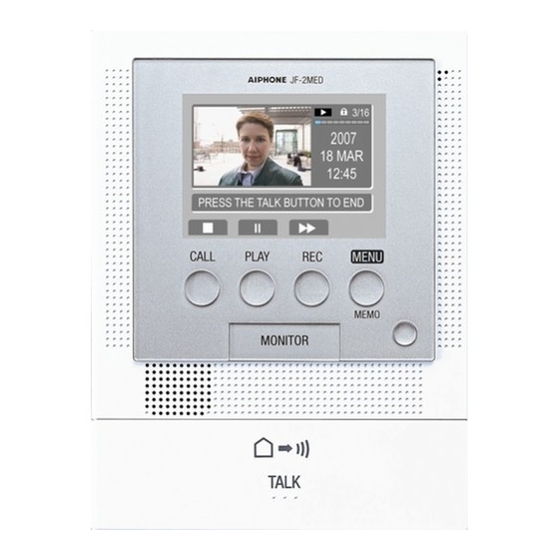
  • Page 21: Methode De Fonctionnement

    Pour rembobiner l'écran de lecture cadre par cadre. REGLAGE Ecrans de réglage et méthodes d'affichage JF-2MED En mode veille, appuyez sur le bouton MENU/MEMO jusqu'à ce Appuyez sur le bouton de lecture (PLAY) ou sur le bouton que l'écran de réglage s'affiche (environ 3 secondes).
  • Page 22: Programmer La Date Et L'heure

    PROGRAMMER LA DATE ET L'HEURE JF-2MED Après avoir effectué les étapes 1 et 2 de la section 7-1, Appuyez sur le bouton d'appel (CALL) pour régler "l'année" puis déplacez le curseur sur "Mois". sélectionnez "PROGRAMMER LA DATE ET L'HEURE" et appuyez sur le bouton d'appel (CALL).
  • Page 23: Programmer La Gache Electrique

    PROGRAMMER LA 2EME PLATINE JF-2MED Lors du branchement de la 2ème platine, sélectionnez Sur l'écran "PROGRAMMER LA 2EME PLATINE", appuyez sur "Vidéo","Audio" ou "Aucun" (poste de porte 2 non branché)". le bouton de lecture (PLAY) ou d'enregistrement (REC) pour Ces opérations doivent être effectuées par un installeur.
  • Page 24: Fonctionnement

    FONCTIONNEMENT Répondre à un appel du portier (mode MAINS LIBRES, mode manuel) Appuyez sur le bouton d'appel (CALL). Fonction d'appel vocal instantané Même si vous ne répondez pas, la zone autour de la porte est visible et audible à l'aide des fonctions vidéo/audio (pendant environ 45 secondes). Les sons intérieurs ne sont pas perceptibles de l'extérieur.
  • Page 25: Message Pour L'entrée

    Message pour l'entrée Pendant la communication, la fonction d'appel vocal Appuyez sur le bouton d'appel (CALL) ou sur le bouton de lecture (PLAY). instantané ou la surveillance de l'entrée, appuyez sur le Le Message sélectionné devient jaune, "ENVOIE DU MESSAGE" s'affiche bouton MENU/MEMO pour afficher l'écran du menu.
  • Page 26: Enregistrement Automatique

    Transfert d'un appel de l'entrée Pendant la communication avec le poste de porte, appuyez sur le Si le bouton parole (TALK) du poste qui reçoit le transfert est enfoncé, bouton d'appel (CALL) pour appeler le poste en transfert. la communication avec le poste de porte est établie (l'écran du poste qui •...
  • Page 27: Lire L'image Enregistrée

    Lire l'image enregistrée Si des images ont été enregistrées automatiquement, par exemple celles lorsque vous étiez sorti, la LED de lecture (rouge) clignote. ∗ De plus, les opérations décrites ci-dessous sont également possibles sur l'écran de lecture. • Bouton d'appel (CALL): Pour afficher l'image précédente (la plus récente).
  • Page 28: Effacer L'image Enregistrée

    18 : 45 VOULEZ-VOUS EFFACER L'IMAGE? 8-12 Enregistrement des mémos vocaux JF-2MED Des mémos vocaux à usage interne peuvent être enregistrés. Appuyez sur le bouton d'appel (CALL) pour terminer l'enregistrement. L'enregistrement peut contenir jusqu'à 3 éléments (environ 15 Autrement, l'opération se termine automatiquement après environ 15 secondes maximum par élément).
  • Page 29: Effacement Des Mémos Vocaux

    8-14 Effacement des mémos vocaux JF-2MED Appuyez sur le bouton MENU/MEMO en mode veille. Appuyez sur le bouton MENU/MEMO. 02 DEC 18:45 02 DEC 18:47 02 DEC 18:48 SELECT PLAY EFFACER Sélectionnez le mémo que vous voulez effacer à l'aide du Appuyez sur le bouton d'appel (CALL) pour effacer.
  • Page 30: Algemene Voorzorgsmaatregelen

    6. Als het toestel defect is of niet naar behoren functioneert, moet u de voeding 5. Steek geen metalen of brandbare voorwerpen in de openingen van de behuizing. Dit loskoppelen of de aan/uit-schakelaars van de JF-2MED en de JF-2HD uitschakelen. kan brand of een elektrische schok veroorzaken.
  • Page 31: Installatie

    Laat minstens 5 cm vrije ruimte hoofdpost en de monitor-bijpost te monteren. rechtstreeks zonlicht. aan beide zijden. JF-2MED / JF-2HD + 15 cm + 5 cm + 5 cm (6") (2") (2")
  • Page 32 BEDRADING Steek de draden degelijk in de juiste aansluiting zoals afgebeeld. DOOR 1 Video-deurpost JF-2MED Monitor-hoofdpost AIPH ONE JF-D A JF-DA AIPHON JF-DVF AIPHO JF-DV JF-DV JF-DVF A1 A2 DOOR 2 AIPH ONE JF-D A JF-DA AIPHON JF-DVF AIPHO JF-DV...
  • Page 33 Oproepen van deurpost 2 Niet gebruikt. Oproepen van deurpost 2 Niet gebruikt. Optionele langeafstandsadapter JBW-BA Gebruik JBW-BA als de bedradingsafstand tussen de JF-DA video-deurpost en JF-2MED 100m tot 300m bedraagt. JF-DV JBW-BA JF-2MED AIPH ONE JF-DA 1. Gebruik een PE (polyethyleen) geïsoleerde kabel JF-DVF met geleiderdiameter volgens onderstaande tabel.
  • Page 34 Menu-/boodschapknop (MENU/MEMO), 2. Het volume van de beltoon en het waarschuwingsgeluid verandert LED-indicatie "boodschap" (rood) (JF-2MED) niet als u de volumeregeling aanpast terwijl ze in werking zijn. Het MENU-knop (JF-2HD) volume wordt pas aangepast bij de volgende oproep of Aan/uit-schakelaar waarschuwing.
  • Page 35: Taal Instellen

    Weergavescherm frame per frame terugspoelen. INSTELLINGEN Instelschermen en weergavemethoden JF-2MED Druk in stand-by op de knop MENU/MEMO totdat het Druk op de knop PLAY of REC om het item te selecteren dat u wilt instelscherm wordt weergegeven (ong. 3 seconden).
  • Page 36: Datum/Tijd Instellen

    DATUM/TIJD INSTELLEN JF-2MED Na het uitvoeren van stappen 1 en 2 in deel 7-1 kiest u Druk op de knop CALL om "Year" (jaar) in te stellen en de cursor te "DATUM/TIJD INSTELLEN" en drukt u op de knop CALL.
  • Page 37: Standaardinstellingen Herstellen

    DEUR 2 INSTELLEN JF-2MED Wanneer u deurpost 2 aansluit, moet u "Video", "Audio" of "None In het scherm "DEUR 2 INSTELLEN" drukt u op de knop PLAY (deurpost 2 niet aangesloten)" instellen. of REC om het type deurpost te kiezen dat is aangesloten.
  • Page 38 BEDIENING Een deuroproep beantwoorden (HANDS-FREE-modus, "druk-om-te-spreken"-modus) Druk op de oproepknop (CALL). Spraakoproepfunctie Zelfs zonder te beantwoorden, krijgt u binnen beeld en geluid van de deurpost (gedurende ong. 45 seconden). Het geluid van binnen is niet hoorbaar buiten. De beltoon weerklinkt, u ziet de bezoeker op het beeldscherm en hoort het geluid van buiten.
  • Page 39 Bericht voor deurpost Druk tijdens de communicatie, spraakoproepfunctie of Druk op de oproepknop (CALL) of de weergaveknop (PLAY). Het ingangsbewaking op de knop MENU/MEMO om het gekozen bericht wordt geel, "BERICHT WORDT VERSTUURD" wordt menuscherm weer te geven. getoond en het gekozen bericht wordt weergegeven op de deurpost. PRE SS THE TALK BUTT ON...
  • Page 40: Handmatige Opname

    Als een oproep van een video-deurpost binnenkomt, begint het toestel automatisch op te nemen. Tijdens de opname knippert de opname-LED (rood) (alleen JF-2MED). • De opname begint ong. 2 seconden na het indrukken van de oproepknop (CALL) op de video-deurpost.
  • Page 41 Opgenomen beeld weergeven Als er automatische beelden zijn opgenomen, bijvoorbeeld tijdens uw afwezigheid, knippert de weergave-LED (rood). ∗ Daarnaast zijn ook de onderstaande bewerkingen mogelijk in het weergavescherm. • Oproepknop (CALL): Weergave van vorig (recenter) beeld. Door de knop 1 seconde of langer in te drukken, kunt u enkel het eerste beeld van elke serie bekijken, vanaf de oudste tot de meest recente datum, zolang de knop ingedrukt blijft.
  • Page 42 18 : 45 BEELD WISSEN? 8-12 Boodschappen opnemen JF-2MED Het is mogelijk om boodschappen op te nemen voor intern gebruik. Druk op de oproepknop (CALL) om de opname te beëindigen. Zo niet, Maximaal 3 boodschappen kunnen worden opgenomen (elk dan eindigt de opname automatisch na ong. 15 seconden.
  • Page 43: Technische Gegevens

    Wanneer echter EXTERNE DETECTOR INSTELLEN is ingesteld , weerklinkt het geluid van JF-2MED met een volume dat overeenkomt met "High" (vast). OPMERKINGEN: 1. De tijd van het waarschuwingsgeluid kan worden ingesteld in EXTERNE DETECTOR INSTELLEN. (Zie deel 7-9) De fabrieksinstelling is 2.
  • Page 44: Garantie

    This equipment has been tested and found to comply with the limits for a Class B digital WARRANTY English device, pursuant to Part 15 of the FCC Rules. These limits are designed to provide reasonable protection against harmful interference in a residential installation. This Aiphone warrants its products to be free from defects of material and workmanship equipment generates, uses, and can radiate radio frequency energy, and if not installed under normal use and service for a period of two years after delivery to the ultimate user...

Ce manuel est également adapté pour:

Jf-2hd

Table des Matières