Table des Matières

Publicité

Les langues disponibles
  • FR

Les langues disponibles

  • FRANÇAIS, page 31

Liens rapides

97024
BEdiEnungs-
anlEitung
V
2A
6A
10A
V
A
10A
%
DE
Bedienungsanleitung
Mikroprozessor Ladegerät Lt10
GB
Instructions for use
Microprocessor charger Lt10
FR
Mode d'emploi
Chargeur à microprocesseur Lt10
IT
Manuale d'istruzioni
Caricabatterie con microprocessore Lt10
CZ
Návod k obsluze
Mikroprocesorová nabíječka Lt10
SK
Návod na obsluhu
Mikroprocesorová nabíjačka batérií Lt10
A
V/A/%

Publicité

Table des Matières
loading

Sommaire des Matières pour AEG 97024

  • Page 1 97024 Bedienungsanleitung Mikroprozessor Ladegerät Lt10 Instructions for use Microprocessor charger Lt10 Mode d’emploi Chargeur à microprocesseur Lt10 Manuale d’istruzioni Caricabatterie con microprocessore Lt10 Návod k obsluze Mikroprocesorová nabíječka Lt10 Návod na obsluhu Mikroprocesorová nabíjačka batérií Lt10 BEdiEnungs- anlEitung V/A/%...
  • Page 2 DE - Seite 3 Vor jeder Benutzung unbedingt lesen. Anleitung und Ratschläge befolgen. GB - Page 17 Read these instructions before using the charger. Follow all instructions and recommendations. FR - Page 31 Veuillez lire les présentes instructions avant toute utilisation de l’appareil et suivre les conseils mentionnés ici.
  • Page 3: Table Des Matières

    INhALT Einleitung ................... . 4 Bestimmungsgemäßer Gebrauch.
  • Page 4: Einleitung

    EINLEITUNG Erklärung der Symbole und Signalworte, die in dieser Bedienungsanleitung und/oder am Gerät verwendet werden: Beachten Sie diese Bedienungsanleitung bei der Verwendung des Geräts. Lebens- und Unfallgefahr für Kinder! Beachten Sie Warn- und Sicherheitshin- weise! Gerät nur an witterungsgeschützten Stand- orten verwenden! Schutzisoliertes Gehäuse (Schutzklasse II)
  • Page 5: Bestimmungsgemäßer Gebrauch

    Das Ladegerät ist zum Aufladen von offenen und Modell LT10 einer Vielzahl von geschlossenen, wartungsfreien Blei-Säure-Akkus (Batterien) hergestellt, wie sie Artikelnummer 97024 in Autos, Schiffen, LKW und anderen Fahrzeugen Eingangsspannung 220 - 240 V AC eingebaut sind z. B.: •...
  • Page 6 Der hersteller ist nicht verantwortlich für Schäden Explosions- und Brandgefahr! verursacht durch: • • Unsachgemäßen Anschluss und/oder Betrieb. Beim Laden der Batterie kann Knallgas (gasför- • Äußere Krafteinwirkung, Beschädigungen des miger Wasserstoff und Sauerstoff) entstehen. Geräts und/oder Beschädigungen von Teilen des Beim Kontakt mit offenem Feuer (Flamme, Glut, Geräts durch mechanische Einwirkungen oder...
  • Page 7 Deutsch • Beschädigungsgefahr Entfernen Sie das Gerät und das Polanschlusska- • bel mit Klemmen von der Batterie, bevor Sie mit Platzieren Sie das Gerät niemals über oder in Ihrem Fahrzeug fahren. Nähe der zu ladenden Batterie. Gase aus der Bat- Wenn Sie das Polanschlusskabel mit Ringösen terie können das Gerät beschädigen.
  • Page 8: Produktübersicht

    PRODUKTÜBERSICHT 15 16 17 18 V/A/% 11 10 Bezeichnung Funktion zur Spannungswahl. Taste 12 V / 24 V Anzeige im Display (12 P oder 24 P) entsprechend der Auswahl. zur Auswahl des Ladestroms. Taste 2 A / 10 A / 20 A Anzeige mit der entsprechenden LED (siehe Pos.
  • Page 9: Funktionen

    Deutsch Bezeichnung Funktion Anzeige des ausgewählten Ladestroms (nur im Lademodus). LED (rot) 2 A / 6 A / 10 A Umschaltbar über Taste (2). Polanschlusskabel (+) Zum Anschluss des Ladegeräts an die Batterie (+ Pol) mit Klemme (rot) Polanschlusskabel (-) Zum Anschluss des Ladegeräts an die Batterie (- Pol) mit Klemme (schwarz) Netzkabel mit Netzstecker...
  • Page 10: Bedienung

    BEDIENUNG Die LED „Power“ (15) leuchtet. 5. Stellen Sie vor Ladebeginn sicher, dass die am Ladegerät eingestellte Ladespannung (12 V /24 Vor dem Gebrauch V) der angeschlossene Batterie entspricht. Eine Warnung! zu hoch eingestellte Ladespannung kann zu Beschädigung/Zerstörung der angeschlossenen Stellen Sie vor Gebrauch des Geräts sicher, dass...
  • Page 11: Überbrückungsstrom (Power Supply)

    Deutsch Überbrückungsstrom (Power Supply) Automatischer Temperaturausgleich Während eines Batteriewechsels versorgt das Ladegerät das Fahrzeug mit Strom (13,6 V±0,3 V, Umgebungstem- 12 V 24 V 7 A±1 A) und es gehen keine Daten verloren. peratur ±0,25 V ±0,25 V ±2 º 1.
  • Page 12: Ladevorgang Beenden Und Ladegerät Trennen

    • Ladevorgang beenden und Ladegerät trennen Durch die Sicherheitsschaltung beginnt das Ladegerät nicht mit dem Ladevorgang, wenn die 1. Beenden Sie den Ladevorgang durch Drücken Spannung unter 1,5 ± 0,5 V liegt. der Taste „START / STOP“ (3). •...
  • Page 13: Sicherheitsfunktionen

    Deutsch SICHERHEITSFUNKTIONEN • Das Ladegerät ist mit folgenden Schutzeinrichtun- Kurzschluss (defekte Batterie) • gen versehen, um Beschädigungen des Ladegeräts Falschanschluss (Anschluss mit umgekehrter und der Batterie oder des Fahrzeugs zu vermeiden: Polarität) • Funkenbildung • Überhitzung • Überstrom • Überladung FEhLERSUChE Fehler/Problem Mögliche Ursache...
  • Page 14: Reinigung, Pflege Und Wartung

    REINIGUNG, PFLEGE UND WARTUNG • Reinigen Sie die Batterieklemmen jedes Mal nach Beendigung des Ladevorgangs. Wischen Sie, um Korrosion zu vermeiden, jegliche Batterieflüssig- keit ab, die eventuell mit den Batterieklemmen in Kontakt gekommen ist. • Rollen Sie die Kabel ordentlich auf, wenn Sie das Gerät lagern.
  • Page 15 Deutsch...
  • Page 16 www.aeg-automotive.com...
  • Page 17 TABLE OF CONTENTS Introduction ..................18 Normal use .
  • Page 18: Introduction

    INTRODUCTION Explanation of symbols and signal words used in these operating instructions and/or the device: Follow instructions when using the machine. Risk of bodily or fatal injury to children! Follow warnings and safety instructions! Only use device in locations protected from...
  • Page 19: Normal Use

    The charger is intended for charging open and Model LT10 a variety of closed, maintenance-free lead-acid rechargeable batteries (batteries) as found in cars, Item number 97024 boats, lorries and other vehicles, e.g.: • Input 220 - 240 V AC wet batteries (WET) 50/60 hz •...
  • Page 20: Safety

    SAFETy Risk of chemical burns! • Batteries contain acid, which could damage the General Safety Guidelines eyes and skin. Charging batteries further genera- Read all safety guidelines and instructions. Non- tes gasses and vapours hazardous to the health. compliance with safety guidelines and instructions •...
  • Page 21 English 21 Risk of electrical shock! Risk of injury! • • Chargers may interfere with the operation of Never attempt to charge non-rechargeable, active electronic implants, e.g. pacemakers, thus damaged or frozen batteries. • pose a personal hazard. Do not use this device to charge dry cell batteries. •...
  • Page 22: Product Overview

    PRODUCT OVERVIEW 15 16 17 18 V/A/% 11 10 Description Function to select the voltage. 12 V / 24 V button The display shows the respective selection (12P or 24P). to select the charging current. 2 A / 10 A / 20 A button Displayed with the respective LED (see no.
  • Page 23: Functions

    English 23 Description Function Displays the selected charging current (in charging mode only). LED (red) 2 A / 6 A / 10 A Switch with the button (2). Terminal connection cable (+) To connect the charger to the battery (+ terminal) with clamp (red) Terminal connection cable (-) To connect the charger to the battery (- terminal)
  • Page 24: Operation

    OPERATION 5. Before beginning the charging process, ensure the charging voltage (12 V/24V) the charger is set to matches the connected battery. Selecting Before use the charging current too high can damage/dest- roy the connected battery. Warning! Start charging...
  • Page 25: Bridging Power Supply

    English 25 Bridging power supply Automatic temperature adjustment While changing the batteries, the charger provides the vehicle with electricity (13,6 V±0,3 V, 7 A±1 A) Automatic tempe- 12 V 24 V and no data is lost. rature adjustment ±0.25 V ±0.25 V ±2 º...
  • Page 26: Completing Charging And Disconnecting The Charger

    Completing charging and disconnecting the Step 1: Condition check charger The charger checks the battery condition and calcu- lates the required 1. Press the „START / STOP“ button (3) to finish charging parameters. the charging process. 2. First, remove the plug from the 230V power Step 2: Desulphation (rescue) socket.
  • Page 27: Safety Functions

    English 27 SAFETy FUNCTIONS • The charger features the following safety features incorrect connection (connected with reversed to prevent damage to the charger and the battery polarity), • or the vehicle: sparking • • Short circuit (defective battery), overheating • excess current •...
  • Page 28: Cleaning, Care And Maintenance

    CLEANING, CARE AND MAINTENANCE • Clean clamps after every charging. To prevent corrosion, wipe off any battery fluid which may have come into contact with the clamps. • Carefully wind the cable when storing the device. This will help prevent accidental damage to the cable and the device.
  • Page 29 English 29...
  • Page 30 www.aeg-automotive.com...
  • Page 31 TABLE DES MATIèRES Introduction ..................32 Utilisation conforme.
  • Page 32: Introduction

    INTRODUCTION Explication des symboles et mots d’avertissements qui sont utilisés dans la présente notice d’explication et/ou sur l’appareil: Lorsque vous utilisez l’appareil, veuillez vous conformer à la présente notice d’utilisation. Risque d’accident et danger de mort pour les enfants ! Veuillez respecter les consignes de mise en garde et de sécurité...
  • Page 33: Utilisation Conforme

    Ce chargeur est conçu pour recharger toutes les Modèle LT10 batteries au plomb (accumulateurs plomb-acide) ouvertes ainsi qu’un grand nombre de batteries fer- 97024 Numéro d’article mées ne demandant aucun entretien comme celles 220 - 240 V AC installées dans les voitures, les bateaux, les camions Tension d’entrée...
  • Page 34 Le fabricant n’est pas responsable des dommages Risque d’explosion et d’incendie ! causés par: • • un raccordement et/ou une utilisation non De l’hydrogène gazeux (gaz détonant) peut se conformes, former lorsque la batterie est en charge. Une •...
  • Page 35 Français 35 Risque de choc électrique ! Risque de blessure ! • • Les chargeurs peuvent gêner le fonctionnement N’essayez jamais de charger des batteries non des implants électroniques comme les pacema- rechargeables, endommagées ou gelées. • kers cardiaques et ainsi mettre en danger les N’utilisez pas l’appareil pour charger des batteries personnes.
  • Page 36: Aperçu Du Produit

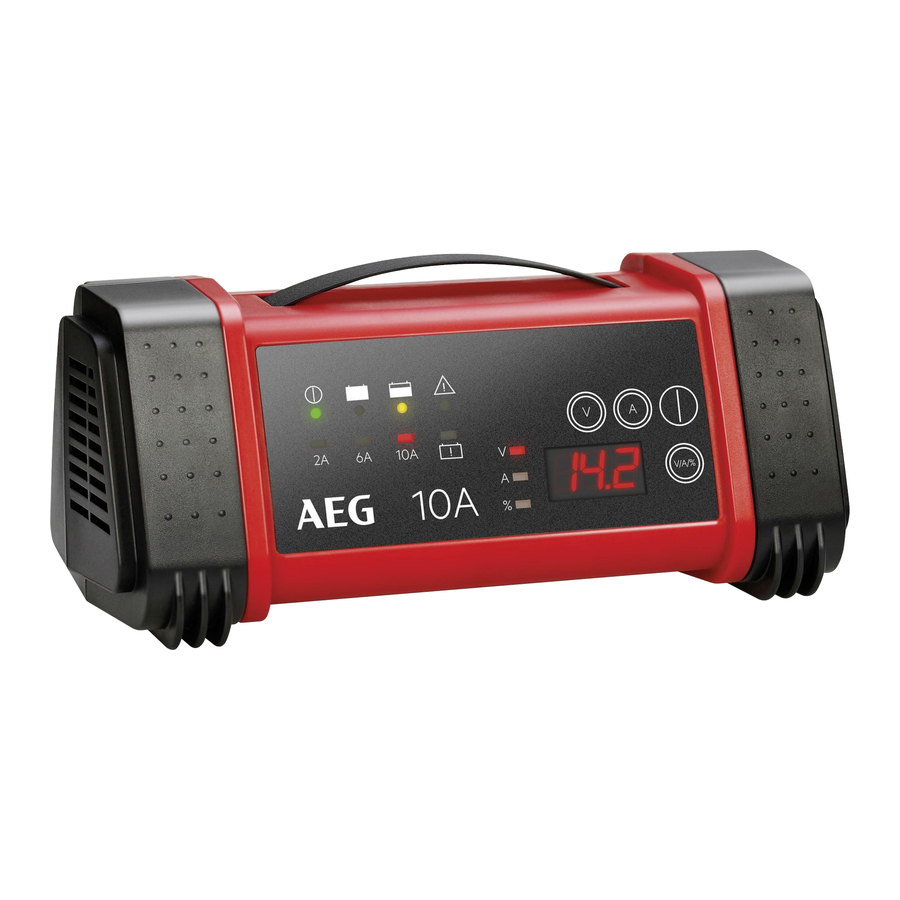
    APERçU DU PRODUIT 15 16 17 18 V/A/% 11 10 Dénomination Fonction Pour la sélection de tension. Touche 12 V / 24 V Indication sur l’afficheur (12P ou 24P) selon la sélection. Pour la sélection du courant de charge.
  • Page 37: Fonctions

    Français 37 Dénomination Fonction S’allume lorsque la tension de batterie se trouve dans la plage LED (rouge) Bad Battery 0,5 V - 1,5 V. Affichage du courant de charge sélectionné (uniquement en mode de LED (rouge) 2 A / 6 A / 10 A charge).
  • Page 38: Utilisation

    UTILISATION Le voyant LED « Power » (15) s’allume. 5. Assurez-vous avant le début de la charge que la tension réglée sur le chargeur (12 V/24V) Avant l’utilisation correspond à celle de la batterie branchée. Un Avertissement ! tension de charge sélectionnée trop élevée peut conduire à...
  • Page 39: Courant De Transfert (Power Supply)

    Français 39 Courant de transfert (Power Supply) Compensation automatique de température Pendant un remplacement de batterie, le chargeur Température 12 V 24 V alimente le véhicule en électricité (13,6 V±0,3 V, ambiante ±0,25 V ±0,25 V 7 A±1 A). Aucune donnée n‘est ainsi perdue. ±2 º...
  • Page 40: Terminer Le Processus De Charge Et Débrancher Le Chargeur

    Terminer le processus de charge et débrancher Étape 1 : Vérification d‘état le chargeur Le chargeur vérifie l‘état de batterie et calcule les paramètres de charge nécessaire. 1. Achevez le processus de charge en pressant la touche « START / STOP » (3).
  • Page 41: Fonctions De Sécurité

    Français 41 FONCTIONS DE SéCURITé • Le chargeur est équipé des dispositifs de protection branchement erroné (branchement avec polarité suivants permettant d’éviter des détériorations du inversée), • chargeur et de la batterie ou du véhicule : formations d’étincelles • • court-circuit (batterie défectueuse), surchauffe •...
  • Page 42: Nettoyage, Entretien Et Maintenance

    NETTOyAGE, ENTRETIEN ET MAINTENANCE • Nettoyez la pince à chaque fois une fois que le processus de charge est terminé. Essuyez tout li- quide de la batterie pouvant être entré en contact avec les pinces pour éviter toute corrosion.
  • Page 43 Français 43...
  • Page 44 www.aeg-automotive.com...
  • Page 45 SOMMARIO Introduzione ..................46 Uso conforme.
  • Page 46: Introduzione

    INTRODUZIONE Spiegazione dei simboli e dei termini di avverten- za utilizzati in queste istruzioni per l’uso e/o sul dispositivo: Per l’utilizzo del dispositivo attenersi a queste istruzioni. Pericolo di vita e di incidenti per i bambini! Rispettare le istruzioni e le avvertenze per...
  • Page 47: Uso Conforme

    Questo caricabatterie è adatto per ricaricare le Modello LT10 batterie piombo-acido aperte e molti accumulatori (batterie) piombo-acido chiusi che non necessitano 97024 Codice articolo manutenzione, quali i tipi impiegati su auto, navi, 220 - 240 V AC autocarri e altri veicoli, ad esempio: Potenza assorbita •...
  • Page 48 Il produttore non è da considerarsi responsabile per Pericolo d’esplosione e d’incendio! danni causati da: • • Collegamento e/o funzionamento non corretto. Durante la ricarica della batteria può prodursi gas • Azioni violente esterne, danni al dispositivo e/o a tonante (ossigeno e idrogeno in forma gassosa).
  • Page 49 Italiano 49 Pericolo di folgorazione! Pericolo di lesioni! • • I caricabatterie possono condizionare il funzio- Non cercare mai di caricare batterie danneggiate, namento di impianti elettronici, quali ad esempio non ricaricabili o congelate. • i pace-maker, e quindi essere pericolosi per le Non utilizzare il caricabatterie per caricare persone che li portano.
  • Page 50: Descrizione Del Prodotto

    DESCRIZIONE DEL PRODOTTO 15 16 17 18 V/A/% 11 10 Denominazione Funzione Per la selezione della tensione. Tasto 12 V / 24 V Visualizzazione nel display (12P o 24P) in base alla selezione effettuata. Per la selezione della corrente di carica.
  • Page 51: Funzioni

    Italiano 51 Denominazione Funzione LED “Bad Battery” (rosso) Si illumina se la tensione batteria è tra 0,5 V e 1,5 V. Visualizzazione della corrente di carica selezionata (solo in modalità di LED 2 A / 6 A / 10 A (rosso) carica).
  • Page 52: Utilizzo

    UTILIZZO Il LED “Power” (15) si illumina. 5. Assurez-vous avant le début de la charge que la tension réglée sur le chargeur (12 V/24V) Prima dell’uso correspond à celle de la batterie branchée. Un Avvertenza! tension de charge sélectionnée trop élevée peut conduire à...
  • Page 53: Corrente Bypass (Power Supply)

    Italiano 53 Corrente bypass (Power Supply) Bilanciamento automatico della temperatura Durante la sostituzione della batteria del veico- lo il caricabatterie fornisce corrente al veicolo Temperatura 12 V 24 V (13,6 V±0,3 V, 7 A±1 A), così i dati non vanno perduti. ambiente ±0,25 V ±0,25 V...
  • Page 54: Fine Del Processo Di Ricarica E Stacco Del Caricabatterie

    Fine del processo di ricarica e stacco del carica- Passo 1: verifica dello stato batterie Il caricabatterie verifica lo stato della batteria e calcola i parametri di ricarica 1. Terminare il processo di ricarica premendo il necessari. tasto “START / STOP” (3).
  • Page 55: Funzioni Di Sicurezza

    Italiano 55 FUNZIONI DI SICUREZZA • Il caricabatterie è provvisto di funzioni di sicurezza cortocircuito (batteria difettosa), • che proteggono la batteria, il veicolo e lo stesso cari- collegamento errato (polarità invertita), • cabatterie dal rischio di danneggiamenti dovuti a: scintille •...
  • Page 56: Pulizia, Manutenzione Eriparazioni

    PULIZIA, MANUTENZIONE E RIPARAZIONI • Pulire sempre i morsetti dopo la ricarica. Per evitare la corrosione, pulire i morsetti da eventuali residui di liquido batteria. • Avvolgere con cura i cavi del dispositivo prima di riporlo. Ciò aiuta a evitare danneggiamenti accidentali ai cavi del dispositivo.
  • Page 57 Italiano 57...
  • Page 58 www.aeg-automotive.com...
  • Page 59 OBSAH Úvod ....................60 Použití...
  • Page 60: Úvod

    ÚVOD Vysvětlení symbolů a signální slov, použitých v tomto návodu k obsluze nebo na přístroji: Při používání přístroje dbejte vždy na tento návod k obsluze. Nebezpečí ohrožení života a nehody pro malé děti! Dbejte na výstražná a bezpečnostní upozornění! Přístroj používat jen v místech chráněných...
  • Page 61: Použití Ke Stanovenému Účelu

    Technická data Nabíječka je vyrobena k nabíjení otevřených a Model LT10 početných uzavřených, bezúdržbových kyselino- olovnatých akumulátorů (baterií), vestavěných v 97024 Číslo artiklu osobních autech, lodích, nákladních automobilech a 220 - 240 V AC jiných vozidlech, jako například: Vstup napětí...
  • Page 62 Výrobce neponese žádnou odpovědnost za škody Nebezpečí výbuchu a požáru! způsobené: • • Nesprávným připojením a / nebo použitím. Při nabíjení baterie se může tvořit plynný vodík • Působením vnější síly, poškozením zařízení a / (Oxyhydrogen). Při kontaktu s otevřeným ohněm nebo poškozením součástí...
  • Page 63 Česky 63 Nebezpečí zásahu elektrickým proudem Nebezpečí zranění! • • Nabíječky mohou rušit aktivní implantáty jako Nenabíjejte nikdy vadné nebo zmrzlé baterie ani např. kardiostimulátory a ohrozit tím dotyčné baterie, které nejsou určené k nabíjení. • osoby. Nepoužívejte přístroj k nabíjení baterií se suchými •...
  • Page 64: Popis Výrobku

    POPIS VýROBKU 15 16 17 18 V/A/% 11 10 Č. Název Funkce pro volbu napětí. Tlačítko 12 V / 24 V Zobrazení na displeji (12P nebo 24P) podle výběru. pro volbu nabíjecího proudu. Tlačítko 2 A / 10 A / 20 A Zobrazení...
  • Page 65: Funkce

    Česky 65 Č. Název Funkce Zobrazení zvoleného nabíjecího proudu (jen v režimu nabíjení). LED (červená) 2 A / 6 A / 10 A Přepínání je možné tlačítkem (2). Připojovací kabel (+) Pro připojení nabíječky na baterii (+ pól) se svorkou (červený) Připojovací...
  • Page 66: Použití

    POUžITí LED „Power“ (15) svítí. 5. Před nabíjením zkontrolujte, jestli odpovídá nabíjecí napětí (12 V nebo 24 V), nastavené na Před použitím nabíječce, napětí připojené baterie. Příliš vysoké Varování! nabíjecí napětí může vést k poškození nebo zničení připojené baterie.
  • Page 67: Přemostěné Proudu (Power Supply)

    Česky 67 Přemostěné proudu (Power Supply) Automatické vyrovnávání teploty Během výměny baterie napájí nabíječka vozidlo proudem (13,6 V±0,3 V, 7 A±1 A) a nedojde tím ke Teplota okolního 12 V 24 V ztrátě dat. prostředí ±0,25 V ±0,25 V ±2 º...
  • Page 68: Ukončení Nabíjení A Odpojení Nabíječky

    Ukončení nabíjení a odpojení nabíječky Krok 1: Kontrola stavu Nabíječka kontroluje stav baterie a vypočítá otřebné 1. Ukončete nabíjení stisknutím tlačítka „START / parametry nabíjení. STOP“ (3). 2. Vytáhněte nejdříve síťovou zástrčku ze zásuvky s Krok 2: Záchrana napětím 230 V.
  • Page 69: Bezpečnostní Funkce

    Česky 69 BEZPEČNOSTNí FUNKCE • Nabíječka je vybavena následujícími, ochrannými Zkrat (vadná baterie), • funkcemi, aby se zabránilo jejímu poškození nebo Nesprávné připojení (připojení s opačnou pola- poškození baterie a vozidla: ritou), • Jiskření • přehřátí • nadproud • přebití ANALýZA PORUCH Chyba/Problém Možné...
  • Page 70: Čištění, Ošetřování Aúdržba

    ČIšTěNí, OšETřOVáNí A ÚDRžBA • Po každém nabíjení vyčistěte svorky. Otírejte vždy tekutinu z baterie, která zůstala na svorkách, aby jste zabránili korozi. • Před skladováním přístroje pečlivě stočte kabely. Toto pomáhá vyloučit nechtěné poškození kabelů a přístroje. •...
  • Page 71 Česky 71...
  • Page 72 www.aeg-automotive.com...
  • Page 73 OBSAH Úvod ....................74 Používanie v súlade s určeným účelom .
  • Page 74: Úvod

    ÚVOD Význam symbolov a výstražných upozornení, ktoré sú používané v tomto návode na používanie a/alebo na prístroji: Pri používaní prístroja dodržiavajte tento návod na ovládanie. Nebezpečenstvo ohrozenia života a nehody pre deti! Rešpektujte varovné a bezpečnostné pokyny! Prístroj používajte iba na miestach chráne- ných pred poveternostnými vplyvmi!
  • Page 75: Používanie V Súlade S Určeným Účelom

    Technické údaje Nabíjačka je určená na nabíjanie otvorených a Model LT10 mnohých uzatvorených, bezúdržbových olovo- kyselinových akumulátorov (batérií), ktoré sú 97024 Číslo výrobku zabudované v automobiloch, lodiach, nákladných 220 - 240 V AC automobiloch a iných vozidlách, napr.: Príkon •...
  • Page 76 Výrobca neponesie žiadnu zodpovednosť za škody Nebezpečenstvo explózie a spôsobené: požiaru! • Nesprávnym pripojením a / alebo použitím. • • Pôsobením vonkajšej sily, poškodením zariadenia Pri nabíjaní batérie môže vznikať plynný vodík a / alebo poškodením častí zariadenia mecha- (výbušný...
  • Page 77 Slovenčina 77 Nebezpečenstvo zásahu elektrickým Nebezpečenstvo poranenia! prúdom! • Nikdy sa nepokúšajte dobíjať nedobíjateľné, • Nabíjačky batérií môžu rušiť činnosť aktívnych poškodené alebo zamrznuté batérie. • elektronických implantátov ako je napr. kardiosti- Nabíjačku batérií nikdy nepoužívajte na nabíjanie mulátor a tým ohroziť osoby. batérií...
  • Page 78: Prehľad Produktu

    PREHľAD PRODUKTU 15 16 17 18 V/A/% 11 10 Č. Označenia Funkcia pre výber napätia. Tlačidlo 12 V / 24 V Zobrazenie na displeji (12P alebo 24P) príslušne k voľbe. pre výber nabíjacieho prúdu. Tlačidlo 2 A / 10 A / 20 A Zobrazenie s príslušnou LED-kontrolkou (pozri polohu 11).
  • Page 79: Funkcie

    Slovenčina 79 Č. Označenia Funkcia Zobrazenie zvoleného nabíjacieho prúdu (len v nabíjacom režime). LED-kontrolka (červená) 2 A / 6 A / 10 A Prepínateľné tlačidlom (2). Pólový pripojovací kábel (+) Pre pripojenie nabíjačky na batériu (+ pól) so svorkou (červená) Pólový...
  • Page 80: Použitie

    POUžITIE LED-kontrolka „Power“ (15) svieti. 5. Před nabíjením zkontrolujte, jestli odpovídá nabíjecí napětí (12 V nebo 24 V), nastavené na Pred použitím nabíječce, napětí připojené baterie. Příliš vysoké Varovanie! nabíjecí napětí může vést k poškození nebo zničení připojené baterie.
  • Page 81: Premosťovací Prúd (Power Supply)

    Slovenčina 81 Premosťovací prúd (Power Supply) Automatická kompenzácia teploty Počas výmeny batérie nabíjačka dodáva vozidlu prúd (13,6 V±0,3 V, 7 A±1 A) a nestratia sa žiadne Teplota okolia 12 V 24 V údaje. ±2 ±0,25 V ±0,25 V º 1. Nabíjačku pripojte k batérii. ≤...
  • Page 82: Ukončenie Procesu Nabíjania A Odpojenie Nabíjačky

    Ukončenie procesu nabíjania a odpojenie Krok č. 1: Kontrola stavu nabíjačky Nabíjačka skontroluje stav batérie a vypočíta po- trebné nabíjacie parametre. 1. Nabíjanie ukončite stlačením tlačidla „START / STOP“ (3). Krok č. 2: Desulfatizácia (revitalizácia) 2. Najskôr vytiahnite zástrčku z 230 V elektrickej •...
  • Page 83: Bezpečnostné Funkcie

    Slovenčina 83 BEZPEČNOSTNé FUNKCIE • Nabíjačka je vybavená nasledovnými ochranný- Skrat (poškodená batéria), • mi zabezpečeniami zabraňujúcimi poškodenie Nesprávne pripojenie (opačná polarita) • nabíjačky a batérie alebo vozidla: Iskrenie • prehrievanie • nadmerný prúd alebo • nadmerné nabitie ANALýZA CHýB Chyba/problém Možné...
  • Page 84: Čistenie, Starostlivosť Aúdržba

    ČISTENIE, STAROSTLIVOSť A ÚDRžBA • Po každom ukončení nabíjacieho procesu vyčistite svorky. Aby ste predišli korózii, utrite každú baté- riovú tekutinu, ktorá sa môže eventuálne dostať do kontaktu so svorkami. • Keď prístroj skladujete, dôkladne navite kábel. Tým predídete prípadným poškodeniam kábla a prístroja.
  • Page 85 Slovenčina 85...
  • Page 87 AEG is a registered trademark used under license from AB Electrolux (publ).
  • Page 88 MTS MarkenTechnikService Gmbh & Co. KG Benzstr. 1 D-76185 Karlsruhe ▪ SPA SystemPartner GmbH & Co. Industriestr. 31 CH-8112 Otelfingen ▪ SPA Systems s.r.o. Pod Višňovkou 1661/37 140 00 Praha 4 - Krč, CZ ▪ www.aeg-automotive.com Stand der Informationen: 05/ 2017 EAN: 4038373970244...

Table des Matières