Publicité

Les langues disponibles

Les langues disponibles

Liens rapides

Libretto istruzioni
Instruction booklet
Notice d'emploi et d'entretien
COD. 5.471.084.576
VORTICE LIMITED
Beeches House - Eastern Avenue
Burton on Trent
DE13 0BB
Tel. (+44) 1283-492949
Fax (+44) 1283-544121
UNITED KINGDOM
VORT SUPER DRY
VORTICE FRANCE
72 Rue Baratte-Cholet
94106 Saint Maur Cedex
Tel. (+33) 1-55.12.50.00
Fax (+33) 1-55.12.50.01
FRANCE
20/12/2016
VORTICE ELETTROSOCIALI
S.p.A.
Strada Cerca, 2 - frazione di Zoate
20067 TRIBIANO (MI)
Tel. (+39) 02-90.69.91
Fax (+39) 02-90.64.625
ITALIA

Publicité

Table des Matières
loading

Sommaire des Matières pour Vortice VORT SUPER DRY

  • Page 1 Libretto istruzioni Instruction booklet Notice d’emploi et d’entretien VORT SUPER DRY COD. 5.471.084.576 20/12/2016 VORTICE LIMITED VORTICE ELETTROSOCIALI VORTICE FRANCE Beeches House - Eastern Avenue S.p.A. 72 Rue Baratte-Cholet Burton on Trent Strada Cerca, 2 - frazione di Zoate 94106 Saint Maur Cedex...
  • Page 2: Table Des Matières

    Specifications....... 16 instructions carefully. Vortice will not accept any Safety ........17 Parts name and dimension drawing .
  • Page 3: Funzioni

    ITALIANO Funzioni • Asciugatura delle mani igienica, senza contatto. • Risparmio energetico grazie a un'asciugatura ultra rapida. • Pratico ed economico. • Timer antivandalismo per un uso senza problemi. • Elimina la necessità di usare asciugamani di tessuto o di carta; minore produzione di rifiuti. •...
  • Page 4: Sicurezza

    ITALIANO Sicurezza Attenzione: questo simbolo indica che è necessario prendere precauzioni per evitare danni all’utente • Non tentare di installare l'apparecchio da soli; l'installazione deve essere eseguita solo da un tecnico dell'assistenza qualificato. Altrimenti si rischia di pregiudicare la sicurezza e il corretto funzionamento dell'apparecchio. •...
  • Page 5: Nomenclatura Delle Parti E Disegno Di Ingombro

    ITALIANO Nomenclatura delle parti e disegno di ingombro Interruttore Alimentazione elettrica Interruttore riscaldamento velocità Coperchio tempo di asciugatura spia di spia e indicazione guasti alimentazione di autodiagnosi zona di asciugatura accensione/ illuminazione spegnimento sensore tubo di scarico filtro aria corpo serbatoio di recupero posizione della scatola fusibili...
  • Page 6: Utilizzo Dell'apparecchio

    ITALIANO Utilizzo dell’apparecchio Vedi fig.4: - Pulsante “Interruttore riscaldamento” OFF: resistenza spenta, per funzionamento estivo; - Pulsante “Interruttore riscaldamento” ON: - pulsante “Interruttore velocità” L: resistenza sempre accesa; - pulsante “interruttore velocità” H: resistenza accesa se T ambiente < 20°C, spenta se T ambiente > 25°C. •...
  • Page 7: Manutenzione/Pulizia

    ITALIANO Manutenzione/pulizia AVVERTENZA • Prima di pulire l'apparecchio, spegnere l'interruttore principale. • Evitare di spruzzare acqua sull'apparecchio ATTENZIONE • Indossare dei guanti per effettuare la pulizia dell'apparecchio. • Il rivestimento antibatterico è efficace contro i batteri presenti sulle superfici dell'apparecchio). •...
  • Page 8 ITALIANO (Fig.14) • Aggiungere 200 cc d'acqua nel foro di scarico (per evitare intasamenti). • Prima di utilizzare l'apparecchio controllare che il serbatoio di recupero dell'acqua sia in posizione. foro di scarico (Fig.15) (Fig.16) Pulizia del filtro dell’aria Pulizia Settimanale •...
  • Page 9: Diagnosi Dei Guasti, Schema Elettrico

    ITALIANO Diagnosi dei guasti, schema elettrico Se si verifica uno delle situazioni seguenti, controllare l'apparecchio e procedere come segue: Problema Controllo Intervento • Le spie del display sono accese? • Inserire l'interruttore differenziale salvavita. L'asciugamani non soffia aria • L'interruttore di accensione/ •...
  • Page 10 ITALIANO Schema elettrico (Fig.17) Schema elettrico Motore Fusibile Interruttore sonda interruttori interruttore temperatura termici protezione accensione di sicurezza termica /spegnimento Morsettiera Fusibile sonda sonda compensazione temperatura PCB ricezione PCB avvio sensori sensori Stato Descrizione Stato Descrizione Soluzione Controllare lil collegamento alla rete Assenza di alimentazione e spegnere Tensione di ingresso...
  • Page 11: Precauzioni Prima Dell'installazione

    ITALIANO Precauzioni prima dell’installazione dell’apparecchio Evitare di installare l'asciugamani negli ambienti sottoelencati al fine di prevenire possibili anomalie di funzionamento dell'apparecchio: • Luoghi in cui la temperatura ambiente può oltrepassare i limiti dei -10°C o +40°C. • Ambienti in cui l'apparecchio può bagnarsi. •...
  • Page 12: Installazione

    ITALIANO Installazione N.B. Se l’apparecchio è munito di spina ignorare le istruzioni che descrivono i collegamenti elettrici. • Utilizzare una corrente alternata monofase. (Da non utilizzare in caso di alimentazione di rete che si discosta di ± 10 % rispetto al valore nominale della tensione.) •...
  • Page 13 ITALIANO (Fig.24) Tirare i due fili indipendenti del cavo di alimentazione presa di gancio alimentazione superiore nell'apparecchio e fissarli. L'asciugamani viene consegnato completo di cavo di power cord power cord alimentazione. Se si intende sostituirlo, procedere come segue. • Tirare il cavo di alimentazione attraverso il foro dedicato cavo elettrico sul retro dell'apparecchio, fissare la parte posteriore ai 3 ganci situati sul pannello di montaggio e assicurare il tutto...
  • Page 14: Prova Di Funzionamento

    ITALIANO (Fig.27) Fissare il coperchio frontale • Inserire i 3 nottolini di bloccaggio del coperchio frontale nell'apparecchio. corpo • Rimettere a posto le 2 viti rimosse. • Fissare il serbatoio di recupero. pannello frontale • Assicurarsi che il filtro dell'aria sia inserito a fondo. vite di montaggio serbatoio di recupero filtro...
  • Page 15: Informazione Importante Per Lo Smaltimento Ambientalmente Compatibile

    ITALIANO Informazione importante per lo smaltimento ambientalmente compatibile IN ALCUNI PAESI DELL'UNIONE EUROPEA QUESTO PRODOTTO NON RICADE NEL CAMPO DI APPLICAZIONE DELLA LEGGE NAZIONALE DI RECEPIMENTO DELLA DIRETTIVA RAEE E QUINDI NON È IN ESSI VIGENTE ALCUN OBBLIGO DI RACCOLTA DIFFERENZIATA A FINE VITA. Questo prodotto è...
  • Page 16: Features

    ENGLISH Features • Drying hands without contact, it’s hygienic • Electricity cost saving because of drying hands at high speed • It's economic &practical • Anti-damage timer, use unworried • Do not use towels & tissues, no dispose of waste •...
  • Page 17: Safety

    ENGLISH Safety Attention: this symbol indicates that care must be taken to avoid injury to the user • Do not attempt to install the unit yourself unless you are a trained services technician. Otherwise, this may affect the safety and proper functioning of the unit. •...
  • Page 18: Parts Name And Dimension Drawing

    ENGLISH Parts name and dimension drawing heating button speed button cover drying time and fault display power indicator self-check indicator hand drying area lamp power switch sensor drain hose air filter unit drain tank posizione della terminal box location scatola fusibili pannello installazione installation panel foro di passaggio del...
  • Page 19: Using The Unit

    ENGLISH Using the unit See fig. 4: - Heating switch button OFF: heating element off, for summertime operation; - Heating switch button ON: -- Speed switch button L: heating element always on; -- Speed switch button heating element on if room T < 20°C, off if room T > 25°C. •...
  • Page 20: Maintenance/Cleaning

    ENGLISH Maintenance/cleaning WARNING • Before you clean the unit turn off the power switch. • Do not splatter water on the unit. CAUTION • Wear gloves when cleaning. • The antibacterial coating is effective when the bacteria exposed the coated surfaces. •...
  • Page 21 ENGLISH (Fig.14) • Add 200cc (around 1 cup)of water through the drain hole. • Use the unit after confirming that the water tank is in place drain hole (Fig.15) (Fig.16) Cleaning the air filter Cleaning the air filter Around once a week •...
  • Page 22: Troubleshooting, Electrical Schematic

    ENGLISH Troubleshooting, electrical schematic If you discover the following circumstance, please inspection and handling as following: Problem Check Action Do the display indicators lights • Turn the ground-fault circuit breaker on. No air blows even if hands are Is the power switch on? •...
  • Page 23 ENGLISH Electrical schematic (Fig.17) Status Introductions Status Introductions Solution Check the external Power Power not supply power source, close indicator Light Power input normally Extinguish the power switch light Master board fuse blew out Check motor connecting Extinguish Don’t work wires and the rotor Motor falt, it can’t start State...
  • Page 24: Precautions Before Installing

    ENGLISH Precautions before installing Do not install in the following types of locations, othewise this may cause malfunction: • Locations where the temperature can exceed -10℃ or 40℃ • Locations where the unit may come into direct contact with water •...
  • Page 25: Installation

    ENGLISH Installation N.B. If the unit is equipped with a plug ignore the instructions describing the electrical connections. • Use a single-phase alternating rated voltage supply, (Do not used with a power supply exceeding rated voltage ±10% ). • Use a power cord which is between 2 mm and 2.5 mm thick, (Cords other than 2mm - 2.5 mm...
  • Page 26 ENGLISH (Fig.24) presa di gancio Pull the separate line power cord into the unit and Power socket alimentazione Upper hook superiore secure inside power cord power cord Power cord This machine has been made with power cord, if you want to change, please according to the following steps.
  • Page 27: Test Run

    ENGLISH (Fig.27) Attach the front panel • Insert the 3 front panel chuckholes into the unit. • Replace the 2 screws that were removed. • Attach the drain tank. • Make sure the air filter is all the way in Test run Step Check...
  • Page 28: Important Information Concerning The Environmentally Compatible Disposal

    ENGLISH Important information concerning the environmentally compatible disposal IN CERTAIN EUROPEAN UNION COUNTRIES THIS PRODUCT DOES NOT FALL WITHIN THE REQUIREMENTS OF THE NATIONAL LAWS IMPLEMENTING DIRECTIVE WEEE, AND IN THESE COUNTRIES THE PRODUCT IS NOT SUBJECT TO SEPARATE DISPOSAL OPERATIONS AT THE END OF ITS WORKING LIFE. This product conforms to EU Directive2002/96/EC.
  • Page 29: Fonctions

    FRANCAIS Fonctions • Séchage des mains hygiénique, sans contact • Économie d'énergie grâce à un séchage ultra rapide. • Économique et pratique • Minuterie anti-vandalisme, pour une utilisation sans souci. • Pas de serviettes en tissu ou papier; il génère moins de déchets •...
  • Page 30: Sécurité

    FRANCAIS Sécurité Attention: ce symbole indique la nécessité de prendre quelques précautions pour la sécurité de l’utilisateur • Ne tentez pas d'installer l'appareil vous-même à moins que vous ne soyez un technicien de service qualifié. Vous risqueriez de compromettre la sécurité et le bon fonctionnement de l'appareil. •...
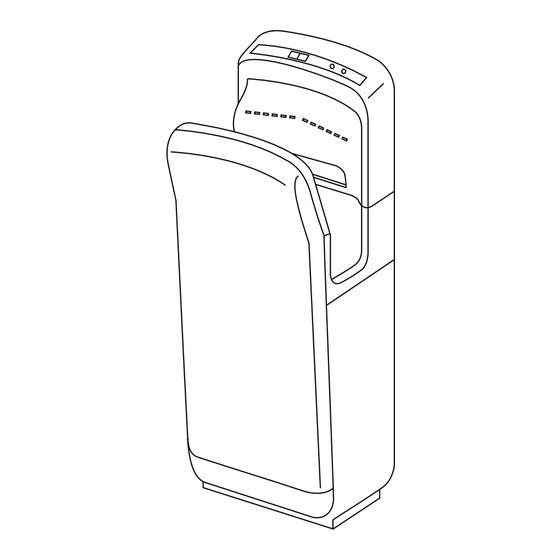
  • Page 31: Nom Des Pièces Et Plan D'encombrement

    FRANCAIS Nom des pièces et plan d'encombrement Interrupteur de chauffage Alimentation électrique Interrupteur de vitesse Couvercle Temps de séchage et Voyant Voyant affichage des pannes d'alimentation d'autodiagnostic Zone de séchage des mains marche/arrêt Éclairage capteur Tuyau d'évacuation Filtre à air carter Réservoir de récupératio Emplacement de...
  • Page 32: Utilisation De L'appareil

    FRANCAIS Utilisation de l'appareil Voir fig.4: - bouton “Interrupteur chauffage” OFF : résistance éteinte pour fonctionnement estival; - bouton “Interrupteur chauffage” ON: -- bouton “Interrupteur vitesse” L: résistance toujours allumée; -- bouton “Interrupteur vitesse” H: ésistance allumée si T ambiante < 20° C, éteinte si T ambiante > 25° C. •...
  • Page 33: Nettoyage Courante

    FRANCAIS Nettoyage courante MISE EN GARDE • Avant de le nettoyer, mettez l'appareil hors tension. • N'éclaboussez pas l'appareil. AVERTISSEMENT • Portez des gants lors du nettoyage de l'appareil. • Le revêtement antibactérien est efficace avec les bactéries qui sont exposées aux surfaces de l'appareil. •...
  • Page 34 FRANCAIS (Fig.14) • Ajoutez 200 cc d'eau par l'orifice d'évacuation (pour éviter qu'il ne se bouche). • Utilisez l'appareil après avoir vérifié que le réservoir de récupération d'eau est en place. Orifice d'évacuation (Fig.15) (Fig.16) Nettoyage du filtre à air Nettoyage du filtre à...
  • Page 35: Diagnostic De Pannes, Schéma Électrique

    FRANCAIS Diagnostic de pannes, schéma électrique Si l'une des circonstances suivantes se produit, inspectez l'appareil et procédez comme suit : Problème Vérification Mesure Les voyants de l'afficheur s'allu- ment-ils ? • Enclenchez le disjoncteur de fuite de terre. Le sèche-mains ne souffle pas L'interrupteur marche/arrêt est-il •...
  • Page 36 FRANCAIS Schéma électrique (Fig.17) schéma électrique moteur fusible interrupteur sonde de disjoncteur coupe-circuits température thermique thermiques marche/arrêt résistances blocs de fusible sonde de sonde de jonction compensation température PCB des PCB démarrage capteurs capteurs alimentation État Descriptions Status Introductions Solution Vérifiez la prise secteur Absence d'alimentation et mettez l'appareil...
  • Page 37: Précautions Préalables À La Pose De L'appareil

    FRANCAIS Précautions préalables à la pose de l'appareil N'installez pas le sèche-mains dans les endroits suivants, au risque d'entraîner un mauvais fonctionnement de l'appareil : • Lieux où la température ambiante peut dépasser les -10 °C ou 40 °C. • Lieux où l'appareil peut prendre l'eau. •...
  • Page 38: Installation

    FRANCAIS Installation N.B. Si l'appareil est équipé d'une fiche ignorer les instructions qui décrivent les connexions électriques. • Utilisez un courant alternatif monophasé. (À ne pas utiliser avec un réseau d'alimentation dont la tension dépasse la valeur nominale de ± 10 %). •...
  • Page 39 FRANCAIS (Fig.24) Tirez deux fils indépendants cordon Crochet Crochet d'alimentation dans l'appareil et les fixer. supérieur supérieur prise secteur prise secteur Le sèche-mains est livré accompagné d'un cordon cordon électrique cordon électrique d'alimentation. Si vous voulez le changer, respectez les étapes suivantes.
  • Page 40: Essai De Fonctionnement

    FRANCAIS (Fig.27) Fixez le capot avant • Insérez les 3 cliquets de verrouillage du capot avant dans l'appareil. carter • Remettez les 2 vis déposées en place. • Fixez le réservoir de récupération. capot avant • Assurez-vous que le filtre à air est complètement enfoncé. vis de montage réservoir de récupération filtre à...
  • Page 41: Information Importante Pour L'elimination Compatible Avec L'environment

    FRANCAIS Information importante pour l’elimination compatible avec l’environnement DANS CERTAINS PAYS DE L'UNION EUROPÉENNE, CE PRODUIT NE FAIT PAS PARTIE DU DOMAINE D'APPLICATION DE LA LOI NATIONALE D'ASSIMILATION DE LA DIRECTIVE DEEE ET PAR CONSÉQUENT, IL N'Y EXISTE AUCUNE OBLIGATION DE COLLECTE DIFFÉRENCIÉE À LA FIN DE SA DURÉE DE VIE. Ce produit est conforme à...
  • Page 42 Note...
  • Page 43 Note...
  • Page 44 La Vortice S.p.A. si riserva il diritto di apportare tutte le varianti migliorative ai prodotti in corso di vendita. Vortice S.p.A. reserves the right to make improvements to products at any time and without prior notice. La société Vortice S.p.A. se réserve le droit d'apporter toutes les variations afin d'améliorer ses produits en cours de commercialisation.

Table des Matières