Table des Matières

Publicité

Les langues disponibles

Les langues disponibles

Liens rapides

Vor dem Gebrauch des
Gerätes die Betriebs-
anleitung aufmerksam
lesen.
Before using the tool,
read the operating
instructions carefully.
Avant l'utilisation de
l'appareil, consultez
soigneusement le
mode d'emploi.
Prima d'utilizzare
l'apparecchio, leggere
attentamante le istruzi-
oni per l'uso.
STP 63
Pneumatisches Handgerät zum Umreifen mit Stahlband
Pneumatic hand tool for steel strapping
Appareil pneumatique pour le cerclage par feuillard d'acier
Apparecchio pneumatica per reggiare con reggetta
BETRIEBSANLEITUNG
OPERATING INSTRUCTIONS
MODE D'EMPLOI
ISTRUZIONI PER L'USO
05.11
Originalbetriebsanleitung
Translation of original manual
Traduction du mode d'emploi original
Traduzione dall'originale
Ab Serie-Nr. 545
From serie no 545
A partir du no de série 545
A partire dal no. di serie 545
DEUTSCH
ENGLISH
FRANÇAIS
ITALIANO
3
13
23
33

Publicité

Table des Matières
loading

Sommaire des Matières pour strapex STP 63

  • Page 1 Prima d’utilizzare l’apparecchio, leggere attentamante le istruzi- oni per l’uso. STP 63 Pneumatisches Handgerät zum Umreifen mit Stahlband Ab Serie-Nr. 545 Pneumatic hand tool for steel strapping From serie no 545 Appareil pneumatique pour le cerclage par feuillard d‘acier A partir du no de série 545...
  • Page 2: Up To Approx. 850 N/Mm

    +1 800 779 380 Telefon +47 7382 06 00 Wir erklären in alleiniger Verantwortung, dass das sales@iwdstrapping.com.au reception.as@kihlberg.no Gerät STP 63, auf welches sich diese Erklärung bezieht, mit den geltenden Bestimmungen der Richt- Belgien Österreich Strapex Sprl Strapex GmbH linie des Rates vom 17. Mai 2006 (2006/42/EG)
  • Page 3: Table Des Matières

    Strapex STP 63 TECHNISCHE DATEN INHALTSVERZEICHNIS Seite Gewicht 11,5 kg 1 Technische Daten 2 Allgemeines Abmessung Länge 400 mm 2.1 Hinweis zum Umweltschutz Breite 120 mm 3 Sicherheitsvorschriften Höhe 310 mm 4 Beschreibung 4.1 Aufbau Spannkraft Bis ca. 6500 N 4.2 Funktionsprinzip...
  • Page 4: Allgemeines

    Strapex STP 63 ALLGEMEINES Diese Betriebsanleitung soll das Kennenlernen des Gerätes und den bestimmungsgemässen Einsatz VORSICHT! erleichtern. Die Betriebsanleitung enthält wichtige Hinweise, wie das Gerät sicher, sachgerecht und wirt- Wird verwendet bei Ge- schaftlich einzusetzen ist. Das Einhalten der Hinweise fahren für Leben...
  • Page 5: Sicherheitsvorschriften

    Strapex STP 63 SICHERHEITSVORSCHRIFTEN Informieren Sie sich! Keine Gas- oder Druck- Vor dem Gebrauch des luftfl aschen verwenden! klsf klsd Gerätes die Betriebsan- Das Gerät darf nicht an lksdf kl kl sdllk kl sd klk kl sdaf asdf klk kl kl leitung sorgfältig lesen.
  • Page 6: Beschreibung

    Strapex STP 63 BESCHREIBUNG 4.1 AUFBAU 1 Luftanschluss 2 Druckreduzierventil 3 Druckluftmotor 4 Klinke (Spannvorgang unterbrechen) 5 Gelbe Taste (Verschliessen) 6 Grüne Taste (Spannen) 7 Handgriff 8 Hebel 9 Spannrad 10 Spannmatrize 11 Verschliesszangen 12 Grundplatte 13 Aufhängebügel Fig. 1 4.2 FUNKTIONSPRINZIP...
  • Page 7: Inbetriebnahme

    Strapex STP 63 INBETRIEBNAHME 5.1 AUFHÄNGEN DES GERÄTES Das Gerät ist mit einem Aufhängebügel (3/1) ausge- stattet. Der Aufhängebügel ist so konstruiert, dass das Gerät horizontal, vertikal oder seitlich an einem Federzug aufgehängt werden kann. 5.2 DRUCKLUFTAUFBEREITUNG Motor und Verschliesserkolben werden durch Ölnebel der Druckluft geschmiert.
  • Page 8: Bedienung

    Strapex STP 63 BEDIENUNG 6.1 BEDIENUNG DES GERÄTES – Band von der Rolle abziehen und satt um das Umreifungsgut legen. Band ca. 30 cm vor dem Bandanfang mit der linken Hand fassen. – Gerät mit der rechten Hand am Griff fassen und den Hebel bis zum Anschlag hochziehen.
  • Page 9: Verschlusskontrolle

    Strapex STP 63 Verschliessen – Mit dem Daumen der rechten Hand die gelbe Taste (7/1) betätigen, bis das Band abgeschnitten ist. Fig. 7 – Gerät mit der rechten Hand am Griff fassen und den Motor bis zum Anschlag hochziehen und das Gerät nach hinten rechts von der Umreifung weg- schwenken.
  • Page 10: Wartung Und Instandsetzung

    Strapex STP 63 WARTUNG UND INSTANDSETZUNG 7.1 SPANNKRAFT/SPANNGESCHWINDIGKEIT EINSTELLEN – Luftdruck am Druckreduzierventil der Wartungs- einheit auf 5–6 bar einstellen. – Mit Schraubenzieher Drosselschraube (10/1) des Druckluftmotors so einstellen, dass bei gewünschter Bandspannung der Druckluftmotor zum Stillstand kommt. Dabei ist darauf zu achten, dass einwandfrei gekerbt und das Band abgeschnitten wird.
  • Page 11: Spannrad Ersetzen

    Strapex STP 63 7.4 SPANNRAD ERSETZEN Dreht das Spannrad durch, bevor die ge- wünschte Bandspannung erreicht ist, muss das Spannrad ersetzt werden (Voraussetzung: Spiel richtig eingestellt, siehe Kapitel 7.2). Ausbau – Gerät von Luftanschluss trennen. – Zylinderschraube (13/6) und Scheibe (13/7) entfer- nen.
  • Page 12: Abschneidmesser, Matrizen Und

    Strapex STP 63 7.6 ABSCHNEIDMESSER, MATRIZEN UND STEMPEL ERSETZEN Ausbau – Gerät von Luftanschluss trennen. – Sicherungsscheibe (15/9) und Scheibe (15/10) ent- fernen und Achse (15/11) herausstossen. – Drei Zylinderschrauben (15/5) entfernen. – Grundplatte (15/8) zusammen mit Verschlussme- chanik so weit wie möglich aus dem Gehäuse herausziehen.
  • Page 13: Technical Data

    (157‘000 lbs/in DECLARATION OF AGREEMENT We take sole responsibility for declaring that the CH-8953 Dietikon, 18.12.2009 tool STP 63, to which this declaration refers, is in full compliance with the current requirements General Manager Manager Products of the guidelines laid down by the council on...
  • Page 14: General Information

    Strapex STP 63 GENERAL INFORMATION These operating instructions are intended to simplify familiarisation with the strapping tool and the pos- CAUTION! sibilities of application for the intended purpose. The operating instructions contain important information Used where there is dan- concerning the safe, proper and effi cient use of the ger to life and health.
  • Page 15: Safety Instructions

    Strapex STP 63 SAFETY INSTRUCTIONS Do not use a bottled Inform yourself! Read the operating in- air or gas source! Do not operate this tool structions carefully. klsf klsd lksdf kl kl sdllk kl sd by using a bottled air or...
  • Page 16: Description

    Strapex STP 63 DESCRIPTION 4.1 DESIGN 1 Compressed air connection 2 Pressure reduzing valve 3 Compressed air motor 4 Pawl (Interrupting tensioning process) 5 Yellow button (Sealing) 6 Green button (Tensioning) 7 Handle 8 Lever 9 Tension wheel 10 Tensioning plate...
  • Page 17: Initial Operation

    Strapex STP 63 INITIAL OPERATION 5.1 SUSPENDING THE TOOL The tool can be suspended on a spring balancer with the suspension bracket (3/1) supplied. The suspensi- on bracket is designed to operate the tool horizontally or vertically or sideways. 5.2 COMPRESSED-AIR CONNECTION Motor and sealing piston are lubricated by oil mist of the compressed air.
  • Page 18: Operating Instructions

    Strapex STP 63 OPERATING INSTUCTIONS 6.1 OPERATING THE TOOL – Draw strap from reel and place tightly around the package. Grip strap with the left hand approx. 30 cm (12“) from the beginning of the strap. – Hold the handle of the tool in the right hand and raise the lever up to the stop.
  • Page 19: Checking The Seal

    Strapex STP 63 Sealing – Press the yellow button (7/1) with the right thumb until the strap is cut off. Fig. 7 – Raise the motor to the stop and swing the tool away to the right. – Check the seal (see chapter 6.2).
  • Page 20: Preventive And Corrective Maintenance

    Strapex STP 63 PREVENTIVE AND CORRECTIVE MAINTENANCE 7.1 ADJUSTING TENSIONING FORCE/ TENSIONING SPEED – Set air pressure at pressure reducing valve of maintenance unit to 5–6 bar. – With a screwdriver adjust pressure reducing valve (10/1) of air motor, so that the motor stops when the required tension is reached.
  • Page 21: Replacing Tension Wheel

    Strapex STP 63 7.4 REPLACING TENSION WHEEL If the tension wheel spins before the re- quired strap tension is reached, the tension wheel must be replaced (precondition: clearence set correctly, see chapter 7.2). Remove – Disconnect tool from air supply.
  • Page 22: Replacing Knife, Die And Die Plate

    Strapex STP 63 7.6 REPLACING KNIFE, DIE AND DIE PLATE Remove – Disconnect tool from air supply. – Remove lock washer (15/9) and washer (15/10) and push out shaft (15/11). – Remove three cylinder screws (15/5). – Withdraw base plate (15/4) together with sealing mechanism from housing as far as possible.
  • Page 23: Données Techniques

    Jusqu‘à environ 1100 N/mm DÉCLARATION DE CONFORMITÉ Nous déclarons sous notre propre responsabilité CH-8953 Dietikon, 18.12.2009 que l‘appareil STP 63 ci-dessus, au sujet duquel se réfère cette déclaration, est conforme avec les General Manager General Manager Products prescriptions en vigueur de la directive du conseil...
  • Page 24: Instructions Générales

    Strapex STP 63 INSTRUCTIONS GÉNÉRALES Ces instructions de service doivent faciliter la con- naissance de l‘appareil et les possibilités d‘utilisation PRUDENCE! selon les règles. Les instructions de service contien- nent d‘importants renseignements, à savoir comment Utilisé si risque de mort l‘appareil doit fonctionner en toute sécurité, selon les...
  • Page 25: Instructions De Sécurité

    Strapex STP 63 INSTRUCTIONS DE SÉCURITÉ Bouteilles gaz ou d‘air Renseignez-vous! Avant l‘utilisation de comprimé interdites! Interdiction de branche- l‘appareil, consultez j lsfj lsdj l sdfj l j ljsdll jj ljsd ment de l‘appareil à une soigneusement le mode f ljj l j ljsdafj...
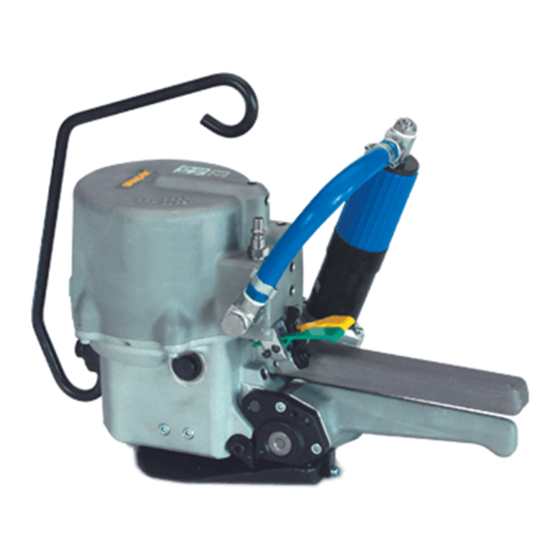
  • Page 26: Description

    Strapex STP 63 DESCRIPTION 4.1 MODULES PRINCIPAUX 1 Raccordement air comprimé 2 Soupape réductrice 3 Moteur à air comprimé 4 Cliquet d’arrèt (Interruption de la tension) 5 Touche jaune (sertissage) 6 Touche verte (serrage) 7 Levier 8 Levier 9 Molette de tension...
  • Page 27: Mise En Service

    Strapex STP 63 MISE EN SERVICE 5.1 SUSPENSION DE L‘APPAREIL L’appareil peut être suspendu à un câble avec ressort par le crochet (3/1) compris dans la livraison. Ce cro- chet est conçu pour que l’appareil puisse être suspen- du horizontalement,verticalement ou latéralement.
  • Page 28: Mode D'emploi

    Strapex STP 63 MODE D‘EMPLOI 6.1 MODE D‘EMPLOI POUR L‘APPAREIL – Dérouler le feuillard et le disposer autour de la marchandise à cercler. Saisir avec la main gauche le feuillard à environ 30 cm de son début. – Saisir avec la main droite l’appareil et relever le levier jusqu’à...
  • Page 29: Vérifi Cation Du Sertissage

    Strapex STP 63 Sertissage – Avec le pouce de la main droite, appuyer sur la touche jaune (7/1) jusqu’à ce que le feuillard soit serti et coupé. Fig. 7 – Relever le moteur jusqu’à la butée et retirer l’appareil par la droite.
  • Page 30: Instruction De Service

    Strapex STP 63 INSTRUCTION DE SERVICE 7.1 RÉGLAGE DE LA FORCE ET DE LA VITESSE DE TENSION – Régler la pression à 5–6 bar à la soupape de réduction de pression de l’unité de traitement de l’air. – Régler (10/1) avec un tournevis le moteur à air com- primé...
  • Page 31: Remplacement De La Molette De Tension

    Strapex STP 63 7.4 REMPLACEMENT DE LA MOLETTE DE TENSION Si la molette de tension patine avant que la tension souhaitée ait été atteinte, cette derniére doit être remplacée (condition préliminaire: le jeu est correctement réglé, voir chapitre 7.2) Démontage –...
  • Page 32: Du Poinçon

    Strapex STP 63 7.6 REPLACEMENT DU COUTEAU, DE LA MATRICE ET DU POINÇON Démontage – Déconnecter l’air comprimé. – Enlever le circlips (15/9), la rondelle (15/10) et faire sortir l’axe (15/11). – Dévisser et enlever les trois vis (15/5). – Ecarter le plus possible du boîtier le châssis (15/4) avec le mécanisme de fermeture.
  • Page 33 Fino a 1100 N/mm DICHIARAZIONE DI CONFORMITÀ Dichiariamo sotto la nostra responsabilità che CH-8953 Dietikon, 18.12.2009 l‘apparecchio STP 63, al quale questa dichiarazio- ne si riferisce, corrisponde alle prescrizioni in vigore General Manager General Manager Products delle direttive del Consiglio europeo del 17 maggio...
  • Page 34: Informazioni Generali

    Strapex STP 63 INFORMAZIONI GENERALI Queste istruzioni per l‘uso hanno lo scopo di facilitare la conoscenza dell‘apparecchio e delle sue possibilità PERICOLO! d‘utilizzo. Esse contengono importanti informazioni su come utilizzare l‘apparecchio in modo sicuro, compe- Viene usato come indica- tente ed economico. La loro osservanza contribuisce...
  • Page 35: Prescrizioni Di Sicurezza

    Strapex STP 63 PRESCRIZIONI DI SICUREZZA Si informi! Non bombola di gas o Prima di utilizzare l’appa- aria compressa! recchio, leggere atten- Non collegare l‘appa- l sdf l sdll l sd tamente le istruzioni per recchio ad una bombola di...
  • Page 36: Descrizioni

    Strapex STP 63 DESCRIZIONI 4.1 COSTRUZIONE 1 Allacciamento aria 2 Valvola di riduzione 3 Motore ad aria compressa 4 Lama di bloccaggio 5 Tasto giallo (chiudere) 6 Tasto verde (tendere) 7 Leva 8 Leva 9 Rotella di tensione 10 Matrice di tensione...
  • Page 37: Messa In Esercizio

    Strapex STP 63 MESSA IN ESERCIZIO 5.1 AGGANCIO DELL‘APPARECCHIO L’apparecchio può essere appeso al gancio a molla (3/1) compreso nella fornitura. Il gancio di appoggio è costruito in modo da poter appendere l’apparecchio in posizione orizzontale, verticale o laterale. 5.2 RACCORDO ARIA COMPRESSA Il motore e il pistone d‘otturazione vengono ingrassati...
  • Page 38: Istruzioni Per L'uso

    Strapex STP 63 ISTRUZIONI PER L‘USO 6.1 ISTRUZIONI PER L‘USO DELL‘APPARECCHIO – Togliere la reggetta dal rullo e appoggiarla ferma- mente sull’elemento da imballare. Prendere con la mano sinistra la reggetta ca. 30 cm prima dell’inizio della reggetta. – Con la mano destra prendere il manico dell’...
  • Page 39: Controllo Della Chiusura

    Strapex STP 63 Chiudere – Con il pollice della mano destra premere il tasto giallo (7/1) fi no a quando la reggetta viene tagliata. Fig. 7 – Sollevare il motore fi no all‘arresto e spostare l’apparecchio verso destra per liberarlo.
  • Page 40: Manutenzione E Riparazione

    Strapex STP 63 MANUTENZIONE E RIPARAZIONE 7.1 REGOLAZIONE DELL‘ACCOPPIAMENTO A FRIZIONE/VELOCITÀ DI TENSIONE – Regolare la pressione dell’aria alla valvola di ridu- zione della pressione nell’unità di manutenzione a 5–6 bar. – Con il cacciavite regolare (10/1) il motore dell’aria compressa in modo da fare arrestare il motore al raggiungimento della tensione desiderata.
  • Page 41: Sostituzione Della Rotella Di Tensione

    Strapex STP 63 7.4 SOSTITUZIONE DELLA ROTELLA DI TENSIONE Se la rotella di tensione gira prima che sia ottenuto il bloccaggio desiderato la rotella deve essere sostituita (ammesso che il gioco sia stato regolato correttamente, vedi capitolo 7.2). Smontaggio – Staccare l’apparecchio dall’allacciamento all’aria.
  • Page 42: Sostituzione Del Coltello, Della Matrice

    Strapex STP 63 7.6 SOSTITUZIONE DEL COLTELLO, DELLA MATRICE E DELLO STAMPO Smontaggio – Staccare l’apparecchio dall’allacciamento dell’aria. – Togliere la rondella di sicurezza (15/9) e la rondella (15/10) estarre l‘asse (15/11). – Rimuovere le tre viti cilindriche (15/5). – Estarre il più possibile dalla carcassa la piastra di base (15/4), assieme al meccanismo di chiusura.

Table des Matières