Publicité

Les langues disponibles
  • FR

Les langues disponibles

  • FRANÇAIS, page 26

Liens rapides

2
6
5
3
4
>
1
:
D 116
GEBRAUCHSANWEISUNG
BRUGSANVISNING
INSTRUCCIONES DE USO
MANUEL D'UTILISATION
OPERATING MANUAL
ISTRUZIONI D'USO
GEBRUIKSAANWIJZING
INSTRUKCJA OBSŁUGI
2
10
18
26
34
42
50
58

Publicité

Table des Matières
loading

Sommaire des Matières pour Zibro D116

  • Page 1 D 116 GEBRAUCHSANWEISUNG BRUGSANVISNING INSTRUCCIONES DE USO MANUEL D'UTILISATION OPERATING MANUAL ISTRUZIONI D’USO > GEBRUIKSAANWIJZING INSTRUKCJA OBSŁUGI...
  • Page 2 Sehr geehrte Damen und Herren, herzlichen Glückwunsch zum Kauf Ihres Entfeuchters! Sie haben ein hochwertiges Produkt erworben, das Ihnen jahrelang Freude machen wird, vorausgesetzt, Sie benutzen das Gerät vorschriftsmäßig. Lesen Sie daher zunächst diese Gebrauchsanweisung, so dass Sie wissen, wie Sie Ihren Entfeuchter seiner optimalen Lebensdauer zuführen. Wir gewähren Ihnen namens des Herstellers 2 Jahre Garantie auf eventuelle Material- oder Produktionsfehler.
  • Page 3 HAUPTBAUTEILE ³ ³ Bedienungstastatur · Auslass für trockene Luft » Herausnehmbarer Wasserbehälter Einlass für feuchte Luft ´ Luftfilter ² Auslauf (ø 13 mm) mit Deckel ¶ Bewegliches Rad º Stecker und Kabel ¾ Griff...
  • Page 4: Sicherheitsvorschriften

    WAS SIE VORHER WISSEN MÜSSEN ALLGEMEIN • Für ein optimales Resultat sollten Sie das Gerät nicht zu nahe an einen Heizkörper oder eine andere Wärmequelle stellen. • Achten Sie darauf, dass alle Fenster geschlossen sind; nur dann ist höchste Effizienz möglich.
  • Page 5: Bedienung

    • Entleeren Sie vor dem Transport des Geräts den Wasserbehälter. • Stellen Sie das Gerät in einem Abstand von mindestens 20 cm zur Wand auf. Hängen Sie Kleidung mindestens in einem Abstand von 50 cm über dem Gerät auf und sorgen Sie dafür, dass keine Feuchtigkeit in das Gerät tropft.
  • Page 6 Das Gerät beginnt zu entfeuchten, wenn die Luftfeuchtigkeit im Raum höher ist als der eingestellte Wert. Wenn der eingestellte Wert erreicht ist, schaltet sich das Gerät automatisch aus. Das Gerät schaltet sich wieder ein, wenn die Luftfeuchtigkeit im Raum wieder steigt. Wählen Sie die Gebläsegeschwindigkeit, indem Sie auf die -Taste drücken.
  • Page 7 REINIGUNG Bevor Sie mit der Reinigung beginnen, schalten Sie bitte den Entfeuchter aus. Ziehen Sie anschließend den Stecker aus der Steckdose. GEHÄUSE Reinigen Sie das Gehäuse des Geräts mit einem trockenen weichen Lappen. Wenn das Gerät stark verschmutzt ist, können Sie ein mildes Reinigungsmittel benutzen. Wischen Sie dann mit einem feuchten Lappen nach.
  • Page 8: Garantiebedingungen

    TABELLE ZUR STÖRINGSSUCHE Bevor Sie den technischen Kundendienst zu Hilfe rufen, bitten wir Sie zunächst Folgendes zu kontrollieren. Problem Ursache Abhilfe Der Stecker steckt nicht in der Stecken Sie den Stecker in die Steckdose. Steckdose. Der Hygrostat ist zu niedrig Stellen Sie den Hygrostat in die eingestellt.
  • Page 9: Technische Daten

    Zur Vorbeugung von unnötigen Kosten empfehlen wir Ihnen, zunächst immer erst genau in der Bedienungsanleitung nachzulesen. Finden Sie darin keine Lösungsmöglichkeit, wenden Sie sich bitte an Ihren Händler. TECHNISCHE DATEN Type D 116 Netzspannung V / Hz / F 220-240 / 50 / 1 Leistungsaufnahme Stromstärke Schallniveau...
  • Page 10 Kære fru, hr. Hjertelig tillykke med købet af din affugter. Du har købt et kvalitetsprodukt, som du vil have glæde af i mange år, såfremt du bruger apparatet på forsvarlig vis. Læs derfor denne brugervejledning, så din affugter får en optimal levetid. På...
  • Page 11: Vigtige Dele

    VIGTIGE DELE ³ ³ Betjeningspanel · Udblæsning af tør luft » Udtagelig vandbeholder Indsugning af fugtig luft ´ Luftfilter ² Vandafledningsstuds (ø 13 mm) med låg ¶ Styrehjul º Stik og ledning ¾ Håndtag...
  • Page 12: Sikkerhedsforskrifter

    HVAD DU SKAL VIDE PÅ FORHÅND GENERELLE • For at få et optimalt resultat skal apparatet ikke stå for tæt på en radiator eller andre varmekilder. • Sørg for, at alle vinduer er lukkede, så apparatet virker så hensigtsmæssigt som muligt.
  • Page 13 KONTROLLAMPER BETJENINGSPANEL Lampen begynder at lyse for at angive, at optøningsfunktionen er startet. Det er nødvendigt for at undgå isdannelse i apparatet. Denne lampe begynder at lyse, når vandbeholderen er fuld. Apparatet slukkes automatisk. Tænd-/sluktast Ventilatortast Timertast Indstillingstast/hygrostat BETJENING Stik stikket i stikkontakten. Sørg for, at vandbeholderen er anbragt rigtigt.
  • Page 14 Hvis der er behov for det, kan du bruge timer-funktionen. Med denne -funktion kan du slukke apparatet på et på forhånd indstillet tidspunkt, fra 1 og 12 timer. Når den indstillede tid er udløbet, slukkes apparatet. Med hvert tryk på tasten øger du tiden med en time.
  • Page 15 RENGØRING Før du påbegynder rengøringen, skal du slukke affugteren. Tag herefter stikket ud af stikkontakten. YDERSIDEN Rengør ydersiden med en blød, tør klud. Hvis apparatet er meget beskidt, kan du bruge et mildt rengøringsmiddel. Tør efterfølgende efter med en lidt fugtig klud. Apparatet må...
  • Page 16 PROBLEM, ÅRSAG OG LØSNING Før du beder om teknisk hjælp, kan du selv kontrollere følgende: Problem Årsag Løsning Stikket sidder ikke i Stik stikket i stikkontakten. stikkontakten. Hygrostaten står i en for lav Drej hygrostaten i den ønskede stand. position. Apparatet fungerer ikke.
  • Page 17: Tekniske Data

    TEKNISKE DATA Type D 116 Netspænding V / Hz / F 220-240 / 50 / 1 Tilført effekt Strømstyrke Støjniveau Affugtning L/24 timer* Kølemiddel type / gr R-134a / 200 Kompressor Piston Automatisk optøning Indstillingstast / Hygrostat Mål (bxhxd) 340 x 570 x 245 Nettovægt Kapacitet beholder Luftcirkulation (max.)
  • Page 18 Estimado cliente, Le felicitamos por la compra de su deshumidificador. Acaba de adquirir un producto de alta calidad, que le proporcionará pleno confort durante muchos años, siempre que lo utilice debidamente. Por lo tanto, le recomendamos que lea primero este manual de instrucciones, para prolongar la vida útil de su deshumidificador.
  • Page 19: Componentes Principales

    COMPONENTES PRINCIPALES ³ ³ Panel de control · Salida del aire seco » Depósito extraíble de agua Entrada para aire húmedo ´ Filtro de aire ² Tubo de evacuación (ø 13 mm) con tapón ¶ Rueda multidireccional º Enchufe y cable ¾...
  • Page 20: Instrucciones De Seguridad

    LO QUE DEBE SABER DE ANTEMANO GENERAL • Para obtener un resultado óptimo, no coloque el aparato cerca de un radiador o otra fuente calorífica. • Mantenga cerradas todas las ventanas para una mayor eficacia. • La capacidad de deshumidificación depende de la temperatura y de la humedad del aire en la habitación.
  • Page 21: Panel De Control

    PANEL DE CONTROL La luz se enciende para indicar que ha comenzado la función de deshielo. Esto es necesario para evitar la formación de excesivo hielo en el evaporador del aparato. Esta luz se enciende cuando el depósito de agua está lleno. El aparato se desconecta automáticamente.
  • Page 22: Evacuación Del Agua

    Si lo desea, puede hacer uso de la función de temporizador. Esta función le permite desactivar el aparato a una hora previamente programada. Con el botón se puede programar un tiempo de funcionamiento de entre 1 y 12 horas. Cuando haya transcurrido el tiempo programado, el aparato se apagará.
  • Page 23: Parte Exterior

    LIMPIEZA Apague el deshumidificador antes de limpiarlo. A continuación desenchufe el aparato. PARTE EXTERIOR Limpie la parte exterior con un paño suave y seco. Si está muy sucio, puede usar un producto de limpieza suave. A continuación, pasar un paño húmedo. Nunca pulverice agua sobre el aparato.
  • Page 24 AVERÍAS Antes de solicitar asistencia técnica, verifique los siguientes puntos: Problema Causa Solución El aparato no está bien Enchufe correctamente el enchufado. aparato. El botón regulador se encuentra Sitúe el botón regulador en la a un nivel bajo. posición deseada. El aparato no funciona.
  • Page 25: Especificaciones Técnicas

    ESPECIFICACIONES TÉCNICAS Type D 116 Corriente de red V / Hz / Ph 220-240 / 50 / 1 Capacidad absorbida Intensidad de corriente Nivel sonoro Deshumidificación L/24h* Refrigerante R-134a / 200 Compresor Piston Descongelación automática sí Botón regulador/higrostáto sí Dimensiones (an x al x p) 340 x 570 x 245 Peso neto Capacidad depósito...
  • Page 26 Pour assurer une durée de vie optimale de votre déshumidificateur, lisez d’abord ces instructions d’utilisation. Les produits Zibro Clima sont garantis contre tout vice de fabrication ou de conception pendant une durée de 2 ANS à compter de la date d’achat.
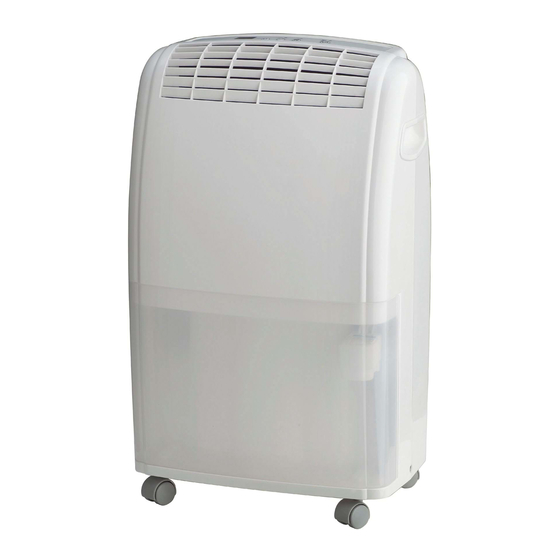
  • Page 27: Pièces Principales

    PIÈCES PRINCIPALES ³ ³ Tableau de commande · Sortie d’air » Réservoir d’eau amovible Entrée d’air ´ Filtre à air ² Embout d’évacuation d’eau (ø 13 mm) avec bouchon ¶ Roulette º Cordon d’alimentation ¾ Poignée...
  • Page 28: À Savoir Avant La Première Utilisation

    À SAVOIR AVANT LA PREMIÈRE UTILISATION GÉNÉRAL • Pour obtenir un résultat optimal de votre appareil, ne pas le placer près d’un radiateur ou d’une autre source de chaleur. • Fermez toutes les fenêtres de la pièce pour une efficacité maximum. •...
  • Page 29: Le Tableau De Commande

    LE TABLEAU DE COMMANDE Ce témoin lumineux indique que la fonction dégel est en fonctionnement. Afin de prévenir une formation de glace dans l’appareil Ce témoin lumineux s’allumera pour indiquer que le réservoir d’eau est plein. L’appareil s’éteint alors automatiquement. Touche de mise en fonctionnement Touche vitesse de ventilation Touche programmateur...
  • Page 30 Si vous le souhaitez, vous pouvez utiliser la fonction minuterie. Celle-ci vous permet de programmer à l’avance l’arrêt automatique de l’appareil. Pour programmer l’heure d’arrêt (de 1 à 12 heures), appuyez sur la touche . Chaque pression sur la touche augmente la durée de fonctionnement d’une heure. Ceci s’affiche sur l’écran. Au bout de 10 secondes, l’affichage indique à...
  • Page 31: L'extérieur

    LE NETTOYAGE Avant de nettoyer le déshumidificateur, éteignez-le puis débranchez-le. L’EXTÉRIEUR Nettoyez l’extérieur de l’appareil avec un chiffon doux et sec. Si l’appareil est vraiment sale, vous pouvez utiliser un produit nettoyant doux. Passer ensuite un chiffon légèrement humide. Ne jamais verser d‘eau sur l’appareil. LE FILTRE À...
  • Page 32: Les Conditions De Garantie

    TABLEAU DES PANNES Avant de demander une assistance technique, contrôlez d’abord les points suivants: Problème Origines Solutions L’appareil n’est pas branché. Branchez l’appareil L’hygrostat est sur une position Tournez l’hygrostat jusqu’à la trop basse. position souhaitée. L’appareil ne fonctionne pas. Le réservoir d’eau est plein.
  • Page 33: Spécification Techniques

    Pour éviter des dépenses inutiles, nous vous conseillons de toujours consulter en premier lieu mode d’emploi. Si celui-ci ne donne pas de résultat, emmenez le déshumidificateur à réparer chez votre distributeur. SPÉCIFICATION TECHNIQUES Type D 116 Tension secteur V / Hz / Ph 220-240 / 50 / 1 Puissance absorbée Intensité...
  • Page 34 Dear Sir, Madam, Congratulations with the purchase of your dehumidifier. You have acquired a high quality product which will give you many years of pleasure, if you use it responsibly. Please read the user's manual first in order to ensure the optimum life span of your dehumidifier. On behalf of the manufacturer, we provide a two-year warranty on material- or manufacturing defects.
  • Page 35: Important Components

    IMPORTANT COMPONENTS ³ ³ Control panel · Dry air outlet » Removable water container Humid air inlet ´ Air filter ² Drainage spout (ø 13 mm) with cap ¶ Castor º Plug and cord ¾ Handle...
  • Page 36: Safety Regulations

    WHAT YOU MUST KNOW IN ADVANCE GENERAL • To obtain optimum performance from your dehumidifier, do not place it near a radiator or any other heat source. • Ensure that all windows are closed in order to achieve maximum efficiency. •...
  • Page 37: The Control Panel

    THE CONTROL PANEL This light indicates that the defrost function has been activated. This is necessary to prevent excessive formation of ice in the device. This light indicates that the water container is full. The device switches off automatically. ON-/OFF-button Ventilator-button Timer button Adjustment button/hydrostat...
  • Page 38: Water Drainage

    The timer function enables you to switch the device off after a certain time. The operating time can be set between 1 and 12 hours with the -button. Every time you press the button, the running time is extended by 1 hour. This will be shown on the display.
  • Page 39 CLEANING Switch the dehumidifier off and remove the plug from the socket before cleaning. THE EXTERIOR Clean the exterior with a soft, dry cloth. If the device is extremely dirty, use a mild cleaning agent. Wipe the device with a slightly damp cloth. Never spray the device with water. THE AIR FILTER When used regularly, the filter may become clogged with dust and particles.
  • Page 40: Conditions Of Warranty

    TROUBLESHOOTING Check the following before contacting technical support: Problem Cause Solution Insert the plug into the wall The powercord is not connected. outlet. Turn the hydrostat to the The hydrostat setting is too low. desired setting. The unit does not work. Remove the water from the The water container is full.
  • Page 41: Technical Specifications

    To prevent unnecessary expenses, we recommend that you always carefully read the user’s manual first. If this does not provide a solution, take the dehumidifier to your distributor for repair. TECHNICAL SPECIFICATIONS Model D 116 Mains voltage V / Hz / Ph 220-240 / 50 / 1 Power consumption Amperage...
  • Page 42 Per una durata ottimale del suo Zibro Clima, La invitiamo a leggere le presenti istruzioni d’uso. La informiamo inoltre che questo apparecchio è...
  • Page 43: Componenti Principali

    COMPONENTI PRINCIPALI ³ ³ Pannello di controllo · Uscita aria deumidificata » Vaschetta di raccolta dell'acqua Ingresso aria umida ´ Filtro dell’aria ² Bocchetta di scarico (ø 13 mm) con tappo ¶ Ruota girevole º Spina e cavo di alimentazione ¾...
  • Page 44: Informazioni Preliminari

    INFORMAZIONI PRELIMINARI NORME GENERALI • Per ottenere un funzionamento ottimale, è preferibile evitare di posizionare l'apparecchio in prossimità di un termosifone o di un'altra fonte di calore. • Assicurarsi che tutte le finestre siano chiuse, in modo da permettere all’apparecchio di funzionare con la massima efficienza.
  • Page 45: Il Pannello Di Controllo

    • Svuotare la vaschetta dell'acqua prima di trasportare o spostare l'apparecchio. • Rispettare una distanza di almeno 20 cm fra l'apparecchio e la parete. Lasciare almeno 50 cm di distanza fra il deumidificatore e gli indumenti appesi sopra di esso, assicurandosi inoltre che l'acqua non sgoccioli sull’apparecchio.
  • Page 46: Scarico Dell'acqua

    L'apparecchio entra in funzione non appena l'umidità dell'aria presente nell'ambiente supera il valore impostato e una volta raggiunto, l'apparecchio si disattiva automaticamente, riprendendo a funzionare quando l'umidità relativa nell'ambiente supera di nuovo tale valore. Selezionare la velocità del ventilatore premendo il tasto .
  • Page 47: L'esterno

    PULIZIA Pulire il deumidificatore solo dopo averlo spento ed averlo staccato dalla presa della corrente. L'ESTERNO Il deumidificatore può essere pulito esternamente con un panno morbido ed asciutto. Se l'apparecchio è molto sporco si può utilizzare un detergente neutro da togliersi con un panno leggermente umido.
  • Page 48: Individuazione Guasti

    INDIVIDUAZIONE GUASTI Prima di richiedere assistenza tecnica, si consiglia di verificare i punti di seguito elencati : Problema Causa probabile Rimedio La spina non è inserita nella Inserire la spina nella presa. presa. L'igrostato è impostato su un Orientare l'igrostato nella L'apparecchio non valore basso.
  • Page 49: Specifiche Tecniche

    Per prevenire costi inutili, si consiglia di leggere sempre attentamente le istruzioni prima dell’uso. Qualora nelle istruzioni non vi sia alcun suggerimento in merito, portare il deumidificatore al rivenditore per la riparazione. SPECIFICHE TECNICHE Type D 116 Tensione di rete V / Hz / Ph 220-240 / 50 / 1 Potenza assorbita...
  • Page 50 Geachte mevrouw, mijnheer, Van harte gefeliciteerd met de aankoop van uw ontvochtiger. U heeft een kwaliteitsproduct aangeschaft waar u nog vele jaren plezier van zult hebben, mits u het apparaat verantwoord gebruikt. Lees daarom eerst deze gebruiksaanwijzing voor een optimale levensduur van uw ontvochtiger. Wij geven u namens de fabrikant twee jaar garantie op mogelijke materiaal- of fabricagefouten.
  • Page 51: Belangrijke Onderdelen

    BELANGRIJKE ONDERDELEN ³ ³ Bedieningspaneel · Uitlaat van droge lucht » Uitneembaar waterreservoir Inlaat van vochtige lucht ´ Luchtfilter ² Afvoertuit (ø 13 mm) met dop ¶ Zwenkwieltje º Stekker en snoer ¾ Handvat...
  • Page 52: Veiligheidsvoorschriften

    WAT U VOORAF DIENT TE WETEN ALGEMEEN • Om een optimaal resultaat te krijgen, het apparaat niet dicht bij een radiator of een andere warmtebron plaatsen. • Zorg ervoor dat alle ramen gesloten zijn om maximale efficiëntie te bereiken. • De ontvochtigingscapaciteit is afhankelijk van de temperatuur en de luchtvochtigheid in de ruimte.
  • Page 53 • De ondergrond moet stevig en waterpas zijn. Dit voorkomt trillingen, geluid en mogelijke waterlekkage. BEDIENINGSPANEEL Dit lampje gaat branden om aan te geven dat de ontdooifunctie is gestart. Dit is nodig om overmatige ijsvorming in het apparaat te voorkomen. Dit lampje gaat branden wanneer het waterreservoir vol is.
  • Page 54 Selecteer de ventilatorsnelheid door op de -toets te drukken. U heeft de keuze uit twee standen: ‘LO’ en ‘HI’. Indien gewenst kunt u gebruik maken van de timer functie. Met deze functie kunt u het apparaat op een vooraf ingestelde tijd laten uitschakelen. Met de -toets kan een werkingstijd worden ingesteld tussen 1 en 12 uur.
  • Page 55 REINIGING Voordat u begint met reinigen dient u de ontvochtiger uit te schakelen. Neem daarna de stekker uit het stopcontact. DE BUITENKANT Reinig de buitenkant met een zachte, droge doek. Indien het apparaat erg vuil is kunt u een mild schoonmaakmiddel gebruiken. Vervolgens afvegen met een licht-vochtige doek. Het apparaat nooit nat spuiten.
  • Page 56: Garantievoorwaarden

    STORINGSTABEL Voordat u om technische ondersteuning vraagt, dient u de volgende zaken te controleren: Probleem Oorzaak Oplossing De stekker zit niet in het Steek de stekker in het stopcontact. stopcontact. De hygrostaat staat op een te Draai de hygrostaat naar de lage stand.
  • Page 57: Technische Specificaties

    TECHNISCHE SPECIFICATIES Type D 116 Netspanning V / Hz / F 220-240 / 50 / 1 Opgenomen vermogen Stroomsterkte Geluidsniveau Ontvochtigingscapaciteit ltr/24 uur* Koudemiddel soort / gr R-134a / 200 Compressor Piston Automatisch ontdooien Insteltoets / hygrostaat Afmeting (bxhxd) 340 x 570 x 245 Netto gewicht Inhoud waterreservoir Luchtdebiet (max.)
  • Page 58 Drodzy Państwo, Serdecznie gratulujemy Wam zakupu naszego odwilżacza powietrza. Nabyliście Państwo urządzenie wysokiej jakości, z którego będziecie mieć pożytek przez wiele, wiele lat, pod warunkiem, że używać go będziecie w sposób odpowiedzialny. Prosimy najpierw zapoznać się z treścią niniejszej instrukcji obsługi, gdyż pomoże to Państwu zapewnić optymalną trwałość zakupionego odwilżacza powietrza.
  • Page 59: Identyfikacja Części

    Identyfikacja części ³ ³ Panel sterowania · Otwór wylotowy suchego powietrza » Ruchomy zbiornik wody Otwór wlotowy wilgotnego powietrza ´ Filtr powietrza ² Rurka odpływowa (ø13 mm) z zaślepką ¶ Kółko samonastawne º Przewód z wtyczką sieciową ¾ Uchwyt...
  • Page 60 Jak używać odwilżacz powietrza Generalnie • Aby odwilżacz pracował sprawnie i optymalnie, w pobliżu jego nie mogą znajdować się grzejniki ani inny sprzęt wytwarzający ciepło. • Urządzenie działa z największą wydajnością, gdy wszystkie okna i drzwi w pomieszczeniu są zamknięte. •...
  • Page 61 • Przed transportem odwilżacza opróżnić całkowicie zbiornik wody. • Wolna przestrzeń wokół urządzenia musi wynosić co najmniej 20 cm. Odzież (pranie) należy wieszać na wysokości co najmniej 50 cm ponad urządzeniem oraz upewnić się, że nie kapie do niego woda. •...
  • Page 62 Urządzenie rozpoczyna usuwanie wilgoci, gdy wilgotność powietrza w pomieszczeniu jest wyższa od ustawionej wartości. Po osiągnięciu żądanego ustawionego stopnia wilgotności odwilżacz wyłącza się automatycznie, po czym włącza się ponownie, kiedy wilgotność w pomieszczeniu wzrośnie ponad wymaganą. Ustaw pożądaną prędkość wentylatora naciskając na przycisk .
  • Page 63 Czyszczenie Przed przystąpieniem do czyszczenia należy najpierw wyłączyć odwilżacz, a następnie odłączyć go od sieci zasilającej. Czyszczenie obudowy Zewnętrzny korpus urządzenia należy wycierać miękką, suchą szmatką. Jeśli urządzenie jest bardzo zabrudzone, można użyć delikatnego środka czyszczącego, a następnie wytrzeć lekko wilgotną...
  • Page 64: Rozwiązywanie Problemów

    Rozwiązywanie problemów Przed skontaktowaniem się z serwisem należy sprawdzić następujące możliwe przyczyny usterek: Urządzenie nie działa Przyczyna Rozwiązanie Urządzenie nie jest podłączone do Włóż wtyczkę do gniazdka sieci. zasilania. Higrostat ustawiony jest na zbyt Przekręć pokrętło higrostatu do niskim poziomie. wymaganej pozycji.
  • Page 65: Dane Techniczne

    DANE TECHNICZNE D 116 220-240 / 50 / 1 Napięcie V / Hz / Ph Zyżycie prądu Zużycie energii Nasilenie hałasu (ciśn. akustyczne) Odwilżenie przy L/24 godz * R-134a / 200 Chłodziwo Piston Kompressor typ Automatyczne odszranianie Regulacja poziomu wilgotności 340 x 570 x 245 Wymiary ( szerxwysxdł...
  • Page 68 Holloway Bank, Wednesbury tel: +43 7434 44867 West Midlands WS10 OAW fax: +43 7434 44868 tel.: +44 121 506 1818 email: pvgaustria@zibro.com fax: +44 121 505 1744 email: gases@lister.co.uk e BELGIË PVG Belgium NV/SA > ITALIA Industrielaan 55 PVG Italy SRL 2900 SCHOTEN Via Niccolò...

Table des Matières