Sony CDX-F5510 Mode D'emploi
Table des Matières
Les langues disponibles
Les langues disponibles
Liens rapides
FM/AM
Compact Disc
Player
Operating Instructions
Mode d'emploi
Owner's Record
The model and serial numbers are located on the bottom of the unit.
Record these numbers in the space provided below.
Refer to these numbers whenever you call upon your Sony dealer regarding this product.
Model No.
For installation and connections, see the supplied installation/connections manual.
En ce qui concerne l'installation et les connexions, consulter le manuel
d'installation/raccordement fourni.
CDX-F5510
CDX-F50M
© 2005 Sony Corporation
Serial No.
2-515-314-11 (1)
US
FR
Chapitres
Table des Matières
Dépannage

Manuels Connexes pour Sony CDX-F5510


Sommaire des Matières pour Sony CDX-F5510
- Page 20 CDX-F5510 et le CDX-F50M. Nous vous remercions d’avoir fait l’acquisition Le tableau ci-dessous indique les différences de ce lecteur de disques compacts Sony. Ce entre les 2 appareils. Elles sont également lecteur vous offre les fonctions suivantes. décrites dans chaque section (exemple : « CDX- •...
- Page 21 Table des matières Préparation Autres fonctions Réinitialisation de l’appareil ....4 Modification des caractéristiques du son ..10 Réglage de l’horloge ..... 4 Réglage des caractéristiques du son Mode DEMO .
-
Page 22: Préparation Réinitialisation De L'appareil
Mode DEMO Préparation Réinitialisation de Lorsque l’appareil est mis hors tension, l’horloge est affichée en premier, puis l’écran du mode de l’appareil démonstration (DEMO) apparaît. Pour annuler le mode DEMO, réglez « DEMO- Avant la première mise en service de l’appareil, OFF »... -
Page 23: Installation De La Façade
Insertion du disque dans Installation de la façade l’appareil Enfilez l’orifice A de la façade sur la tige B de l’appareil, puis poussez doucement sur le côté gauche pour l’engager en position. Appuyez sur (OPEN). Appuyez sur (SOURCE) sur l’appareil (ou Insérez le disque (côté... -
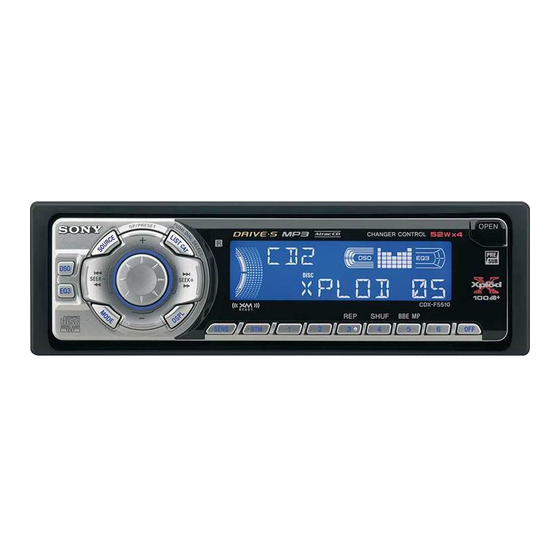
Page 24: Emplacement Des Commandes Et Opérations De Base
Emplacement des commandes et opérations de base Appareil principal OPEN SEEK SEEK SHUF BBE MP SENS CDX-F50M Sans la façade RESET Mini-télécommande RM-X151 (CDX-F5510 uniquement) SOURCE MODE – DSPL SCRL –... - Page 25 (5): BBE MP* Pour plus de détails, reportez-vous aux numéros de pages indiqués. Les touches correspondantes Activation de la fonction BBE MP, réglage de la mini-télécommande pilotent les mêmes de « BBEMP-ON » en cours de lecture sur fonctions que celles de l’appareil. cet appareil.
-
Page 26: Rubriques D'affichage
Lecture répétée et aléatoire Pour plus de détails sur le raccordement d’un En cours de lecture, appuyez changeur CD/MD, reportez-vous à la page 12. plusieurs fois sur (3) (REP) ou sur (4) (SHUF) jusqu’à ce que le réglage souhaité apparaisse dans la fenêtre Rubriques d’affichage d’affichage. -
Page 27: Radio
Radio Recherche automatique des fréquences Réception et mémorisation des stations Sélectionnez la bande, puis appuyez sur (SEEK) –/+ pour rechercher la station. Attention Le balayage s’interrompt lorsque l’appareil Pour régler des stations pendant que vous capte une station. Répétez cette procédure conduisez, utilisez la fonction de mémorisation jusqu’à... -
Page 28: Autres Fonctions
Tournez la molette de sélection du Autres fonctions volume plusieurs fois pour régler le paramètre sélectionné. Modification des Le niveau du volume peut être réglé par incréments de 1 dB, –10 dB à +10 dB. caractéristiques du son Réglage des caractéristiques du son —... -
Page 29: Suppression Du Nom Personnalisé
Appuyez sur la touche (LIST) et Tournez la commande de volume maintenez-la enfoncée. plusieurs fois pour sélectionner le réglage (exemple « ON » ou « OFF »). L’attribution du nom est terminée et l’écran d’affichage revient en mode de lecture/ Appuyez sur la touche de sélection et réception normale. -
Page 30: Si Vous Utilisez Un Équipement En Option
Appuyez sur (GP/PRESET) CONTRAST Pour sauter Pour ajuster le contraste de la fenêtre d’affichage. plusieurs dans les 2 secondes après que Le niveau du contraste peut être groupes de vous avez relâché la touche une réglé par incréments de 7. suite première fois. -
Page 31: Mini-Télécommande Rm-X114
Mini-télécommande RM-X114 Satellite de commande RM-X4S Emplacement des commandes Installation de l’étiquette Les touches correspondantes de la mini- Apposez d’abord l’étiquette comportant les télécommande permettent de commander les indications, suivant la position de montage du mêmes fonctions que celles de l’appareil. satellite de commande. -
Page 32: Appareil Audio Auxiliaire
Dans Vous pouvez raccorder des appareils portables ce cas, retirez le disque et attendez environ une Sony à la borne BUS AUDIO IN/AUX IN de heure que l’humidité se soit évaporée. l’appareil. Si le changeur ou un autre appareil n’est pas raccordé... -
Page 33: À Propos Des Fichiers Mp3
• Les disques de forme non standard (ex. : en – caractères affichables pour un nom de dossier/ forme de cœur, de carré ou d’étoile) ne peuvent fichier : 32 (Joliet) ou 32/64 (Romeo) ; pour les pas être lus avec cet appareil. Vous risquez étiquettes ID3 : 15/30 caractères (versions 1.0, d’endommager votre appareil si vous essayez 1.1, 2.2 et 2.3) ou 63/126 caractères (version... -
Page 34: Entretien
En cas d’ingestion de la pile, consultez version ultérieure, ou SonicStage Simple Burner 1.0 immédiatement un médecin. ou 1.1, qui sont fournis avec les produits Sony • Essuyez la pile avec un chiffon sec pour assurer un Network. bon contact. -
Page 35: Nettoyage Des Connecteurs
3 Tirez sur les clés de déblocage pour retirer Radio le cadre de sûreté. Plage de syntonisation : CDX-F5510 : 87,5 à 107,9 MHz CDX-F50M : 87,5 à 108,0 MHz (incréments de 50 kHz) 87,5 à 107,9 MHz (incréments de 200 kHz) -
Page 36: Amplificateur De Puissance
Cet appareil ne doit pas être branché à un Plage de syntonisation : préamplificateur numérique ou à un égaliseur CDX-F5510 : compatible avec le système BUS Sony. 530 à 1 710 MHz CDX-F50M : La conception et les caractéristiques techniques sont 531 à... - Page 37 Le contenu de la mémoire a été effacé. Ce CD ATRAC ne peut pas être lu. • La touche RESET a été enfoncée. • Le disque n’a pas été créé par un logiciel agréé, t Recommencez la procédure comme SonicStage ou SonicStage Simple d’enregistrement dans la mémoire.
-
Page 38: Affichage Des Erreurs Et Messages
Vérifiez le raccordement. Si le message appuyiez sur une touche.) d’erreur ne disparaît pas de l’affichage, Le raccordement des haut-parleurs ou des communiquez avec votre détaillant Sony le amplificateurs est incorrect. plus proche. t Reportez-vous au guide d’installation de READ cet appareil et vérifiez le raccordement. - Page 39 à l’écran. Si ces solutions ne permettent pas d’améliorer la situation, communiquez avec votre détaillant Sony le plus proche. Si vous portez l’appareil à réparer en raison d’un problème de lecture de CD, apportez également le disque utilisé au moment où le problème s’est...