Table des Matières

Publicité

Les langues disponibles
  • FR

Les langues disponibles

Liens rapides

液晶カラーテレビ用壁掛け金具
LCD Color TV Wall-Mount Bracket
Téléviseur couleur LCD et le support de
montage au mur
Wandhalter für LCD-Farbfernsehgerät
Ménsula de montaje el TV color de cristal
líquido en la pared
ご注意:本製品(SHARP, AN-52AG1)は、下記の SHARP 製液晶テレビ専用のものです。
    これ以外の製品とともに使用すると、事故を引き起こすおそれがあります。
CAUTION:This product (SHARP, AN-52AG1) is only to be used for the SHARP LCD TV as follows.
Using the bracket for another product could cause an accident.
AN-52AG1
取扱説明書
OPERATION MANUAL
MODE D'EMPLOI
BEDIENUNGSANLEITUNG
MANUAL DE MANEJO
1 1 1 1 1

Publicité

Table des Matières
loading

Sommaire des Matières pour Sharp AN-52AG1

  • Page 1 BEDIENUNGSANLEITUNG MANUAL DE MANEJO ご注意:本製品(SHARP, AN-52AG1)は、下記の SHARP 製液晶テレビ専用のものです。     これ以外の製品とともに使用すると、事故を引き起こすおそれがあります。 CAUTION:This product (SHARP, AN-52AG1) is only to be used for the SHARP LCD TV as follows. Using the bracket for another product could cause an accident. 1 1 1 1 1...
  • Page 2 目次 安全に正しくお使いいただくために・・・・・・・・・・・・3 外形寸法図・・・・・・・・・・・・・・・・・・・・・・・4 同梱品・・・・・・・・・・・・・・・・・・・・・・・・・5 壁用金具を壁に取り付ける・・・・・・・・・・・・・・・・6 本体金具ユニットAの角度を設定する・・・・・・・・・・・9 本体金具ユニットAを液晶テレビに取り付ける・・・・・・・11 本体金具ユニットBを本体金具ユニットAに取り付ける・・・13 壁用金具結合レバーを設定する・・・・・・・・・・・・・・14 液晶カラーテレビを壁に取り付ける・・・・・・・・・・・・15 お客様ご相談窓口のご案内・・・・・・・・・・・・・・・・16...
  • Page 3 ■お買いあげありがとうございました ご使用の前にこの取扱説明書をよくお読みください。 特に 「安全に正しくお使いいただくために」 は必ず お読みください。 お読みになったあとは、 いつでも取り出せる場所に必ず大切に保管してください。 安全に正しくお使いいただくために この取扱説明書および商品には、 安全にお使いいただくためにいろいろな表示をしていま す。その表示を無視して誤った取り扱いをすることによって生じる内容を、次のように区 分しています。 内容をよく理解してから本文をお読みになり、 記載事項をお守りください。 警告 人が死亡または重傷を負うおそれがある内容を示しています。 注意 人が傷害を負ったり財産が損害を受けるおそれがある内容を示しています。 ・・・・・・・ 図記号の意味 記号は、してはいけないことを表しています。 安全のため特に注意してください 警告 ■取り付け方法、取り付け方向は、この説明書に従って施工してください。落下に よるケガや破損の原因となります。 ■取り付け工事は、確実な作業が必要ですので、販売店や工事店にご相談ください。 ■取り付けの際には、金具等に指などをはさまないようにご注意ください。 ■取り付ける壁面は十分な強度があることを確認してください。 ( 壁に補強材の入っ ている部分に取り付けてください) ■取り付け金具には他の荷重をかけないでください。 落下によるケガや破損の原因 となります。 ■取り付け部品の改造・変更は行わないでください。 落下によるケガや破損の原因 となります。 注意 湿気やほこりの少ない場所へ 風通しのよい場所へ...
  • Page 4 ◎工事店様へ 必ずお守りください ・お客様の安全のため、取り付け場所の強度 には、液晶カラーテレビと壁掛け金具の荷 液晶カラーテレビの設置には特別な技術 重に耐えるよう十分注意のうえ、設計施工 が必要ですので、必ず専門の取り付け工 を行ってください。 事業者へご依頼ください。お客様による ・作業は必ず 2 名以上で行ってください。 工事は一切行わないでください。取り付 ・壁用金具に対する壁取付ねじは同梱されて け不備、 取り扱い不備による事故、 損傷に いません。壁に適合する市販のねじを選定 ついては、当社は責任を負いません。 ください。 外形寸法図 299.6 壁用金具 17-φ6.5 本体金具ユニット B 本体金具ユニットA こ こ テ の の レ 4-φ12 孔 取 ビ の 付 に 裏...
  • Page 5 同梱品 壁用金具・・・1 個 本体金具ユニッ トB・・・1 個 本体金具ユニッ トA・・・1 個 ※垂直設置用に組み立て済み 本体金具ユニッ ト B 用 壁掛け金具固定用及び本体金具 本体金具ユニット 補助金具・・・1 個 テレビ取付用 ユニット B 補助金具固定用 A・B 固定用 ねじ A M5 ねじ B M6 ねじ C M4 長さ: 8mm (4 本) 長さ: 12mm (4 本) 長さ:...
  • Page 6 壁用金具を壁に取り付ける 壁用金具を設置する場所を決める ご用意いただいた5円玉付きの糸を使って、 壁用金具の垂直を合わせます。 垂直位置は、 壁用金具左右いずれかのV字みぞで確認します。 2ヶ所のねじ孔の位置に、 エンピツ等で印をつけます。 セロハンテープなど V字みぞ  形状のねじ孔 ねじ孔に合わせて、 エンピツなどで背面の 壁に印をつけます ケガキ線 テレビ画面のセンターを あらわしています V字みぞ 同梱品:壁用金具 垂直基準線(V字みぞ)と糸が重なる ようにして水平・垂直を合わせます ねじを仮止めする 一旦壁用金具を壁から離し、 壁につけたねじ孔のマーク位置に市販のねじ (2本) を仮止 めします。 このとき、 ねじ頭は、 壁用金具が掛けられるよう壁から4ミリ以上浮いた状態 にします。 取り付けたねじに壁用金具を掛け、 左右に傾いていないか確認後、 しっかりと ねじを締めます。 残りのねじ孔にも市販のねじ (14〜18本) を使って止めます。 4mm以上 壁 壁 8.5mm以下...
  • Page 7 壁掛け設置のしかた 液晶テレビを壁掛け設置する位置を決める際、以下のような手順によって、 より正確に設置することができます。 1液晶テレビを設置する壁面のテレビの四隅の位置にテープなどを貼り、  テレビの外形寸法の目印をつける 24ケ所の目印から対角線を引き、その交点 (テレビ画面の中心となる位置)  に目印をつける 3この目印と壁用金具のディスプレイ中心を示す刻印を合わせ、壁用金具を  壁に取り付ける 4壁掛け金具ユニットを液晶テレビに取り付けた後、壁面の寸法の目印   (テレビの四隅) を目安にして、テレビを壁用金具に取り付ける 5目印のテープ類を取り除く [例] LC−52GX2 (サイドスピーカータイプ) を壁掛け設置する場合 (単位:mm) 1 4 8 2 ( 5 2 G X 2 ) 1 2 6 4 ( 5 2 G X 1 ) 1 5 1 4 3 0 7 6 1...
  • Page 8 壁用金具側面の高さ表記について 本壁掛け金具は、0cm (標準) 、+5cm、−5cmと、液晶テレビの高さを 3段階に変えることができます。 本体金具ユニットの最上部のピンが壁用金具の上から2番目の溝 (黄色で 「0」 の表示) にかかった状態が標準 (テレビ画面センター) です。 (下図参照) (壁用金具のテレビ画面センターをあらわすケガキ線も、0cm (標準) 状態で のものです。) (緑) (黄) (青) 壁側←   →TVセット側...
  • Page 9 本体金具ユニットAの角度を設定する 壁掛け金具ユニッ トは、 梱包状態では垂直設置用 (0° ) に組み立てられており、 斜め設 置の場合は以下の手順で設置角度の設定が必要です。 (0° /5° /10° /15° /20° /の5つの角度に設定可能です。 ) ・壁掛け金具ユニットの角度調整の際、指などをはさまないようにご注意ください。 垂直設置用のねじを外す 垂直設置用のねじ (4本) を外します。この4本のねじのうち2本は角度を設定する とき (手順4) に使用します。ねじはなくさないように大切に保管ください。 本体金具ユニットAを開く 液晶テレビセット側の金具を図に従い、矢印方向に引きます。...
  • Page 10 本体金具ユニットAの角度を設定する (つづき) ねじ孔を設定する角度にあわせる 金具の表示に従い、設定する角度のねじ孔を合わせます。 0゜ 15゜ 20゜ 5゜ 10゜ 手順 1 で外した 4 本のねじのうち 2 本を使い、ねじを締める (例:15°に設定する場合) ※梱包状態の垂直 (0°) に戻すときのみ、手順1で外した4本のねじを全て使います。...
  • Page 11 本体金具ユニットAを液晶テレビに取り付ける 52V型液晶カラーテレビ (LC-52G X1W、 LC-52G X2W) の場合、 以下の手順で取り 付けます。 ・壁掛け金具ユニットを液晶カラーテレビに取り付ける作業は、液晶カラーテレビの背面を上 側にして、やわらかい布やクッションなどの上に置いて行ってください。 ・ 52型は立てた状態でもスタンドを外すことができますが、 壁掛け金具が取り付けやすい寝か せた状態での取り外し方を説明しています。 ・テレビを起こすときは、スピーカー部分を持たないようにしてください。故障の原因となる ことがあります。 テーブルスタンドを外す テーブルスタン ドを止めているねじ (4本) を外し、 テーブルスタン ドを外します。 (矢印方向に引いてから外します) 取り外したスタン ド固定ねじ (4本) は保管してください。 ケーブルの処理をする 端子カバーを外し、 ケーブルの配線をしたうえで再びカバーを取り付けます。...
  • Page 12 本体金具ユニットAを液晶テレビに取り付ける (つづき) 本体金具ユニットAを取り付ける 角度設定した壁掛け金具ユニッ トを液晶カラーテレビの背面に取り付けます。 z 液晶カラーテレビ背面の孔 (4ヶ所) に本体金具ユニットAのねじ孔 (4ヶ所) を合 わせます。 (刻印A) x 同梱のテレビ取付用ねじB (M6、長さ12mm) 4本を使用してしっかりと締め 付けます。 ※ 液晶カラーテレビ背面の孔 (4ヶ所) にキャップが付いている場合は、あらかじ め取り外しておいてください。...
  • Page 13 本体金具ユニットBを本体金具ユニットAに取り付ける 本体金具ユニットAの角孔に本体金具ユニットBのフック部を差し込む 付属のねじ C(M4、長さ 6mm)6 本で本体金具ユニットAと本体金具 ユニット B を固定する 本体金具ユニット B に本体金具ユニットB補助金具のねじ孔をあわせ、 付属のねじ A(M5、長さ 8mm)2 本で固定する...
  • Page 14 壁用金具結合レバーを設定する ・下記手順 1 と 2 は必ず行ってください。壁用金具結合レバーを固定しなければ、液晶カラー テレビが落下してケガの原因となります。 ・壁用金具結合レバーのねじは、出荷時は+ 5cm に設定されています。 壁用金具結合レバーから、ねじ(M4、長さ 6mm)を 2 本外す 壁用金具結合レバーの高さを調整し、設定したい高さにレバーを合わせ、 手順1で外したねじ(M4、長さ 6mm)を 2 本止める 〈上 5cm〉         〈0 設定〉         〈下 5cm〉 0 表示 − 5 表示 + 5 表示 (黄色)   (青色)   (緑色)...
  • Page 15 液晶カラーテレビを壁に取り付ける ・壁用金具への取り付けは必ず 2 人以上で行ってください。 ・下記手順 1 と 2 は必ず行ってください。手順 1 のみでの設置は液晶カラーテレビが落下して ケガの原因となります。 液晶カラーテレビに取り付けた本体金具ユニットを、壁用金具に取り付ける 壁用金具の両サイ ドの溝に、 本体金具ユニッ トの凸ピンを引っかけます。 こ こ こ こ こ の の の の の と と と と と き き き き き 、 、 、 、 、 本 本 本 本 本 体 体 体 体 体 金 金 金 金 金 具 具 具 具 具 ユ ユ ユ ユ ユ ニ ニ ニ ニ ニ ッ ッ ッ ッ ッ ト ト ト ト ト 側 側 側 側 側 面 面 面 面 面 の の の の の 最 最 最 最 最 上 上 上 上 上 部 部 部 部 部 の の の の の ピ ピ ピ ピ ピ ン ン ン ン ン が が が が が 、 、 、 、 、 前 前 前 前 前 ペ ペ ペ ペ ペ ー ー ー ー ー ジ ジ ジ ジ ジ で で で で で 高 高 高 高 高 さ さ さ さ さ を を を を を 設 設 設 設 設 定 定 定 定 定 し し し し し た た た た た 壁 壁 壁 壁 壁 用 用 用 用 用 金 金 金 金 金 具 具 具 具 具 結...
  • Page 16 お客様ご相談窓口のご案内 修理・お取扱い・お手入れについてのご相談ならびにご依頼は、 お買いあげの販売店へご連絡ください。 転居や贈答品などで、保証書記載の販売店にご相談できない場合は、下記窓口にご相談ください。 ● 製品の故障や部品のご購入に関するご相談は ....修理相談センター  へ ● 製品のお取扱い方法、その他ご不明な点は ......お客様相談センター へ 修 理 相 談 セ ン タ ー ● 修理相談センター(沖縄・奄美地区を除く)  ■受付時間 *月曜〜土曜:午前9時〜午後6時 *日曜・祝日:午前10時〜午後5時(年末年始を除く) 0570 - 02 - 4649 当ダイヤルは、全国どこからでも一律料金でご利用いただけます。 (注)PHS・IP電話からは、下記電話におかけください。 <東日本地区> <西日本地区> ○ PHS・IP電話でのご利用は ..... (一般電話) 043 - 299 - 3863 06 - 6792 - 5511 ○...
  • Page 17 地区別窓口一覧 (つづき) 担当地域 拠 点 名 電 話 番 号 郵便番号 所 在 地 中 国 地 区 広島サービスセンター 082-874-8149 〒731-0113 広島市安佐南区西原2-13-4 四 国 地 区 高松サービスセンター 087-823-4901 〒760-0065 高松市朝日町6-2-8 九 州 地 区 福岡サービスセンター 092-572-4652 〒816-0081 福岡市博多区井相田2-12-1 沖縄・奄美地区 那覇サービスセンター 098-861-0866 〒900-0002 那覇市曙2-10-1 ■ 受付時間 *月曜〜土曜:午前9時〜午後6時 *日曜・祝日:午前10時〜午後5時...
  • Page 18: Table Des Matières

    Contents To Ensure Safe and Correct Use..........E-1 Outside dimension drawing ............E-2 Accessories packaged with the TV .......... E-3 Installing the based bracket to the wall ........E-4 Adjusting the Angle of Main bracket unit A ....... E-7 Mount main bracket unit A to the LCD television ..... E-9 Mount main bracket unit B to the main bracket unit A ....
  • Page 19: To Ensure Safe And Correct Use

    • Thank you for purchasing a SHARP product. Before using the product, please be sure to read this operation manual carefully. In particular, be sure to read the section “To Ensure Safe and Correct Use.” After reading the manual, keep it in a convenient location where it can be accessed at any time.
  • Page 20: Outside Dimension Drawing

    The customer of the LCD color TV and the wall-mount bracket. should not attempt to install the TV. Sharp shall • Be sure to use two or more people to conduct the not be responsible for improper installation or work.
  • Page 21: Accessories Packaged With The Tv

    TV installation location after taking into consideration the viewing posture, line of sight, and the visual and aural ranges. • Sharp shall bear no responsibility for damages, etc., caused by the LCD color TV Caution falling due to insufficient installation strength or improper installation.
  • Page 22: Installing The Based Bracket To The Wall

    Installing the based bracket to the wall Determine the location where the based bracket will be installed. Take the coin with the string and align it perpendicular to the based bracket. Use the V-shaped notches of the bracket in the vertical position to check the horizontal offset of the based bracket.
  • Page 23 How to Install on the Wall Use the following procedure to determine the position for mounting the LCD television on the wall so that it will be installed correctly. (1) Place tape, etc., to mark the four corners of the LCD television to be mounted on the wall to show the dimensions of the television.
  • Page 24 Height marks on the side of the based bracket The wall-mount bracket allows the height of the LCD television to be changed between the 3 settings of 0 cm (standard), +5 cm, and -5 cm. The standard position (television screen center) is when the top-most pin of the main bracket unit is in the second groove from the top of the based bracket (shown by a yellow “0”).
  • Page 25: Adjusting The Angle Of Main Bracket Unit A

    Adjusting the Angle of Main bracket unit A The wall-mount bracket unit is preassembled in the vertical (0°) position setting when packed, so the following procedure must be used to install the TV at an angle. (5 angles are possible: 0°, 5°, 10°, 15°, 20°) Caution •...
  • Page 26 Adjusting the Angle of Main bracket unit A (Continued) Align the screw holes that set the angle. Follow the marks on the bracket and align the screw holes that set the angle. 0° 15° 20° 5° 10° Use 2 of the 4 screws that were removed in Step 1 and tighten them into the bracket.
  • Page 27: Mount Main Bracket Unit A To The Lcd Television

    Mount main bracket unit A to the LCD television Use the following procedures to install the Model 52 inch LCD color TV (LC-52GX1W, LC-52GX2W). The illustrations are for explanation purposes and may different from the actual product. • When installing the wall-mount bracket to the LCD color TV, place the LCD color TV face Caution down on a soft cloth or cushion.
  • Page 28 Mount main bracket unit A to the LCD television (Continued) Install the main bracket unit A. Install the wall-mount bracket (with the angle set) to the back of the LCD color TV. Align the main bracket unit A screw holes (4 locations) to the LCD color TV back holes.
  • Page 29: Mount Main Bracket Unit B To The Main Bracket Unit A

    Mount main bracket unit B to the main bracket unit A Insert the hooks of main bracket unit B into the square holes of main bracket unit A. Use the included 6 screws C (M4, 6mm length) to fasten together main bracket unit A and main bracket unit B.
  • Page 30: Set The Wall-Mount Bracket Connection Lever

    Set the wall-mount bracket connection lever • Be sure to perform Steps 1 and 2 below. If the wall-mount bracket connection lever is not Caution fastened, the LCD television could fall down and injure someone. • The wall-mount bracket connection lever screws are installed in the +5cm holes at shipment. Remove the 2 screws (M4, 6mm length) from the wall-mount bracket connection lever.
  • Page 31: Installing The Lcd Color Tv On The Wall

    Installing the LCD color TV on the wall • Be sure to use at least 2 people when installing the LCD color TV to the based bracket. Caution • Be sure to perform Steps 1 and 2 below. Only performing Step 1 could result in the display falling and injuring someone.
  • Page 32 Table des matiers Pour assurer une utilisation sûre et correcte ......F-1 Schéma des dimensions extérieures ........F-2 Accessoires fournis avec le téléviseur ........F-3 Montage du support à base sur le mur ........F-4 Réglage de l'angle de l'unité A de support principal ....F-7 Montage de l'unité...
  • Page 33: Pour Assurer Une Utilisation Sûre Et Correcte

    • Nous vous remercions d'avoir acheté un produit SHARP. Avant d'utiliser ce produit, veillez absolument à lire attentivement le présent mode d'emploi. En particulier, veillez à lire la section "Pour assurer une utilisation sûre et correcte". Après avoir lu le mode d'emploi, conservez-le à...
  • Page 34: A L'attention De L'entrepreneur

    LCD et le support de montage au mur. spécialisé dans ces travaux d'installation. Le client ne • Pour effectuer les travaux, le concours d'au moins deux doit pas installer lui-même le téléviseur. Sharp décline personnes est absolument nécessaire. toute responsabilité relative à une installation incorrecte •...
  • Page 35: Accessoires Fournis Avec Le Téléviseur

    • Sharp décline toute responsabilité en cas de dommages, etc., causés par une panne du téléviseur Attention couleur LCD dûe à un manque de solidité de l'installation ou à une installation incorrecte.
  • Page 36: Montage Du Support À Base Sur Le Mur

    Montage du support à base sur le mur Déterminez l'emplacement où le support à base doit être installé. Prenez la pièce munie d'un fil et alignez celui-ci perpendiculairement au support à base. À l'aide des encoches en forme de V du support en position verticale, vérifiez le décalage horizontal du support de base.
  • Page 37: Comment Effectuer Le Montage Au Mur

    Comment effectuer le montage au mur Procédez comme suit pour déterminer la position de fixation du téléviseur LCD sur le mur, afin qu'il soit installé correctement. (1) Mettez du ruban adhésif, etc., pour marquer les quatre coins du téléviseur LCD à monter sur le mur afin d'indiquer les dimensions du téléviseur. (2) Tracez des lignes diagonales à...
  • Page 38: Repères De Hauteur Marqués Sur Le Côté Du Support À Base

    Repères de hauteur marqués sur le côté du support à base Le support pour montage mural permet de changer la hauteur du téléviseur LCD parmi les trois réglages de 0 cm (standard), +5 cm et -5 cm. La position standard (centre de l'écran du téléviseur) est celle qui est établie quand la goupille située tout en haut de l'unité...
  • Page 39: Réglage De L'angle De L'unité A De Support Principal

    Réglage de l'angle de l'unité A de support principal L'unité de support pour montage mural a été pré-assemblée avec le réglage en position verticale (0°) dans l'emballage; il faut donc procéder comme suit pour monter le téléviseur avec un angle voulu. (5 angles de montage sont réalisables: 0°, 5°, 10°, 15°, 20°) •...
  • Page 40 Réglage de l'angle de l'unité A de support principal (suite) Alignez les trous des vis qui permettent de régler l'angle. Suivez les repères marqués sur le support et alignez les trous de vis qui permettent de régler l'angle. 0° 15° 20°...
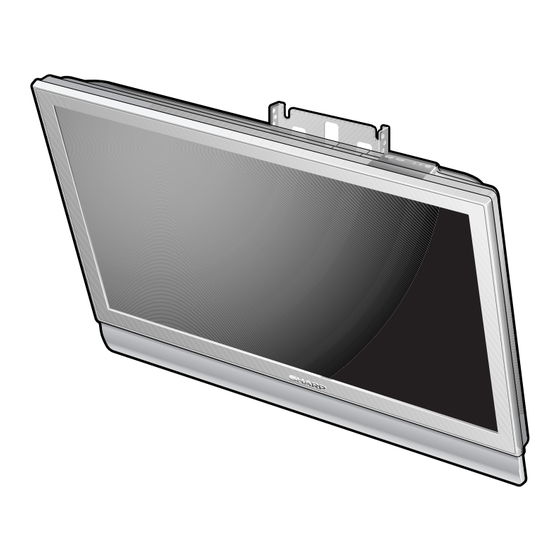
  • Page 41: Montage De L'unité A De Support Principal Sur Le Téléviseur Lcd

    Montage de l'unité A de support principal sur le téléviseur LCD Procédez comme suit pour monter le modèle de téléviseur LCD couleur de 52 pouces (LC-52GX1W, LC-52GX2W). Les illustrations sont utilisées à titre explicatif, et peuvent être différentes du produit réel. •...
  • Page 42: Installation Du Unité A De Support Principal

    Montage de l'unité A de support principal sur le téléviseur LCD (suite) Installation du unité A de support principal Installez le support de montage au mur (avec l'angle ajusté) à l'arrière du téléviseur couleur LCD. Alignez les trous de vis de l'unité A de support principal (4 emplacements) sur les trous du dos du téléviseur LCD couleur.
  • Page 43: Montez L'unité B De Support Principal Sur L'unité A De Support Principal

    Montez l'unité B de support principal sur l'unité A de support principal. Insérez les crochets de l'unité B de support principal dans les trous carrés de l'unité A de support principal. Utilisez les six vis fournies C (M4, 6 mm de long) pour joindre l'unité A de support principal et l'unité...
  • Page 44: Fixez Le Levier De Connexion Du Support Pour Montage Mural

    Fixez le levier de connexion du support pour montage mural. • Veillez à effectuer les étapes 1 et 2 ci-dessous. Si le levier de connexion du support pour Attention montage mural n'est pas fixé, le téléviseur LCD risquerait de tomber et de blesser quelqu'un. •...
  • Page 45: Installation Du Téléviseur Couleur Lcd Sur Le Mur

    Installation du téléviseur couleur LCD sur le mur • Le concours d'au moins deux personnes est indispensable pour monter le téléviseur LCD Attention couleur sur le support à base. • Veillez à effectuer les étapes 1 et 2 ci-dessous. Si vous effectuez l'étape 1 seulement, l'écran risquera de tomber et de blesser quelqu'un.
  • Page 46 Inhalt Zur Gewährleistung von sicherem und korrektem Gebrauch ... D-1 Maßzeichnungen ..............D-2 Lieferumfang ................D-3 Befestigen des Basishalters an der Wand ........ D-4 Einstellen des Winkels der Haupthaltereinheit A ...... D-7 Befestigen der Haupthaltereinheit A am LCD-Fernsehgerät ..D-9 Befestigen der Haupthaltereinheit B an Haupthaltereinheit A ..
  • Page 47: Zur Gewährleistung Von Sicherem Und Korrektem Gebrauch

    • Wir danken Ihnen für den Kauf eines SHARP-Produkts. Bitte lesen Sie diese Bedienungsanleitung vor Gebrauch des Produkts sorgfältig durch. Schenken Sie dabei dem Abschnitt "Zur Gewährleistung von sicherem und korrektem Gebrauch" besondere Aufmerksamkeit. Bewahren Sie die Anleitung nach der Durchsicht an einem leicht zugänglichen Ort griffbereit auf.
  • Page 48: Maßzeichnungen

    • Führen Sie die Arbeit mit zwei oder mehr Personen einem Installationsversuch des Fernsehgerätes aus. Abstand nehmen. Sharp übernimmt keine Haftung • Die Befestigungsschrauben für den Wandhalter sind für Unfälle, Sachschäden oder Verletzungen, die auf nicht im Lieferumfang enthalten. Besorgen Sie sich für das Wandmaterial geeignete Schrauben im unsachgemäße Installation zurückzuführen sind.
  • Page 49: Lieferumfang

    Legen Sie den Installationsort des Fernsehgerätes fest, nachdem Sie Betrachtungshaltung, Sichtlinie sowie optische und akustische Entfernung in Erwägung gezogen haben. • Sharp übernimmt keine Haftung für Schäden usw., die durch Herunterfallen des LCD-Farbfernsehgerätes Vorsicht wegen unzureichender Installationsfestigkeit oder unsachgemäßer Installation verursacht werden.
  • Page 50: Befestigen Des Basishalters An Der Wand

    Befestigen des Basishalters an der Wand Festlegen der Installationsposition des Basishalters. Die Schnur mit der daran befestigten Münze lotrecht zum Basishalter ausrichten. Den horizontalen Versatz des Basishalters anhand der V-Kerben des Halters in der Vertikalposition prüfen. Markieren Sie die Positionen für die Schraubenlöcher mit einem Bleistift usw. Zellophanband usw.
  • Page 51: Befestigung An Der Wand

    Befestigung an der Wand Ermitteln Sie die Wandmontageposition des LCD-Fernsehgerätes nach dem folgenden Verfahren, um korrekte Installation zu gewährleisten. (1) Die vier Ecken des an der Wand zu montierenden LCD-Fernsehgerätes mit Klebeband etc. markieren, um die Abmessungen des Fernsehgerätes zu zeigen.
  • Page 52 Höhenmarkierungen an der Seite des Basishalters Der Wandhalter gestattet eine Höhenverstellung des LCD-Fernsehgeräts in 3 Stufen von 0 cm (Standard), +5 cm und –5 cm. Die Standardposition (Fernsehschirmmitte) ist gegeben, wenn sich der oberste Stift der Haupthaltereinheit in der zweiten Nut des Basishalters von oben befindet (durch eine gelbe „0“...
  • Page 53: Einstellen Des Winkels Der Haupthaltereinheit A

    Einstellen des Winkels der Haupthaltereinheit A Die Wandhaltereinheit wurde bei der Verpackung auf die Senkrechtstellung (0°) vormontiert. Daher muss das folgende Verfahren angewandt werden, um das Fernsehgerät zu neigen. (5 Winkel sind verfügbar: 0°, 5°, 10°, 15°, 20°) • Achten Sie beim Einstellen der Wandhalterneigung darauf, dass Sie sich nicht die Finger Vorsicht usw.
  • Page 54 Einstellen des Winkels der Haupthaltereinheit A (Fortsetzung) Die Schraubenlöcher zur Einstellung des Winkels ausrichten. Die Schraubenlöcher zur Einstellung des Winkels anhand der Markierungen am Halter ausrichten. 0° 15° 20° 5° 10° 2 der in Schritt 1 entfernten 4 Schrauben in den Halter eindrehen. (Beispiel: Bei Einstellung auf 15°.) *Alle 4 der in Schritt 1 entfernten Schrauben werden nur dann verwendet, wenn der Halter auf die vormontierte Senkrechtstellung (0°) zurückgestellt wird.
  • Page 55: Befestigen Der Haupthaltereinheit A Am Lcd-Fernsehgerät

    Befestigen der Haupthaltereinheit A am LCD-Fernsehgerät Wenden Sie das folgende Verfahren zur Installation des 52-Zoll-Modells des LCD- Farbfernsehgeräts (LC-52GX1W, LC-52GX2W) an. Die Abbildungen dienen Erläuterungszwecken und können vom tatsächlichen Produkt abweichen. • Wenn Sie den Wandhalter am LCD-Farbfernsehgerät montieren, legen Sie das LCD- Vorsicht Farbfernsehgerät mit der Bildschirmseite nach unten auf ein weiches Tuch oder Kissen.
  • Page 56 Befestigen der Haupthaltereinheit A am LCD-Fernsehgerät (Fortsetzung) Montage des Haupthaltereinheit A. Befestigen Sie den Wandhalter (mit eingestelltem Winkel) an der Rückseite des LCD- Farbfernsehgerätes. Die Schraubenlöcher der Haupthaltereinheit A (4 Stellen) auf die Löcher in der Rückseite des LCD-Farbfernsehgeräts ausrichten. (Prägung „A“) Den Halter mit den 4 im Lieferumfang des Fernsehgeräts enthaltenen TV- Installationsschrauben B (M6, 12 mm Länge) am Fernsehgerät befestigen.
  • Page 57: Befestigen Der Haupthaltereinheit B An Haupthaltereinheit A

    Befestigen der Haupthaltereinheit B an Haupthaltereinheit A Die Haken der Haupthaltereinheit B in die Rechtecklöcher der Haupthaltereinheit A einhängen. Die Haupthaltereinheiten A und B mit den 6 mitgelieferten Schrauben C (M4, 6 mm Länge) zusammenmontieren. Die Haupthaltereinheit B auf die Schraubenlöcher im Hilfshalter der Haupthaltereinheit B ausrichten, und die Teile mit den mitgelieferten 2 Schrauben A (M5, 8 mm Länge) zusammenmontieren.
  • Page 58: Einstellen Der Wandhalter-Verbindungsplatte

    Einstellen der Wandhalter-Verbindungsplatte • Führen Sie die nachstehenden Schritte 1 und 2 aus. Falls die Wandhalter-Verbindungsplatte Vorsicht nicht befestigt wird, kann das LCD-Fernsehgerät herunterfallen und jemanden verletzen. • Die Schrauben der Wandhalter-Verbindungsplatte wurden vor dem Versand in die +5-cm- Löcher installiert. Die 2 Schrauben (M4, 6 mm Länge) von der Wandhalter- Verbindungsplatte entfernen.
  • Page 59: Montage Des Lcd-Farbfernsehgerätes An Der Wand

    Montage des LCD-Farbfernsehgerätes an der Wand • Halten Sie das LCD-Farbfernsehgerät bei der Montage am Basishalter mit mindestens 2 Personen. Vorsicht • Führen Sie die nachstehenden Schritte 1 und 2 aus. Wird nur Schritt 1 ausgeführt, kann das Display herunterfallen und jemand verletzen. Installieren der am LCD-Farbfernsehgerät befestigten Haupthaltereinheit am Basishalter.
  • Page 60 Indice Para garantizar su seguridad y uso correcto ........ES-1 Dibujo de dimensiones exteriores ............. ES-2 Accesorios entregados con el TV ............. ES-3 Instalación de la ménsula de base en la pared ......... ES-4 Ajuste del ángulo de la unidad de ménsula principal A ....ES-7 Monte la unidad de ménsula principal A en el televisor de cristal líquido ..
  • Page 61: Para Garantizar Su Seguridad Y Uso Correcto

    • Muchas gracias por su compra de un producto de SHARP. Antes de utilizar el producto, lea sin falta, cuidadosamente este manual de instruciones. En especial, lea la sección “Para garantizar su seguridad y uso correcto”. Después de leer el manual, guárdelo en un lugar conveniente donde pueda encontrarlo en cualquier momento.
  • Page 62: Dibujo De Dimensiones Exteriores

    El cliente no TV color y la ménsula de montaje en la pared. debe tratar de instalar el TV. Sharp no se • Asegúrese que haya dos o más personas para hace responsable por una mala instalación realizar el trabajo.
  • Page 63: Accesorios Entregados Con El Tv

    Determine el lugar de instalación de TV teniendo en cuenta el lugar desde el que lo va a ver, línea de visión y la gama visual y auditiva. • Sharp no se hace responsable por daños, etc. provocados porque se caiga la pantalla de cristal Precaución líquido del TV color debido a que no se instaló...
  • Page 64: Instalación De La Ménsula De Base En La Pared

    Instalación de la ménsula de base en la pared Determine el lugar donde se va a instalar la ménsula de base. Tome una moneda con cuerda y alinee perpendicularmente a la ménsula de base. Utilice las muescas en forma de V de la ménsula en la posición vertical para verificar el desplazamiento horizontal de la ménsula de base.
  • Page 65: Cómo Instalar En La Pared

    Cómo instalar en la pared Utilice el siguiente procedimiento para determinar la posición de montaje del televisor de cristal líquido en la pared para que esté correctamente instalado. (1) Coloque cinta, etc. para marcar las cuatro esquinas del televisor de cristal líquido a montar en la pared para mostrar las dimensiones del televisor.
  • Page 66 Marcas de altura en el lado de la ménsula de base La ménsula de montaje la pared permite cambiar la altura del televisor de cristal líquido entre 3 ajustes de 0 cm (normal), +5 cm y -5 cm. La posición normal (centro de la pantalla de televisión) es cuando el pasador superior de la unidad de ménsula principal está...
  • Page 67: Ajuste Del Ángulo De La Unidad De Ménsula Principal A

    Ajuste del ángulo de la unidad de ménsula principal A La unidad de ménsula de montaje en a pared está armado previamente para el ajuste de posición vertical (0°) antes de colocarlo en su caja y debe utilizar el siguiente procedimiento para instalar el TV en un ángulo.
  • Page 68 Ajuste del ángulo de la unidad de ménsula principal A (Continúa) Alinee los orificios de tornillos que fijan el ángulo. Siga las marcas en la ménsula y alinee los orificios de tornillos que fijan el ángulo. 0° 15° 20° 5° 10°...
  • Page 69: Monte La Unidad De Ménsula Principal A En El Televisor De Cristal Líquido

    Monte la unidad de ménsula principal A en el televisor de cristal líquido Utilice los siguientes procedimientos para instalar el modelo de TV color de cristal líquido de 52 pulg. (LC-52GX1W, LC-52GX2W). Las figuras son sólo para explicación y pueden ser diferentes de su producto en sí. •...
  • Page 70 Monte la unidad de ménsula principal A en el televisor de cristal líquido (Continúa) Instalación de la unidad de ménsula principal A. Instale la ménsula de montaje en la pared (con el juego de ángulo) en la parte trasera de la pantalla de cristal líquido del TV color.
  • Page 71: Monte La Unidad De Ménsula Principal B En La Unidad De Ménsula Principal A

    Monte la unidad de ménsula principal B en la unidad de ménsula principal A Inserte los ganchos en la unidad de ménsula principal B en los orificios cuadrados de la unidad de ménsula principal A. Utilice los 6 tornillos incluidos C (M4, longitud de 6 mm) para apretar entre sí...
  • Page 72: Instale La Palanca De Conexión De Ménsula De Montaje En La Pared

    Instale la palanca de conexión de ménsula de montaje en la pared • Asegúrese de realizar los pasos 1 y 2 a continuación. Si no se fija la palanca de conexión de Precaución ménsula de montaje en la pared, el televisor de cristal líquido puede caerse y herir a alguien. •...
  • Page 73: Instalación De La Pantalla De Cristal Líquido Del Tv Color En La Pared

    Instalación de la pantalla de cristal líquido del TV color en la pared • Asegúrese de que haya por lo menos 2 personas cuando instale el TV color de cristal líquido Precaución en la ménsula de base. • Asegúrese de realizar los siguientes pasos 1 y 2. Si sólo realiza el paso 1 puede provocar una caída de la pantalla provocando heridas.
  • Page 75 CH-1...
  • Page 76 CH-2...
  • Page 77 CH-3...
  • Page 78 CH-4...
  • Page 79 CH-5...
  • Page 80 CH-6...
  • Page 81 CH-7...
  • Page 82 CH-8...
  • Page 83 CH-9...
  • Page 84 CH-10...
  • Page 85 CH-11...
  • Page 86 CH-12...
  • Page 87 CH-13...
  • Page 88 〒545-8522 大阪市阿倍野区長池町22番22号 本 社 AVシステム事業本部 〒329-2193 栃木県矢板市早川町174番 SHARP CORPORATION ★この取扱説明書は再生紙を使用しています。 日本印刷 * This Operation Manual is made from recycled paper. Printed in Japan * Ce mode d’emploi est fabriqué à partir de papier recyclé. Imprimé au Japon * Diese Bedienungsanleitung ist aus Recyclingpapier hergestellt.

Table des Matières