Table des Matières

Publicité

Les langues disponibles
  • FR

Les langues disponibles

  • FRANÇAIS, page 23

Liens rapides

NeoPix Easy 2
Home Projector
Register your product and get support at
www.philips.com/support
EN User Manual
FR Manuel utilisateur
DE Bedienungsanleitung
ES Manual del usuario
+
IT Manuale d'uso
NL Gebruiksaanwijzing
RU Руководство пользователя

Publicité

Table des Matières
loading

Sommaire des Matières pour Philips NeoPix Easy 2+

  • Page 1 EN User Manual FR Manuel utilisateur DE Bedienungsanleitung ES Manual del usuario IT Manuale d’uso NeoPix Easy 2 NL Gebruiksaanwijzing Home Projector RU Руководство пользователя Register your product and get support at www.philips.com/support...
  • Page 2 User Manual NeoPix Easy 2 Home Projector Register your product and get support at www.philips.com/support...
  • Page 3: Table Des Matières

    Table of contents Introduction ����������������������������������������������3 7 Service ����������������������������������������������� 15 Dear customer ............3 Cleaning ..............15 About this user manual ........3 Update software ...........15 What’s in the box ............3 Troubleshooting ............16 General safety information �������������4 8 Appendix ������������������������������������������� 17 Setting up the product .........4 Technical data ............
  • Page 4: Introduction

    Introduction What’s in the box NeoPix Easy 2 projector (NPX442) Dear customer Remote control with 2 AAA batteries A/C power adapter Thank you for purchasing this projector. Power plugs (EU, UK, US) We hope you enjoy this product and the many Quick Start Guide functions it offers! Lens cover...
  • Page 5: General Safety Information

    Please find the details of authorised service shut it down immediately and unplug the centres on the warranty card supplied with this product. Do not remove the type label from this product, as this will void the warranty. Philips · NeoPix Easy 2...
  • Page 6: Power Supply

    2 Overview Power supply Use only a power adapter which is certified for this product (see Technical data, page 17). Top view Check whether the mains voltage of the power supply matches the mains voltage available at the setup location. This product complies with the voltage type specified on the product.
  • Page 7: Front View

    Switch the projector on or to standby. Connect to the VGA port on a computer. • When the projector is switched on, the Rear IR sensor LED turns green. When the projector is in standby, the LED turns red. Philips · NeoPix Easy 2...
  • Page 8: Access Home Menu

    3 Initial operation Access home menu The home menu provides easy access to media player, setup and other useful features in the Placing projector projector. You can install the projector in four different Press . The home menu is displayed. configuration.
  • Page 9: Changing Screen Size

    • The LED on the projector turns red. To adjust projection to the correct position, MICRO SD HDMI press , and go to SETUP - Panel Flip Rotate. Philips · NeoPix Easy 2...
  • Page 10: Preparing The Remote Control

    Preparing the remote To adjust the screen height when placing the projector on the table, turn the angle control adjustment knob located on the bottom of the projector. CAUTION! The improper use of batteries can lead to overheating, explosion, risk of fire and injury.
  • Page 11: Connect To Playback Devices

    VGA signal to an Using a RCA cable with 3.5 mm plug, Philips · NeoPix Easy 2...
  • Page 12: Connecting To External Speakers Or Headphones

    external monitor. The following resolutions are supported: MICRO SD HDMI Resolution Image refresh rate 640 x 480 60 Hz SVGA 800 x 600 60 Hz 1024 x 768 60 Hz WXGA 1280 x 768 60 Hz 1280 x 720 60 Hz FULL HD 1920 x 1080 60 Hz...
  • Page 13: Media Playback

    PHOTO: access and play photo files • • If video media player is selected, only. only the playable video files can be Select MUSIC to activate music media displayed. player and access music files. Philips · NeoPix Easy 2...
  • Page 14: Photo Playback

    • If music media player is selected, Select PHOTO to activate photo media only the playable music files can be player and access photo files. displayed. • If photo media player is selected, Select a music file and press OK to play only the playable photo files can be music.
  • Page 15: Change Settings

    (in hour). movie and music. • Auto Volume: Set auto volume on to reduce sudden changes in volume. Surround Sound: Turn surround on or • off. Philips · NeoPix Easy 2...
  • Page 16: Cleaning The Lens

    Update software The latest software of the projector can be found on www.philips.com/support for you to get the best features and support from the projector. Before you update the software of the projector, check the current software version: •...
  • Page 17 What to do if the projector does not • Check that the HDMI cable is plugged in correctly. work when connecting to a notebook • Make sure that the notebook PC has been switched to projector display. Philips · NeoPix Easy 2...
  • Page 18: Technical Data

    8 Appendix Power source Power consumption ....operating: 42 W ..........Standby: 0.3 W Technical data Power supply ........ power adapter ..Input: 100-240V~, 50/60Hz, 1.0 A (max) Technology/optical ..........Output: DC 12 V, 3.5 A Display technology ........LCD Light source ............LED Product details Resolution .........
  • Page 19 The Declaration of Compliance can be this device must accept any interference consulted on the site www.philips.com/ received, including interference that may projection. cause undesired operation. FCC RF Radiation Exposure Statement: Preservation of the environment as part...
  • Page 20 Screeneo Innovation SA/PHILIPS products or Screeneo Innovation SA/PHILIPS approve d products. Screeneo Innovation SA shall not be held liable...
  • Page 21 PHILIPS and the PHILIPS’ Shield Emblem are registered trademarks of Koninklijke Philips N.V. used under license. This product was brought to the market by Screeneo Innovation SA., further referred to in this document as Screeneo Innovation SA., and is the manufacturer of the product.
  • Page 22 Manuel utilisateur NeoPix Easy 2 Home Projector Enregistrez votre produit et obtenez de l’aide sur www.philips.com/support...
  • Page 23 Table des matières Introduction ����������������������������������������������3 Restauration des paramètres par défaut ..15 Rotation de l’écran de projection ....15 Cher client ..............3 Configuration du minuteur de veille À propos du manuel utilisateur ......3 automatique ............15 Contenu de la boîte ..........3 Configuration de la veille automatique ..15 Informations générales sur la 7 Service �����������������������������������������������16 sécurité...
  • Page 24: Introduction

    Introduction Contenu de la boîte Projecteur NeoPix Easy 2 (NPX442) Cher client Télécommande alimentée par 2 piles Nous vous remercions d’avoir choisi ce Adaptateur d’alimentation CA projecteur. Fiches secteur (EU, UK, US) Nous espérons que vous apprécierez ce Guide de démarrage rapide produit et les nombreuses fonctions qu’il Protège-objectif offre !
  • Page 25: Informations Générales Sur La Sécurité

    Prenez toujours soin de l’appareil. Évitez de Pour votre propre sécurité, n’utilisez pas toucher l’objectif. Ne posez jamais d’objets l’appareil pendant des orages accompagnés lourds ou à extrémité tranchante sur d’éclairs l’appareil ou le câble d’alimentation. Philips · NeoPix Easy 2...
  • Page 26: Réparations

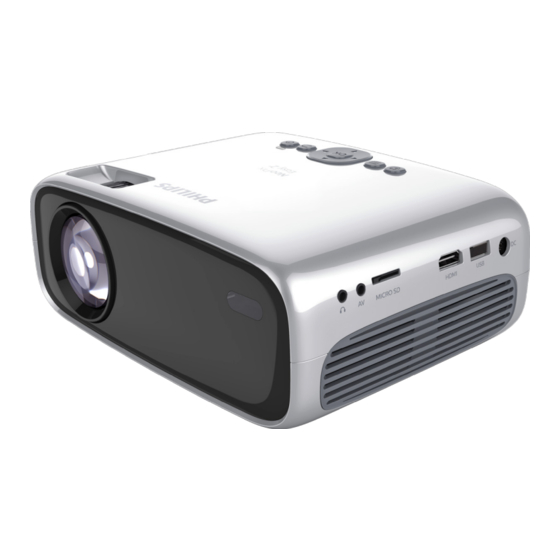
    2 Aperçu Réparations Ne réparez pas vous-même l’appareil. Une maintenance non conforme peut Vue de dessus occasionner des dommages corporels et matériels. Faites examiner votre appareil exclusivement par un centre de maintenance agréé. La carte de garantie contient les coordonnées des centres de maintenance agréés.
  • Page 27: Vue De Face

    Branchez ici l’alimentation électrique. Vue arrière Pour augmenter ou diminuer le volume. Pour démarrer, mettre en pause ou reprendre la lecture multimédia. Pour passer au fichier multimédia précédent/suivant. Pour revenir à l’écran de menu précédent. Philips · NeoPix Easy 2...
  • Page 28: Accès Au Menu De L'accueil

    3 Première mise Touches de navigation • Pour parcourir les options du menu. en service • Appuyez sur / pour modifier une sélection. Installation du projecteur Pour accéder au menu des réglages. Vous pouvez installer le projecteur dans • Pour allumer ou mettre en veille de 4 différentes configurations.
  • Page 29: Modification De La Taille De L'écran

    écran de projection par l’arrière spécial sont nécessaires. Branchez l’adaptateur d’alimentation fourni à la prise du projecteur puis à la prise murale. • La LED du projecteur s’allume en rouge. Philips · NeoPix Easy 2...
  • Page 30: Préparation De La Télécommande

    Mise sous tension et installation Appuyez sur pour allumer le projecteur. La LED du projecteur passe du rouge au vert. • Pour éteindre le projecteur, réappuyez sur . La LED du MICRO SD HDMI projecteur passe du vert au rouge. •...
  • Page 31: Branchement À Des Appareils De Lecture

    écran (par ex. un projecteur). Consultez le mode d’emploi de votre ordinateur portable pour savoir comment activer la sortie vidéo externe. Branchez un câble VGA au connecteur VGA du projecteur et à la sortie VGA d’un ordinateur. Philips · NeoPix Easy 2...
  • Page 32: Branchement À Des Haut-Parleurs Externes Ou À Des Écouteurs

    Branchez un câble audio de 3,5 mm au connecteur du projecteur et à la sortie audio analogique (prise 3,5 mm, ou prises rouge et blanche) des haut- parleurs externes. Autrement, branchez les écouteurs au connecteur projecteur. • Les haut-parleurs du projecteur se désactivent automatiquement lors du branchement des écouteurs ou des haut-parleurs...
  • Page 33: Lecture Multimédia

    : .mp3/.aac/.ogg/.flac lecteurs multimédias suivants. Répétez les étapes 1 à 2 dans le chapitre MUSIC (MUSIQUE) : accédez et jouez • « Lecture de film ». Le menu de l’accueil seulement des fichiers audio. s’affichera. Philips · NeoPix Easy 2...
  • Page 34: Affichage De Photo

    Sélectionnez une fonction de commande, puis appuyez sur OK pour exécuter la commande. Appuyez sur pour quitter le mode de lecture choisi. Affichage de photo Formats de fichiers pris en charge Les formats de fichier suivants sont pris en charge : .jpeg/.bmp/.png/.gif Répétez les étapes 1 à...
  • Page 35: Modification Des Paramètres

    • Noise Reduction (Réduction du bruit) : pour réduire le niveau de bruit. Paramètres du son Appuyez sur Sélectionnez SETUP (CONFIGURATION), puis appuyez sur OK pour accéder aux options de configuration. Philips · NeoPix Easy 2...
  • Page 36: Paramètres De Langue

    Rotation de l’écran de Sélectionnez une option du son, puis appuyez sur / pour effectuer les projection modifications : • Sound Mode (Mode sonore) : Appuyez sur sélectionnez les paramètres Sélectionnez SETUP (CONFIGURATION), sonores prédéfinis pour votre vidéo puis appuyez sur OK pour accéder aux ou musique.
  • Page 37: Service

    Avant de mettre à jour le logiciel du projecteur, contrôlez la version actuelle du logiciel : • Appuyez sur , puis sélectionnez SETUP - Info (CONFIGURATION - Infos). Philips · NeoPix Easy 2...
  • Page 38: Dépannage

    Dépannage Éteignez le projecteur en appuyant sur . Attendez au moins dix secondes. Mise sous tension Allumez le projecteur en appuyant une fois sur S’il se produit un problème ne pouvant Si le problème persiste, veuillez être corrigé à l’aide des instructions de contacter notre centre de maintenance ce manuel utilisateur, suivez les étapes technique ou votre revendeur.
  • Page 39 Que faire si le projecteur ne • Vérifiez que le câble HDMI est branché fonctionne pas lorsqu’il est correctement. connecté à un ordinateur portable ? • Assurez-vous que l’ordinateur portable a été commuté sur l’écran du projecteur. Philips · NeoPix Easy 2...
  • Page 40: Annexe

    8 Annexe Source d’alimentation Consommation électrique ................en fonctionnement : 42 W Caractéristiques ..........En veille : 0,3 W Alimentation électrique ......... techniques ........adaptateur d’alimentation . Entrée : 100 à 240 V~, 50/60 Hz, 1,0 A (max) Technologie/Optique ..........Sortie : 12 V CC/3,5 A Technologie d’affichage .......
  • Page 41 Cet appareil doit accepter toute une installation particulière. Si cet appareil interférence, y compris des provoque des interférences nuisibles à interférences qui peuvent provoquer un la réception radio ou télévision, ce qui fonctionnement non désiré de l’appareil. Philips · NeoPix Easy 2...
  • Page 42 être produits originaux de Screeneo Innovation éliminées au dépôt prévu à cet effet. SA ou PHILIPS ou des produits agréés par Screeneo Innovation SA ou PHILIPS. Screeneo Innovation SA n’assume aucune responsabilité pour les demandes de dommages et intérêts à...
  • Page 43 PHILIPS and the PHILIPS’ Shield Emblem are registered trademarks of Koninklijke Philips N.V. used under license. This product was brought to the market by Screeneo Innovation SA., further referred to in this document as Screeneo Innovation SA., and is the manufacturer of the product.
  • Page 44 Bedienung- sanleitung NeoPix Easy 2 Home Projector Registrieren Sie Ihr Produkt und erhalten Sie Support unter www.philips.com/support...
  • Page 45 Inhaltsverzeichnis Einleitung ��������������������������������������������������3 Drehen/spiegeln des projizierten Bildes ..16 Einstellen des Schlummerfunktion ....16 Sehr geehrter Kunde, ..........3 Automatische Abschaltung .......16 Information zu dieser Bedienungsanleitung ..........3 7 Wartung und Pflege ������������������������ 17 Lieferumfang ............3 Reinigung..............17 Allgemeine Sicherheitshin- Aktualisieren der Software ........ 17 weise ����������������������������������������������������4 Fehlerbehebung ............18 Einrichten des Produkts ........4...
  • Page 46: Einleitung

    Einleitung VORSICHT! Beschädigung des Produkts oder Datenverlust! Sehr geehrter Kunde, Dieses Symbol warnt Sie vor möglichen Produktschäden vielen Dank, dass Sie sich für diesen und Datenverlusten. Diese Projektor entschieden haben. Schäden können in Folge einer Wir hoffen, Sie genießen dieses Produkt und unsachgemäßen Handhabung die vielen Funktionen, die es Ihnen bietet! entstehen.
  • Page 47: Allgemeine Sicherheitshinweise

    Stromversorgung. Lassen Sie das von Kindern gelangen. Produkt anschließend von einem autorisierten Nehmen Sie das Produkt zu Ihrer eigenen Kundendienstzentrum überprüfen. Sicherheit nicht während eines Gewitters in Lassen Sie im Umgang mit dem Produkt stets Betrieb. Philips · NeoPix Easy 2...
  • Page 48: Reparaturen

    2 Übersicht Reparaturen Nehmen Sie keine eigenständigen Reparaturarbeiten an dem Produkt vor. Ansicht von oben Eine unsachgemäße Wartung kann zu ernsthaften Verletzungen oder Schäden am Produkt führen. Lassen Sie das Produkt daher ausschließlich von einem autorisierten Kundendienstzentrum in Stand setzen. Informationen zu autorisierten Kundendienstzentren finden Sie auf der diesem Produkt beiliegenden Garantiekarte.
  • Page 49: Vorderansicht

    Schließen Sie hier das Netzteil an. Rückansicht Erhöhen oder verringern Sie den Lautstärkepegel. Starten bzw. pausieren Sie die Wiedergabe oder setzen Sie sie fort. Springen Sie zur nächsten/vorherigen Mediendatei. Kehren Sie zum vorherigen Menübildschirm zurück. Philips · NeoPix Easy 2...
  • Page 50: Aufrufen Des Startmenüs

    3 Erstmalige Navigationstasten • Mit diesen Tasten navigieren Sie durch die verschiedenen Menüpunkte. Inbetriebnahme • Über die Tasten / ändern Sie die aktuelle Auswahl. Aufstellung und Montage Erhalten Sie Zugang zum des Projektors Einstellungsmenü. Zur Aufstellung bzw. Montage des Projektors •...
  • Page 51: Ändern Der Projektionsflächengröße

    Zeit. Bei korrekter Für die Deckenmontage hinter der Ausführung lässt sich dieser nun Projektionsfläche ist eine separat einfach vom runden Sockel des erhältliche Halterung für den Projektor Netzteils lösen. und eine spezielle Rückprojektionswand erforderlich. Philips · NeoPix Easy 2...
  • Page 52: Inbetriebnahme Der Fernbedienung

    Legen Sie nun die im Lieferumfang enthaltenen Batterien (Typ AAA) unter Berücksichtigung der angegebenen Polarität (+/-) ein. Verschließen Sie das Batteriefach anschließend wieder. Schließen Sie nun das mitgelieferte Netzteil an den Netzeingang des Projektors und anschließend an eine Steckdose in der Nähe an. •...
  • Page 53: Anschließen Von

    Verwenden Sie anschließend die Tasten Anschluss des Projektors und dem / , um die Bildgröße anzupassen. HDMI-Ausgang am Wiedergabegerät. MICRO SD HDMI Drücken Sie , um die Liste der Eingangsquellen anzuzeigen, und wählen Sie anschließend HDMI. Philips · NeoPix Easy 2...
  • Page 54: Anschließen Von Geräten Über Av

    Anschließen von Geräten Nehmen Sie ein VGA-Kabel zur Hand und verbinden Sie es mit dem VGA-Anschluss über AV des Projektors und dem VGA-Ausgang eines Computers. Schließen Sie ein Wiedergabegerät (z. B. einen DVD-Spieler, eine Spielekonsole, eine Videokamera oder eine Digitalkamera) an den AV-Anschluss des Projektors an.
  • Page 55: Medienwieder-Gabe

    Kopfhörer die zur Anpassung des Lautstärkepegels vorgesehenen Tasten auf der Fernbedienung, um die Lautstärke auf einen angenehmen Pegel einzustellen. Verwenden Sie nun die Navigationstasten und die OK, um einen der folgenden Media Player auszuwählen. Philips · NeoPix Easy 2...
  • Page 56: Musikwiedergabe

    Musikwiedergabe MUSIC (MUSIK): Nur auf Audiodateien • zugreifen und diese wiedergeben. Unterstützte Dateiformate MOVIE (FILM): Nur auf Videodateien • zugreifen und diese abspielen. Im Folgenden sind die unterstützten Dateiformate aufgeführt: .mp3/.aac/.ogg/ PHOTO (BILD): Nur auf Bilddateien • .flac zugreifen und diese anzeigen. Wählen Sie MOVIE (FILM), um den Video- Wiederholen Sie die im Abschnitt Media Player aufzurufen und Zugriff auf...
  • Page 57: Wiedergabe Von Bilddateien

    OK drücken. Möchten Sie einen auszuwählen. bestimmten Modus wieder verlassen, MUSIC (MUSIK): Nur auf Audiodateien • dann drücken Sie auf zugreifen und diese wiedergeben. MOVIE (FILM): Nur auf Videodateien • zugreifen und diese abspielen. Philips · NeoPix Easy 2...
  • Page 58: Ändern Der Einstellungen

    6 Ändern der • Noise Reduction (Rauschunterdrückung): Stellen Sie das gewünschte Niveau der Einstellungen Rauschunterdrückung ein. Toneinstellungen In diesem Abschnitt erfahren Sie, wie Sie Änderungen an den Einstellungen des Drücken Sie auf Projektors vornehmen können. Wählen Sie dann die Option SETUP Bildeinstellungen (EINSTELLUNGEN) und drücken Sie OK, um Zugriff auf die verschiedenen...
  • Page 59: Wiederherstellen Der Werkseinstellungen

    Wählen Sie dann die Option SETUP (EINSTELLUNGEN) und drücken Sie OK, um Zugriff auf die verschiedenen Einstellungsmöglichkeiten zu erhalten. Wählen Sie anschließend den Menüpunkt Sleep Timer (Schlummerfunktion) und drücken Sie / , um eine beliebige Zeitspanne (in Minuten) festzulegen. Philips · NeoPix Easy 2...
  • Page 60: Wartung Und Pflege

    Aktualisieren der Software Abschluss des Aktualisierungsvorgangs schaltet sich der Projektor automatisch Die aktuellste Softwareversion des aus. Projektors finden Sie unter www.philips. Entfernen Sie anschließend den USB- com/support. Damit stehen Ihnen stets die Datenträger und schalten Sie den besten Funktionen und die größtmögliche Projektor wieder ein.
  • Page 61: Fehlerbehebung

    HDMI-Verbindung) eingestellt ist. Der Projektor schaltet sich • Wenn der Projektor über einen längeren Zeitraum in selbstständig aus. Betrieb ist, wird die Oberfläche des Gehäuses heiß. • Überprüfen Sie, ob das Netzkabel ordnungsgemäß angeschlossen ist. Philips · NeoPix Easy 2...
  • Page 62 Probleme Ursachen und Lösungen Der Projektor kann den USB- • Der Projektor unterstützt das exFAT-Dateisystem Datenträger nicht lesen. nicht. • Formatieren Sie den USB-Stick im FAT-Format und versuchen Sie es erneut. Der Projektor reagiert nicht auf die • Überprüfen Sie die Batterien der Fernbedienung. Befehle der Fernbedienung.
  • Page 63: Anhang

    Anschlüsse ..HDMI, CVBS, VGA, USB (2.0), ......Micro SD-Kartensteckplatz, ......Kopfhörerausgang (3,5 mm) Multimedia-Player Unterstützte Videoformate ......MP4, RMVB, AVI, RM, MKV Unterstützte Audioformate .. MP3, WMA, OGG, AAC, FLAC, APE, WAV Unterstützte Bildformate ..BMP, PNG, JPEG Philips · NeoPix Easy 2...
  • Page 64 Holen Sie sich Rat beim Händler Den vollständigen Text der oder einem erfahrenen Radio- und Konformitätserklärung können Sie auf der Fernsehtechniker ein. Webseite www.philips.com/projection Dieses Produkt entspricht Abschnitt 15 der einsehen. FCC-Bestimmungen. Der Betrieb unterliegt den beiden folgenden Bedingungen: Die Erhaltung der Umwelt im Rahmen Dieses Gerät darf keine den Funkverkehr...
  • Page 65 Verwendung von etwaiger Optionen oder vorgesehenen Sammelstellen zu entsorgen. Verbrauchsmaterialien ergeben, die nicht als Originalprodukte von Screeneo Innovation SA bzw. PHILIPS oder von Screeneo Innovation SA bzw. PHILIPS zugelassene Produkte gekennzeichnet sind. Screeneo Innovation SA haftet auch nicht Produkt: Der durchgestrichene Mülleimer auf für Schäden aufgrund elektromagnetischer...
  • Page 66 PHILIPS and the PHILIPS’ Shield Emblem are registered trademarks of Koninklijke Philips N.V. used under license. This product was brought to the market by Screeneo Innovation SA., further referred to in this document as Screeneo Innovation SA., and is the manufacturer of the product.
  • Page 67 Manual del usuario NeoPix Easy 2 Home Projector Registra tu producto y recibe asistencia en www.philips.com/support...
  • Page 68 Índice Introducción ���������������������������������������������3 Rotar/girar la pantalla de proyección ...15 Seleccionar el tiempo de apagado Estimado cliente .............3 automático (Sleep timer) ........15 Sobre este manual del usuario ......3 Seleccionar apagado automático ....15 Contenido de la caja ..........3 7 Mantenimiento ��������������������������������16 Información general de Limpieza..............16 seguridad ��������������������������������������������4 Actualización de software .........16...
  • Page 69: Introducción

    Introducción Contenido de la caja Proyector NeoPix Easy 2 (NPX442) Estimado cliente Mando a distancia con 2 pilas AAA Adaptador de corriente CA Gracias por comprar este proyector. Conectores eléctricos (EU, UK, US) ¡Esperamos que disfrutes de este producto y Guía de inicio rápido de las múltiples funciones que ofrece! Tapa del objetivo...
  • Page 70: Información General De Seguridad

    Lleva a revisar el producto a un servicio técnico autorizado. Trata siempre el producto con cuidado. Evita tocar la lente. No coloques objetos pesados o punzantes sobre el producto ni sobre el cable de alimentación. Philips · NeoPix Easy 2...
  • Page 71: Reparaciones

    2 Descripción Reparaciones No repares tú mismo el producto. Un general mantenimiento inadecuado puede producir lesiones o daños en el producto. El producto debe repararse en un servicio técnico Vista superior autorizado. Encuentra más detalles sobre los servicios técnicos autorizados en la tarjeta de garantía incluida con este producto.
  • Page 72: Vista Frontal

    Salte al archivo multimedia anterior o posterior. Volver a la pantalla anterior del menú. Botones de navegación • Navegar por las opciones del menú. • Pulsa / para cambiar una selección. Philips · NeoPix Easy 2...
  • Page 73: Acceder Al Menú De Inicio

    3 Puesta en Acceder al menú de ajustes. marcha • Enciende el proyector o lo pone en espera. Colocar el proyector • Cuando el proyector está encendido, el LED se ilumina en verde. Si el proyector está en espera, el LED se Puedes instalar el proyector en cuatro ilumina en rojo.
  • Page 74: Cambiar El Tamaño De La Pantalla

    • El LED del proyector se volverá rojo. Para ajustar la proyección en la posición correcta, pulsa y ve a SETUP - Panel Flip rotate (CONFIGURACIÓN - Girar o rotar panel). MICRO SD HDMI Philips · NeoPix Easy 2...
  • Page 75: Preparar El Mando A Distancia

    Preparar el mando a Para ajustar la altura de la pantalla cuando se coloca el proyector en la distancia mesa, gira el botón de ajuste del ángulo situado en la parte inferior del proyector. ¡ATENCIÓN! El uso inadecuado de las pilas puede provocar sobrecalentamiento, explosión y riesgo de fuego o de MICRO SD...
  • Page 76: Conectar A Dispositivos

    Revisa el manual del usuario de tu ordenador portátil para saber cómo activar la salida externa de vídeo. Conecta la toma VGA del proyector a la salida VGA de un ordenador con un cable VGA. Philips · NeoPix Easy 2...
  • Page 77: Conexión A Altavoces Externos O Auriculares

    Conecta la toma del proyector a la entrada analógica de audio (conector de 3,5 mm o conectores rojo y blanco) de los altavoces externos con un cable de audio de 3,5 mm. O conecta la toma del proyector a unos auriculares. •...
  • Page 78: Reproducción De Archivos Multimedia

    Pulsa los Botones de navegación y OK Selecciona una función de control y para seleccionar uno de los siguientes pulsa OK o activa el control. Para salir de reproductores multimedia. un modo en concreto, pulsa Philips · NeoPix Easy 2...
  • Page 79: Reproducción De Música

    Reproducción de música • Marcar dos puntos para repetir la reproducción Formatos de archivos compatibles • Para silenciar o restaurar el volumen Admite los siguientes formatos de archivos: • Acceder a la lista de reproducción .mp3/.aac/.ogg/.flac • Acceder a la información del archivo actual Repite los pasos 1 al 2 de "Reproducción de películas"...
  • Page 80: Cambiar Los Ajustes

    Color Temperature (Temperatura del color): selecciona una temperatura de color diferente. Aspect Ratio (Relación de aspecto): • selecciona unas proporciones de la pantalla. • Noise Reduction (Reducción de ruido): selecciona un nivel de reducción de ruido. Philips · NeoPix Easy 2...
  • Page 81: Ajustes De Sonido

    Ajustes de sonido Rotar/girar la pantalla de proyección Pulsa Selecciona SETUP (CONFIGURACIÓN) y Pulsa pulsa a continuación OK para acceder a Selecciona SETUP (CONFIGURACIÓN) y las opciones de ajustes. pulsa a continuación OK para acceder a Selecciona una opción de sonido y pulsa las opciones de ajustes.
  • Page 82: Mantenimiento

    • Pulsa y selecciona a continuación SETUP - Info (CONFIGURACIÓN - Info). ¡ATENCIÓN! No apagues el proyector ni extraigas el dispositivo flash USB mientras se está actualizando. Philips · NeoPix Easy 2...
  • Page 83: Solución De Problemas

    Solución de problemas Apaga el proyector pulsando Espera al menos diez segundos. Reiniciar Enciende el proyector pulsando vez. Si se presenta un problema que no se Si el problema persiste, por favor puede corregir con las instrucciones de este contacta con nuestro centro de servicio manual del usuario, sigue las instrucciones técnico o tu distribuidor.
  • Page 84 ¿Qué hacer si el proyector no • Comprueba que el cable HDMI esté conectado funciona al conectarse a un correctamente. ordenador portátil? • Asegúrate de que el ordenador portátil se haya puesto en modo de pantalla externa. Philips · NeoPix Easy 2...
  • Page 85: Apéndice

    8 Apéndice Fuente de alimentación Consumo ....en funcionamiento: 42 W ..........en espera: 0,3 W Datos técnicos Alimentación de corriente ..Adaptador de corriente Tecnología/óptica ...Entrada: 100-240 V a 50/60 Hz, 1,0 A (max) Tecnología de visualización ......LCD ..........Salida: 12 V CC, 3,5 A Fuente luminosa ..........
  • Page 86 Si este aparato interferencias que puedan causar un causara interferencias perjudiciales en la recepción de radio o de televisión, lo cual se Philips · NeoPix Easy 2...
  • Page 87 Screeneo Innovation SA/PHILIPS o como productos autorizados por Screeneo Innovation SA/PHILIPS. Screeneo Innovation SA no se responsabiliza de daños producidos por interferencias Producto: El símbolo de una papelera...
  • Page 88 PHILIPS and the PHILIPS’ Shield Emblem are registered trademarks of Koninklijke Philips N.V. used under license. This product was brought to the market by Screeneo Innovation SA., further referred to in this document as Screeneo Innovation SA., and is the manufacturer of the product.
  • Page 89 Manuale d’uso NeoPix Easy 2 Home Projector Registrare il prodotto e ricevere assistenza su www.philips.com/support...
  • Page 90 Tabella dei contenuti Introduzione ���������������������������������������������3 Rotazione/capovolgimento dello schermo di proiezione ........15 Gentile cliente ............3 Impostazione del timer di spegnimento ..15 Informazioni sul manuale d’uso ......3 Impostazione dello spegnimento Contenuto della confezione .......3 automatico ..............15 Informazioni generali sulla 7 Manutenzione ����������������������������������16 sicurezza ����������������������������������������������4 Pulizia ...............16 Configurazione del prodotto ......4...
  • Page 91: Introduzione

    Introduzione Contenuto della confezione Gentile cliente Proiettore NeoPix Easy 2 (NPX442) Telecomando con 2 batterie AAA Grazie per aver acquistato questo proiettore. Adattatore di alimentazione C/A Vi auguriamo buon divertimento con questo Spine di alimentazione (EU, UK, US) prodotto e le numerose funzioni che offre! Guida di avvio rapida Informazioni sul manuale Copriobiettivo...
  • Page 92: Informazioni Generali Sulla Sicurezza

    Far controllare il prodotto da un centro di assistenza autorizzato. Maneggiare sempre il prodotto con cura. Evitare di toccare l’obiettivo. Non appoggiare mai oggetti pesanti o appuntiti sul prodotto o sul cavo di alimentazione. Philips · NeoPix Easy 2...
  • Page 93: Riparazioni

    2 Panoramica Riparazioni Non riparare il prodotto in maniera autonoma. La manutenzione impropria Vista dall’alto può causare lesioni o danni al prodotto. Il prodotto deve essere riparato da parte di un centro di assistenza autorizzato. I dettagli dei centri di assistenza autorizzati sono riportati sulla scheda di garanzia fornita con il presente prodotto.
  • Page 94: Vista Frontale

    Consente di accedere al menu principale. Consente il collegamento all’alimentazione. Aumento o diminuzione del volume. Vista posteriore Consente di avviare, mettere in pausa e riprendere la riproduzione di contenuti multimediali. Consente di passare al file multimediale precedente/successivo. Philips · NeoPix Easy 2...
  • Page 95: Accesso Al Menu Principale

    3 Prima messa in Consente di ritornare a una schermata di menu precedente. funzione Pulsanti di navigazione • Consente di navigare le opzioni di menu. Collocazione del • Premere / per cambiare una proiettore selezione. È possibile installare il proiettore in quattro Consente di accedere al menu configurazioni differenti.
  • Page 96: Modifica Delle Dimensioni Dello Schermo

    • Il LED sul proiettore diventa rosso. Per regolare la proiezione alla posizione corretta, premere , e andare su SETUP MICRO SD HDMI - Panel Flip Rotate (CONFIGURAZIONE - Capovolgimento rotazione pannello). Philips · NeoPix Easy 2...
  • Page 97: Preparazione Del Telecomando

    Preparazione del • La distanza tra il proiettore e lo schermo determina la dimensione telecomando effettiva dell’immagine. Per regolare l'altezza dello schermo ATTENZIONE! quando si posiziona il proiettore sul piano, ruotare la manopola di L’uso improprio delle batterie regolazione dell'angolazione situata può...
  • Page 98: Collegamento Ai Dispositivi Di

    HDMI. display, ad esempio un proiettore. Consultare il manuale d'uso del proprio portatile per scoprire come attivare l'uscita video esterna. Utilizzando un cavo VGA, collegare il connettore VGA del proiettore all'uscita VGA di un computer. Philips · NeoPix Easy 2...
  • Page 99: Collegamento Ad Altoparlanti Esterni O Cuffie

    Usando un cavo audio da 3,5 mm, collegare il connettore del proiettore all'ingresso audio analogico (jack da 3,5 mm, o jack rosso e bianco) degli altoparlanti esterni. Oppure collegare il connettore del proiettore alle cuffie. • Gli altoparlanti del proiettore si disattivano automaticamente quando gli altoparlanti esterni o le cuffie vengono collegati al...
  • Page 100: Riproduzione Multimediale

    OK per attivare il comando. Premere i pulsanti di navigazione e OK Per uscire da una modalità particolare, per selezionare uno dei supporti lettore premere seguenti. MUSIC (MUSICA): consente di • accedere e riprodurre solamente file audio. Philips · NeoPix Easy 2...
  • Page 101: Riproduzione Della Musica

    Riproduzione della musica • Contrassegnare due punti per ripetere la riproduzione Formati di file supportati • Muto o ripristino del volume Vengono supportati i formati di file seguenti: • Accedere all’elenco di riproduzione .mp3/.aac/.ogg/.flac • Accedere alle informazioni del file corrente Ripetere i passaggi da 1 a 2 in ‘Riproduzione dei film’, dopodiché...
  • Page 102: Modifica Delle Impostazioni

    Consente di impostare una temperatura colore differente. Aspect Ratio (Rapporto di aspetto): • Consente di impostare un rapporto per lo schermo. • Noise Reduction (Riduzione del rumore): Consente di impostare un livello di riduzione del rumore. Philips · NeoPix Easy 2...
  • Page 103: Impostazioni Audio

    Impostazioni audio Seguire le istruzioni su schermo per avviare o annullare il ripristino. Premere Rotazione/ Selezionare SETUP (CONFIGURAZIONE), e poi premere OK per accedere alle capovolgimento dello opzioni di impostazione. schermo di proiezione Selezionare un’opzione audio e poi premere / per modificarla: Premere •...
  • Page 104: Manutenzione

    Prima di aggiornare il software del proiettore, controllare la versione corrente del software: • Premere , e poi selezionare SETUP - Info (CONFIGURAZIONE - Informazioni). ATTENZIONE! Non spegnere il proiettore o rimuovere la chiavetta USB durante l'aggiornamento. Philips · NeoPix Easy 2...
  • Page 105: Risoluzione Dei Problemi

    Risoluzione dei problemi Spegnere il proiettore premendo Attendere almeno dieci secondi. Accensione o spegnimento Accendere il proiettore premendo una volta dell'alimentazione Se il problema persiste, contattare il Se si verifica un problema che non può nostro centro di assistenza tecnica o il essere risolto con le istruzioni contenute nel proprio rivenditore.
  • Page 106 Cosa fare se il proiettore non • Controllare che il cavo HDMI sia inserito funziona quando è collegato a un correttamente. notebook? • Assicurarsi che sul notebook sia stata attivata la visualizzazione tramite proiettore. Philips · NeoPix Easy 2...
  • Page 107: Appendice

    8 Appendice Sorgente di alimentazione Consumo di energia ....in funzione: 42 W ........... Standby: 0,3 W Dati tecnici Alimentazione ..adattatore di alimentazione . Ingresso: 100-240 V~, 50/60 Hz, 1,0 A (max) Tecnologia/ottica ..........Uscita: CC 12 V, 3,5 A Tecnologia display ......... LCD Sorgente luminosa .........
  • Page 108 è conforme allo/agli standard se non installato e utilizzato secondo le RSS di Industry Canada. istruzioni, può causare interferenze dannose Il funzionamento è soggetto alle due per le comunicazioni radio. condizioni seguenti: Philips · NeoPix Easy 2...
  • Page 109 Batterie: Se il prodotto contiene batterie, quelli designati come prodotti originali queste devono essere smaltite in un Screeneo Innovation SA/PHILIPS o prodotti apposito punto di raccolta. approvati Screeneo Innovation SA/PHILIPS. Screeneo Innovation SA esclude qualsiasi...
  • Page 110 PHILIPS and the PHILIPS’ Shield Emblem are registered trademarks of Koninklijke Philips N.V. used under license. This product was brought to the market by Screeneo Innovation SA., further referred to in this document as Screeneo Innovation SA., and is the manufacturer of the product.
  • Page 111 Gebruiksa- anwijzing NeoPix Easy 2 Home Projector Registreer uw product en krijg ondersteuning op www.philips.com/support...
  • Page 112 Inhoudsopgave Inleiding ����������������������������������������������������3 Projectiescherm draaien/keren .......15 Slaaptimer instellen ..........15 Geachte klant ............3 Automatisch slapen instellen......15 Over deze gebruiksaanwijzing ......3 7 Onderhoud ����������������������������������������16 Wat zit er in de doos ..........3 Algemene veiligheid- Reinigen ..............16 sinformatie ������������������������������������������4 Software bijwerken ..........16 Installatie van het product ........4 Probleemoplossing ..........
  • Page 113: Inleiding

    Inleiding Wat zit er in de doos NeoPix Easy 2 projector (NPX442) Geachte klant Afstandsbediening met 2 AAA-batterijen Voedingsadapter Dank u voor het aanschaffen van deze Stekkers (EU, VK, VS) projector. Snelstartgids Wij hopen dat u veel plezier hebt van dit Lenskap product en de vele functies die het biedt! Over deze...
  • Page 114: Algemene Veiligheidsinformatie

    Gebruik het product voor uw eigen veiligheid Behandel het product altijd met zorg. Raak niet tijdens onweersbuien met bliksem. de lens niet aan. Zet nooit zware of scherpe voorwerpen op het product of op het netsnoer. Philips · NeoPix Easy 2...
  • Page 115: Reparaties

    2 Overzicht Reparaties Repareer het product niet zelf. Verkeerd onderhoud kan leiden tot letsel of schade Bovenaanzicht aan het product. Het product moet door een bevoegd servicecentrum worden gerepareerd. U treft de details van bevoegde servicecentra aan op het garantiebewijs bij dit product. Verwijder het typeplaatje niet van dit product, omdat hierdoor de garantie ongeldig wordt.
  • Page 116: Vooraanzicht

    Volume verhogen of verlagen. Achteraanzicht Het afspelen van media starten, onderbreken of hervatten Ga naar het vorige/volgende mediabestand Keer terug naar een vorig menuscherm. Navigatietoetsen • Navigeer menu-opties. • Druk op / om een selectie te wijzigen. Philips · NeoPix Easy 2...
  • Page 117: Open Startmenu

    3 Eerste gebruik Het instellingenmenu openen. De projector plaatsen • Zet de projector aan of in stand-by. • Wanneer de projector wordt U kunt de projector in vier verschillende ingeschakeld, wordt de led groen. Als configuraties installeren. Volg de projector in de stand-bymodus onderstaande richtlijnen voor verschillende staat, wordt de led rood.
  • Page 118: Schermgrootte Wijzigen

    • De led op de projector wordt rood. MICRO SD HDMI Druk op om de projectie in de juiste positie te zetten en ga naar SETUP - Panel Flip Rotate (INSTELLEN - Draaien paneel). Philips · NeoPix Easy 2...
  • Page 119: De Afstandsbediening Gebruiksklaar Maken

    De afstandsbediening • De afstand tussen de projector en het scherm bepaalt de feitelijke gebruiksklaar maken afmetingen van het beeld. Draai aan de hoekinstellingsknop aan VOORZICHTIG! de onderkant van de projector om de schermhoogte aan te passen wanneer u Verkeerd gebruik van batterijen de projector op de tafel plaatst.
  • Page 120: Verbinden Met Afspeelappa

    Raadpleeg de handleiding van uw laptop om erachter te komen hoe u de externe video-uitgang kunt activeren. Gebruik een VGA-kabel om de VGA- connector op de projector te verbinden met de VGA-uitgang van een computer. Philips · NeoPix Easy 2...
  • Page 121: Verbinden Met Externe Luidsprekers Of Hoofdtelefoon

    Gebruik een 3,5 mm audiokabel om -connector op de projector aan te sluiten op de analoge audio-ingang (3,5 mm jack of rode en witte jacks) van de externe luidsprekers. U kunt ook de -connector op de projector aansluiten op de hoofdtelefoon. •...
  • Page 122: Afspelen Van Media

    .mp3/.aac/.ogg/.flac selecteren. Herhaal stap 1 en 2 in ‘Films afspelen’ en MUSIC (MUZIEK): alleen • het startmenu wordt weergegeven. audiobestanden openen en afspelen. MOVIE (FILM): alleen videobestanden • openen en afspelen. Philips · NeoPix Easy 2...
  • Page 123: Foto's Weergeven

    Selecteer een besturingsfunctie en druk op OK om de besturing te activeren. Druk op om een bepaalde modus te verlaten. Foto's weergeven Ondersteunde bestandsformaten De volgende bestandsformaten worden ondersteund: .jpeg/.bmp/.png/.gif Herhaal stap 1 en 2 in ‘Films afspelen’ en Druk op de navigatietoetsen en OK om het startmenu wordt weergegeven.
  • Page 124: Instellingen Wijzigen

    • Noise Reduction (Ruisonderdrukking): Stel een ruisonderdrukkingsniveau in. Geluidsinstellingen Druk op Selecteer SETUP (INSTELLEN) en druk op OK om de instellingenopties te openen. Selecteer een geluidsoptie en druk vervolgens op / voor het wijzigen van: Philips · NeoPix Easy 2...
  • Page 125: Taalinstellingen

    Selecteer Panel Flip Rotate (Draaien • Sound Mode (Geluidsmodus): Selecteer vooraf gedefinieerde paneel) en druk op / om het geluidsinstellingen voor uw video of projectiescherm te draaien of te keren. muziek. Selecteer User (Gebruiker) Slaaptimer instellen om de volgende instellingen aan te passen: Stel een tijdsperiode in waarna de projector Treble (Hoge tonen): Stel een...
  • Page 126: Onderhoud

    Software bijwerken De meest recente software van de projector kan worden gevonden op www.philips.com/support, zodat u de beste eigenschappen en ondersteuning voor de projector krijgt. Controleer de huidige softwareversie, voordat u de software van de projector bijwerkt: •...
  • Page 127: Probleemoplossing

    Probleemoplossing Schakel de projector uit door op drukken. Uit- en weer inschakelen Wacht ten minste tien seconden. Schakel de projector in door eenmaal op Als er zich een probleem voordoet dat niet te drukken. kan worden gecorrigeerd met de instructies Als het probleem aanhoudt, neem in deze gebruiksaanwijzing, volg dan de hier dan contact op met ons technisch...
  • Page 128 Wat te doen als de projector niet • Controleer of de HDMI-kabel correct is aangesloten. werkt wanneer aangesloten op een • Zorg dat de laptop is ingesteld om weer te geven via laptop? de projector. Philips · NeoPix Easy 2...
  • Page 129: Aanhangsel

    8 Aanhangsel Stroombron Stroomverbruik ......werkend: 42 W ..........Stand-by: 0,3 W Technische gegevens Stroomvoorziening ....lichtnetadapter .. Ingang: 100 - 240 V - 50/60 Hz; 1,0 A (max.) Technologie/optisch ..........Uitgang: DC 12 V; 3,5 A Schermtechnologie ........LCD Lichtbron ............Led Productinformatie Resolutie ........
  • Page 130 Er is echter geen garantie dat er zich in Dit apparaat zal alle interferentie een bepaalde installatie geen interferentie accepteren, inclusief interferentie die een voordoet. Als dit apparaat schadelijke storing ongewenste werking van het apparaat kan veroorzaken. Philips · NeoPix Easy 2...
  • Page 131 Screeneo Innovation SA/PHILIPS of door Screeneo Innovation SA/PHILIPS goedgekeurde producten. Screeneo Innovation SA mag niet aansprakelijk worden gesteld voor enige...
  • Page 132 PHILIPS and the PHILIPS’ Shield Emblem are registered trademarks of Koninklijke Philips N.V. used under license. This product was brought to the market by Screeneo Innovation SA., further referred to in this document as Screeneo Innovation SA., and is the manufacturer of the product.
  • Page 133: Руководство Пользователя

    Руководство пользователя NeoPix Easy 2 Home Projector Зарегистрируйте изделие и получите поддержку на веб-сайте www.philips.com/support...
  • Page 134 Содержание Введение �������������������������������������������������������3 Поворот/транспонирование проекционного экрана �������������������������������������������������������������������������15 Уважаемый клиент! �����������������������������������������������������3 Настройка таймера сна ���������������������������������������������15 Об этом руководстве ���������������������������������������������������3 Автоматический переход в спящий режим �������������15 Комплект поставки ������������������������������������������������������3 7 Обслуживание ��������������������������������������16 1 Общая информация по технике Очистка �����������������������������������������������������������������������16 безопасности �������������������������������������������4 Обновление программного обеспечения ���������������16 Настройка...
  • Page 135: Введение

    Введение Комплект поставки Проектор NeoPix Easy 2 (NPX442) Уважаемый клиент! Пульт дистанционного управления с 2-мя батареями типа AAA Благодарим вас за приобретение проектора� Адаптер питания для сети переменного тока Штепсельные вилки (стандарты Европы, США и Мы надеемся, что вы останетесь довольны нашим Великобритании) изделием...
  • Page 136: Общая Информация По Технике

    Для вашей собственной безопасности не авторизованный сервисный центр� используйте устройство во время грозы с молнией� Всегда обращайтесь с изделием с осторожностью� Не прикасайтесь к объективу� Не ставьте тяжелые или острые предметы на изделие или на его кабель питания� Philips · NeoPix Easy 2...
  • Page 137: Ремонт

    2 Общие сведения Ремонт Не ремонтируйте устройство самостоятельно� Ненадлежащее техобслуживание может привести Вид сверху к травмам или повреждению изделия� Ремонт устройства должен выполняться в авторизованном сервисном центре� Вы можете найти подробную информацию об авторизованных сервисных центрах, выполняющих гарантийное обслуживание, в документации, включенной в комплект поставки данного изделия� Не...
  • Page 138: Вид Спереди

    возможен доступ к дополнительным Порт USB параметрам� Подключение к USB-накопителю для воспроизведения медиафайлов� Доступ в главное меню� Подключение электропитания� Увеличение или уменьшение громкости� Вид сзади Пуск, пауза или возобновление воспроизведения� Переход к предыдущему/следующему медиафайлу� Возврат на экран предыдущего меню� Philips · NeoPix Easy 2...
  • Page 139: Доступ В Главное Меню

    3 Предварительные Кнопки навигации • Выбор опций меню� действия • Используйте кнопки / , чтобы изменить выбор� Установка проектора Доступ в меню настроек� Вы можете установить проектор в четырех • Включение проектора или переключение в различных конфигурациях� Для выбора различных режим ожидания� вариантов...
  • Page 140: Изменение Размера Экрана

    крепления и специальный экран заднего проецирования� • Светодиод на проекторе начнет светиться красным цветом� Чтобы отрегулировать направление MICRO SD HDMI проецирования, нажмите кнопку и перейдите в меню SETUP - Panel Flip Rotate (НАСТРОЙКА - Поворот откидной панели)� Philips · NeoPix Easy 2...
  • Page 141: Подготовка Пульта Дистанционного Управления

    Подготовка пульта • Чтобы выключить проектор, нажмите кнопку еще раз� После этого дистанционного управления светодиодный индикатор питания на проекторе изменит цвет с зеленого на ПРЕДУПРЕЖДЕНИЕ! красный� • Расстояние между проектором и Ненадлежащее использование батарей экраном определяет фактический размер может привести к перегреву оборудования, изображения�...
  • Page 142: Подключение К Устройствам Через Порт Hdmi

    Подключение к устройствам через порт AV Подключите устройство воспроизведения (такое как DVD-плеер, игровая приставка, видеокамера или цифровой фотоаппарат) к проектору через порт AV� После выполнения этого подключения изображение будет отображаться на проекционном экране, а звук – воспроизводиться динамиками проектора� Philips · NeoPix Easy 2...
  • Page 143: Подключение Внешних Звуковых Колонок Или

    Установите требуемое разрешение экрана на компьютере и переключите сигнал VGA на внешний монитор� Поддерживаются следующие MICRO SD HDMI режимы разрешения: Разрешение Частота обновления изображения 640 × 480 60 Гц SVGA 800 × 600 60 Гц 1024 × 768 60 Гц WXGA 1280 ×...
  • Page 144: Воспроизведение Медиафайлов

    • MUSIC (МУЗЫКА): позволяет просматривать Повторите шаги 1 и 2 в режиме Movie Playback и воспроизводить только звуковые файлы� (Воспроизведение фильмов), после чего • MOVIE (ФИЛЬМЫ): позволяет откроется главное меню� просматривать и воспроизводить только видеофайлы� Philips · NeoPix Easy 2...
  • Page 145: Воспроизведение Фотографий

    дистанционного управления� Выберите функцию управления и нажмите OK, чтобы активировать ее� Для выхода из определенного режима нажмите кнопку Воспроизведение фотографий Поддерживаемые форматы файлов Поддерживаются следующие форматы файлов: �jpeg/�bmp/�png/�gif Используйте кнопки навигации и кнопку OK, Повторите шаги 1 и 2 в режиме Movie Playback чтобы выбрать следующие медиаплееры� (Воспроизведение...
  • Page 146: Изменение Настроек

    • Digital Zoom (Цифровой зум): Увеличение или уменьшение размера проецируемого изображения. • Color Temperature (Цветовая температура): изменение цветовой температуры� • Aspect Ratio (Соотн� сторон): установка соотношения сторон экрана� • Noise Reduction (Шумоподавление): установка уровня шумоподавления� Philips · NeoPix Easy 2...
  • Page 147: Настройки Звука

    Настройки звука Поворот/транспонирование проекционного экрана Нажмите Выберите SETUP (НАСТРОЙКА) и нажмите OK Нажмите для доступа к параметрам настройки� Выберите SETUP (НАСТРОЙКА) и нажмите OK Выберите опцию Звук, а затем используйте для доступа к параметрам настройки� кнопки / , чтобы изменить следующие Выберите пункт Panel Flip Rotate (Поворот параметры: откидной...
  • Page 148: Обслуживание

    Перед обновлением программного обеспечения проектора проверьте текущую версию программного обеспечения: • Нажмите кнопку , а затем выберите SETUP - Info (НАСТРОЙКА - Свед�)� ПРЕДУПРЕЖДЕНИЕ! Не выключайте проектор и не извлекайте USB-накопитель во время обновления� Philips · NeoPix Easy 2...
  • Page 149: Устранение Неполадок

    Устранение неполадок Выключите проектор, нажав кнопку . Подождите как минимум 10 сек� Выключение и повторное Включите проектор, нажав кнопку один раз� включение питания Если проблема не будет устранена, обратитесь в центр технического обслуживания или к Если возникнет проблема, которую не удастся дилеру� устранить методами, указанными в настоящем руководстве, следуйте...
  • Page 150 • Для этого проектора умеренное выделение тепла во время проектора� работы является нормальным явлением� Что делать, если проектор не работает • Убедитесь, что кабель HDMI подключен надлежащим при подключении к ноутбуку? образом� • Убедитесь, что ноутбук переключен на дисплей проектора� Philips · NeoPix Easy 2...
  • Page 151: Приложение

    8 Приложение Питание Потребляемая мощность ��� в рабочем режиме: 42 Вт ��������������������������������������в ждущем режиме: 0,3 Вт Технические данные Электропитание ��������������������������������Адаптер питания .. Вход: 100–240 В перем. тока, 50/60 Гц, 1,0 A (макс�) Технология/оптические параметры ......... Выход: 12 В пост� тока, 3,5 А Технология...
  • Page 152 для радио- или телевизионных приемников, что в разделе 2�5 RSS102� Пользователи могут можно легко определить, включив и выключив получить информацию об уровнях воздействия устройство, вы можете попытаться устранить помехи радиочастотного излучения и нормах соответствия, перечисленными ниже способами� принятых в Канаде� Philips · NeoPix Easy 2...
  • Page 153 отходов� отличных от тех, которые указаны в качестве оригинальных продуктов компании Screeneo Батареи: если изделие содержит батареи, они Innovation SA/PHILIPS или продуктов одобренных должны быть утилизированы в соответствующем компанией Screeneo Innovation SA/PHILIPS� пункте сбора� Компания Screeneo Innovation SA не несет...
  • Page 154 PHILIPS and the PHILIPS’ Shield Emblem are registered trademarks of Koninklijke Philips N�V� used under license� This product was brought to the market by Screeneo Innovation SA�, further referred to in this document as Screeneo Innovation SA�, and is the manufacturer of the product�...

Table des Matières