Table des Matières
Publicité
Les langues disponibles
Les langues disponibles
Liens rapides
ACQUARIO COMPLETO
IT
PRONTO PER L'INSTALLAZIONE
Istruzioni e garanzia
COMPLETE AQUARIUM
EN
READY TO INSTALL
Instructions and warranty
AQUARIUM COMPLET
FR
PRÈT POUR L'INSTALLATION
Mode d'emploi et garantie
KOMPLETTES AQUARIUM,
DE
FERTIG ZUR MONTAGE
Gebrauchs-anleitung und Garantie
COMPLEET AQUARIUM
NL
KLAAR VOOR GEBRUIK
Aanwunzingen garantie
AQUARIO COMPLETO
ES
LISTO PARA SU INSTALACIÒN
Instrucciones y garantia
NMO 20
NMO 20W
NMO 30
NMO 30W
NMO 30R
NMO 30RW
NMO 50
NMO 50W
NMO 50R
NMO 50RW
Publicité
Chapitres
Table des Matières

Manuels Connexes pour Newa NEWA MORE NMO 20


Sommaire des Matières pour Newa NEWA MORE NMO 20
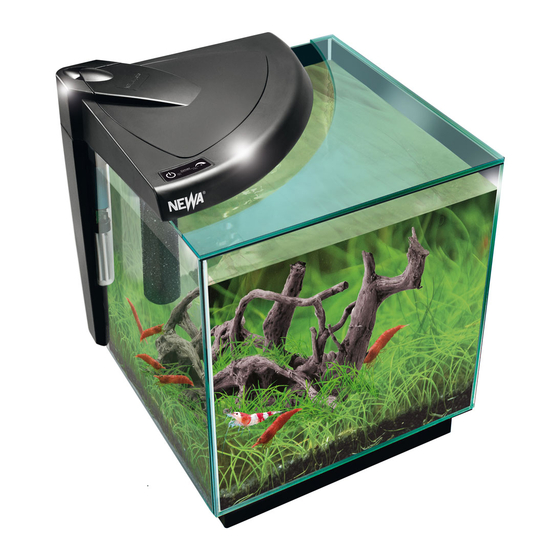
- Page 1 ACQUARIO COMPLETO PRONTO PER L’INSTALLAZIONE Istruzioni e garanzia COMPLETE AQUARIUM READY TO INSTALL Instructions and warranty AQUARIUM COMPLET PRÈT POUR L’INSTALLATION Mode d’emploi et garantie KOMPLETTES AQUARIUM, FERTIG ZUR MONTAGE Gebrauchs-anleitung und Garantie COMPLEET AQUARIUM KLAAR VOOR GEBRUIK Aanwunzingen garantie AQUARIO COMPLETO LISTO PARA SU INSTALACIÒN Instrucciones y garantia...
- Page 3 NMO 20 NMO 20W NMO 30 NMO 30W NMO 30R NMO 30RW NMO 50 NMO 50W NMO 50R NMO 50RW...
- Page 4 Fig. 1 NMO 20 NMO 20 NMO 30 NMO 30 NMO 20W NMO 30W NMO 20W NMO 30W 35 (NMO 20W) 35 (NMO 30W) 35 (NMO 20W) 35 (NMO 30W) optional optional optional optional...
- Page 5 NMO 30R NMO 50 NMO 30RW NMO 50W NMO 50R NMO 50RW optional optional 35 (NMO 30RW) 35 (NMO 50W) (NMO 50RW)
- Page 6 Fig. 2 Fig. 3 Fig. 4 Fig. 5 Fig. 6 Fig. 7 Fig. 8 CLICK Fig. 9 Fig. 10 Fig. 11 Fig.13 Fig.12 Fig.14...
-
Page 7: Water Level
Fig. 15 Fig. 16 Fig. 17 2-3 cm Fig. 18 Fig. 19 Fig. 20 AIR IN AIR OUT Fig. 21 Fig. 23 Fig. 22 NMO 30R NMO 20 NMO 50 NMO 30 NMO 50R OVERFLOW OVERFLOW Fig.24 Fig.25 Fig.26 WATER LEVEL 3 cm 5 cm Fig.27... - Page 8 Fig. 30 Fig. 31 RICAMBI ED ACCESSORI (Denominazione dei componenti pag. 8) SPARE PARTS AND ACCESSORIES (Component names page 19) REF. Fig.1 PIÈCES DE RECHANGE ET ACCESSOIRES (Dénomination des composants page 30) ERSATZ- UND ZUBEHÖRTEILE (Bezeichnung der Bestandteile Seite 41) page 2-3 RESERVEONDERDELEN EN ACCESSOIRES (Namen van de onderdelen pag.
-
Page 9: Table Des Matières
ErP (2009/125/EC) per il sistema di illuminazione. ATTENZIONE: Il presente simbolo riportato sull’ e tichetta del Newa More indica che è necessario leggere attentamente questo manuale di istruzioni operative prima di mettere in funzione, usare e manutenzionare l’apparecchio. - Page 10 dell’apparecchio e alla comprensione dei pericoli ad esso inerenti. I bambini non devono giocare con l’apparecchio perché questo non è un giocattolo. La pulizia e la manutenzione destinata ad essere effettuata dall’utilizzatore non deve essere effettuata da bambini senza sorveglianza. 2) ATTENZIONE: Scollegare o spegnere tutti gli apparecchi presenti nell’acquario prima di svolgere operazioni di installazione e manutenzione.
-
Page 11: Specifiche Del Prodotto
II. SPECIFICHE DEL PRODOTTO II.a Denominazione dei componenti (fig. 2) 1) Vasca 2) Guarnizioni bordi (sigillante vetri) 3A) Base di rialzo 3B) Cornice in plastica per base acquario 4) Coperchio riscaldatore e/o innesto bicchiere schiumatoio (versioni NMO30, 30R, 50, 50R) 5) Sede per innesto riscaldatore 6) Riscaldatore 7) Coperchio zona filtrante (versione NMO 20 e NMO 30) -
Page 12: Disimballaggio E Controlli Preliminari
Controllare che il prodotto abbia tutti i componenti riportati nel par. II a L’acquario NEWA More è confezionato in modo tale che possa resistere ai normali urti e pressioni che si verificano durante il trasporto. Può comunque capitare che urti eccessivi o errate manipolazioni possano causare danni all’acquario perciò consigliamo di seguire queste avvertenze per attuare un controllo della tenuta della vasca: •... -
Page 13: Versione Marino (Nmo 30R - 50R)
5. Raggruppare i cavi d’alimentazione degli apparecchi sull’angolo del filtro spingendoli leggermente verso l’alto al fine di favorire l’ o perazione successiva (fig. 9). La versione bianca dei NEWA More è dotata di una spirale per raccogliere i cavi ed occultarli alla vista. - Page 14 COLLEGAMENTO CON SORGENTI E SCARICHI D’ACQUA (fig. 21). Il filtro è uno strumento fondamentale nella gestione dell’acquario, senza il quale occorrerebbero cambi d’acqua molto frequenti. Il potente ed efficace NEWA More filter ha lo scopo di far circolare e “pulire” l’acqua, trattenendo sia le impurità in sospensione sia le sostanze invisibili disciolte che derivano da escrementi di animali, da foglie morte e da residui di cibo.
-
Page 15: Regolazione Del Riscaldatore
V.f ILLUMINAZIONE E PROGRAMMAZIONE DEL TIMER Tutti gli acquari NEWA More sono dotati di LED d’alta qualità in grado di garantire un apporto luminoso estremamente efficace per una lunga durata d’ e sercizio. La brillantezza dei LED bianchi e attinici assicurano una costante crescita della flora e il benessere degli animali ospitati. -
Page 16: Accensione Dell'acquario
NOTA: 1. ATTENZIONE: In caso d’interruzione dell’alimentazione elettrica, anche per pochi secondi; il settaggio del tempo impostato sul timer verrà cancellato: sarà necessaria una nuova programmazione. 2. Se si spegne manualmente la luce diurna (tasto luce LED bianca) mentre l’impianto d’illuminazione, comandato dal timer, è... -
Page 17: Manutenzione
3. Sostituire la porosa in legno riposizionandola negli appositi fermi angolari. Inserire nuovamente lo slittino in sede, prestando attenzione a non piegare il tubo d’aerazione. 4. Riposizionare in sede il filtro Newa More (vedi cap. V par. b punti 5 e 6) e ogni sua componente agendo in senso inverso. -
Page 18: Vii.d Sostituzione Del Riscaldatore
Prestare attenzione affinché il cappuccio del riscaldatore si adagi completamente all’anello (fig. 8). 4. Riposizionare in sede il filtro Newa More (vedi cap. V par. b punti 5 e 6) e ogni sua componente agendo in senso inverso. -
Page 19: Corretto Smaltimento Del Prodotto
X. GARANZIA L’acquario NEWA More è garantito secondo la Direttiva Europea 1999/44 CE da difetti di materiali e di lavorazione per un periodo di 24 mesi dalla data d’acquisto. Se l’apparecchio non funzionasse correttamente entro questo termine dalla data d’acquisto, restituirlo al rivenditore di zona. - Page 20 EU) directive and to REACH (1907/2006/EC) regulations, as well as to the ErP (2009/125/EC) directive for the lighting system. WARNING: the symbol on the label of Newa More indicates that you must thoroughly read this operating instruction manual before starting up, operating or carrying out any maintenance operations on the appliance.
-
Page 21: Product Specifications
2) WARNING: turn off and disconnect all the electrical equipment in the aquarium before carrying out any maintenance tasks. 3) The power cord must not be repaired or replaced. If it is damaged, replace the entire appliance. 4) Read the warnings and observe the symbols on the labels of all electrical appliances and in the instructions. 5) Fill the tank always making sure that the water level is 3cm from the upper rim;... -
Page 22: Ii.b Technical Data
33) Corner cable housing profile 34) Optional tank lid 35) White cable cover (for white NEWA More aquariums NMO 20W - NMO 30W- NMO 30RW - NMO 50W - NMO 50RW) 36) Power supply for LED light unit II.b Technical data... -
Page 23: Unpacking And Preliminary Checks
(Fig. 9).NEWA More white color version is provided with a spiral in order to gather the cords and hide them. It is recommended to use it before going on with the following point. 6. Position the NEWA More filter on any corner of the tank, inserting its sides into the slots provided on the filter (Fig. 10). The... -
Page 24: Marine Water Version (Nmo30R - 50R)
It is recommended to use it before going on with the following point. 6. Position the NEWA More filter on any corner of the tank, inserting its sides into the slots provided on the filter (Fig. 17). The filter will be correctly positioned when it is stable and parallel to the bottom of the tank. -
Page 25: Filtering
WITH WATER INLETS AND OUTLETS (Fig. 21). The filter is an essential tool for operating the aquarium. Without it, the water would need to be changed very often. The powerful and effective NEWA More filter is intended to circulate and “clean” water, trapping suspended impurities and invisible dissolved substances derived from animal excrement, dead leaves and food debris. -
Page 26: Lighting And Timer Setting
1. Depending on the version, remove the lid of the filtering area or the heater lid (versions NMO 30 and 50), or remove the skimmer collection cup (version NMO30R). 2. Adjust to the required temperature using the special knob on the NEWA Therm Eco heater. For safety reasons, regularly check the temperature using an accurate immersion thermometer. -
Page 27: Switching On The Aquarium
Rinse the Biofoam filter cartridge with water taken from the aquarium in order to preserve the bacterial colonies. b. Clean the bottom of the aquarium by gently sucking up any deposited sediment. It is advisable to use the NEWA Pgr gravel cleaning set. -
Page 28: Vii.b Replacing The Filter Cartridges
3. Replace the porous wood element and put it back into the special brackets. Put the slide back into position, taking care not to bend the aeration pipe. 4. Put the Newa More filter and all its components back into position (see Chapter V, paragraph b, steps 5 and 6), in reverse order. VII.d REPLACING THE HEATER WARNING: before proceeding with this operation, it is advisable to disconnect the power supply cable of the heater from the electrical socket and wait at least 15 minutes before removing it from the water. -
Page 29: Troubleshooting
FAULTS CAUSES SOLUTIONS Check that all the power supply cables are The NEWA More filter grouped together along the corner of the tank Incorrect assembly does not stick to the tank and that the tank edges are inserted into the special slots on the filter. -
Page 30: Correct Disposal Of The Product
IX. CORRECT DISPOSAL OF THIS PRODUCT (WASTE ELECTRICAL & ELECTRONIC EQUIPMENT) 2012/19/UE (EN50419) Applicable in the European Union and other European countries with separate collection systems. When you decide to scrap the aquarium, in order to recover the recyclable materials (plastic, glass, etc.) and to safely dispo- se of its electrical components, the various materials should be separated and disposed of separately in compliance with the local regulations in force. - Page 31 é clairage. ATTENTION: le présent symbole reporté sur l’ é tiquette du Newa More indique qu’il est nécessaire de lire attentivement ce manuel d’instructions avant de mettre l’appareil en service, de l’utiliser et de procéder à son entretien.
-
Page 32: Ii.a Dénomination Des Composants
que les personnes en question ont reçu des instructions sur l'utilisation de l'appareil en conditions de sécurité et sur les dangers liés à son utilisation. Les enfants ne doivent pas jouer avec l'appareil parce que ce n'est pas un jouet. Les opérations de nettoyage et d'entretien incombant à l'utilisateur ne doivent pas être effectuées par des enfants sans surveillance. -
Page 33: Spécifications Du Produit
II. SPÉCIFICATIONS DU PRODUIT II.a Dénomination des composants (fig. 2) 1) Cuve 2) Joints bords (mastic vitres) 3A) Base de surélévation 3B) Corniche en plastique pour base aquarium 4) Couvercle chauffage et/ou enclenchement verre écumeur (versions NMO30, 30R, 50 et 50R) 5) Logement pour enclenchement chauffage 6) Chauffage 7) Couvercle zone filtrante (versions NMO 20 et NMO 30) -
Page 34: Déballage Et Contrôles Préliminaires
Version eau douce (NMO 20-30-50) 1. Prélever le filtre NEWA More et tous les autres composants de leur emballage respectif et les poser sur une surface plate. 2. Retirer les couvercles de la zone filtrante et du logement du chauffage (fig.6). -
Page 35: Version Eau De Mer (Nmo30R - 50R)
Il est recommandé de l’utiliser avant de procéder avec le point suivant. 6. Placer le filtre NEWA More sur n’importe quel angle de la cuve en insérant les côtés de celle-ci dans les logements prévus sur le filtre (fig. -
Page 36: Filtration
RELIÉ À DES SOURCES ET DES ÉVACUATIONS D’EAU (fig. 21). Le filtre est un instrument fondamental dans la gestion de l’aquarium, sans lequel il faudrait changer l’ e au très fréquemment. Le NEWA More filter, filtre puissant et efficace, est chargé de faire circuler et de «... -
Page 37: Réglage Du Chauffage
Le brillant des LED blancs et actiniques assurent une croissance constante de la flore et le bien-être des animaux vivant dans l’aquarium. Le système d’ é clairage des aquariums NEWA More est commandé par des interrupteurs à... -
Page 38: Allumage De L'aquarium
4. Pour confirmer et quitter la programmation, appuyer sur la touche « OK » (touche éclairage LED bleus). 5. Les LED blancs clignoteront un nombre de fois identique au nombre d’heures programmé pour que l’ é clairage diurne reste allumé. ATTENTION: à la fin de la première programmation, tant l’éclairage à LED blancs que l’éclairage à LED bleus s’allumeront simultanément pendant le temps configuré. -
Page 39: Entretien
3. Ôter le profil angulaire guide-câbles de son logement, en agissant sur le petit levier situé sur l’angle du filtre Newa More (fig. 28). 4. Extraire le filtre Newa More de son logement et le déposer sur un essuie-main en papier ou en tissu, en le plaçant sur un côté (fig. 29). -
Page 40: Vii.c Remplacement Du Diffuseur En Bois
3. Remplacer le diffuseur en bois et le remettre en place dans les arrêtoirs angulaires spécifiques. Insérer à nouveau la glissière, en veillant à ne pas plier le tuyau d’aération. 4. Remettre en place le filtre Newa More (voir chap. V par. b points 5 et 6) et tous ses composants en procédant en sens inverse. VII.d REMPLACEMENT DU CHAUFFAGE ATTENTION : avant de procéder à... -
Page 41: Comment Éliminer Ce Produit
ANOMALIES CAUSES SOLUTIONS La pompe d'actionnement n'est pas Brancher la fiche à la prise branchée à la prise d'alimentation d’alimentation électrique. électrique. Débit d’eau Cartouche Mechanichem encrassée. Rincer ou remplacer la cartouche. limité ou absent. La pompe bloquée par de la saleté Procéder à... -
Page 42: Wichtige Sicherheitsvorschriften
Das Produkt entspricht außerdem der RoHS 2 - Richtlinie (2011/65/EU) und der REACH - Regelung (1907/2006/ EC) sowie, was das Beleuchtungssystem betrifft, der ErP-Richtlinie (2009/125/EC). ACHTUNG: Dieses auf dem Produktetikett von Newa More befindliche Symbol zeigt an, dass es vor der Inbetriebsetzung, dem Gebrauch und der Wartung des Geräts notwendig ist, diese Gebrauchsanweisungen aufmerksam durchzulesen. - Page 43 beaufsichtigt werden oder in der sicheren Verwendung des Gerätes unterwiesen und über die mit seiner Verwendung zusammenhängenden Gefahren aufgeklärt wurden. Kinder dürfen nicht mit dem Gerät spielen, da es kein Spielzeug ist. Die vom Benutzer durchzuführende Reinigung und Wartung des Geräts darf nicht von unbeaufsichtigten Kindern durchgeführt werden.
-
Page 44: Produkteigenschaften
II. PRODUKTEIGENSCHAFTEN II.a Bezeichnung der Bestandteile (Abb. 2) 1) Becken 2) Randdichtungen (Scheiben-Dichtstoff) 3A) Sockel 3B) Kunststoffrahmen für Aquarumsockel. 4) Deckel des Heizers und/oder Anschluss des Abschäumerbechers (für die Versionen NMO30, 30R, 50, 50R) 5) Anschlussstelle für den Heizer 6) Heizer 7) Deckel des Filterbereichs (für die Versionen NMO 20 und NMO 30) 8) Deckel des Filterbereichs (für die Versionen NMO 30R, NMO50, NMO 50R) 9) Chemischer Filtereinsatz für NMO 20 (Mechanichem More I) -
Page 45: Auspacken Und Kontrolle
Keine Reinigungsmittel und keine mit Seifen, Lösungsmitteln oder anderen chemischen Mitteln in Kontakt gekommenen Schwämme verwenden. V.b MONTAGE DES NEWA MORE FILTERS Süßwasserversion (NMO 20 - 30 - 50) 1. Den NEWA More Filter und alle anderen Bestandteile aus den jeweiligen Verpackungen auspacken und auf eine ebene... -
Page 46: Meerwasserversion (Nmo 30R - 50R)
10. ACHTUNG: Die elektrischen Geräte erst einschalten, wenn das Aquarium eingerichtet und mit Wasser gefüllt ist. Meerwasserversion (NMO 30R-NMO 50R) 1. Die für die Montage der Süßwasserversion des NEWA MORE Filters (NMO 20 - 30 - 50) beschriebenen Anweisungen von Punkt 1 bis Punkt 4 genau befolgen. -
Page 47: Filterung
3. Das Rückschlagventil (Seite mit der auf den Kunststoff gedruckten Schrift “AIR IN”) an das freie Ende des an den Durchflussregler angeschlossenen Schlauchteils anschließen. Dann das letzte Ende des PVC-Schlauchs an den NEWA Wind S Belüfter anschließen (Abb. 20). 4. Den Belüfter erst ans Stromnetz anschließen, wenn das Aquarium eingerichtet und mit Wasser gefüllt ist. -
Page 48: Einstellung Des Heizers
Die meisten Zierfische benötigen eine Wassertemperatur, die je nach Gattung unterschiedlich zwischen 24°C und 28°C schwankt. Es ist sehr wichtig, die Wassertemperatur konstant zu halten. Zu diesem Zweck verfügen die NEWA More Aquarien (außer dem Modell NMO 20) über den präzisen und zuverlässigen automatischen Tauchheizer NEWA Therm eco, dessen Thermostat auf Temperaturen von mindestens 18°C bis höchstens 32°C eingestellt werden kann. -
Page 49: Einschalten Des Aquariums
2. Zum Aktivieren der Programmierfunktion ein paar Sekunden beide Einschalttasten der (weißen und blauen) LED-Leuchten drücken: die blauen Leuchtdioden beginnen zu blinken. 3. Die Taste “+1h” (Taste der weißen Leuchtdioden) genau so viele Male drücken, wie viele Stunden man wünscht, dass das Licht eingeschaltet bleibt. -
Page 50: Wartung
2. Den Abschäumerbecher, den Deckel des Filterbereichs und die Mechanichem More und Biofoam Filtereinsätze (falls vorhanden) herausnehmen. Die Teile in einen Behälter legen. 3. Das winkelförmige Profil zur Unterbringung der Kabel aus seinem Sitz lösen. Dazu den kleinen Hebel an der Ecke des Newa More Filters betätigen (Abb. 28). -
Page 51: Vii.c Wechsel Des Porösen Holzeinsatzes
1. Die Punkte 1 bis 4 des Kap. VII, Absatz a befolgen. 2. Mit einer Hand den NEWA More Filter halten, den unteren Teil des Heizers in die andere Hand nehmen und nach oben schieben. Den Heizer an der Kunststoffkappe festhalten und mit einer leichten Zugbewegung herausziehen (Abb. 31). Das Speisekabel herausziehen. -
Page 52: Garantie
PROBLEME URSACHEN LÖSUNGEN Die Bewegungspumpe ist nicht an der Den Stecker in die Netzsteckdose stecken Netzsteckdose angeschlossen. Wasserfördermenge Cartuccia Mechanichem intasata Den Filtereinsatz ausspülen oder auswechseln unzureichend An der Pumpe die notwendigen La pompa è bloccata per sporcizia oder nicht vorhanden Wartungsarbeiten vornehmen (siehe Kap. - Page 53 ErP (2009/125/EG) voor de verlichting. LET OP: Dit symbool op het plaatje van de Newa More geeft aan dat u de gebruiksaanwijzing aandachtig door moet lezen voor het apparaat in werking te stellen, te gebruiken en er onderhoud aan te verrichten.
- Page 54 of nadat deze personen instructies gekregen hebben met betrekking tot een veilig gebruik van het apparaat en de ermee verbonden gevaren begrepen hebben. Kinderen mogen niet met het apparaat spelen daar het geen speelgoed is. De reiniging en het onderhoud die door de gebruiker moeten worden verricht, mogen niet door kinderen zonder toezicht gedaan worden.
-
Page 55: Productspecificaties
II. PRODUCTSPECIFICATIES II.a Namen van de onderdelen (fig. 2) 1) Aquariumbak 2) Randafdichtingen (glaskit) 3A) Verhoging 3B) Plastic lijst voor aquariumbasis 4) Deksel verwarming en/of verbinding beker van de afschuimer (uitvoeringen NMO30, 30R, 50, 50R) 5) Verbindingsplaats verwarming 6) Verwarming 7) Deksel van de filterzone (uitvoering NMO 20 en NMO 30) 8) Deksel van de filterzone (uitvoeringen NMO 30R, 50 en 50R) 9) Chemisch filterpatroon voor NMO 20 (Mechanichem More I) -
Page 56: Uitpakken En Voorafgaande Controles
Controleren of het product alle componenten van par. II a bevat Het NEWA More aquarium is zodanig verpakt dat het bestendig is tegen normale stoten en belastingen die zich tijdens het transport kunnen voordoen. Het kan evenwel gebeuren dat te hevige stoten of het verkeerd behandelen van het aquarium schade aanricht en daarom raden wij aan deze waarschuwingen op te volgen om de afdichting van de aquariumbak te controleren: •... -
Page 57: Zeewater Uitvoering (Nmo 30R - 50R)
Het wordt aanbevolen om ze te gebruiken voordat u verder gaat met de volgende stap. 6. Plaats het NEWA More filter op een willekeurige hoek van de aquariumbak met de zijkanten ervan in de gleuven daarvoor op het filter (fig. -
Page 58: Filtering
In het NEWA More filter wordt deze functie uitgevoerd door de actieve koolstof van plantaardige oorsprong in de NEWA More Mechanichem patroon. Deze koolstof wordt gekenmerkt door een zeer poreuze structuur en een groot oppervlak waardoor hij een groot zowel fysisch als chemisch absorptievermogen heeft. -
Page 59: Regeling Van De Verwarming
De meeste siervissen moeten in verwarmd water leven bij een temperatuur tussen de 24°C en de 28°C, naar gelang het soort. Het is erg belangrijk dat de temperatuur van het water constant gehouden wordt en daarom zijn de NEWA More aquaria (behalve het model NMO 20) voorzien van de nauwkeurige en betrouwbare automatische onderwaterverwarming NEWA Therm eco, waarvan de thermostaat ingesteld kan worden van een minimum van 18°... -
Page 60: Het Aquarium Aanzetten
gaan een uur later uit. 6. In geval van een verkeerde programmering van de tijdklok, de procedure van punt 2 tot punt 4 herhalen. 7. Om de tijdklok te deactiveren moet u de programmering betreden (punt 2) en verlaten (punt 4) zonder de toets “+1h” (toets van het witte LED licht) in te drukken. -
Page 61: Onderhoud
Newa More (fig. 28). 4. Verwijder het Newa More filter van zijn plaats en leg het op een papieren of stoffen handdoek, op zijn kant (fig. 29). 5. De waaierkamer van het pomphuis scheiden om bij de magnetische rotor te komen. -
Page 62: Vii.d De Verwarming Vervangen
1. Volg de punten van 1 t.e.m. 4 van hoofdstuk VII paragraaf a. 2. Houd met één hand het NEWA More filter vast en pak de verwarming aan de onderkant vast en duw hem naar boven. Houd de verwarming aan de plastic dop vast, haal hem van zijn plaats door er zachtjes aan te trekken (fig. 31). Verwijder de stroomkabel. -
Page 63: Correcte Verwijdering Van Dit Product
AFWIJKINGEN OORZAKEN OPLOSSINGEN De pomp is niet op het stopcontact Steek de stekker in het stopcontact aangesloten Mechanichem patroon verstopt De patroon schoon spoelen of vervangen Waterstroming beperkt of afwezig De pomp is geblokkeerd door vuil De pomp reinigen (zie hoofdstuk VII punt a) of slijtage van de rotor De pomp werkt niet goed Wend u tot uw verkoper... - Page 64 Este equipo está diseñado para usar como acuario de agua dulce o salada, para ser utilizado dentro de la casa. Cualquier otro uso no está admitido y por lo tanto el fabricante no se responsabiliza por los daños que pudieran derivar del mismo. Newa More cumple con la normativa vigente de seguridad vigente en la UE (EN60598-2-11) mientras la bomba cumpla con la norma EN60335-2-41.
-
Page 65: Especificaciones Del Producto
del aparato y haber comprendido los peligros inherentes al mismo. Los niños no deben jugar con el aparato ya que no es un juguete. La limpieza y el mantenimiento por parte del usuario no deben ser realizados por niños sin supervisión. 2) ATENCIÓN: Desenchufe o apague todos los aparatos presentes en el acuario o en la cubeta antes de realizar operaciones de instalación y manutención. -
Page 66: Ii.b Datos Técnicos
3A) Base de elevación 3B) Marco de plástico para base de acuario 4) Tapa del calentador y/o acoplamiento del vaso del espumador (versiones NMO30, 30R, 50 y 50R) 5) Alojamiento para el acoplamiento del calentador 6) Calentador 7) Tapa de la zona filtrante (versiones NMO 20 y NMO 30) 8) Tapa de la zona filtrante (versiones NMO 30R, 50, 50R) 9) Cartucho de filtración química para NMO 20 (Mechanichem More I) 10) Cartucho de filtración química para versiones NMO 30, 30R, 50, 50R (Mechanichem More II) -
Page 67: Desembalaje Y Controles Preliminares
Controlar que el producto tenga todos los componentes indicados en el apart. II a El acuario NEWA More está embalado para que pueda resistir los golpes y presiones normales que se producen durante el transporte. De todos modos, puede suceder que golpes excesivos o manipulaciones incorrectas causen daños al acuario, por lo que se recomienda seguir estas advertencias para realizar un control de la estanqueidad del recipiente: •... -
Page 68: Versión De Agua Marina (Nmo 30R - 50R)
10. ATENCIÓN: Activar los equipos eléctricos solo después de haber preparado el acuario a gusto y haberlo llenado con agua. Versión de agua marina (NMO 30R - 50R) 1. Seguir atentamente las instrucciones del punto 1 al 4, descritas para el ensamblaje del NEWA MORE Filter versión de agua dulce (NMO 20-30-50). - Page 69 CONEXIÓN CON FUENTES Y DESCARGAS DE AGUA (fig. 21). El filtro es una instrumento fundamental en la gestión del acuario, sin el cual será necesario cambiar el agua con mucha frecuencia. El potente y eficaz NEWA More filter tiene la finalidad de hacer circular y “limpiar”...
-
Page 70: Ajuste Del Calentador
NMO20: En caso de corte de electricidad, cuando vuelva la tensión se encenderá la luz sea cual sea la configuración anterior. El sistema de iluminación de los acuarios NEWA MORE es controlado por interruptores con mandos táctiles para cada uno de los dos tipos de luces (blanca y actínica. -
Page 71: Encendido Del Acuario
6. En caso de error en la programación del temporizador, repetir el procedimiento del punto 2 al punto 4. 7. Para desactivar el temporizador es necesario entrar (punto 2) y salir de la programación (punto 4) sin pulsar botón “+1h” (botón luz LED blanca). -
Page 72: Mantenimiento
4. Volver a colocar en su alojamiento el filtro Newa More (véase cap. V apart, b puntos 5 y 6) y cada uno de sus componentes interviniendo en el sentido inverso. -
Page 73: Vii.d Sustitución Del Calentador
Prestar atención para que el capuchón del calentador se adapte completamente al anillo (fig. 8). 4. Volver a colocar en su alojamiento el filtro Newa More (véase cap. V apart, b puntos 5 y 6) y cada uno de sus componentes interviniendo en el sentido inverso. -
Page 74: Garantía
ANOMALÍAS CAUSAS SOLUCIONES La bomba de movimiento no está Conectar la clavija a la toma conectada a la toma de alimentación de alimentación eléctrica eléctrica El caudal del agua Cartucho Mechanichem obstruido Enjuagar o sustituir el cartucho es limitado o no hay La bomba está... - Page 76 ITALY: NEWA TECNO INDUSTRIA Srl Via dell’Artigianato 2 - 35010 Loreggia (PD) Tel. +39 049 5794069 Fax +39 049 5794699 Numero Verde 800-860306 17.85.007 MADE IN ITALY...