Table des Matières
Publicité
Les langues disponibles
Les langues disponibles
Liens rapides
Publicité
Chapitres
Table des Matières

Sommaire des Matières pour DRAMINSKI GMDM
- Page 1 GRAIN MOISTURE AND DENSITY www.draminski.com METER (GMDM) with the built-in scales Operating manual Bedienungsanleitung Mode d’emploi Instrucciones de uso Инструкция обслуживания ISO 9001:2008...
-
Page 2: Table Des Matières
TABLE OF CONTENTS INTRODUCTION........3 BUTTON FEATURES ....... 5 SWITCH ON . -
Page 4: Introduction
INTRODUCTION CHAPTER... - Page 5 Thank you for buying the new Grain Moisture and The manufacturer, DRAMIŃSKI company, offers its Density Meter (GMDM) grain moisture meter. This expertise to users and at the same time reserves excellent meter will be an indispensable device the right to introduce construction and software for your business.
-
Page 6: Button Features
BUTTON FEATURES CHAPTER... - Page 7 button CANCEL • leaving the operation presently being performed buttons • scrolling grain names and menu commands, choosing the parameters to be viewed after the measurement (e.g. weight, density) button • switching the instrument on and off (Note! The meter will turn off automatically after three minutes if no buttons pressed!) button TARE...
-
Page 8: Switch On
SWITCH ON CHAPTER... - Page 9 Switch the instrument on using button. Then Scroll the grain names by using buttons to the following will appear: find the required one. Moisture Meter Model: WD-W2 serial no: 1500 Note! After switching the instrument on the last tested grain will be displayed.
-
Page 10: Measurement Mode
MEASUREMENT MODE CHAPTER... -
Page 11: Pour The Sample Into The Measurement
Place the instrument on the horizontal and After taring (which take some seconds) the following stable basis, e.g. a table. commands will appear: Befor starting the measurement check if: a) the measurement compartment is empty pour in sample b) and put the empty dosage tube on the instrument to tare it. - Page 12 In the case of improper sizing of grains quantities sample (too little or too much) the message like release key too light sample too heavy can appear. 3. After the dosage tube is placed on the instrument, The sample is being weighted now, do not touch press the metal button in the dosage tube and the instrument! (Pay attention if the instrument hold it until the grain from the tube pours into...
- Page 13 4. Now pressing buttons you can view: a) weight [gm], b) density [kg/m 5. After finishing the measurement and taking the reading the dosage tube can be taken off the instrument and the sample poured out. The instrument is quite heavy, so when pouring out the grain it is recommended to hold the device with both hands.
-
Page 14: Species And Ranges
SPECIES AND RANGES CHAPTER... - Page 15 canola 4% - 20% barley 9% - 24% 9% - 24% triticale 9% - 24% wheat quality 9% - 24% maize 9% - 24% common 9% - 24% oats 9% - 24%...
-
Page 16: Battery Charging
BATTERY CHARGING CHAPTER... - Page 17 When fully charged, the battery can work Lower battery power is indicated by the words battery continuously 15 hours. flashing on the LCD. When such message is displayed it is not possible to perform any operations/measurements with the device. A new battery is required when this indicator appears.
-
Page 18: Technical Data
TECHNICAL DATA CHAPTER... - Page 19 Dimensions L (19 cm)x W (15 cm)x H (12,5 cm) Weight 1752g (with the dosage tube), 1590 g (without the dosage tube) Display LCD display 2x16 characters Power Nickel-Cadmium battery – 1000 mAh capacity Working time about 25 hours (discharged battery signaled automatically) Working and storing temperature min.
-
Page 20: Equipment
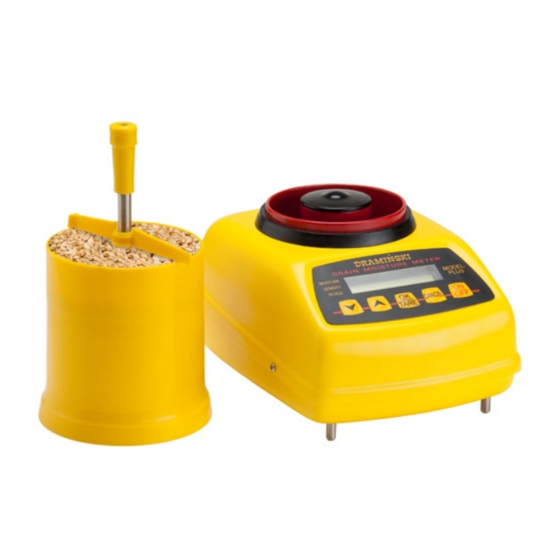
EQUIPMENT CHAPTER... - Page 21 ATTENTION! FOR ALL MEASUREMENTS THE INSTRUMEN MUST THE SURFACE CAN NOT BE SUBJECT TO ANY STAND ON HARD, FLAT SURFACE (F.EX.TABLE, DESK). VIBRATIONS BECAUSE IT WILL INTERFERE WITH THE MEASUREMENT PROCESS AND COULD CAUSE ERRORS. Measurement compartment Dosage tube LCD display Membrane keyboard Balance feet...
- Page 22 INHALTSVERZEICHNIS EINFÜHRUNG ........23 DRUCKTASTENFUNKTIONEN ......25 MESSUNGEN (SCHEMA DER BEDIENUNG) .
-
Page 24: Einführung
EINFÜHRUNG KAPITEL... - Page 25 Wir beglückwünschen Sie zu dem Kauf Ihres neuen DRAMINSKI behält ich das Recht vor, Änderungen Feuchtigkeitsmessgerätes Grain Moisture and in Konstruktion und Software zur Verbesserung der Density Meter (GMDM). Er wird ein unentbehrliches Geräte durchzuführen. Hilfsmittel Ihrer täglichen Arbeit werden. Dank der eingebauten Waage die vorgenommenen Bitte lesen Sie vor der Inbetriebnahme die Messungen noch genauer werden.
-
Page 26: Drucktastenfunktionen
DRUCKTASTENFUNKTIONEN KAPITEL... - Page 27 – Taste CANCEL • Mit dieser Taste wird auf die zuletzt ausgewählte Funktion verzichtet. Damit kann man beispiels- weise von der Messung einer Getreidesorte zu der Messung einer anderen Getreidesorte übergehen. – Tasten • Mit diesen Tasten kann man nach bestimmten Getreidesorten suchen, die im Menü...
-
Page 28: Messungen (Schema Der Bedienung)
MESSUNGEN (SCHEMA DER BEDIENUNG) KAPITEL... - Page 29 Das Gerät mit der – Taste einschalten Mit Hilfe der Tasten kann eine andere (vorprogrammierte) Getreidesorte gewählt werden. Auf dem Display erscheint eine kurze Zeit lang der Name des Gerätes, das Modell und seine Serien- nummer, danach immer der Name der zuletzt un- tersuchten Getreidesorte, z.B.: Feuchtigkeits- tester...
-
Page 30: Messvorgang
MESSVORGANG KAPITEL... - Page 31 Das Messgerät soll sich während der Messung Roggen auf einer harten, geraden und stabilen Fläche Tarieren 1,2 (1,2,3) befinden. Vor Beginn der Messung ist zu überprüfen, ob Nach Austarieren, das ein paar Sekunden dauern der Messbehälter leer und sauber ist. Danach kann, erscheint auf dem Display folgende Meldung: soll die leere Dosiervorrichtung auf dem Messbehälter gestellt werden, um das Gerät...
- Page 32 abzustreifen, indem damit in beide Seiten sehr Roggen vorsichtig gedreht wird. Ok dröcken 3. Ist die Dosiervorrichtung entsprechen der obigen Anweisungen vorbereitet worden, so ist sie Nach Drücken der – Taste über dem Messbehälter zu positionieren. Kurz TARE danach erscheint auf dem Display die Aufschrift Roggen Samen einföllen warten...
- Page 33 Anschließend erscheint auf dem Display das Um die Messung der Feuchtigkeit auf der gleichen Ergebnis der Messung – Feuchtigkeit in % und Probe zu wiederholen, sollte nach dem Entfernen Temperatur in °C.: der Probe wieder der leere Spender auf die Messkammer gelegt werden und dann drücken TARE Roggen...
-
Page 34: Getreidesorten Und Messbereiche
GETREIDESORTEN UND MESSBEREICHE KAPITEL... - Page 35 raps 4% - 20% sommergerste 9% - 24% roggen 9% - 24% weizenroggen 9% - 24% qualitätsweizen 9% - 24% mais 9% - 24% weizen 9% - 24% hafer 9% - 24%...
-
Page 36: Aufladen Der Akkumulatoren
AUFLADEN DER AKKUMULATOREN KAPITEL... - Page 37 Das Gerät signalisiert automatisch eine nicht mehr ausreichende Ladung der Batterie, indem es auf Batterie schwach dem Display die Meldung anzeigt. Mit dieser Meldung ist nicht möglich, alle Messun- gen auf dem Gerät auszuführen. Das Gerät wird von eingebauten CdNi-Akkus ge- speist, die mittels des mitgelieferten Netzgerätes aufgeladen werden.
-
Page 38: Technische Daten
TECHNISCHE DATEN KAPITEL... - Page 39 Abmessungen Länge 19 cm, Breite 15 cm, Höhe 12,5 cm Masse 1752 g ( mit Dosiervorrichtung) 1590 g (ohne Dosiervorrichtung) Anzeige alphanumerisches LCD-Display Stromversorgung integrierter CdNi – Akku, Kapazität 1000 mAh Arbeitszeit ca. 25 Stunden, Arbeits- und min. +5°C, max. +45°C Aufbewahrungstemperatur Fehlergrenze der Anzeigen: ±...
-
Page 40: Zubehör
ZUBEHÖR KAPITEL... - Page 41 1. Dosiervorrichtung ACHTUNG! 2. Netzgerät WÄHREND DER MESSUNG SOLL DAS GERÄT AUF EINER HARTEN, GERADEN UND STABILEN FLÄCHE STEHEN. DIESE FLÄCHE DARF KEINEN SCHWINGUN- GEN UNTERLIEGEN, DA VIBRATIONEN DEN VERLAUF DES MESSVORGANGS STÖREN UND SOMIT MESS- FEHLER VERURSACHEN KÖNNEN. Messbehälter mit eingebautem Temperatursensor Dosiervorrichtung zum Einfüllen alphanumerisches...
- Page 42 TABLE DES MATIÈRES INTRODUCTION........43 FONCTIONS DES TOUCHES ......45 DEMARRAGE .
-
Page 44: Introduction
INTRODUCTION CHAPITRE... - Page 45 Nous vous remercions pour l’achat du notre Le fabricant – la société DRAMINSKI reste au service nouveau hygromètre grains Grain Moisture de ses usagers en leur offrant son savoir et, en and Density Meter (GMDM). Ce parfait appareil même temps elle se réserve le droit d’apporter de mesure vous servira d’un irremplaçable utile...
-
Page 46: Fonctions Des Touches
FONCTIONS DES TOUCHES CHAPITRE... - Page 47 Touche CANCEL • annulation de l'opération précédente (par ex. de la mesure d'une espèce de grain à la mesure d'une autre espèce) Touches • déroulement de noms de grains et de fonctions possibles de menu, choix de paramètres pour la lecture après la mesure (par ex. poids de Touche l'échantillon, densité...
-
Page 48: Demarrage
DEMARRAGE CHAPITRE... - Page 49 Le nom affiché peut etre changé si besoin à l’aide de Appuyer sur la touche Sur l’afficheur apparaîtra touches pour un moment le nom de l’appareil, modèle et numéro en série par exemple: Testeur Humidite Modele: WD - W2 N: 1500 de serie Après l’appareil affichera le nom de grain (nom ou fonction dernièrement utilisée) par exemple: Seigle...
-
Page 50: Mesurage
MESURAGE CHAPITRE... - Page 51 Avant d’effectuer les mesures vérifier si l’appareil Après le tarage de quelques secondes l'appareil est posé sur une surface plane, dure et stabile. affichera : Avant toute mesures: Seigle a) vérifier si le bol de mesure est vide Mettez echant b) poser le doseur vide au dessus du bol afin de tarer l’appareil avec le doseur non rempli.
- Page 52 corrects. Au cas où la quantité de grains n'est pas Seigle Echantillon petit bien mesurée l'appareil affichera appuyez OK Echantillon grand bien 3. Une fois le doseur rempli avec des grains, il faut le après avoir exécuté poser au dessus du bol de mesure sur l'afficheur TARE Mettez echant apparaît...
- Page 53 Un moment après, le résultat de mesure Afin de répéter la mesure d'humidité du même d'humidité en pourcentage et la température échantillon, enlever l'échantillon, remettre le doseur seront affichés par exemple: vide sur le bol de mesure et seulement appuyer sur la touche TARE Seigle...
-
Page 54: Especes Et Capacite De Mesure
ESPECES ET CAPACITE DE MESURE CHAPITRE... - Page 55 colza 4% - 20% triticale 9% - 24% seigle 9% - 24% orge 9% - 24% blé tendre 9% - 24% 9% - 24% blé dur 9% - 24% avoine 9% - 24%...
-
Page 56: Chargement D´accumulateurs
CHARGEMENT D´ACCUMULATEURS CHAPITRE... - Page 57 L’appareil possède une signalisation automatique Batterie si l’alimentation est épuisée. Il affiche alors faible . Dans ce cas il n’est pas possible d’effectuer aucune opération ou la mesure sur l’appareil. Le dispositif est alimenté avec des accumulateurs intérieurs NiCd. Le chargement s’effectue avec alimenteur 12 V/100 mA inclus.
-
Page 58: Données Techniques
DONNÉES TECHNIQUES CHAPITRE... -
Page 59: Alimentation
Proportions longueur 19 cm, largeur 15 cm, hauteur 12,5 cm Poids 1752 g (avec doseur), 1590 g (sans doseur) Affichage LCD, alphanumérique 2 x 16 signes Alimentation accumulateur intérieur NiCd 1000 mAh Temps de foncionnement environ 25 heures, annonce automatiquement l’accumulateur vide Température de travail et stockage min. -
Page 60: Equipement
EQUIPEMENT CHAPITRE... - Page 61 1. Doseur pour le bol de mesure. ATTENTION ! 2. Rechargeur d’accumulateur. PENDANT LES MESURES L’APPAREIL DOIT ETRE POSE SUR UNE SURFACE DURE ET PLANE (BUREAU). LA SURFACE NE PEUT SUBIR DE VIBRATIONS, D’AGITATIONS CAR CELA PROVOQUERAIT LE RESULTAT FAUX DE MESURE. Chambre de mesure Doseur spéciale Écran LCD...
- Page 62 TABLA DE CONTENIDOS INTRODUCCIÓN ....... . .63 FUNCIONES DE LOS BOTONES ......65 ACTIVACIÓN DEL APARATO .
-
Page 64: Introducción
INTRODUCCIÓN CAPÍTULO... - Page 65 El fabricante – la empresa DRAMINSKI está humedad del grano Grain Moisture and Density dispuesta a compartir sus conocimientos con los Meter (GMDM). Este medidor perfecto será una usuarios. Al mismo tiempo se reserva el derecho herramienta inestimable en su actividad. Gracias a para la introducción de los cambios, las mejoras en...
-
Page 66: Funciones De Los Botones
FUNCIONES DE LOS BOTONES CAPÍTULO... - Page 67 Botones • desplaza los nombres de los granos y las funciones disponibles del menú, selección para la lectura de los respectivos parámetros tras realizar la medición (por ej.: masa de la muestra, densidad). Botón • enciende y apaga el aparato (¡Atención! El dispositivo se apaga solo si durante tres minutos permanece inactivo.) Botón...
-
Page 68: Activación Del Aparato
ACTIVACIÓN DEL APARATO CAPÍTULO... - Page 69 Conectar la alimentación – botón Centeno En la pantalla aparece el siguiente comunicado de introducción El nombre visualizado, tras iniciar el dispositivo, Detector se puede cambiar con la ayuda de los botones de humedad Model: WD - W2 numero: 1500 Luego, aparece automáticamente el nombre del tipo de grano (siempre es el nombre o la última función que se utilizó) por ejemplo:...
-
Page 70: Proceso De Medición
PROCESO DE MEDICIÓN CAPÍTULO... - Page 71 El dispositivo, antes de empezar cualquier Centeno medición, debe encontrarse sobre una base alquitranado 1,2 (1,2,3) horizontal sólida y estable. Antes de empezar la medición: Tras la calibración (que dura unos segundos) a) hay que verificar si la cámara de medición aparece el siguiente comunicado: está...
- Page 72 lados por esta razón la acción de girar la hélice apretado hasta que toda la muestra pase a la hay que realizarla con cuidado.) cámara de medición. Si en este momento aparece pila descargada el comunicado no es posible La muestra examinada tiene que ser propiamente continuar trabajando con el aparato.
- Page 73 En este momento se lleva a cabo el pesaje 5. Ahora pulsando los botones también se de la muestra. Rogamos no tocar el aparato. puede leer otros parámetros de la muestra: Preste atención si el aparato y la superficie a) la masa [en gramos], en la que se encuentra no están expuestas b) la densidad del llenado [en kg/hl].
-
Page 74: Especies Y Rangos De Medición
ESPECIES Y RANGOS DE MEDICIÓN CAPÍTULO... - Page 75 canola 4% - 20% cebada 9% - 24% centeno 9% - 24% triticale 9% - 24% trigo de calidad 9% - 24% maiz 9% - 24% trigo común 9% - 24% avena 9% - 24%...
-
Page 76: Carga De Los Acumuladores
CARGA DE LOS ACUMULADORES CAPÍTULO... - Page 77 El aparato posee una señalización automática sobre El tiempo de carga es de aproximadamente 12– el agotamiento de la fuente de alimentación. 14 horas. pila descargada En tales situaciones visualiza . Si Los acumuladores (cargados completamente) per- aparece este comunicado no es posible la realización miten trabajar aproximadamente 15 horas conti- de ningún tipo de las opreciones/mediciones en nuas.
-
Page 78: Datos Técnicos
DATOS TÉCNICOS CAPÍTULO... - Page 79 Dimensiones largo 19 cm, ancho 15 cm, alto 12,5 cm Masa del dispositivo 1752 g (con dosificador), 1590 g (sin dosificador) Indicador de lectura pantalla LCD, alfanumérico 2x16 caracteres Alimentación acumulador interno de CdNi capacidad – 1000 mAh Tiempo de trabajo aprox.
-
Page 80: Accesorios
ACCESORIOS CAPÍTULO... - Page 81 1. Dosificador para rellenar la cámara de medición LA SUPERFICIE DONDE SE EFECTUA LA MEDICIÓN 2. Alimentador para cargar el acumulador NO PUEDE ESTAR DISPUESTA A LAS VIBRACIONES U OTROS CHOQUES DEBIDO A QUE ESO PODRÍA ATENCIÓN! INFLUIR EN EL PROCESO DE LA MEDICIÓN Y PROVO- DURANTE LA MEDICIÓN EL APARATO DEBE ESTAR CAR LOS ERRORES.
- Page 82 СОДЕРЖАНИЕ ВСТУПЛЕНИЕ ........83 ФУНКЦИИ КЛАВИШ .......85 ИЗМЕРЕНИЯ...
-
Page 84: Вступление
ВСТУПЛЕНИЕ РАЗДЕЛ... - Page 85 Производитель – Компания DRAMIŃSKI всегда ра зерна Grain Moisture and Density Meter готов помочь пользователю своими знаниями, а (GMDM). Этот идеальный прибор станет незаме- также оставляет за собой право вносить измене- нимым инструментом в вашем хозяйстве. Изме- ния и улучшения в области дизайна и програм- рения, благодаря...
-
Page 86: Функции Клавиш
ФУНКЦИИ КЛАВИШ РАЗДЕЛ... - Page 87 Кнопка CANCEL • отказ от ранее произведенной операции Кнопки • просмотр семян и доступных функций в меню, выбирание для считывания отдельных пара- метров после проведенного измерения (напр. масса пробы, плотность). Кнопка • приведение в действие аппарата и выключение после окончания работы. (Внимание! Прибор отключится...
-
Page 88: Измерения
ИЗМЕРЕНИЯ РАЗДЕЛ... - Page 89 Включить питание - кнопка Рожь На индикаторе на момент появится вступитель- ное сообщение Высветившееся после приведение в действие Тестер аппарата название можно изменить, если есть та- Влажности кая необходимость при помощи кнопок Модель: W D - W2 Нр. фаб: 1500 Потом...
-
Page 90: Измерительный Процесс
ИЗМЕРИТЕЛЬНЫЙ ПРОЦЕСС РАЗДЕЛ... - Page 91 Прибор перед началом измерений должен Рожь быть поставлен на горизонтальном, твердом тарирование 1,2 (1,2,3) и стабильном основании. Перед началом измерения следует прове- Внимание! Не прикасаться к устройству во рить, пуста ли измерительная камера, и по- время тарирования. том поставить не наполненный дозатор над После...
- Page 92 мощи лопатки, производя ей обороты в обе Рожь стороны, до полного снятия излишка. нажми OK 3. После подготовки дозатора следует его акку- ратно поставить сверху измерительной каме- после нажатия ры. На индикаторе должно появиться сообще- TARE засыпать пробу ние Рожь 4.
- Page 93 Рожь 14,8% 22°C 5. Теперь нажимая кнопки можно счи- тать также другие параметры пробы: массу [в граммах], ссыпная плотность [в кг/м 6. После законченного измерения и счтитания результатов можно снять дозатор с прибора и высыпать пробу из камеры. Аппарат доста- точно...
-
Page 94: Виды И Диапазоны Измерений
ВИДЫ И ДИАПАЗОНЫ ИЗМЕРЕНИЙ РАЗДЕЛ... - Page 95 рапс 4% - 20% ячмень 9% - 24% рожь 9% - 24% тритикале 9% - 24% пшеница качественная 9% - 24% кукуруза 9% - 24% пшеница 9% - 24% овес 9% - 24%...
-
Page 96: Зарядка Аккумуляторов
ЗАРЯДКА АККУМУЛЯТОРОВ РАЗДЕЛ... - Page 97 Аппарат имеет автоматическую сигнализацию разрядки источника питания. В такой ситуации он высвечивает сообщение Слабая батерея . При таком сообщении не пред- ставляется возможным совершать любые дей- ствия / измерения с помощью устройства. Прибор питается от внутренних аккумуляторов Cd.-Ni (кадмиево-никелевые). Они заряжаются при...
-
Page 98: Технические Данные
ТЕХНИЧЕСКИЕ ДАННЫЕ РАЗДЕЛ... - Page 99 Размеры 19 см x 15 см x 12,5 см Масса прибора вес: 1752 г (с дозатором), 1590 г (без дозатора) Индикатор считывания индикатор LCD, буквенно-цифровой 2x16 знаков Питание внутренний аккумулятор CdNi емкость – 1000 mAh Время работы около 25 часов, разрядка аккумулятора сигнализируется автоматически...
-
Page 100: Оснащение
ОСНАЩЕНИЕ РАЗДЕЛ... - Page 101 1. Дозатор для наполнения измерительной каме- ВНИМАНИЕ! ры. ВО ВРЕМЯ ИЗМЕРЕНИЯ УСТРОЙСТВО ДОЛЖНО 2. Питатель для зарядки аккумулятора. СТОЯТЬ НА ТВЕРДОЙ, ПЛОСКОЙ И УСТОЙЧИВОЙ 3. Дозатор для наполнения измерительной ПОВЕРХНОСТИ (ПЛИТА, ПИСЬМЕННЫЙ СТОЛ, камеры. И ТД.) 4. Питатель для зарядки аккумулятора. ОПОРА...
- Page 102 DRAMIŃSKI S.A. Owocowa 17, 10-860 Olsztyn, Poland Tel. +48 89 527 11 30, Fax +48 89 527 84 44 E-mail: info@draminski.pl Instr. GMDM042015EX...