
Manuels Connexes pour AVer VC520 Pro


Sommaire des Matières pour AVer VC520 Pro
- Page 1 VC520 Pro Instruction Manual 른 가이드 Mode d'emploi Manual de instrucciones Краткое руководство ...
- Page 2 English……..……………………………………………………….…..1 한국어….……………………………………………………………….…11 Español...……………………………………………..……….…….…...21 Français…………………………………………………..………..…...31 Pусский…………………………………….….……………..………..41...
-
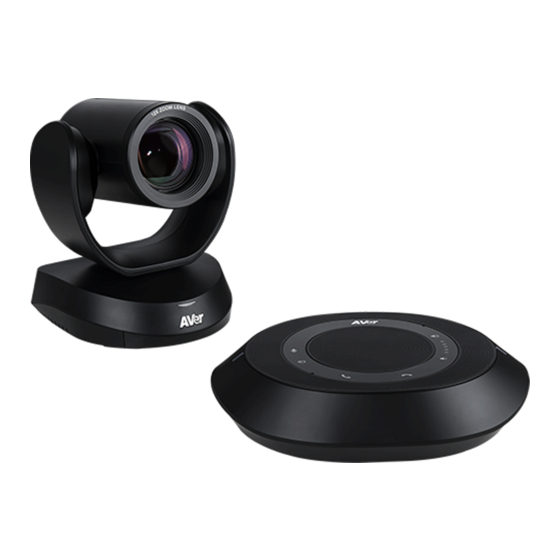
Page 3: Package Contents
51.00[2.01] P/N: 303AU340-AGR *The power cord will vary depending on the standard power outlet of the country where it is sold. More Help For FAQs, technical support, software and user manual download, please visit: http://www.aver.com. English-1... - Page 4 Overview Status LED RS232 in/out port IR sensor Ethernet port Speakerphone port DC 12V power jack (Blue cable) USB3.1 Type B port Kensington Lock 9 1011 12 Speakerphone port Line out port (For extended speakerphone Camera port and microphone connection/ (Blue cable) Red cable)
- Page 5 Installation Connect the camera to power outlet. Power cord Power adapter Connect the camera to the speakerphone using the included compatible cable. [Note] Both speakerphone and camera port are marked in blue. The back cover of the speakerphone will need to be removed to connect the speakerphone cable.
-
Page 6: Remote Controller
*Function requires AVer PTZApp face detection (SmartFrame). Side facial profiles are not detectable. **Not supported for VC520 Pro Press and hold the number button “ ” to turn the WDR function on or off. -
Page 7: Wall Mount Installation
Wall Mount Installation 1. Use the drilling paper included in the package to drill the holes in the wall where the user wants to mount the camera. 2. Use the screw to secure the L-mount bracket on the wall. + B L-mount bracket with screws (included in package). - Page 8 , Fuze, GoToMeeting™, Microsoft Lync™, Vidyo, vMix, WebRTC, Wirecast, XSplit. Step 2: Set the VC520 Pro as your primary camera device in your application (Please consult your application setup guide for details). Step 3: Ready to make a video call.
- Page 9 Using AVer IP Finder to find the Camera To find the IP address of your cameras, you can use the AVer IP Finder application. Follow the below steps to find the IP address of camera. Download the IP Finder from http://www.aver.com/download-center...
- Page 10 Install AVer PTZApp In AVer PTZApp, user can configure the parameters of the camera. Please go to http://www.aver.com/download-center to download the AVer PTZApp. After downloading, double-click on the file and follow the on-screen instructions to complete the installation. Use AVer PTZApp ...
- Page 11 5. Hotkey Control: Enable hotkey control to use keyboard control camera’s movement and backlight. The default is off. A hotkey tip will display when mouse is moved to the PTZ control button in PTZ mode. If the hotkey function is enabled after installing the PTZApp, PTZApp auto launch next time the PC reboots.
-
Page 12: Contact Information
CAUTION - Risk of explosion if battery is replaced by an incorrect type. - Dispose of used batteries in a safe and proper manner. ©2020 AVer Information Inc. All rights reserved. English-10... - Page 13 드릴 작업용 장착용 나사 간편 가이드 보증서 종이 46.00[1.81] Ø5.50[Ø0.22] 51.00[2.01] P/N: 303AU340-AGR *전원 연결선은 판매 국가별 표준 전원 콘센트 형태에 따라 다릅니다. 추가 도움 FAQ, 기술 지원, 소프트웨어 및 사용 설명서 다운로드는 다음 홈페이지를 참조하세요: http://www.aver.com 한국어-11 ...
- Page 14 개요 상태 LED RS232 IN/OUT 포트 IR 센서 이더넷 포트 스피커폰 포트 DC 12V 전원 잭 (청색 케이블) USB3.1 타입 B 포트 켄싱턴 락 9 1011 12 스피커폰 포트 라인 OUT 포트 (스피커폰 및 마이크 연결 카메라 포트 연장용/ 적색 케이블) (청색...
- Page 15 설치 카메라를 전원 콘센트에 연결합니다. 전원 연결선 전원 코드 제품에 포함되어 있는 호환 케이블을 사용해 카메라를 스피커폰에 연결합니다. [참고] 스피커폰과 카메라 포트는 모두 청색으로 표시되어 있습니다. 스피커폰 케이블을 연결하려면 먼저 스피커폰의 후면 커버를 열어야 합니다. 스피커폰 케이블 카메라를...
- Page 16 참조)가 화면에 표시됩니다. 전화 걸기/받기* [참고] 회의에서 참가자는 얼굴 인식을 위해 카메라를 향해야합니다. 측면이 감지되지 * AVer PTZApp 이 필요한 기능 않습니다. 자세한 내용은 사용 설명서를 참조하십시오. **VC520 Pro 를 지원하지 않습니다 리모콘의 버튼을 1 초 동안 누르면 WDR 기능을 켜거나 끌 수...
- Page 17 벽 장착 설치 방법 1. 제품에 들어 있는 드릴링 종이를 사용해 카메라를 장착하고자 하는 벽 지점에 구멍을 뚫습니다. 2. 나사를 사용해 L 자형 브래킷을 벽에 고정합니다. + B L 자형 브래킷을 나사(제품에 포함)로 조립합니다. 3. 그런 다음 4. L 자형 브래킷을 조립한 다음, L 자형 브래킷의 아랫부분을 벽에 고정합니다. 5.
- Page 18 Chrome: 버전 76.x 이상 Firefox: 버전 69 이상 IE: 지원하지 않음 카메라의 기본 설정 IP 주소는 192.168.1.168 입니다. “AVer IP Finder” 앱을 사용해 카메라를 찾으셔도 됩니다(“AVer IP Finder 이용해 카메라 찾기” 섹션을 참조하세요). 3. 로그인 화면이 표시되면 암호를 입력하세요(기본 설정 엄호는 aver4321 입니다).
- Page 19 AVer IP Finder 이용해 카메라 찾기 카메라의 IP 주소를 찾으려면 AVer IP Finder 애플리케이션을 이용하세요. 아래 방법에 따라 카메라의 IP 주소를 찾으면 됩니다. 1. http://www.aver.com/download-center에서 IP Finder를 다운로드합니다. 2. IP Finder를 실행합니다. 3. “Search”(검색)를 클릭하면 이용 가능한 장치들이 모두 화면에 표시됩니다.
- Page 20 AVer PTZApp 설치하기 AVer PTZApp 을 이용해 카메라의 매개변수를 구성할 수 있습니다. http://www.aver.com/download-center 에서 AVer PTZApp 을 다운로드합니다. 다운로드가 완료되면 파일을 더블클릭한 후 화면에 표시되는 지시 사항에 따라 설치를 완료하면 됩니다. AVer PTZApp 사용하기 1. AVer PTZApp 설치가 완료되면 AVer PTZApp 아이콘을...
- Page 21 4. Flip(뒤집기): 카메라가 위아래가 바뀌어 설치되어 있는 경우 AVer PTZApp 에서 "Flip"(뒤집기) 기능을 사용하면 화면이 정상적으로 표시됩니다. 5. Hotkey Control(핫키 제어): Hotkey Control 기능을 활성화하면 카메라 동작과 백라이트를 키보드로 제어할 수 있습니다. 기본 설정은 비활성(Off) 상태입니다. PTZ 모드에서 마우스를 PTZ 제어 버튼 위로 가져가면 핫키...
- Page 22 음소거하지 않습니다. ©2020 AVer Information Inc. All rights reserved. 이 객체에 대한 모든 권리는 AVer Information Inc.에 있습니다. AVer Information Inc.의 사전 서면 허가 없이는 어떠한 형식이나 수단으로도 복제하거나 전송할 수 없습니다. 모든 정보 또는 사양은 사전 통보 없이 변경 될 수 있습니다.
-
Page 23: Contenu De L'emballage
*Le cordon d'alimentation variera selon la prise de courant standard du pays où il est vendu. Aide supplémentaire Pour la FAQ, l'assistance technique et le téléchargement du logiciel et du mode d'emploi, veuillez visiter : http://www.aver.com Français-21... -
Page 24: Présentation
Présentation Led d'état Port E/S RS232 Capteur infrarouge Port Ethernet Port haut-parleur Prise Jack d'alimentation 12 V cc (Câble bleu) Port type B USB3.1 Sécurité Kensington 9 1011 12 Port haut-parleur Port Line out (Pour connexion Port de caméra haut-parleur et microphone (Câble bleu) étendue / câble rouge) - Page 25 Installation Branchez la caméra à une prise de courant. Cordon d’alimentation Adaptateur d'alimentation Connectez la caméra au haut-parleur en utilisant le câble USB fourni. [Note] Les ports haut-parleur et caméra sont marqués en bleu. Le couvercle arrière du haut-parleur doit être retiré...
-
Page 26: Télécommande
*Cette fonction exige l'application AVer PTZApp [Remarque] Pendant la réunion de **Non pris en charge par la VC520 Pro conférence, les participants doivent faire face à la caméra pour la détection des visages. La face latérale n'est pas détectable. -
Page 27: Installation Du Support Mural
Installation du support mural 1. Perçage du mur au lieu d'installation de la caméra, à l'aide du dessin de perçage fourni. 2. Fixation au mur, à l'aide des vis fournies, du support en forme de L 3. Assemblage des pièces et B du support en L à... -
Page 28: Comment Passer Un Appel Vidéo
, Fuze, GoToMeeting™, Microsoft Lync™, Vidyo, vMix, WebRTC, Wirecast ou XSplit. Étape 2 : Définissez la VC520 Pro comme caméra principale dans votre application (consultez le guide de configuration de l'application pour plus de détails). Étape 3 : Prêt à passer un appel vidéo. -
Page 29: Utilisation D'aver Ip Finder Pour Trouver La Caméra
Utilisation d'AVer IP Finder pour trouver la caméra Pour trouver les adresses IP de vos caméras, vous pouvez utiliser l'application AVer IP Finder. Accomplissez les étapes ci-dessous pour trouver l'adresse IP de la caméra. 1. Téléchargez IP Finder depuis http://www.aver.com/download-center... -
Page 30: Installez L'application Aver Ptzapp
Installez l'application AVer PTZApp Dans AVer PTZApp, vous pouvez paramétrer la caméra. Pour télécharger l'application AVer PTZApp, allez à http://www.aver.com/download-center. Après le téléchargement, double-cliquez sur le fichier et suivez les instructions sur l'écran pour effectuer l'installation. Utilisation de l'application AVer PTZApp ... - Page 31 4. Inversion : Si la caméra est installée sens dessus-dessous, activez la fonction Flip (inversion) dans l'application AVer PTZApp pour que les images s'affichent normalement. 5. Commandes par raccourcis clavier : Permettez l'utilisation du clavier pour commander les mouvements et la fonction contre-jour de la caméra. Par défaut, cette fonction est désactivée.
-
Page 32: Coordonnées De Contact
AVer Information Inc. AVer Information Europe B.V. www.aver.com Westblaak 140, 3012KM, Rotterdam, Pays-Bas 8F, No.157, Da-An Rd., Tucheng Dist., Tel: +31(0)10 7600 550 New Taipei City Assistance technique : EU.RMA@aver.com Taïwan ©2020 AVer Information Inc. Tous droits réservés. Français-30 ... -
Page 33: Contenido Del Paquete
*El cable de alimentación variará en función de la toma de corriente estándar del país en el que se venda el producto. Más ayuda Para preguntas frecuentes, soporte técnico y descargas de software y manuales del usuario, visite: http://www.aver.com. Español-31... -
Page 34: Información General
Información general 1 LED de estado 5 Puerto de entrada/salida RS232 2 Sensor de infrarrojos 6 Puerto Ethernet 3 Puerto de unidad de micrófono-altavoz 7 Conector de alimentación de 12 VCC (cable azul) 4 Puerto USB 3.1 tipo B 8 Conector de seguridad Kensington 9 1011 12 ... - Page 35 Instalación Conecte la cámara a la toma de corriente. Cable de alimentación Adaptador de corriente Conecte la cámara a la unida de micrófono-altavoz mediante el cable compatible incluido. [Nota] Los puertos de la cámara y la unidad de micrófono-altavoz están indicados en azul.
-
Page 36: Mando A Distancia
*Esta función requiere AVer PTZApp **No compatible con la unidad VC520 Pro [Nota] Durante la reunión de conferencia, los participantes deben mirar a la cámara para la detección de rostros. La cara lateral no es detectable. -
Page 37: Instalación Del Soporte Mural
Instalación del soporte mural 1. Utilice la tarjeta de perforación incluida en el paquete para realizar los agujeros en la pared, donde el usuario desee montar la cámara. 2. Fije la pieza del soporte en L a la pared con los tornillos. + B del soporte en L con tornillos (incluidos en el 3. - Page 38 Configuración de la cámara a través del navegador web La VC520 Pro tiene un puerto Ethernet para transmisión IP y permite a los administradores controlar y configurar la cámara de forma remota a través de Internet. Asimismo, la VC520 Pro también admite las funciones RTSP y RTMP.
- Page 39 Uso de AVer IP Finder para encontrar la cámara Para encontrar la dirección IP de sus cámaras, puede utilizar la aplicación AVer IP Finder. Siga los pasos que se describen a continuación para encontrar la dirección IP de la cámara.
- Page 40 Instalación de AVer PTZApp El usuario puede configurar los parámetros de la cámara en AVer PTZApp. Vaya a http://www.aver.com/download-center para descargar AVer PTZApp. Una vez descargada, haga doble clic en el archivo y siga las instrucciones en la pantalla para completar la instalación.
- Page 41 4. Voltear: si la cámara está instalada en posición invertida, active la función "Flip" (Voltear) en AVer PTZApp para que la pantalla se muestre en la posición normal. 5. Control de teclas de acceso rápido: si activa el control de teclas de acceso rápido, podrá...
-
Page 42: Información De Contacto
AVer Information Inc. AVer Information Europe B.V. www.aver.com Westblaak 140, 3012KM, Rotterdam, 8F, No.157, Da-An Rd., Tucheng Dist., Netherland New Taipei City Tel.: +31(0)10 7600 550 Taiwan Soporte técnico: EU.RMA@aver.com ©2020 AVer Information Inc. Todos los derechos reservados. Español-40 ... -
Page 43: Содержимое Упаковки
*Тип вилки сетевого шнура зависит от стандарта розеток сети питания в стране продажи устройства. Дополнительная помощь Чтобы ознакомиться с ответами на часто задаваемые вопросы, получить техническую поддержку, загрузить обновление ПО или руководство пользователя, посетите веб-сайт: http://www.aver.com Pусский -41... -
Page 44: Основные Компоненты
Основные компоненты 1 ЖК-индикатор статуса 5 Порт ввода/вывода RS232 2 ИК-датчик 6 Разъем Ethernet 3 Разъем спикерфона 7 Разъем питания 12 В пост. тока (Синий кабель) 4 Разъем USB3.1 Type B 8 Замок Кенсингтона 9 1011 12 9 Разъем... - Page 45 Установка Подключите видеокамеру к розетке сети питания. Сетевой кабель Сетевой адаптер Подключите камеру к спикерфону с помощью поставляемого в комплекте кабеля. [Примечание] Разъемы для подключения спикерфона и видеокамеры помечены синим цветом. Для подключения кабеля спикерфона необходимо снять заднюю крышку спикерфона.
- Page 46 ручной режим. На экране появится сообщение (как показано на рисунке) для указания в автоматическом или ручном режиме. *Для данной функции требуется приложение AVer PTZApp **Не поддерживается для VC520 Pro [Примечание] Во время Нажмите и удерживайте кнопку с номером”...
-
Page 47: Настенный Монтаж
Настенный монтаж 1. Используя схему расположения монтажных отверстий, которая входит в комплект поставки, просверлите отверстие на стене, где пользователь хочет установить камеру. 2. С помощью винта закрепите часть углового монтажного кронштейна на стене. + B углового монтажного кронштейна, используя 3. - Page 48 Firefox: версии 69 или выше IE:не поддерживается IP-адрес камеры по умолчанию: 192.168.1.168. Пользователь может использовать приложение AVer IP-Finder для поиска камеры (см. раздел "Использование AVer IP-Finder для поиска камеры"). 3. На экране входа в систему введите пароль (пароль по умолчанию - aver4321).
- Page 49 Использование AVer IP Finder для поиска камеры Чтобы найти IP-адрес видеокамеры, вы можете использовать приложение AVer IP-Finder. Выполните следующие действия, чтобы найти IP-адрес камеры. 1. Загрузите приложение IP Finder с сайта http://www.aver.com/download-center 2. Запустите приложение IP Finder. 3. Нажмите кнопку Search (Поиск), и все доступные устройства будут указаны на экране.
- Page 50 Установка приложения AVer PTZApp С помощью приложения AVer PTZApp пользователь может настроить параметры камеры. Перейдите по ссылке http://www.aver.com/download-center, чтобы скачать приложение AVer PTZApp. После загрузки дважды щелкните на файле и следуйте инструкциям на экране, чтобы завершить установку. Использование приложения AVer PTZApp ...
- Page 51 4. Переворот изображения: Если камера установлена в перевернутом положении, включите функцию Flip (Перевернуть) в AVer PTZApp, и экран будет отображаться нормально. 5. Управление с помощью горячих клавиш: Вы можете включить управление с помощью горячих клавиш для управления движением и подсветкой камеры с помощью...
-
Page 52: Контактная Информация
AVer Informаtion Inc. AVer Information Europe B.V. www.aver.com Westblaak 140, 3012KM, Rotterdam, Netherland 8F, No.157, Da-An Rd., Tucheng Dist., Tel: +31(0)10 7600 550 New Taipei City, Taiwan Техническая поддержка EU.RMA@aver.com ©2020 AVer Information Inc. Все права защищены. Pусский -50...