Aiwa XR-MS3 Mode D'emploi
Table des Matières
Les langues disponibles
Les langues disponibles
Liens rapides
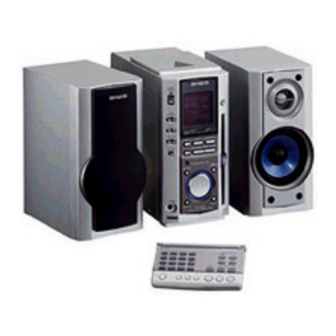
COMPACT DISC STEREO SYSTEM
SISTEMA ESTÉREO DE DISCOS COMPACTOS
CHAINE STEREO AVEC LE LECTEUR DE DISQUE COMPACT
XR-MS3
8A-CL5-913-01
000220BYK-H-M
For assistance and information,
call toll free 1-800-BUY-AIWA.
(United States and Puerto Rico)
U
OPERATING INSTRUCTIONS
MANUAL DE INSTRUCCIONES
MODE D'EMPLOI
En
(English)
E
(Español)
F
(Français)
Chapitres
Table des Matières
Dépannage

Manuels Connexes pour Aiwa XR-MS3


Sommaire des Matières pour Aiwa XR-MS3
- Page 46 FRANÇAIS AVERTISSEMENT Condensation – De l'humidité peut se former sur la lentille de lecture du CD quand: L'appareil est déplacé d'un endroit froid à un endroit chaud. POUR RÉDUIRE LE RISQUE D'INCENDIE OU DE Le chauffage vient juste d'être allumé. DÉCHARGE ÉLECTRIQUE, NE PAS EXPOSER CET L'appareil est utilisé...
- Page 47 Pour la commodité, inscrivez le numéro du modèle et le numéro de RÉCEPTION RADIO série (marqués à l'arrière de l'appareil) dans l'espace ci-dessous. Veuillez les indiquer quand vous contactez un revendeur Aiwa en ACCORD MANUEL ............9 cas de problème.
-
Page 48: Préparatifs
PRÉPARATIFS 1 Raccordez les cordons d'enceinte aux enceintes. RACCORDEMENTS Raccordez les cordons à rayures blanches aux bornes + et les autres cordons aux bornes –. Vérifiez vos accessoires 2 Raccordez les cordons d'enceintes à l'unité principale. Les cordons à rayures blanches doivent être raccordés aux Antenne FM Télécommande Antenne-cadre AM... - Page 49 3 Raccordez les antennes fournies. REMARQUE Raccordez l'antenne FM aux bornes FM 75 Ω et l'antenne- • Raccordez correctement les cordons d'enceinte. Des cadre AM aux bornes AM LOOP. raccordements incorrects peuvent provoquer des courts-circuits aux bornes SPEAKERS. Antenne-cadre AM Antenne FM •...
-
Page 50: Télécommande
TÉLÉCOMMANDE AVANT LA MISE EN SERVICE Insertion des piles zCD EJECT Détachez le couvercle du logement des piles au dos de la télécommande et insérez deux piles R03 (format AAA). TUNER/BAND POWER SHIFT TUNER/BAND ENTER/ R03 (AAA) ILLUMINATION Quand remplacer des piles POWER La portée maximale de la télécommande, à... -
Page 51: Eco/Demo
ÉCLAIRAGE DE L'AFFICHEUR Cet appareil vous permet de changer la luminosité de l'afficheur ECO/DEMO selon votre préférence. Appuyez sur ECO/DEMO alors que l'appareil est sous tension. À chaque pression de cette touche la luminosité de l'afficheur change de la manière suivante: 1 Afficheur plus lumineux 2 Affichage de démonstration 3 Afficheur plus sombre (Les points d'illuminations... -
Page 52: Son
RÉGLAGES AUDIO SYSTÈME BBE Le système BBE augmente la clarté du son de hautes fréquences. Appuyez plusieurs fois sur JOG MODE jusqu'à ce que "BBE" apparaisse dans l'afficheur. Puis tournez VOLUME/MULTI JOG vers la droite ou vers la T-BASS gauche pour sélectionner un des trois niveaux, ou la position Qsurround hors service (off) dans les 6 secondes. -
Page 53: Function
RÉCEPTION RADIO ACCORD MANUEL ÉGALISEUR GRAPHIQUE Cet appareil offre les trois différents types de courbe d'égalisation suivants. ROCK: Son puissant avec aigu et grave accentués POP: Plus grande présence des voix et du registre médium POWER TUNER/BAND JAZZ: Fréquences plus basses accentuées pour la musique de DISPLAY type jazz FUNCTION... -
Page 54: Préréglage De Stations
Pour changer l'intervalle d'accord AM ACCORD D'UNE STATION PRÉRÉGLÉE Le réglage par défaut de l'intervalle d'accord AM est de 10 kHz/ pas. Si vous utilisez l'appareil dans une région où le système 1 Appuyez sur TUNER/BAND pour sélectionner une d'allocation de fréquences est de 9 kHz/pas, changez l'intervalle d'accord. -
Page 55: Jog Mode
LECTURE DE CASSETTE OPÉRATIONS DE BASE LECTURE D'UNE CASSETTE Chargez une cassette. 1 Appuyez plusieurs fois sur DOLBY NR sur l'unité zTAPE EJECT principale, ou appuyez plusieurs fois sur DOLBY NR tout en appuyant sur SHIFT sur la télécommande. Pour les cassettes enregistrées avec DOLBY NR, activez DOLBY NR TAPE l'indication h NR. - Page 56 À propos des cassettes • Pour éviter tout effacement accidentel, brisez les languettes en plastique de la cassette après DISPLAY l'enregistrement avec un tournevis ou un autre outil pointu. Face A SHIFT DISPLAY Fente de Languette Pour changer d'affichage dans le mode de lecture détection de la face Appuyez sur DISPLAY sur l'unité...
-
Page 57: Lecture De Cd
LECTURE DE À propos du témoin du niveau OPÉRATIONS DE BASE L'affichage passe automatiquement au témoin du niveau après 4 secondes. Le témoin du niveau montre un niveau approximatif du son de la zCD EJECT lecture. DISPLAY 0-9,+10 FUNCTION Pour changer d'affichage dans le mode de lecture Appuyez sur DISPLAY sur l'unité... -
Page 58: Lecture Aléatoire/Répétée
PROGRAM LECTURE PROGRAMMÉE REPEAT RANDOM Vous pouvez programmer jusqu'à 30 pistes du disque qui est chargé. Utilisez la télécommande. 1 Dans le mode d'arrêt, appuyez sur PROGRAM tout en appuyant sur SHIFT afin que "PRGM" apparaisse dans l'afficheur. SHIFT 0-9,+10 LECTURE ALÉATOIRE/RÉPÉTÉE 2 Appuyez sur les touches numérotées et sur +10 Utilisez la télécommande. -
Page 59: Enregistrement Sur Cassette
ENREGISTREMENT SUR CASSETTE 6 Sélectionnez et préparez la source à enregistrer. ENREGISTREMENT DE BASE Pour enregistrer depuis une émission de radio, appuyez sur TUNER/BAND et accordez une station. Pour enregistrer depuis un CD, appuyez sur CD sur la télécommande, puis chargez le disque et appuyez sur f ou g pour sélectionner la piste à... -
Page 60: Volume/Multi Jog
• f et g peuvent aussi s'utiliser pour désigner la longueur ENREGISTREMENT AVEC de la cassette. MONTAGE AI DOLBY NR Longueur de cassette FUNCTION JOG MODE VOLUME/ Nombre de pistes MULTI JOG programmées sur wREC/REC MUTE la face A DOLBY NR Temps restant sur la face A La fonction montage AI permet l'enregistrement d'un CD sans... -
Page 61: Enregistrement Avec Montage Programmé
6 Répétez l'opération 5 pour le reste des pistes pour ENREGISTREMENT AVEC la face A. Une piste dont le temps de lecture est plus long que le temps MONTAGE PROGRAMMÉ restant ne peut pas être programmée. DOLBY NR Piste sélectionnée FUNCTION Numéro de programme... -
Page 62: Shift
HORLOGE ET MINUTERIE RÉGLAGE DE L'HORLOGE Si l'affichage de l'heure clignote Si l'afficheur clignote quand l'horloge est affichée, ceci indique que l'horloge s'est arrêtée suite à une panne de courant ou au débranchement du cordon secteur. L'heure actuelle doit être réglée à nouveau. CLOCK RÉGLAGE DE LA LECTURE ET DE L'ENREGISTREMENT... -
Page 63: Minuterie De Sommeil
4 Réglez l'heure de mise sous tension. REMARQUE Tournez VOLUME/MULTI JOG vers la droite pour faire • L'enregistrement temporisé depuis un CD ne peut pas avancer l'heure et vers la gauche pour la faire reculer. La s'exécuter. vitesse de variation de l'heure varie avec la vitesse de rotation •... -
Page 64: Autres Raccordements
• Les cordons de raccordement ne sont pas fournis. Procurez- vous les cordons nécessaires. POUR LIRE UN APPAREIL RACCORDÉ AUX • Consultez votre revendeur Aiwa pour les appareils en option PRISES VIDEO/AUX disponibles. 1 Appuyez sur AUX sur la télécommande, ou PRISES VIDEO/AUX appuyez plusieurs fois sur FUNCTION sur l'unité... -
Page 65: Généralités
GÉNÉRALITÉS ENTRETIEN ET MAINTENANCE GUIDE DE DÉPANNAGE L'entretien et la maintenance périodiques de l'appareil et des Vérifiez les points suivants si l'appareil ne fonctionne pas comme disques sont requis pour optimiser les performances de votre indiqué dans ce Mode d'emploi. appareil. -
Page 66: Spécifications
Système acoustique SPÉCIFICATIONS Type de coffret à deux voies, basse réflexe (à blindage magnétique) Enceintes Grave : Unité principale 85 mm Section tuner FM Aigu : Plage d'accord 87,5 à 108 MHz Type voûté 22 mm Sensibilité utilisable (IHF) 13,2 dBf Impédance 6 ohms Bornes d'antenne... -
Page 67: Index
INDEX & Page Page 1 POWER 6 STANDBY ON ..6, 10, 19, 20 & Touches numérotées ..... 10, 13, 14, 16, 17 2 ECO/DEMO ......7 1/RANDOM ......14 3 FUNCTION ....... 9, 11, 13, 15-18 2/REPEAT ........ 14 4 TUNER/BAND ......