Publicité
A L L
P U R P O S E
V I N Y L
G A R D E N
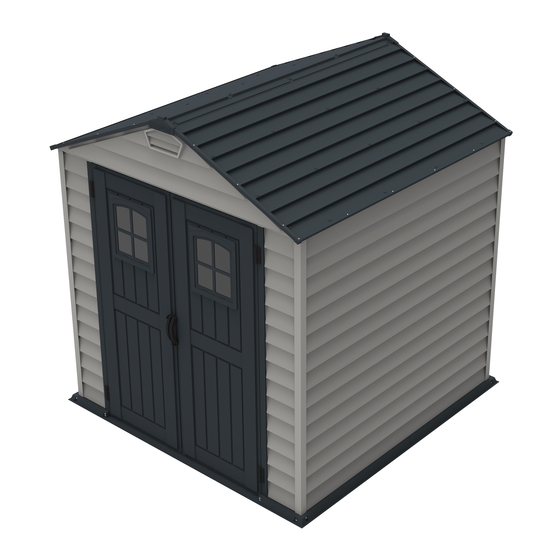
7 Ft x 7 Ft StoreMax Plus
(EN) Model # 30325
(ES) Modelo # 30325
(FR) Modèle # 30325
(EN) OWNER'S MANUAL /
Assembly Instructions '7 Ft x 7 Ft StoreMax'
Size 7 Ft x 7 Ft / 2 .1m x 2.1 m
(Approx.)
Ver: 0.0
Please thoroughly read the owner's manual
before beginning the shed assembly.
Call us or visit duramaxbp.com for damaged
parts.
Do not return to the store.
You can watch the assembly videos on
www.duramaxbp.com
YouTube
Need Help? Comments or Suggestions
Call Customer Service Hotline.
(800) 483-4674
www.duramaxbp.com
WARRANTY ACTIVATION
Thank you for your purchase of DURAMAX
shed. To activate your shed warranty, log
on to our website and fill in the form under
warranty activation.
www.duramaxbp.com/warranty.php
TM
A Product of
S H E D S
(ES) MANUAL DEL PROPIETARIO /
Instrucciones de montaje '7 Ft x 7 Ft StoreMax'
Tamaño 7 Pies x 7 Pies / 2.1 Metros x 2.1 Metros
Ver: 0.0
Por favor a fondo lea el manual del dueño antes
de comenzar la asamblea de cobertizo.
Llámenos o visite duramaxbp.com por daños
partes.
No vuelva a la tienda
Usted puede ver los videos de montaje en
www.duramaxbp.com
YouTube
necesita ayuda? Comentarios, Sugerencias?
La Línea Directa del Servicio del cliente.
(800) 483-4674
www.duramaxbp.com
ACTIVACIÓN DE GARANTÍA
Gracias por su compra de DURAMAX
cobertizo usted. Para activar la garantía
cobertizo, ingrese a nuestra página web y
rellenar el formulario en la activación de la
garantía.
www.duramaxbp.com/warranty.php
(EN) VINYL GARDEN SHED
(ES) JARDÍN DE VINILO CUBIERTO
(FR) ABRI DE JARDIN DE VINYLE
(Aproximado.)
.
(FR) GUIDE D'INSTRUCTIONS /
Instructions de montage '7 Ft x 7 Ft StoreMax'
Mesures 7 Pieds x 7 Pieds / 2.1 Mètre x 2.1 Mètre
Ver: 0.0
Veuillez lire attentivement le mode d 'emploi
avant de commencer l' assemblage de remise.
Appelez-nous ou visitez duramaxbp.com
pour les dommages les pièces.
Ne pas retourner au magasin
Vous pouvez regarder les vidéos de
montage sur
YouTube
www.duramaxbp.com
a besoin d'aide? Commentaires, suggestions?
Hotline service client.
(800) 483-4674
www.duramaxbp.com
ACTIVATION DE LA GARANTIE
Merci pour votre achat de DURAMAX
hangar. Pour activer la garantie de votre
hangar, connectez-vous sur notre site et
remplir le formulaire sous activation
de la garantie.
www.duramaxbp.com/warranty.php
(Approximativ.)
.
Publicité
Table des Matières

Manuels Connexes pour DuraMax StoreMax Plus


Sommaire des Matières pour DuraMax StoreMax Plus
- Page 1 V I N Y L G A R D E N S H E D S (EN) VINYL GARDEN SHED 7 Ft x 7 Ft StoreMax Plus (ES) JARDÍN DE VINILO CUBIERTO (FR) ABRI DE JARDIN DE VINYLE (EN) Model # 30325 (ES) Modelo # 30325 (FR) Modèle # 30325...
- Page 2 (EN) Your Total Solution To Maintenance Free Storage Sheds. • All Weather Durable PVC • Won’t Dent, Rust, Rot or Mildew • Tall Walk In Shed • Never Needs Painting • 53 Inch Wide Double Doors • Easy Assembly • Snow load tested 20lbs/sq.foot •...
- Page 3 Esta garantía otorga derechos legales específicos. Usted puede disfrutar también de otros derechos que pueden ser diferentes para cada estado o país. (FR) Duramax abri de jardin en vynile Garantie Quinze Ans U.S.
-
Page 4: (En) Safety & Precautions
(EN) SAFETY & PRECAUTIONS For your own safety, please read and follow these instructions during the shed assembly. Before You Begin... 1. Check your local building codes regarding footings, location, etc. CAUTION 2. Select a site that allows enough working space around the shed. 3. -
Page 5: Cuidado & Mantenimiento
(ES) SEGURIDAD Y PRECAUCIONES Para su propia seguridad, lea y siga las instrucciones durante el ensamblaje del cobertizo. Antes de comenzar ... 1. Consulte los códigos de construcción locales relativos a cimentación, localización etc. 2. Seleccione un sitio que permite suficiente espacio para trabajar alrededor de la nave. PRECAUCION 3. -
Page 6: Soin Et Entretien
(FR) SÉCURITÉ ET PRÉCAUTIONS Pour votre propre sûreté, svp lisez et suivez ces instructions avant et pendant le montage. Avant de commencer... 1. Vérifiez vos codes de la construction et de l'habitation concernant la pose, l'emplacement, etc. ATTENTION 2. Choisissez un site qui laisse assez d'espace de travail autour de l'abri. 3. - Page 7 (EN) Note : Before starting installation, please refer to Safety & Precautions. (ES) Pozor : Antes de comenzar la instalación, consulte Seguridad y Precauciones. (FR) Note : Avant de commencer l'installation, référez-vous svp au chapitre Sécurité et Précautions. (EN) Tools You Will Need Cordless Drill - Philips Head Screwdriver - Philips Head Hammer or Rubber mallet...
- Page 8 (EN) Parts List (ES) La Lista de partes (FR) Liste des pièces (EN) Check all parts prior to installation. (ES) Revise todas las partes antes de la instalación (FR) Vérifier toutes les pièces avant d'installer. (EN) ACCESSORIES (EN)CODE (EN)CODE (EN) PROFILES (EN) PROFILES (EN)QTY (EN)QTY...
- Page 9 (EN) Exploded View (ES) El Panorama estallado (FR) Vue Explosée VRJ11 VRJ10 VRJ12 FPJ1 RPJ2 RPJ1 RPJ3 RPJ2 FPJ1 RPJ1 VRJ10 VRJ12 VRJ11 VRJ04 VRJ01 VRJ03 VRC05 VRJ02 VRJ08 VRJ07 VRJ08 VRJ05 VRC01 VRJ06 VRJ02 VRJ08 VRJ03 VRC01 VRJ02 VRJ04 VRJ07 VRJ01 VRC05...
-
Page 10: (En) Quick Start (Es) Inicio Rápido (Fr) Démarrage Rapide
(EN) Quick Start (ES) Inicio rápido (FR) Démarrage rapide # 9-20 # 21-28 # 29-34 # 35-40 # 41-42 (EN) IMPORTANT: USE HAND GLOVES TO PREVENT INJURY. (ES) IMPORTANTE: GUANTES DE MANO DE USO PARA PREVENIR LA HERIDA. (FR) IMPORTANT: UTILISER LES GANTS POUR PREVENIR LES ACCIDE NTS. - Page 11 (FR) Réglez la limite de couple de votre perceuse Vis à n # 1 à # 4 pour s'assurer que les vis ne supprime pas les renforts métalliques. DuraMax doit être installé sur une plate-forme en bois de niveau ou une fondation en béton de niveau, qui a une dimension extérieure de 86 7/8”...
- Page 12 BPJ2 (x1) (EN) Silicon not included. (EN) Floor Assembly (ES) Silicio no incluido. (ES) Asamblea de piso (FR) Silicium non inclus. (FR) Assemblage de plancher BPJ2 (EN) Back (ES) Detrás (FR) Arrière BPJ2 BPJ1 (x1) BP (x11) BPJ1 BPJ2 BPJ2 BPJ1 1&2 BPJ2...
- Page 13 VCLJ1 (x2) S1 (x2) VRJ09 (x2) (EN) Side Wall Pre-Assembly (ES) Premontaje de pared lateral (FR) Pré-assemblage de la paroi latérale VCLJ1 VRJ09 VCLJ1 (EN) Note : Make 2 Sets. (ES) Pozor : Hace dos conjuntos. (FR) Note : Faire 2 ensembles. VRJ09 SAC1 (x4) SPJ1 (x2)
- Page 14 SAC1 (x6) SPJ2 (x2) (EN) Note : Make 2 Sets. (ES) Pozor : Hace dos conjuntos. (FR) Note : Faire 2 ensembles. SPJ1 SPJ2 SPJ2 SPJ2 SPJ1 SAC1 SPJ1 SPJ2 1&2 (EN) IMPORTANT: USE HAND GLOVES TO PREVENT INJURY. (ES) IMPORTANTE: GUANTES DE MANO DE USO PARA PREVENIR LA HERIDA. (FR) IMPORTANT: UTILISER LES GANTS POUR PREVENIR LES ACCIDE NTS.
- Page 15 WPC (x4) S1 (x20) CLJ2 (x4) CLJ2 SPJ1 SPJ1 SPJ2 CLJ2 CLJ2 SPJ1 CLJ2 CLJ2 SPJ2 SPJ2 SPJ1 6&7 SPJ2 SPJ2 3&4 SPJ2 CLJ2 (EN) Note : Make 2 Sets. (ES) Pozor : Hace dos conjuntos. (FR) Note : Faire 2 ensembles. CLJ2 SPJ1 SPJ2...
- Page 16 VCLJ2 (x2) S1 (x2) VRJ09 (x2) (EN) Back Wall Pre-Assembly (ES) Premontaje de la pared posterior (FR) Pré-assemblage du mur arrière VCLJ2 VRJ09 VCLJ2 (EN) Note : Make 2 Sets. (ES) Pozor : Hace dos conjuntos. (FR) Note : Faire 2 ensembles. VRJ09 SAC1 (x4) SPJ3 (x1)
- Page 17 SAC1 (x6) SPJ4 (x1) SPJ4 SAC1 SPJ3 SPJ3 SPJ4 SPJ4 SPJ3 1&2 SPJ4 SPJ5 (x1) SPJ6 (x1) (EN) Front Left Wall Pre-Assembly (ES) Premontaje de la pared delantera izquierda SPJ5 (FR) Pré-assemblage du mur avant gauche SPJ6 SPJ5 SPJ6 (EN) IMPORTANT: USE HAND GLOVES TO PREVENT INJURY. (ES) IMPORTANTE: GUANTES DE MANO DE USO PARA PREVENIR LA HERIDA.
- Page 18 CLJ4 (x1) SPJ5 CLJ4 CLICK! SPJ6 SPJ6 SPJ5 CLJ4 CLJ4 SPJ7 (x1) SPJ8 (x1) (EN) Front Right Wall Pre-Assembly (ES) Premontaje de pared frontal derecho (FR) Pré-assemblage du mur avant droit SPJ7 SPJ8 SPJ7 SPJ8 (EN) IMPORTANT: USE HAND GLOVES TO PREVENT INJURY. (ES) IMPORTANTE: GUANTES DE MANO DE USO PARA PREVENIR LA HERIDA.
- Page 19 CLJ1 (x1) SPJ7 CLJ1 CLICK! SPJ8 CLJ1 CLJ1 SPJ8 SPJ7 VRJ01 (x2) S1 (x4) VRC01 (x1) VRJ01 VRJ02 (EN) Front Roof Structure Pre-Assembly (ES) Premontaje de la estructura del techo delantero (FR) Pré-assemblage de la structure du toit avant VRC01 VRJ02 (EN) Make sure these big holes are facing front.
- Page 20 S1 (x6) VRC04 (x1) (EN) Make sure this slot is facing downward. (ES) Asegúrese de que esta ranura esté orientada hacia abajo. (FR) Assurez-vous que cette fente est orientée vers le bas. VRC01 VRC04 RJ (x2) VRC01 1&2 VRC01 VRC01 (EN) IMPORTANT: USE HAND GLOVES TO PREVENT INJURY.
- Page 21 VRJ03 (x1) S1 (x2) VRJ04 (x1) VRJ03 VRC01 VRJ03 VRJ04 VRJ01 VRJ04 VRJ01 (x2) S1 (x8) VRC01 (x1) VRJ02 VRJ01 (EN) Back Roof Structure Pre-Assembly (ES) Premontaje de la estructura del techo posterior (FR) Pré-assemblage de la structure du toit arrière VRC01 VRJ02 EN) Make sure these big holes are facing back.
- Page 22 RJ (x2) VRC01 VRC01 VRC01 1&2 VRJ03 (x1) S1 (x2) VRJ04 (x1) VRJ04 VRJ03 VRC01 VRJ04 VRJ01 VRJ03 (EN) IMPORTANT: USE HAND GLOVES TO PREVENT INJURY. (ES) IMPORTANTE: GUANTES DE MANO DE USO PARA PREVENIR LA HERIDA. (FR) IMPORTANT: UTILISER LES GANTS POUR PREVENIR LES ACCIDE NTS.
- Page 23 (EN) Wall Assembly (ES) Asamblea de pared BCRR (x4) (FR) Montage mural (EN) Parts needed (ES) Las partes necesitaron (FR) Pièces nécessaires (EN)QTY (EN)QTY (EN)CODE (EN)CODE (ES)CODE (ES)QTY (ES)CODE (ES)QTY (FR)CODE (FR)QTÉ (FR)CODE (FR)QTÉ BFLT BFRT BCRR (x1) BCRR (x4) BPJ2 BPJ2 BPJ2...
- Page 24 S5 (x1) (x1) S6 (x1) VCLJ1 SPJ1 (EN) Left (ES)Izquierda (FR) Gauche BPJ2 BPJ1 VCLJ1 BPJ2 VCLJ1 SPJ1 SPJ1 BPJ2 SPJ1 BPJ1 1&2 BPJ2 (EN) Front (ES) Frente BPJ1 (FR) Avant S5 (x4) BCRR (x4) S6 (x4) CLJ2 BPJ1 BPJ1 BCRR BCRR (EN) Left...
- Page 25 S5 (x2) (x1) BFLT (x1) S6 (x2) (EN) Left (ES)Izquierda (FR) Gauche SPJ5 CLJ4 BPJ1 SPJ6 BFLT SPJ5 CLJ4 SPJ5 BPJ1 1&2 (EN) Front (ES) Frente (FR) Avant S1 (x5) SPJ5 SPJ5 (EN) Left SPJ6 (ES)Izquierda SPJ6 CLJ2 (FR) Gauche CLJ2 (EN) Front (ES) Frente...
- Page 26 S5 (x1) (x1) S6 (x1) VCLJ1 (EN) Back (EN) Right (ES) Detrás (ES) Correcta SPJ1 (FR) Arrière (FR) Partie droite BPJ2 BPJ1 SPJ2 VCLJ1 BPJ2 SPJ1 SPJ1 1&2 BPJ1 (EN) Front (ES) Frente (FR) Avant S5 (x4) BCRR (x4) S6 (x4) (EN) Back (ES) Detrás...
- Page 27 S5 (x2) (x1) BFRT (x1) S6 (x2) CLJ1 SPJ7 BPJ1 SPJ8 BFRT CLJ1 CLJ1 SPJ7 BPJ1 (EN) Front (ES) Frente 2&3 (EN) Right (FR) Avant (ES) Correcta (FR) Partie droite S1 (x5) (EN) Front (EN) Right (ES) Frente (ES) Correcta (FR) Avant (FR) Partie droite CLJ2...
- Page 28 (x1) VCLJ2 SPJ3 (EN) Back (ES) Detrás (FR) Arrière BPJ2 SPJ4 2&3 SPJ3 SPJ4 CLJ2 CLJ2 (EN) Right (ES) Correcta (FR) Partie droite SPJ4 SPJ4 SPJ2 4&5 SPJ4 SPJ3 SPJ2 SPJ4 (EN) Back (ES) Detrás (EN) Right (FR) Arrière (ES) Correcta (FR) Partie droite (EN) IMPORTANT: USE HAND GLOVES TO PREVENT INJURY.
- Page 29 S1 (x1) (EN) Back (ES) Detrás (FR) Arrière SPJ4 SPJ4 CLJ2 SPJ3 (EN) Right (ES) Correcta (FR) Partie droite (EN) Back (ES) Detrás 1&2 (FR) Arrière CLJ2 SPJ4 SPJ4 SPJ3 CLJ2 SPJ4 (EN) IMPORTANT: USE HAND GLOVES TO PREVENT INJURY. (ES) IMPORTANTE: GUANTES DE MANO DE USO PARA PREVENIR LA HERIDA.
- Page 30 2 13 S5 (x2) S1 (x1) S6 (x2) VCLJ2 CLJ2 (EN) Back SPJ3 (ES) Detrás (FR) Arrière SPJ4 SPJ4 BPJ2 SPJ3 SPJ3 VCLJ2 BCRR S1 (x8) (EN) Back (ES) Detrás CLJ2 (FR) Arrière SPJ4 SPJ3 (EN) IMPORTANT: USE HAND GLOVES TO PREVENT INJURY. (ES) IMPORTANTE: GUANTES DE MANO DE USO PARA PREVENIR LA HERIDA.
- Page 31 (EN) Roof Assembly (ES) Ensamblaje de techo (FR) Assemblage du toit (EN) Parts needed (ES) Las partes necesitaron (FR) Pièces nécessaires (EN)CODE (EN)QTY (EN)CODE (EN)QTY (ES)CODE (ES)QTY (ES)CODE (ES)QTY (FR)CODE (FR)QTÉ (FR)CODE (FR)QTÉ VRC05 VRJ05 VRJ06 VRJ07 VRJ08 FDCL FDCR S1 (x4) FCC (x4) CLJ2...
- Page 32 FDCL (x1) FDCR (x1) S1 (x2) FDCL FDCL FDCR FDCR CLJ4 CLJ4 1&2 CLJ1 CLJ1 CLJ4 3&4 CLJ1 S2 (x2) S1 (x2) F (x1) 1&2 VRC01 VRC01 FDCL FDCR CLJ4 CLJ1 (EN) IMPORTANT: USE HAND GLOVES TO PREVENT INJURY. (ES) IMPORTANTE: GUANTES DE MANO DE USO PARA PREVENIR LA HERIDA. (FR) IMPORTANT: UTILISER LES GANTS POUR PREVENIR LES ACCIDE NTS.
- Page 33 S1 (x2) S2 (x2) SJ1 (x2) G (x1) 1&2 VCLJ2 S1 (x6) VRC05 (x2) VRC05 VRC05 1&2 VRC05 VRC05 VRC05 SPJ2 VRC05 SPJ2 VCLC5 (EN) IMPORTANT: USE HAND GLOVES TO PREVENT INJURY. (ES) IMPORTANTE: GUANTES DE MANO DE USO PARA PREVENIR LA HERIDA. (FR) IMPORTANT: UTILISER LES GANTS POUR PREVENIR LES ACCIDE NTS.
- Page 34 SJ1 (x8) VRC05 VRC05 SPJ2 VRC05 VRJ05 (x1) S1 (x8) VRJ05 VRJ05 VRJ05 VRJ01 VRJ01 1&2 VRJ05 (EN) IMPORTANT: USE HAND GLOVES TO PREVENT INJURY. (ES) IMPORTANTE: GUANTES DE MANO DE USO PARA PREVENIR LA HERIDA. (FR) IMPORTANT: UTILISER LES GANTS POUR PREVENIR LES ACCIDE NTS.
- Page 35 S7 (x16) VRJ04 VRJ03 VRJ03 VRJ04 VRJ03 VRJ01 VRJ04 VRJ04 VRJ02 S7 (x4) VRJ06 (x1) VRJ05 VRJ06 VRJ06 (EN) IMPORTANT: USE HAND GLOVES TO PREVENT INJURY. (ES) IMPORTANTE: GUANTES DE MANO DE USO PARA PREVENIR LA HERIDA. (FR) IMPORTANT: UTILISER LES GANTS POUR PREVENIR LES ACCIDE NTS.
- Page 36 S1 (x4) S7 (x4) VRJ07 (x2) VRJ06 VRJ07 VRJ07 VRJ07 VRJ07 VRJ09 VRJ07 S7 (x12) VRJ08 (x4) VRJ08 VRJ08 VRJ08 VRJ08 VRJ08 (EN) IMPORTANT: USE HAND GLOVES TO PREVENT INJURY. (ES) IMPORTANTE: GUANTES DE MANO DE USO PARA PREVENIR LA HERIDA. (FR) IMPORTANT: UTILISER LES GANTS POUR PREVENIR LES ACCIDE NTS.
- Page 37 (EN) Roof Panel Assembly (ES) Ensamblaje de panel de techo (FR) Ensemble de panneau de toit (EN) Apply silicone into the holes before inserting the pins (Silicone not included). (ES) Aplicar silicona en los agujeros antes de insertar los pasadores (Silicona no incluido). (FR) Appliquez du silicone dans les trous avant d'insérer les chevilles plastiques (silicone non inclus).
- Page 38 BP (x6) FPJ1 (x1) FPJ1 PPG (x6) RPJ1 (x1) PIN (x6) RPJ1 (EN) IMPORTANT: USE HAND GLOVES TO PREVENT INJURY. (ES) IMPORTANTE: GUANTES DE MANO DE USO PARA PREVENIR LA HERIDA. (FR) IMPORTANT: UTILISER LES GANTS POUR PREVENIR LES ACCIDE NTS.
- Page 39 PPG (x10) RPJ2 (x1) PIN (x10) RPJ2 PPG (x6) RPJ1 (x1) PIN (x6) RPJ1 (EN) IMPORTANT: USE HAND GLOVES TO PREVENT INJURY. (ES) IMPORTANTE: GUANTES DE MANO DE USO PARA PREVENIR LA HERIDA. (FR) IMPORTANT: UTILISER LES GANTS POUR PREVENIR LES ACCIDE NTS.
- Page 40 PPG (x10) RPJ2 (x1) PIN (x10) RPJ2 PPG (x6) RPJ3 (x1) PIN (x6) RPJ3 (EN) IMPORTANT: USE HAND GLOVES TO PREVENT INJURY. (ES) IMPORTANTE: GUANTES DE MANO DE USO PARA PREVENIR LA HERIDA. (FR) IMPORTANT: UTILISER LES GANTS POUR PREVENIR LES ACCIDE NTS.
- Page 41 VRJ10 (x2) S7 (x2) VRJ11 (x2) VRJ10 VRJ11 VRJ10 VRJ11 (EN) Note : Make 2 Sets. (ES) Pozor : Hace dos conjuntos. (FR) Note : Faire 2 ensembles. PPG (x4) PIN (x4) VRJ11 RPJ3 VRJ10 VRJ11 VRJ10 RPJ3 VRJ10 VRJ11 VRJ10 VRJ11 (EN) IMPORTANT: USE HAND GLOVES TO PREVENT INJURY.
- Page 42 S7 (x8) FP (x4) EC2 (x2) VRJ11 VRJ10 VRJ10 VRJ11 S1 (x4) VRJ12 (x2) TC (x4) S7 (x12) VRJ11 VRJ12 VRJ12 VRJ11 VRJ12 VRJ12 1&2 (EN) IMPORTANT: USE HAND GLOVES TO PREVENT INJURY. (ES) IMPORTANTE: GUANTES DE MANO DE USO PARA PREVENIR LA HERIDA. (FR) IMPORTANT: UTILISER LES GANTS POUR PREVENIR LES ACCIDE NTS.
- Page 43 (EN) Door (ES) La puerta (FR) Porte (EN) Parts needed (ES) Las partes necesitaron (FR) Pièces nécessaires (EN)CODE (EN)CODE (EN)QTY (EN)QTY (ES)CODE (ES)CODE (ES)QTY (ES)QTY (FR)CODE (FR)CODE (FR)QTÉ (FR)QTÉ SGC1 SGC1 (x4) DLJ (x1) LH (x2) PW (x4) 1&2 (EN) Left Door (ES) La Puerta izquierda (FR) Porte Gauche SGC1...
- Page 44 SGC1 (x8) PW (x8) SGC1 CLJ1 1&2 CLJ1 SGC1 (x4) L (x1) R (x1) PW (x4) SGC1 SGC1 (EN) IMPORTANT: USE HAND GLOVES TO PREVENT INJURY. (ES) IMPORTANTE: GUANTES DE MANO DE USO PARA PREVENIR LA HERIDA. (FR) IMPORTANT: UTILISER LES GANTS POUR PREVENIR LES ACCIDE NTS.
- Page 45 (EN) Shed Assembly on Concrete Foundation (ES) Montaje de galpón en concreto de la Fundación (FR) Assemblée de hangar sur une fondation en béton (EN) Parts needed (ES) Piezas necesitadas (FR) Pièces nécessaires (EN)QTY (EN)CODE (ES)QTY (ES)CODE (FR)QTÉ (FR)CODE (EN) Note:To ensure that your shed will withstand high winds,you need to anchor on the concrete foundation. A concrete pad or large size concrete patio stone squares is recommended for suitable floor base.
- Page 46 (FR)Le hangar ' DURAMAX ' a été testé et passé des charges de vent élevées dans un environnement de laboratoire contrôlé lorsqu'il est installé avec les directives d'installation de haute vent . Naturelles, les zones de vents forts créent vent à...
- Page 47 (EN) ADDITIONAL ACCESSORIES AVAILABLE (Not included). (ES) ACCESORIOS ADICIONALES DISPONIBLES (No incluidos). (FR) ACCESSOIRES ADDITIONNELS DISPONIBLES (Non fournies avec l’abri). (EN) These accessories are required in case of heavy snow or high wind areas. Please choose relevant accessories according to your needs. (ES) Estos accesorios son requeridas en caso de fuertes nevadas o zonas de alto viento.
- Page 48 (ES) Esperamos que disfrute su cobertizo de almacenaje para DuraMax! (FR) Félicitations ! (FR) Nous espérons que vous apprécierez votre cabanon de DuraMax ! (EN) IMPORTANT: USE HAND GLOVES TO PREVENT INJURY. (ES) IMPORTANTE: GUANTES DE MANO DE USO PARA PREVENIR LA HERIDA.
- Page 49 U.S. Polymers, Inc. 1057 S. Vail Ave Montebello, CA 90640, w w w . d u r a m a x b p . c o m United States of America SKU#30325 RD-0.0 12-02-2020...