Table des Matières
Publicité
Les langues disponibles
Les langues disponibles
Liens rapides
Publicité
Table des Matières

Manuels Connexes pour Denon DP-30L


Sommaire des Matières pour Denon DP-30L
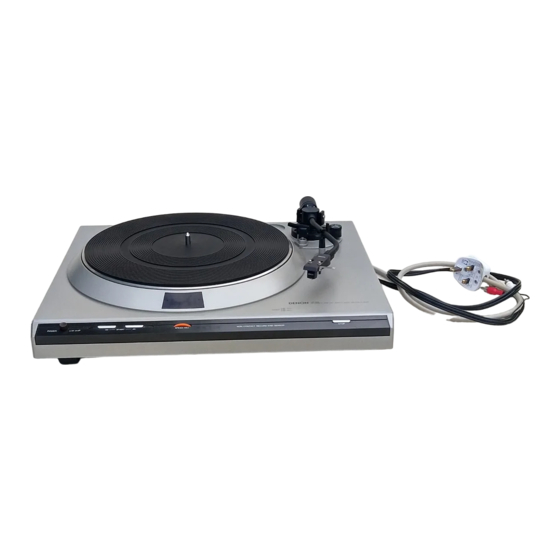
- Page 1 D E N O N OPERATING INSTRUCTIONS SERVO-CONTROLLED DIRECT DRIVE RECORD PLAYER • INSTRUCTIONS D'UTILISATION DE PLATINE TOURNE-DISQUES A ENTRAINEMENT DIRECT ET SERVOCOMMANDE • BEDIENUNGSANLEITUNG PLATTENSPIELER MIT SERVO-GESTEUERTEM DIREKTANTRIEB DP-30L/DP-30L(S) NIPPON COLUMBIA CO., LTD.
-
Page 2: Avertissements Concernant La Sécurité
When removing from wall outlet, be sure to remove by holding the plug attach- ment and not by pulling the cord. Do not open bottom cover In order to prevent electric shock, do not open the bottom cover. If problems occur, contact your DENON dealer. Do not insert anything inside Do not insert metal objects or spill liquid inside the record player. -
Page 3: Important
Model naming Models DP-30L and DP-30L S are different only in the base color. The DP-30L is painted dark brown while the DP- 30L(S) is painted silver. Except for the base color, all the description about the DP-30L applies to the DP-30L(S) as well. -
Page 4: Table Des Matières
LECTURE DU DISQUE ........................19 UN MAUVAIS FONCTIONNEMENT ? ....................24 CARACTÉRISTIQUES PRINCIPALES ....................26 INSTRUCTIONS CONCERNANT LA TÊTE DE LECTURE DENON DL-8A ..........29 INSTRUCTIONS CONCERNANT LA TÊTE DE LECTURE SHURE M75B TYPE 2 ........30 INHALTSVERZEICHNIS BESONDERHEITEN .......................... 5 SICHERHEITSHINWEISE ........................ -
Page 5: Features
à courant direct est utilisé. Ceci permet d'obtenir d'excellentes caractéristiques de pleurage et de vibrations à basse fréquence et une rotation stable, dans des conditions de charges diverses ou extérieures. DENON est fier de présenter ce superbe sys- tème à commande directe. -
Page 7: Lisez Ce Manuel Avant L'emploi
(The rated voltage and frequency are shown on the rating label on the set.) If it is neces- sary to alter the rated voltage and /or the rated frequency, CONTACT YOUR DENON DEALER. LISEZ CE MANUEL AVANT L'EMPLOI Afin de tirer les meilleures performances de cette platine, dans des conditions optimales, veuillez lire ce manuel d'instructions soigneusement. -
Page 8: Precautions For Usage
PRECAUTIONS FOR USAGE Handle the detecting head and magnetic coating with Select a suitable location care As much as possible, avoid locations where the turntable is The speed detection head is positioned with a very small gap exposed directly to the sun, or where it is moist or dusty. to the magnetic coating surface Do not for any reason loosen Place it on a horizontal position with little vibration. -
Page 11: Désignation Des Pièces Et Fonctionnalités
DÉSIGNATION DES PIÈCES ET FONCTIONNALITÉS ( 1 ) Interrupteur général. ( 5 ) Bouton d'arrêt. En appuyant sur ce bouton, le lève-bras se lève et le Il met en marche (ON ) ou arrête (OFF ) le cou- plateau continue à tourner pendant un petit moment rant. -
Page 17: Montage
MONTAGE Ne branchez le cordon d'alimentation qu’une fois le montage terminé. 1. Montage du plateau de lecture. Introduisez vos doigts dans les deux trous du plateau de lecture, comme l'indique la Fig. 1 et assemblez lentement sur l'arbre du moteur. Pour enlever le plateau de lecture, ti- rez-le vers le haut de la même façon. -
Page 18: Connexion
Montage et démontage de la coquille sur le bras de lecture. Comme le montre la Fig. 6, alignez la colonne de gui- dage avec la fente à l'extrémité du bras de lecture et in- sérez-la. Faites tourner le contre-écrou suffisamment dans le sens de la flèche, comme l'indique la Fig. -
Page 19: Réglages
RÉGLAGES Réglage de la force d'appui verticale Réglez sur la force d'appui verticale optimale de la manière suivante. Si une force d'appui verticale incorrecte est utilisée, la pointe de lecture sautillera et on obtiendra un son déformé. Mettez le courant (ON ( 1 ) Appuyez sur le bouton de sélection de vitesse, soit sur ( 2 ) -
Page 20: Lecture Du Disque
Réglage du lève-bras Réglez la hauteur du lève-bras de la façon suivante. (Fig. 13) Mettez le courant avec l'interrupteur général ON ( et appuyez sur le bouton de sélection de vitesse, soit "33" ou "45". Assurez-vous que le lève-bras soit abaissé et coupez le courant OFF ( Desserrez la vis de fixation de hauteur et laissez le lève- bras à... - Page 25 Malfunction? Please, check the following items No sound reproduced Referencer Is cartridge to head shell connection correct? ........• P.12, Fig. 3 Is output cord connection to amplifier correct? ........• P.13, Fig. 8 Is adjustment and selection on amplifier correct? ....... • Instruction for amplifier. ...
-
Page 27: Main Specifications
Poids environ 9,5 Kg ● Bras de lecture Type type équilibré statique avec lève- (1) Pleurage : Mesuré selon la méthode DENON avec volant à bras automatique pulsation magnétique. Les spécifications ci-dessus et l'apparence extérieure du matériel Longueur réelle 220 mm sont susceptibles de modifications en vue d'améliorations. -
Page 30: Instructions Pour La Tête De Lecture Stéréo Dl-8A Du Tourne-Disque Denon Dp-30L
Cette notice d'instructions donne les instructions supplémentaires concernant la tête de lecture jointe au tourne-disque à entrainement direct Modèle DP-30L. Lisez cette notice d'instructions ainsi que le manuel d'instructions (livret) pour le tourne-disque DP-30L. PRÉCAUTIONS La DL-8A est une tête de cartouche MM (Moving Magnet=Aimant Mobile). Par conséquent, vous devez employer un amplificateur équipé... - Page 32 cées par Shure. N'ACCEPTEZ AUCUNE IMITATION. BROTHERS INC. Garantie GUARANTEE: This Shure product is guaranteed in normal Nous offrons sur ce produit SHURE une garantie d'un an use to be free from electrical and mechanical defects for a contre tout défaut électrique ou mécanique à partir de la period of one year from the date of purchase.
- Page 33 NIPPON COLUMBIA CO., LTD. No. 14-14 AKASAKA 4-CHOME MINATO-KU, TOKYO 107 JAPAN T E L EX : JA PA N O LA J2 2 5 91 PHONE: (03) 584-8111 80.6 5118115206 CA B LE: NI PPONC OLU MBI A TO KYO P r i n t e d i n J A P A N...