INVENTOR EPC-09 Mode D'emploi
Masquer les pouces Voir aussi pour EPC-09:
Table des Matières

Publicité

Les langues disponibles
  • FR

Les langues disponibles

  • FRANÇAIS, page 58

Liens rapides

• USER'S MANUAL
• ΕΓΧΕΙΡΙΔΙΟ ΧΡΗΣΗΣ
• MANUAL UTILIZATORULUI
• BEDIENUNGSANLEITUNG
• MODE D'EMPLOI
• MANUALE DELL' UTENTE
• MANUAL DEL PROPIETARIO
ENGLISH | ΕΛΛΗΝΙΚΑ | ROMANA | DEUTSCH |
FRANҪAIS | ITALIANO | ESPAÑOL
REMOTE CONTROLLER
MODELS:
EPC-09
EPC-09BS
1

Publicité

Table des Matières
loading

Sommaire des Matières pour INVENTOR EPC-09

  • Page 1 REMOTE CONTROLLER • USER’S MANUAL • ΕΓΧΕΙΡΙΔΙΟ ΧΡΗΣΗΣ • MANUAL UTILIZATORULUI • BEDIENUNGSANLEITUNG • MODE D'EMPLOI • MANUALE DELL’ UTENTE • MANUAL DEL PROPIETARIO MODELS: EPC-09 EPC-09BS ENGLISH | ΕΛΛΗΝΙΚΑ | ROMANA | DEUTSCH | FRANҪAIS | ITALIANO | ESPAÑOL...
  • Page 2: Table Des Matières

    CONTENTS Remote control specifications ..............2 Function buttons ..................3 Using the remote control ................4 Remote LED screen indicators ..............5 How to use the basic functions ..............6 How to use the advanced functions ............13...
  • Page 3: Remote Control Specifications

    Remote Control Specifications Model RG57H(B)/BG(C)E;RG57H1(B)/BG(C) E;RG57H2(B)/BG(C)EF;RG57H3(B)/ BG(C)EFU1; RG57H3(B)/BG(C)EF; RG57H1 (B)/BG(C)E-M; RG57H(B)/ BG(C)EU1; RG57H4(B)/BG(C)EFU 1; RG57H (B)/BGC E-M; RG57H (B)/BGC EU1 -M Rated Voltage 3.0V(Dry batteries R03/LR03X2) Signal Receiving Range Environment -5°C~60°C(23°F~140°F) O N /OF F S HO R T O N /OF F S HO R T O N /OF F S HO R T...
  • Page 4: Function Buttons

    Function Buttons Before you begin using your new air conditioner, make sure to familiarize yourself with its remote control. The following is a brief introduction to the remote control itself. For instructions on how to operate your air conditioner, refer to the How to Use Basic Functions section of this manual. ON/OFF SHORT CUT Turns the unit on or off.
  • Page 5: Using The Remote Control

    Using The Remote Control TIPS FOR USING REMOTE CONTROL NOT SURE WHAT A FUNCTION DOES? • The remote control must be used within 8 Refer to the How to Use Basic Functions and meters of the unit. How to Use Advanced Functions sections of •...
  • Page 6: Remote Led Screen Indicators

    Remote LED Screen Indicators Transmission Indicator Lights up when remote sends a signal to the unit ON/OFF display Appears when the unit is turned MODE display on, and disappears when it is Displays the current turned off mode, including: • AUTO TIMER ON display TIMER OFF display •...
  • Page 7: How To Use The Basic Functions

    How To Use The Basic Functions SETTING TEMPERATURE The operating temperature range for units is 17-30°C (62oF-86°F). You can increase or decrease the set temperature in 1°C (1°F) increments. AUTO operation O N /O F F S HO R T C U T In AUTO mode, the unit will automatically select the COOL, FAN, HEAT or DRY mode Dased on the...
  • Page 8 How To Use The Basic Functions DRY operation (dehumidifying) 1. Press the MODE button to select DRY mode. 2. Setyour desired temperature using the Temp▲ orTemp ▼ button. 3. Press the ON/OFF button to start the unit. NOTE: FAN SPEED can t be changed in O N /O F F S HO R T C U T...
  • Page 9 How To Use The Basic Functions HEAT operation 1. Press the MODE button to select HEAT mode. 2. Setyour desired temperature using the Temp ▲ or Temp ▼ button. 3. Press the FAN button to select the fan speed: AUTO, LOW, MED, or HIGH. 4.
  • Page 10: Setting The Timer Function

    Setting the TIMER function Your air conditioning unit has two timer-related functions: TIMER ON- sets the amount of time when the unit will automatically turn on. TIMER OFF- sets the amount of time when the unit will automatically turn off. TIMER ON TIMER ON TIMER ON function...
  • Page 11 TIMER OFF function The TIMER OFF function allows you to set a time when the unit will automatically turn off, such as NOTE: When setting the TIMER ON or TIMER when you wake up. OFF functions, up to 10 hours, the time will in- crease in 30-minute increments with each press.
  • Page 12 Setting both TIMER ON and TIMER OFF at the same time Keep in mind that the time periods you set for both functions refer to hours after the current time. For ex- ample, say that the current time is 1:00 PM, and you want the unit to turn on automatically at 7:00 PM. You want it to operate for 2 hours, then automatically turn off at 9:00 PM.
  • Page 13 Example: Setting the unit to turn on after 6 hours, operate for 2 hours, and then turn off (see the figure below) Your remote display T imer on Timer is set to turn ON 6 hours from current time T imer off Timer is set to turn OFF 8 hours from current time Timer starts...
  • Page 14: How To Use The Advanced Functions

    How To Use The Advanced Functions SLEEP Function The SLEEP function is used to decrease energy use while you sleep (if you don’t need the same temperature settings to stay com- fortable). This function can only be activated via remote control. Note: The SLEEP function is not available in FAN or DRY mode.
  • Page 15 NOTE: - Button design is based on a typical model and might be slightly different from the actual one you purchased. - The unit can complete all the functions described. If the unit does not have the feature then the corresponding button on the remote control will not work.
  • Page 16 ΠΕΡΙΕΧΟΜΕΝΑ Χαρακτηριστικά του Ασύρματου Τηλεχειριστηρίου ......... 2 Λειτουργίες Πλήκτρων ................3 Χρήση του τηλεχειριστηρίου ..............4 Ενδείξεις στην LCD Οθόνη ................. 5 Τρόπος χειρισμού των λειτουργιών ............6 Τρόπος χειρισμού των εξειδικευμένων λειτουργιών ......13...
  • Page 17: Χαρακτηριστικά Του Ασύρματου Τηλεχειριστηρίου

    Χαρακτηριστικά Ασύρματου Τηλεχειριστηρίου Μοντέλο RG57H(B)/BG(C)E;RG57H1(B)/BG(C) E;RG57H2(B)/BG(C)EF;RG57H3(B)/ BG(C)EFU1; RG57H3(B)/BG(C)EF; RG57H1 (B)/BG(C)E-M; RG57H(B)/ BG(C)EU1; RG57H4(B)/BG(C)EFU 1; RG57H (B)/BGC E-M; RG57H (B)/BGC EU1 -M 3.0V (Μπαταρίες ξηρού τύπου R03/ Ονομαστική Τάση LR03 2) Εμβέλεια Σήματος Λήψης Εύρος Θερμοκρασίας περιβάλλοντος -5°C ~ 60°C O N /OF F S HO R T O N /OF F S HO R T...
  • Page 18: Λειτουργίες Πλήκτρων

    Λειτουργίες Πλήκτρων Πριν ενεργοποιήσετε το κλιματιστικό σας, βεβαιωθείτε ότι έχετε εξοικειωθεί με τη χρήση του τηλεχειριστηρίου. Ακολουθούν αναλυτικές οδηγίες σχετικά με τις λειτουργίες του τηλεχειριστήριου στην ενότητα «Τρόπος χειρισμού των λειτουργιών» του εγχειριδίου. Πλήκτρο SHORT CUT Πλήκτρο ON/OFF Πιέστε αυτό το πλήκτρο, για Εκκίνηση...
  • Page 19: Χρήση Του Τηλεχειριστηρίου

    Χρήση του τηλεχειριστηρίου ΣΥΜΒΟΥΛΕΣ ΧΡΗΣΗΣ ΤΟΥ ΤΗΛΕΧΕΙΡΙΣΤΗΡΙΟΥ • Το τηλεχειριστήριο θα πρέπει να βρίσκεται σε ΔΕΝ ΕΙΣΤΕ ΣΙΓΟΥΡΗ ΓΙΑ ΤΗΝ ΧΡΗΣΗ απόσταση 8 μέτρων από τη μονάδα. ΜΙΑΣ ΛΕΙΤΟΥΡΓΙΑΣ? • Θα ακουστεί χαρακτηριστικός ήχος όταν η μονάδα Ανατρέξτε στο «Τρόπος χειρισμού λάβει...
  • Page 20: Ενδείξεις Στην Lcd Οθόνη

    Ενδείξεις στην LCD Οθόνη Ένδειξη μετάδοσης εντολών Εμφανίζεται όταν το τηλεχειριστήριο στέλνει σήμα στη μονάδα Ενδείξεις ON/OFF ένδειξη λειτουργιών Εμφανίζεται όταν η μονάδα Εμφανίζει τη ενεργοποιείται/απενεργοποιείται. τρέχουσα λειτουργία: • AUTO TIMER OFF ένδειξη TIMER ON ένδειξη • COO Εμφανίζεται όταν ενεργοποιείται Εμφανίζεται...
  • Page 21: Τρόπος Χειρισμού Των Λειτουργιών

    Τρόπος χειρισμού λειτουργιών ΡΥΘΜΙΣΗ ΘΕΡΜΟΚΡΑΣΙΑΣ Το εύρος ρύθμισης θερμοκρασίας για τις μονάδες είναι 17-30 °C (62 °F -86 °F). Μπορείτε να αυξήσετε ή μειώσετε τη ρυθμισμένη θερμοκρασία κατά 1°C (1°F). Αυτόματη λειτουργία O N /O F F S HO R T C U T Σε...
  • Page 22 Τρόπος χειρισμού λειτουργιών Λειτουργία Αφύγρανσης 1. Πιέστε το πλήκτρο MODE για να επιλέξετε την λειτουργία DRY. 2. Επιλέξτε την επιθυμητή θερμοκρασία χρησιμοποιώντας τα πλήκτρα Temp ▲ ή τα πλήκτρα Temp ▼. 3. Πατήστε το πλήκτρο ON/OFF για να ξεκινήσει η μονάδα. O N /O F F S HO R T C U T...
  • Page 23 Τρόπος χειρισμού λειτουργιών Λειτουργία Θέρμανσης 1. Πιέστε το πλήκτρο MODE για να επιλέξετε την λειτουργία HEAT. 2. Επιλέξτε την επιθυμητή θερμοκρασία χρησιμοποιώντας τα πλήκτρα Temp ▲ ή τα πλήκτρα Temp ▼. 3. Πατήστε το πλήκτρο FAN για να επιλέξετε ταχύτητα ανεμιστήρα: AUTO, LOW, MED ή...
  • Page 24 Ρύθμιση λειτουργίας ΧΡΟΝΟΔΙΑΚΟΠΤΗ Το κλιματιστικό σας διαθέτει δυο λειτουργίες χρονοδιακόπτη: TIMER ON- Ρυθμίζει το χρόνο μέχρι η μονάδα να ενεργοποιηθεί αυτόματα. TIMER OFF- Ρυθμίζει το χρόνο μέχρι η μονάδα να απενεργοποιηθεί αυτόματα. TIMER ON TIMER ON Λειτουργία TIMER ON Με το πλήκτρο TIMER ON μπορείτε να ρυθμίσετε την...
  • Page 25 Λειτουργία TIMER OFF Με το πλήκτρο TIMER OFF μπορείτε να ρυθμίσετε την αυτόματη απενεργοποίηση της ΣΗΜΕΙΩΣΗ: Ρυθμίζοντας τη λειτουργία TIMER μονάδας, για παράδειγμα όταν ξυπνάτε το πρωί. ON ή TIMER OFF η ώρα θα αυξάνεται κατά μισή ώρα έως τις 10ώρες και κατά 1 ώρα έως τις 24 1.
  • Page 26 Ρυθμίζοντας ταυτόχρονα τις λειτουργίες TIMER ON ή TIMER OFF Η ρυθμισμένη περίοδος και για τις 2 λειτουργίες αναφέρεται σε διάστημα ωρών μετά τη τρέχουσα ώρα. Για παράδειγμα, έστω ότι η τρέχουσα ώρα είναι 1:00μμ και θέλετε η μονάδα να ενεργοποιηθεί αυτόματα στις 7:00μμ.
  • Page 27 Παράδειγμα: Ρυθμίστε τη μονάδα να ενεργοποιηθεί σε 6 ώρες, να λειτουργήσει για 2 και έπειτα να απενεργοποιηθεί (δείτε το σχήμα παρακάτω) Η οθόνη του τηλεχειριστηρίου T imer on Ο χρονοδιακόπτης είναι ρυθμισμένος να ενεργοποιηθεί σε 6 ώρες από τη τρέχουσα ώρα T imer off Ο...
  • Page 28: Τρόπος Χειρισμού Των Εξειδικευμένων Λειτουργιών

    Τρόπος χειρισμού των εξειδικευμένων λειτουργιών Λειτουργία SLEEP Η λειτουργία διατηρεί ευχάριστη την ατμόσφαιρα και συνεισφέρει στην εξοικονόμηση ενέργειας κατά τη διάρκεια του ύπνου. Η ενεργοποίηση της συγκεκριμένης λειτουργίας μπορεί να γίνει μόνο από το τηλεχειριστήριο. ΣΗΜΕΙΩΣΗ: Η λειτουργία SLEEP δεν είναι διαθέσιμη...
  • Page 29 ΣΗΜΕΙΩΣΕΙΣ: - Τα σχέδια των πλήκτρων είναι επεξηγηματικά και μπορεί να διαφέρουν ελαφρώς από το πραγματικό προϊόν που αγοράσατε. - Η μονάδα μπορεί να πραγματοποιήσει όλες τις λειτουργίες που αναγράφονται. Αν η μονάδα δεν διαθέτει κάποια λειτουργία τότε το αντίστοιχο πλήκτρο του τηλεχειριστηρίου δεν θα λειτουργήσει. - Αν...
  • Page 30 Cuprins Specificatiile tehnice ale telecomenzii............2 Butoanele pentru alegerea functiilor............3 Utilizarea telecomenzii................4 Indicatoarele cu LED ................... 5 Utilizarea functiilor de baza ................ 6 Utilizarea functiilor complexe..............13...
  • Page 31 Remote Control Specifications RG57H(B)/BG(C)E;RG57H1(B)/BG(C) Model E;RG57H2(B)/BG(C)EF;RG57H3(B)/ BG(C)EFU1; RG57H3(B)/BG(C)EF; RG57H1 (B)/BG(C)E-M; RG57H(B)/ BG(C)EU1; RG57H4(B)/BG(C)EFU 1; RG57H (B)/BGC E-M; RG57H (B)/BGC EU1 -M Rated Voltage 3.0V(Dry batteries R03/LR03X2) Distanta maxima pentru receptionarea semnalelor. Temperatura incaperii. -5°C~60°C(23°F~140°F) O N /OF F S HO R T O N /OF F S HO R T O N /OF F...
  • Page 32: Butoanele Pentru Alegerea Functiilor

    Butoanele pentru alegerea functiilor. Inainte de a utiliza noul aparat de aer coditionat, asigurati-va ca v-ati familiarizat cu functiile sale inainte de a-l utiliza. Mai jos gasiti o scurta introducere a telecomenzii. Pentru instructiuni de folosire a aparatului de aer confitionat va rugam sa consultati sectiunea “UTILIZAREA FUNCTIILOR DE BAZA” din acest manual. ON/OFF SHORT CUT Porneste si opreste aparatul.
  • Page 33: Eliminarea Bateriilor

    Manevrarea telecomenzii. Sfaturi pentru utilizarea telecomenzii. In cazul in care nu sunteti siguri in legatura • Telecomanda va fi folosita la cel mult 8 metri cu o functie, va rugam sa consultati sectiunile de unitatea interioara a aparatului. “Utilizarea functiilor de baza” si “ Utilizarea •...
  • Page 34: Indicatoarele Cu Led

    Indicatoarele cu LED Indicatorul pentru transmisie. Acest indicator se va aprinde de fiecare data cand telecomanda transmite un semnal catre unitate. Indicatorul pentru Indicatorul ON/OFF afisarea modului de Acest indicator se va aprinde atunci cand unitatea functionare. este pornita si se va stinge atunci cand este oprita. Va afisa modul de functionare : TIMER ON display...
  • Page 35: Utilizarea Functiilor De Baza

    Utilizarea functiilor de baza. Setarea temperaturii. Intervalul in care puteti selecta temperatura este de 17-30°C(62oF-86°F). Puteti creste sau scadea temperatura in trepte de 1°C(1°F). Functionarea in modul AUTO O N /O F F S HO R T C U T In timpul functionarii in modul AUTO, aparatul va selecta automat modul COOL, FAN, HEAT sau T IME R...
  • Page 36 Utilizarea functiilor de baza. Functionarea in modul DRY (dezumidificare). 1. Apasati butonul MODE pentru a selecta modul DRY. 2. Pentru a selecta temperatura dorita apasati Temp▲ sau Temp ▼ 3. Apasati butonul ON/OFF pentru a porni unitatea. NOTA: Viteza ventilatorului (FAN SPEED) O N /O F F S HO R T C U T...
  • Page 37 Utilizarea functiilor de baza. Functia de incalzire. 1. Apasati butonul MODE pentru a selecta functia de incalzire (HEAT). 2. Pentru a selecta temperatura dorita apasati Temp ▲ sau Temp ▼. 3. Apasati butonul FAN pentru a va alege nivelul de viteza a ventilatorului : AUTO, LOW, MED sau HIGH 4.
  • Page 38 Setarea functiei TIMER (temporizator). Aparatul dumneavoastra are 2 functii disponibile pentru temporizator: TIMER ON- (temporizator pornire) va ajuta sa alegeti perioada de timp dupa care doriti sa porneasca aparatul de aer conditionat. TIMER OFF- (temporizator oprire) TIMER ON TIMER ON va ajuta sa alegeti perioada de timp dupa care doriti ca aparatul de aer conditionat sa se opreasca.
  • Page 39 Functia TIMER OFF Functia TIMER OFF (temporizator oprire), va permite sa va alegeti perioada dupa care doriti ca NOTA : Atunci cand setati functia TIMER ON aparatul dumneavoastra se sa se opreasca. De sau TIMER OFF, pana la 10 ore, duprata va exemplu, atunci cand va treziti.
  • Page 40 Setarea temporizatorului de pornire si oprire in acelasi timp. In momentul setarii ambelor functii, luati in calcul ca durata de timp se refera la perioada de dupa setare. De exemplu, daca este ora 13:00 si doriti ca unitatea sa porneasca automat la ora 19:00 si doriti sa func- tioneze 2 ore, dupa aceea sa se opreasca la ora 21:00, urmariti pasii ilustrati in imaginile de mai jos: TIMER ON TIMER ON...
  • Page 41 Exemplu : Setarea unitatii pentru pornire dupa 6 ore, functionare 2 ore si oprire (consultati imaginile de mai jos) Display-ul telecomenzii dumneavoastra T imer on TIMER ON (temporizator pornire), este setat la 6 ore din momentul acesta. T imer off TIMER OFF (temporizator oprire) este setat la 8 ore din momentul acesta.
  • Page 42: Utilizarea Functiilor Complexe

    Utilizarea functiilor complexe. Functia SLEEP Functia SLEEP va fi folosita pentru economie de energie in timp ce dormiti (si nu aveti nevoie de aceeasi temperatura). Aceasta functie poate fi activata doar din telecomanda. NOTA: Functia SLEEP nu este disponibila atunci cand aparatul functioneaza in modul FAN sau DRY.
  • Page 43 NOTA : - Design-ul butoanelor este bazat pe modelul tipic de referinta si poate fi usor diferit fata de cel cumparat de catre dumneavoastra. Design-ul telecomenzii dumneavoastra va avea prioritate. - Toate functiile descrise in acest manual pot fi executate de catre unitatile de aer conditionat. In cazul in care unitatea dumneavoastra nu are disponibila o functie, apasarea butonului functiei respective nu va avea nici un efect.
  • Page 44 INHALT Spezifikationen der Fernbedienung ............2 Funktionstasten ...................3 Bedienung der Fernbedienung ..............4 Fernanzeigen im LED - Bildschirm .............5 Grundlagen der Bedienung .................6 Bedienung der erweiterten Funktionen ...........13...
  • Page 45: Spezifikationen Der Fernbedienung

    Spezifikationen der Fernbedienung Modell RG57H(B)/BG(C)E;RG57H1(B)/BG(C) E;RG57H2(B)/BG(C)EF;RG57H3(B)/ BG(C)EFU1; RG57H3(B)/BG(C) EF;RG57H1(B)/BG(C)E-M;RG57H(B)/ BG(C)EU1;RG57H4(B)/BG(C)EFU1 ; RG57H(B)/BGCE-M;RG57H(B)/BG- CEU1-M Nennspannung 3.0V(trockene Batterien R03/LR03X2) Empfangsreichweite des Signals Umweltbedingungen -50060°C(230F~140°F) O N /OF F S HO R T O N /OF F S HO R T O N /OF F S HO R T O N /OF F S HO R T...
  • Page 46: Funktionstasten

    Funktionstasten Bevor Sie die neue Klimaanlage in Betrieb nehmen, sollten Sie sich mit der Fernbedienung vertraut machen. Im Folgenden finden Sie eine kurze Einführung in die Fernbedienung. Anweisungen zur Bedi- enung ihrer Klimaanlage finden Sie im Abschnitt Grundlagen der Bedienung dieses Handbuchs. SCHNELLTASTE EIN AUS (ON/OFF) Stellt ein und aktiviert Ihre bevor-...
  • Page 47: Bedienung Der Fernbedienung

    Bedienung der Fernbedienung TIPPS FÜR DIE VERWENDUNG DER FERNBE- DIENUNG SIE SIND SICH NICHT SICHER, WOZU EINE FUNKTION DIENT? • Die Fernbedienung muss in einem Abstand Eine detaillierte Beschreibung der Benutzung ihrer von maximal 8 Metern vom Gerät verwendet Klimaanlage finden Sie in den Abschnitten Grund- werden.
  • Page 48: Fernanzeigen Im Led - Bildschirm

    Fernanzeigen im LED – Bildschirm Übersendungs-Anzeige Leuchtet auf, wenn die Fernbedienung das Signal an die Einheit sendet EIN / AUS-Anzeige Erscheint, wenn das Gerät eingeschaltet MODUS-Anzeige ist, und verschwindet, wenn es Zeigt den aktuellen ausgeschaltet ist Modus an, einschließlich: ZEITSCHALTUHR EIN-Anzeige ZEITSCHALTUHR AUS-Anzeige •...
  • Page 49: Grundlagen Der Bedienung

    Grundlagen der Bedienung EINSTELLTEMPERATUR Der Betriebstemperaturbereich für die Geräte beträgt 17-30°C (62°F-86°F). Sie können die Einstelltemperatur in Stufungen von 1°C (1°F) erhöhen oder verringern. AUTO-Betrieb O N /O F F S HO R T Im AUTO-Betrieb wählt das Gerät automatisch den C U T Modus COOL, FAN, HEAT oder DRY auf der Basis T IME R...
  • Page 50 Grundlagen der Bedienung DRY-Betrieb (Entfeuchtung) 1. Drücken Sie auf die MODE-Taste, um den DRY-Modus auszuwählen. 2. Stellen Sie mit der Taste Temp ▲ oder Temp ▼ die gewünschte Temperatur ein. 3. Drücken Sie auf die ON / OFF-Taste, um die Einheit zu starten.
  • Page 51 Grundlagen der Bedienung Heizbetrieb 1. Drücken Sie auf die MODE-Taste, um den HEAT-Modus auszuwählen. 2. Stellen Sie mit der Taste Temp ▲ oder Temp ▼ Ihre gewünschte Temperatur ein. 3. Drücken Sie auf die FAN-Taste, um die Lüfter- geschwindigkeit zu wählen: AUTO, LOW, MED oder HIGH.
  • Page 52: Einstellung Der Timer-Funktion

    Einstellung der TIMER-Funktion Ihre Klimaanlage hat zwei Timer-Funktionen: TIMER ON- stellt die Zeitdauer ein, nach der das Gerät automatisch eingeschaltet wird. TIMER OFF- stellt die Zeit ein, nach der das Gerät automatisch ausgeschaltet wird. TIMER ON TIMER ON TIMER ON-Funktion Mit der TIMER ON-Funktion können Sie eine Zeitspanne einstellen, nach der das Gerät autom- atisch eingeschaltet wird, z.
  • Page 53 TIMER OFF-Funktion Mit der TIMER OFF-Funktion können Sie eine Zeitspanne einstellen, nach der das Gerät autom- HINWEIS: Wenn Sie die TIMERON- oder TIM- atisch ausgeschaltet wird, z. B. wenn Sie aufwa- ER-OFF-Funktionen bis zu 10 Stunden einstel- chen. len, erhöht sich die Zeit in 30-Minuten-Schritten bei jedem Drücken.
  • Page 54 Einstellung von TIMER ON und TIMER OFF zur gleichen Zeit Beachten Sie, dass sich die für beide Funktionen eingestellten Zeiträume auf Stunden nach der aktuellen Uhrzeit beziehen. Zum Beispiel sagen wir mal, dass die aktuelle Zeit 1:00 PM ist, und Sie möchten das Gerät automatisch um 19:00 Uhr einschalten.
  • Page 55 Beispiel: Das Gerät so einstellen, dass es nach 6 Stunden sich einschaltet, 2 Stunden arbeitet und dann sich ausschaltet. (Siehe folgende Abbildung) Ihre Fernanzeige T imer on Timer ist eingestellt, um 6 Stunden nach der gegenwärtigen Zeit einzuschalten T imer off Timer ist eingestellt, um 8 Stunden nach der gegenwärtigen Zeit auszuschalten...
  • Page 56: Bedienung Der Erweiterten Funktionen

    Bedienung der erweiterten Funktionen SLEEP-Funktion Die SLEEP-Funktion wird verwendet, um den En- ergieverbrauch während Sie schlafen (und nicht die gleichen Temperatureinstellungen benötigen, um bequem zu bleiben) zu senken. Diese Funk- tion kann nur über die Fernbedienung aktiviert werden. Hinweis: Die SLEEP-Funktion ist im FAN- oder O N /O F F S HO R T DRY-Modus nicht verfügbar.
  • Page 57 HINWEIS: - Tastenentwurf basiert auf typischem Modell und könnte etwas unterschiedlich zu dem tatsächlichen sein, das Sie kauften. Die tatsächliche Form ist auf jeden Fall überwiegend. - Sämtliche beschriebenen Funktionen werden vom Gerät ausgeführt. Wenn das Gerät über eine Funk- tion nicht verfügt, erfolgt kein entsprechender Betrieb, wenn die jeweilige Taste auf der Fernbedienung gedrückt wird.
  • Page 58 SOMMAIRE Spécifications de la télécommande ............2 Boutons de fonctionnement ................3 Traiter la télécommande ................4 Indicateurs de l’écran LED de la télécommande ........5 Comment utiliser les fonctions principales ..........6 Comment utiliser les fonctions avancées ..........13...
  • Page 59: Spécifications De La Télécommande

    Spécifications de la télécommande Modèle RG57H(B)/BG(C)E;RG57H1(B)/BG(C) E;RG57H2(B)/BG(C)EF;RG57H3(B)/ BG(C)EFU1; RG57H3(B)/BG(C)EF; RG57H1 (B)/BG(C)E-M; RG57H(B)/ BG(C)EU1; RG57H4(B)/BG(C)EFU 1; RG57H (B)/BGC E-M; RG57H (B)/BGC EU1 -M Tension nominale 3.0V (batteries sèches R03/LR03x2) Gamme de réception de signes Environnement -5°C~60°C(23°F~140°F) O N /OF F S HO R T O N /OF F S HO R T O N /OF F...
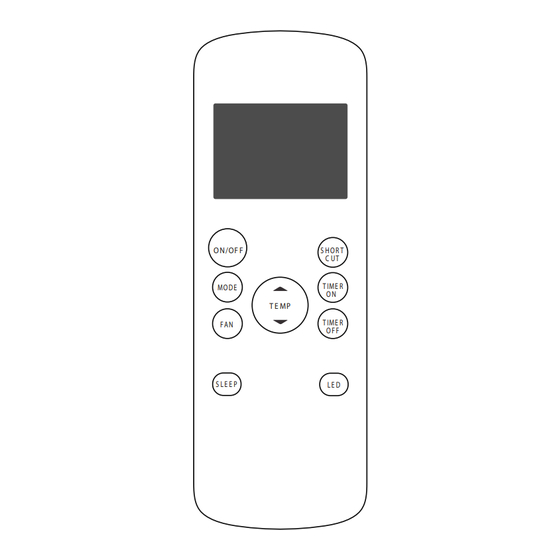
  • Page 60: Boutons De Fonctionnement

    Boutons de fonctionnement Avant de commencer à utiliser votre nouveau climatiseur, assurez-vous que vous vous êtes familiarisés avec sa télécommande. Les informations suivantes constituent un guide d’utilisation en bref de la télécom- mande. Pour des instructions relatives au mode d’emploi de votre climatiseur, voir la section «Comment utiliser les fonctions principales»...
  • Page 61: Traiter La Télécommande

    Traiter la télécommande CONSEILS RELATIFS Á L’UTILISATION DE LA TÉLÉCOMMANDE Vous n’êtes pas sûr de l’usage d’une fonction? Voir la section « Comment utiliser les fonctions • La télécommande doit être utilisée à une principales » de ce manuel pour une description distance de 8 mètres de l’unité.
  • Page 62: Indices De L'écran Led De La Télécommande

    Indices de l’écran LED de la télécommande L’indice de transmission Illumine quand la télécommande envoie des signaux à l’unité. Indice ON/OFF Indice de Mode Il apparaît quand l’unité est allumée et il disparaît quand elle est éteinte. Il indique le mode cou- rant, y compris : Indice TIMER OFF •...
  • Page 63: Comment Utiliser Les Fonctions Principales

    Comment utiliser les fonctions principales RÉGLAGE DE TEMPÉRATURE La plage de température pendant le fonctionnement de l’unité est entre 17°C et 30°C (62°F-86°F). Vous pouvez augmenter ou diminuer la température réglée par incréments de 1°C (1°F°) Fonction automatique Sous le mode automatique, l’unité sélectionne automatiquement le mode COOL (refroidissement), O N /O F F S HO R T...
  • Page 64 Comment utiliser les fonctions principales Fonction de déshumidification (SEC-DRY operation) 1. Pressez sur le bouton MODE pour sélectionner le mode SEC. 2. Réglez votre température souhaitée en utilisant les boutons Temp▲ ou Temp ▼ 3. Pressez sur le bouton ON/OFF pour démarrer l’unité.
  • Page 65 Comment utiliser les fonctions principales Fonction de chaleur (HEAT operation) 1. Pressez sur le bouton MODE pour sélectionner le mode HEAT (mode de chaleur). 2. Réglez votre température souhaitée en utilisant les boutons Temp ▲ ou Temp ▼. 3. Pressez sur le bouton de vitesse du ventilateur (FAN) pour sélectionner la vitesse du ventilateur: AUTO, LOW, MED ou HIGH (AUTO, BASSE, MOYENNE ou HAUTE).
  • Page 66: Réglage De La Fonction De Minuterie (Timer Function)

    Réglage de la fonction de MINUTERIE (TIMER function) Votre climatiseur dispose deux fonctions de minuterie relatives : TIMER ON- règle le délai après lequel l’unité s’allume automatiquement. TIMER OFF- règle le délai après lequel l’unité s’éteint automatiquement. TIMER ON TIMER ON Fonction de TIMER ON La fonction de TIMER ON vous permet de régler une période de temps après laquelle...
  • Page 67 Fonction de TIMER OFF NOTE: Si vous réglez les fonctions TIMER ON et TIMER OFF pour plus de 10 heures, le temps La fonction de TIMER OFF vous permet de régler le s’augmente par incréments de 30 minutes à délai après lequel l’unité s’éteindra automatiquement, chaque pression.
  • Page 68: Réglage Du Timer On Et Du Timer Off En Même Temps

    Réglage du TIMER ON et du TIMER OFF en même temps Gardez à l’esprit que les périodes de temps que vous réglez en même temps pour les deux fonctions, il s’agit des heures postérieures à l’heure courante. Par exemple, dire qu’il est 13 :00 et vous voulez que l’unité...
  • Page 69 Exemple: Régler l’unité à démarrer après 6 heures, elle fonctionne pour un délai de 2 heures et après elle s’arrête (voir la figure ci-dessous) L’écran de votre télécommande T imer on La minuterie est réglée à s’allumer 6 heures après l’heure courante T imer off La minuterie est réglée à...
  • Page 70: Comment Utiliser Les Fonctions Avancées

    Comment utiliser les fonctions avancées Fonction Veille (SLEEP function) La fonction veille est utilisée pour diminuer la con- sommation d’énergie pendant les heures du som- meil (où on n’a pas besoin de la même tempéra- ture pour se sentir confortablement). Cette fonction peut être activée seulement par la télécommande.
  • Page 71 NOTE: - La conception des boutons est fondée sur le modèle typique et peut être un peu différente du modèle que vous avez acheté. - Toutes les fonctions décrites sont réalisées par l’unité, mais si l’unité ne dispose pas ce trait caractéristique, il n’y a pas de fonction relative quand vous pressez sur le bouton relatif de la télécommande.
  • Page 72 CONTENUTO Specifiche del telecomando ...............2 Tasti funzione ....................3 Utilizzo del telecomando ................4 Indicatori sullo schermo LED ..............5 Come utilizzare le funzioni principali ............5 Come utilizzare le funzioni avanzate ............13...
  • Page 73: Specifiche Del Telecomando

    SPECIFICHE DEL TELECOMANDO Modello RG57H(B)/BG(C)E;RG57H1(B)/BG(C) E;RG57H2(B)/BG(C)EF;RG57H3(B)/ BG(C)EFU1; RG57H3(B)/BG(C)EF; RG57H1 (B)/BG(C)E-M; RG57H(B)/ BG(C)EU1; RG57H4(B)/BG(C)EFU 1; RG57H (B)/BGC E-M; RG57H (B)/BGC EU1 -M Tensione nominale 3.0V(Pile a secco R03/LRO3 X 2) Distanza di ricezione segnale Ambiente -5°C~60°C(23°F~140°F) O N /OF F S HO R T O N /OF F S HO R T O N /OF F...
  • Page 74 TASTI DI FUNZIONE Prima di iniziare a utilizzare il nuovo condizionatore d’aria, accertarsi di aver familiarizzato con il vostro telecomando. Quanto segue è una breve introduzione al telecomando stesso. Per le istruzioni su come far funzionare il condizionatore d’aria, consultare la sezione Come utilizzare le Funzioni Principali di questo manuale.
  • Page 75: Usare Il Telecomando

    Usare il Telecomando SUGGERIMENTI PER L’USO DEL TELECOMANDO NON SIETE SICURI SU CHE COSA FA UNA • Il telecomando deve essere utilizzato entro una FUNZIONE? distanza di 8 metri dall’unità. Fare riferimento alla sezione Come Utilizzare le Modal- • L’unità emette un segnale acustico quando viene ità...
  • Page 76 INDICAZIONI SULLO SCHERMO LED Indicatore di trasmissione Si accende quando il telecomando manda un segnale all’ unità Indicatore ON/OFF Si visualizza quando l’ unità si ac- Indicatore Modalità cende e si spegne quando arresta Indica la modalità corrente, incluso: • AUTO Indicatore TIMER ON Indicatore TIMER OFF •...
  • Page 77: Come Utilizzare Le Modalità Principali

    COME UTILIZZARE LE MODALITÀ PRINCIPALI IMPOSTARE LA TEMPERATURA La gamma di temperatura di funzionamento per le unità è 17-30° C (62° F-86 ° F). È pos- sibile aumentare o diminuire la temperatura impostata in incrementi di 1°C (1 ° F). FUNZIONE AUTO O N /O F F S HO R T...
  • Page 78 COME UTILIZZARE LE MODALITÀ PRINCIPALI Modalità DRY (Deumdificazione) 1. Premere il tasto MODE per selezionare la mo- dalità DRY 2. Impostare la temperatura desiderata usando i tasti Temp▲ oTemp ▼ 3. Premere il tasto ON/OFF per avviare l’ unità. NOTA: FAN SPEED non può essere cam- O N /O F F S HO R T C U T...
  • Page 79 COME UTILIZZARE LE MODALITÀ PRINCIPALI Modalità HEAT 1. Premere il tasto MODE per selezionare la modalità HEAT 2. Impostare la temperatura desiderata usando i tasti Temp ▲ oTemp ▼ 3. Premere il tasto FAN per selezionare la velocità della ventola: AUTO, LOW, MED, o HIGH. 4.
  • Page 80: Impostare La Modalità Timer

    IMPOSTARE LA MODALITÀ TIMER L’unità del condizonatore d’ aria ha due funzioni riguardanti il timer: TIMER ON-imposta il periodo di tempo dopo il quale l’unità si avviaautomaticamente. TIMER OFF- imposta il periodo di tempo dopo il quale l’unità si arresta automaticamente. TIMER ON TIMER ON Modalità...
  • Page 81 Modalità TIMER OFF La modalità TIMER OFF consente di impostare un periodo di tempo dopo il quale l’unità si arresta NOTA: Quando si imposta la modalità TIMER automaticamente, ad esempio quando ci si sveglia. ON o la modalità TIMER OFF, fino a 10 ore, il tempo aumenta in incrementi di 30 minuti ogni 1.
  • Page 82 Impostare TIMER ON e TIMER OFF allo stesso tempo Tenete a mente che i periodi di tempo impostati per entrambe le funzioni si riferiscono alle ore dopo l’ora corrente. Ad esempio, supponiamo che l’ora corrente è 13:00, e si desidera che l’unità si accenda automaticamente alle 7:00 PM, che essa funzioni per 2 ore, e che poi si spenga automaticamente alle 9:00 PM.
  • Page 83 Esempio: Impostare il condizionatore d’aria di accendersi dopo 6 ore, funzionare per 2 ore e quindi spegnersi (verdi figura di sotto) Lo schermo del Vostro telecomando T imer on Il timer a ON 6 ore dopo l’ora corrente T imer off Il timer a OFF 8 ore dopo l’ora corrente Il condizionatore...
  • Page 84: Come Utilizzare Le Modalità Avanzate

    COME UTILIZZARE LE MODALITÀ AVANZATE Modalità SLEEP La funzione SLEEP è utilizzata per diminuire il consumo di energia mentre dormite (e non avete bisogno delle stesse impostazioni di temperatura per stare comodi). Questa funzione può essere attivata solo tramite il telecomando. Nota: La funzione SLEEP non è...
  • Page 85 NOTE: - Il design dei tasti è basato sul modello tipico e potrebbe essere leggermente diverso da quello che è stato acquistato, la forma reale prevarrà .- Tutte le funzioni descritte possono essere compiute dall’unità, se l’unità non dispone una certa caratteristica, quando si preme il tasto relativo sul telecomando non vi è...
  • Page 86 ÍNDICE Especificaciones del mando a distancia ...........2 Botones de función ..................3 Manejo del mando a distancia ..............4 Indicadores de la pantalla de LED .............5 Como usar las funciones básicas...............6 Como usar las funciones avanzadas ............13...
  • Page 87 Especificaciones del control remoto Modelo RG57H(B)/BG(C)E;RG57H1(B)/BG(C) E;RG57H2(B)/BG(C)EF;RG57H3(B)/ BG(C)EFU1; RG57H3(B)/BG(C)EF; RG57H1 (B)/BG(C)E-M; RG57H(B)/ BG(C)EU1; RG57H4(B)/BG(C)EFU 1; RG57H (B)/BGC E-M; RG57H (B)/BGC EU1 -M Tensión normal 3.0V(Pilas secas R03/LR03 2) Zona de recepción del señal Ambiente -5°C~60°C(23°F~140°F) O N /OF F S HO R T O N /OF F S HO R T O N /OF F...
  • Page 88 Botones de función Antes de que comience a utilizar el nuevo aire acondicionado, asegúrese de familiarizarse con su mando a distancia . Lo que sigue es una breve introducción al mando a distancia. Para obtener instrucciones sobre cómo operar el aire acondicionado consulte la sección Cómo usar las funciones básicas de este manual. (SHORT-CUT) ON/OFF ATAJO DE TECLADO...
  • Page 89: Manejo Del Mando A Distancia

    MANEJO DEL MANDO A DISTANCIA CONSEJOS PARA UTILIZAR EL MANDO A DISTANCIA • El mando a distancia debe ser utilizado dentro de NO ES SEGURO QUÉ UNA FUNCIÓN HACE? los 8 metros de la unidad. Consulte las secciones Cómo usar las funciones •...
  • Page 90 Indicadores de la pantalla de LED Indicador De Emisión Se ilumina cuando el mando a dis- tancia envía una señal a la unidad MODO de la pantalla ON/OFF display Appears when the unit is turned Muestra el modo actual, incluyendo on, and disappears when it is turned off •...
  • Page 91 Como usar las funciones básicas El ajuste de la temperatura El rango de temperatura de funcionamiento de las unidades es 17 - 30ºC (62ºF - 86ºF). Puede aumentar o disminuya la temperatura establecida en 1º C (1º F) Incrementos Funcionamiento automática En el modo AUTO, la unidad seleccionará...
  • Page 92 Como usar las funciones básicas Funcionamiento en SECO (deshumidificacion) 1. Pulse el botón de MODO (MODE) para seleccionar el modo SECO (DRY) 2. Ajuste la temperatura deseada con el botón Temp▲ arriba o abaja Temp ▼. 3. Presione el botón de Encendido/apagado ON / OFF para iniciar la unidad.
  • Page 93 Como usar las funciones básicas Funcionamiento de la calefacción 1. Pulse el botón de MODO (MODE) para seleccionar el modo de CALOR 2. Ajuste la temperatura deseada usando el botón de Temp ▲ arriba o Temp▲ abajo 3. Pulse el botón del ventilador (FAN) para selec- cionar la velocidad del ventilador AUTO, BAJA, MEDIA o ALTA 4.
  • Page 94 Ajuste la función de Temporizador Su unidad de aire acondicionado tiene dos Funciones relacionadas con el temporizador: TIMER ON (TEMPORIZADOR ENCENDIDO) establece la cantidad de tiempo después de que la unidad se encenderá automáticamente. TIMER ON TIMER ON TIMER OFF (TEMPORIZADOR APAGADO) establece la cantidad de tiempo después de que la unidad se apagará...
  • Page 95 Función TIMER OFF (TEMPORIZADOR APAGADO) La función TIMER OFF(TEMPORIZADOR Nota: Cuando ajuste las funciones de TIMER ON APAGADO) le permite establecer un período de (TEMPORIZADOR ENCENDIDO) o TIMER OFF tiempo después del cual la unidad se apagará au- (TEMPORIZADOR APAGADO) hasta 10 horas, tomáticamente, tales como cuando usted despierta.
  • Page 96 Ajuste de TIMER ON (TEMPORIZADOR ENCENDIDO) y TIMER OFF (APAGADO) al mismo tiempo Tenga en cuenta que los períodos de tiempo establecidos para ambas funciones se refieren a horas después de la hora actual. Por ejemplo, digamos que la hora actual es 1:00 PM, y desea que la unidad se encienda automáticamente a las 7:00 PM.
  • Page 97 Ejemplo: Ajuste de la unidad para que se encienda después de 6 horas, opere durante 2 horas y luego apáguela (consulte la figura siguiente) Su pantalla remota T imer on El temporizador está ajustado para encender 6 horas desde la hora actual T imer off El temporizador está...
  • Page 98 Como usar la funciones avanzadas Función de Sleep (Reposo) La función SLEEP se utiliza para disminuir el uso de energía cuando duerme (y no necesi- ta los mismos ajustes de temperatura para permanecer cómodos). Esta función sólo se puede activar a través del control remoto. Nota: La función SLEEP no está...
  • Page 99 NOTA: - El diseño de los bombillos se basa en un modelo típico y puede ser ligeramente diferente - Del actual que usted compró, la forma real prevalecerá. - Todas las funciones descritas son realizadas por la unidad, Si la unidad no tiene una función en particular, presionando la tecla de la función en el mando a distancia no tendrá...
  • Page 100: Remote Controller

    REMOTE CONTROLLER...

Ce manuel est également adapté pour:

Epc-09bs

Table des Matières