Publicité

Les langues disponibles
  • FR

Les langues disponibles

  • FRANÇAIS, page 9

Liens rapides

SUMMER BREEZE
220
50
50
240
60
Watts
Volts
Hz
DE
Bedienungsanleitung
FR
Mode d'emploi
NL
Handleiding
INSTRUCTION MANUAL
EN
Instruction manual
IT
Istruzioni per l'uso
ES
Manual del usuario
DFS45SCO

Publicité

Table des Matières
loading

Sommaire des Matières pour Bestron DFS45SCO

  • Page 1 SUMMER BREEZE DFS45SCO INSTRUCTION MANUAL Watts Volts Bedienungsanleitung Instruction manual Mode d’emploi Istruzioni per l’uso Handleiding Manual del usuario...
  • Page 2 HERZLICHEN GLÜCKWUNSCH! Herzlichen Glückwunsch zum Erwerb dieses Bestron-Produktes. In dieser Gebrauchsanweisung erläutern wir die Funktion und die Benutzung. Lesen Sie somit diese Gebrauchsanweisung aufmerksam durch, bevor Sie das Gerät benutzen. Verwenden Sie das Gerät nur so, wie es in der Gebrauchsanweisung beschrieben ist. Bewahren Sie die Gebrauchsanweisung danach sorgfältig auf.
  • Page 3 ausreichend frei ist und nicht mit brennbarem Material in Kontakt kommen kann. Elektrogeräte dürfen nie bedeckt werden. • Sorgen Sie dafür, dass Elektrogeräte, Kabel oder Stecker nicht mit Wasser in Berührung kommen. • Tauchen Sie Elektrogeräte, Kabel oder Stecker nie in Wasser oder eine andere Flüssigkeit.
  • Page 4: Ce-Konformitätserklärung

    UMWELT • Werfen Sie Verpackungsmaterial, wie zum Beispiel Plastik und Karton, in die dazu bestimmten Container. • Dieses Produkt am Ende der Nutzungsdauer nicht als normalen Haushaltabfall entsorgen, sondern bei einer Sammelstelle zur Wiederverwendung von elektrischem und elektronischem Gerät. Achten Sie auf das Symbol auf dem Produkt, der Gebrauchsanweisung oder Verpackung.
  • Page 5 FUNKTION - Allgemein Das Gerät ist nur für den Hausgebrauch vorgesehen und nicht für die professionelle Verwendung. 1. Ventilatorkorb 2. Ventilatorflügel 3. Motorgehäuse 4. Drehsperre 5. Geschwindigkeitsknopf 6. Befestigungsstift des Ventilators auf dem Stativ 7. Winkeleinstelltaste 8. Kabel mit Stecker 9.
  • Page 6 MONTIEREN - Ventilator montieren 1. Lösen Sie die 4 Schrauben (siehe Abbildung 3A) vom Motorgehäuse (3B). 2. Setzen Sie die Rückseite des Lüfterkorbs (mit Griff) (3D) mit dem Griff (3C) oben auf die Welle des Motorgehäuses (3B). 3. Befestigen Sie die Rückseite des Lüfterkorbs mit 4 Schrauben (3A). 4.
  • Page 7: Reinigung Und Wartung

    FUNKTION - Verwendung 1. Stellen Sie den Ventilator auf den Boden, auf einen flachen Untergrund. 2. Stellen Sie die gewünschte Höhe des Stativs ein. Drehen Sie hierzu die Höhensperre los (gegen den Uhrzeigersinn). Bewegen Sie das Stativ auf die gewünschte Höhe und drehen Sie die Höhensperre wieder fest (im Uhrzeigersinn).
  • Page 8 Ventilator an. GARANTIEBESTIMMUNGEN Bestron handhabt unter den folgenden Bedingungen eine Garantie von 60 Monaten ab Kaufdatum gegen Defekte, die durch Herstellungs- und/oder Materialfehler entstanden sind. 1. Im genannten Garantiezeitraum werden keine Kosten für Arbeitslohn und Material berechnet.
  • Page 9: Ce Que Vous Devez Savoir Au Sujet Des Appareils Électriques

    FÉLICITATIONS ! Nous vous félicitons pour l’achat de votre produit Bestron. Dans le présent manuel d’utilisation, nous vous expliquons comment celui fonctionne et comment vous devez l’utiliser. Nous vous invitons par conséquent à lire attentivement les instructions d’utilisation avant d’utiliser l’appareil. Lorsque vous l’utilisez, prenez soin de suivre parfaitement les instructions d’utilisation.
  • Page 10: Ce Que Vous Devez Savoir Au Sujet De Cet Appareil

    • Les appareils électriques doivent pouvoir libérer la chaleur qu’ils produisent de sorte à éviter tout risque d’incendie. Vérifiez par conséquent s’il y a suffisamment d’espace autour de l’appareil et faites en sorte que celui-ci ne puisse entrer en contact avec du matériel inflammable.
  • Page 11: Environnement

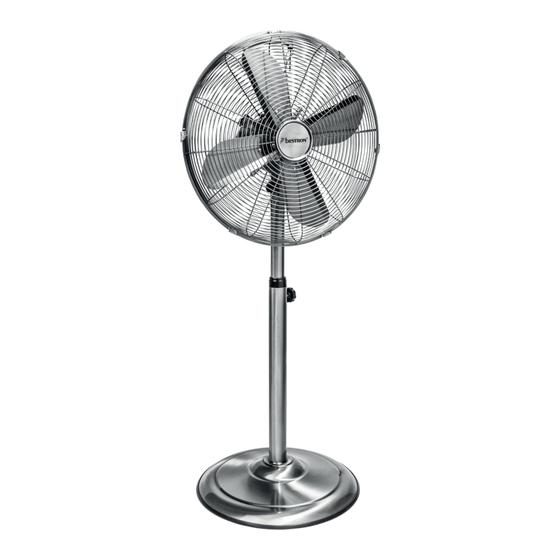
    ENVIRONNEMENT • Débarrassez-vous du matériel d’emballage comme le plas- tique et les boîtes dans les containers destinés à cet effet. • À la fin de sa durée de vie, ne jetez pas ce produit comme un simple déchet ménager mais remettez-le à un centre de collecte de recyclage des produits électriques et électroniques.
  • Page 12 FONCTIONNEMENT - Généralités L’appareil est destiné uniquement à l’utilisation domestique, et non à l’usage professionnel. 1. Corbeille du ventilateur 2. Pales du ventilateur 3. Bloc moteur 4. Verrouillage d’angle 5. Bouton de réglage de la vitesse 6. Tige d fixation du ventilateur sur le montant du pied télescopique 7.
  • Page 13 MONTAGE - Montage du ventilateur 1. Dévissez les 4 vis (voir figure 3A) du boîtier du moteur (3B). 2. Placez l’arrière du panier du ventilateur (avec la poignée) (3D) sur l’arbre du boîtier du moteur (3B), avec la poignée (3C) en haut. 3.
  • Page 14: Nettoyage Et Entretien

    FONCTIONNEMENT - Ventiler 1. Installez le ventilateur par terre, sur une surface plane. 2. Réglez le pied télescopique à la hauteur voulue. Pour ce faire, vous desserrez le verrouillage de hauteur (contre le sens des aiguilles d’une montre). Étirez le pied télescopique jusqu’à la hauteur voulue et resserrez le verrouillage de hauteur (dans le sens des aiguilles d’une montre).
  • Page 15: Dispositions Concernant La Garantie

    Pour remonter les pièces détachées, vous procédez comme décrit sous ‘Montage du ventilateur’. DISPOSITIONS CONCERNANT LA GARANTIE Le présent produit Bestron bénéficie – aux conditions ci-après – d’une garantie de 60 mois suivant la date d’achat et couvrant toute panne résultant d’un défaut/vice de fabrication et/ou de fonctionnement.
  • Page 16 PROFICIAT! Proficiat met de aankoop van dit Bestron-product. In deze gebruiksaanwijzing leggen we de werking en het gebruik uit. Lees de gebruiksaanwijzing dus aandachtig door vóór u het apparaat gaat gebruiken. Gebruik het apparaat alleen zoals beschreven in de gebruiksaanwijzing. Bewaar de gebruiksaanwijzing daarna zorgvuldig.
  • Page 17 • Zorg ervoor dat elektrische apparaten, snoeren of stekkers niet in aanraking komen met water. • Dompel elektrische apparaten, snoeren of stekkers nooit onder in water of een andere vloeistof. • Pak elektrische apparaten niet op wanneer ze in het water zijn gevallen.
  • Page 18: Ce-Conformiteitsverklaring

    MILIEU • Werp verpakkingsmateriaal zoals plastic en dozen in de daarvoor bestemde containers. • Dit product aan het eind van de gebruiksduur niet inleveren als normaal huishoudelijk afval, maar bij een inzamelpunt voor hergebruik van elektrische en elektronische apparatuur. Let op het symbool op het product, de gebruiksaanwijzing of de verpakking.
  • Page 19 WERKING - Algemeen Het apparaat is alleen bedoeld voor huishoudelijke doeleinden, niet voor professioneel gebruik. 1. Ventilatorkorf 2. Ventilatorvinnen 3. Motorhuis 4. Draaivergrendeling 5. Snelheidsknop 6. Bevestigingspen ventilator op statief 7. Hoekinstellingsknop 8. Snoer met stekker 9. Hoogtevergrendeling 10. Uitschuifbaar statief WERKING - Vóór het eerste gebruik Haal de ventilator uit de verpakking en verwijder alle verpakkingsonderdelen.
  • Page 20 MONTAGE - Ventilator monteren 1. Draai de 4 schroeven (zie figuur 3A) los van het motorhuis (3B). 2. Plaats de achterkant van de ventilatorkorf (met handvat) (3D) op de as van het motorhuis (3B), met het handvat (3C) aan de bovenkant. 3.
  • Page 21: Reiniging En Onderhoud

    WERKING - Ventileren 1. Plaats de ventilator op de vloer, op een vlakke ondergrond. 2. Stel de gewenste hoogte van het statief in. Draai hiervoor de hoogtevergrendeling los (tegen de klok in). Zet het statief in de gewenste hoogte en draai de hoogtevergrendeling weer vast (met de klok mee). 3.
  • Page 22: Garantiebepalingen

    9. Aanspraak op garantie kan alleen bij uw (web-)winkelier of rechtstreeks bij de Bestron Service Dienst. Stuur echter nooit zomaar iets op. Het pakket kan dan namelijk geweigerd worden en eventuele kosten zijn voor uw rekening.
  • Page 23 CONGRATULATIONS! Congratulations with the purchase of this Bestron product. These instructions tell you how the product works and how to use it. Read the instructions carefully before you start using the appliance. Only use the appliance in the manner described in the instructions. Keep these instructions in a safe place for future reference.
  • Page 24 Never immerse electrical appliances, cords or plugs in water or any other liquid. • Do not touch electrical appliances if they have fallen in the water. Immediately pull the plug out of the socket. Stop using the appliance. • Make sure that electrical appliances, cords and plugs do not come into contact with heat sources, such as a hot hob or open fire.
  • Page 25 ENVIRONMENT • Dispose of packaging material such as plastic and cardboard boxes in the designated containers. • Do not dispose of this product as normal domestic waste at the end of its life, but hand it in at a collection point for the reuse of electric and electronic equipment.
  • Page 26 OPERATION - General The appliance is intended only for domestic use, not for professional use. 1. Fan housing 2. Fan blades 3. Motor housing 4. Oscillation button 5. Speed dial 6. Fan/stand attachment bolt 7. Angle-adjustment knob 8. Power cord and plug 9.
  • Page 27 MONTAGE - Assembling the fan 1. Unscrew the 4 screws (see figure 3A) from the motor housing (3B). 2. Place the back of the fan basket (with handle) (3D) on the shaft of the motor housing (3B), with the handle (3C) at the top. 3.
  • Page 28: Cleaning And Maintenance

    OPERATION - Ventilate 1. Set the fan on the floor, on a level surface. 2. Adjust the stand to the required height. To do so, loosen the height lock (anticlockwise). Adjust the stand to the required height, and tighten the height lock (by turning it clockwise).
  • Page 29: Warranty Conditions

    8. The warranty does not entitle the purchaser to compensation for any damage other than replacement or repair of the faulty parts. Bestron cannot in any event be held liable for any indirect or consequential losses caused by or in relation to the equipment it has provided.
  • Page 30 COMPLIMENTI! Congratulazioni per l’acquisto di questo prodotto Bestron. Nelle presenti istruzioni per l’uso viene spiegato il funzionamento e l’impiego dell’apparecchio. Pertanto, prima di utilizzarlo, leggerle attentamente. Utilizzare l’apparecchio esclusivamente come di seguito descritto. Conservare queste istruzioni in luogo sicuro. In caso di guasto: Nel caso indesiderato in cui l’unità...
  • Page 31 • Mai immergere apparecchi elettrici, cavi o spine in acqua o in altri liquidi. • Se gli apparecchi elettrici dovessero cadere in acqua, mai tentare di raccoglierli. Scollegare immediatamente la spina dalla presa elettrica e non riutilizzare l’apparecchio. • Assicurarsi che gli apparecchi elettrici, i cavi e le spine non entrino in contatto con fonti di calore, come piastre calde o fiamme libere.
  • Page 32: Dichiarazione Di Conformità Ce

    DISPOSIZIONI AMBIENTALI • Smaltire i materiali di imballaggio, come plastica e scatole di cartone, negli appositi contenitori. • Al termine della sua vita utile, non smaltire il prodotto come un normale rifiuto domestico, ma conferire presso un punto di raccolta per il riciclaggio di apparecchiature elettriche ed elettroniche.
  • Page 33 FUNZIONAMENTO - Avvertenze generali Questo apparecchio è concepito esclusivamente per l’impiego domestico e non per l’uso professionale. 1. Griglia di protezione 2. Pale del ventilatore 3. Vano motore 4. Dispositivo per il blocco direzionale 5. Selettore di velocità 6. Manopola per il blocco del ventilatore sulla piantana 7.
  • Page 34 MONTAGGIO - Montaggio del ventilatore 1. Svitare le 4 viti (vedi figura 3A) dall’alloggiamento del motore (3B). 2. Posizionare il retro del cestello della ventola (con maniglia) (3D) sull’albero dell’alloggiamento del motore (3B), con la maniglia (3C) in alto. 3. Fissare la parte posteriore del cestello della ventola con 4 viti (3A). 4.
  • Page 35: Pulizia E Manutenzione

    USO - Ventilare 1. Collocare il ventilatore sul pavimento, in un luogo dal piano orizzontale. 2. Regolare l’altezza della piantana sulla posizione desiderata. A tale scopo, allentare il dispositivo di blocco della regolazione dell’altezza (ruotandolo in senso antiorario). Regolare l’altezza della piantana e serrare il dispositivo di blocco della regolazione dell’altezza (ruotandolo in senso orario).
  • Page 36: Disposizioni Di Garanzia

    DISPOSIZIONI DI GARANZIA In base alle seguenti condizioni, Bestron garantisce questo apparecchio per la durata di 60 mesi dalla data di acquisto contro i guasti causati da difetti di fabbricazione e/o del materiale. 1. Durante il periodo di garanzia non verranno addebitati costi di manodopera e per i materiali necessari.
  • Page 37 ¡FELICIDADES! Felicidades por la compra de este producto Bestron. En estas instrucciones le explicamos su funcionamiento y cómo usarlo. Antes de usar el aparato, lea bien el manual de instrucciones. Utilice el aparato únicamente tal y como se describe en el manual de instrucciones.
  • Page 38 • Nunca sumerja los aparatos eléctricos, cables o enchufes en agua ni en ningún otro líquido. • No toque los aparatos eléctricos si se han caído al agua. Desenchúfelo inmediatamente de la toma de corriente. No vuelva a usar el aparato. •...
  • Page 39: Medio Ambiente

    MEDIO AMBIENTE • Tire el material de embalaje, como plástico y cajas, en el contenedor apropiado. • Al final de su vida útil, no se desprenda de este producto como un residuo normal. Llévelo a un punto blanco de su ciudad para el reciclaje de aparatos eléctricos y electrónicos.
  • Page 40 FUNCIONAMIENTO - General Este aparato está concebido únicamente para uso doméstico, no para uso profesional. 1. Rejilla 2. Aspas 3. Unidad de alojamiento del motor 4. Bloqueo de la función de rotación 5. Perilla para ajustar la velocidad 6. Perilla para fijar el ventilador en el pedestal 7.
  • Page 41 MONTAJE - Ensamblaje del ventilador 1. Desatornille los 4 tornillos (consulte la figura 3A) de la caja del motor (3B). 2. Coloque la parte posterior de la cesta del ventilador (con manija) (3D) en el eje de la caja del motor (3B), con la manija (3C) en la parte superior.
  • Page 42: Limpieza Y Mantenimiento

    USO - Ventilar 1. Coloque el ventilador en el suelo, sobre una superficie plana. 2. Ajuste la altura deseada. Para ello, afloje la perilla de fijación de la altura (gírela en dirección contraria a las agujas del reloj). Una vez haya ajustado el pedestal a la altura deseada apriete nuevamente la perilla (girándola en la dirección de las agujas del reloj).
  • Page 43 ‘ensamblaje del ventilador’. DISPOSIZIONI DI GARANZIA In base alle seguenti condizioni, Bestron garantisce questo apparecchio per la durata di 60 mesi dalla data di acquisto contro i guasti causati da difetti di fabbricazione e/o del materiale. 1. Durante il periodo di garanzia non verranno addebitati costi di manodopera e per i materiali necessari.
  • Page 44 v181102-02 NEED HELP? CHAT WITH US! WHATSAPP CUSTOMER SERVICE B E S T R O N . C O M / W H A T S A P P...

Table des Matières