Publicité
Liens rapides
For Residential Use Only
Please visit our website for the most current instructions, assembly tips, report damage, or request parts. www.walkeredison.com
Copyright
2024
by Walker E dison F urniture Co., LLC. All rights reserved.
©
Elias Queen Bed
SKU# ELIB5C
LOT:
AAYYWW-XXX
TM
Revised
02/2025-V3
1
Publicité

Manuels Connexes pour Walker Edison Elias ELIB5C Serie


Sommaire des Matières pour Walker Edison Elias ELIB5C Serie
- Page 1 Elias Queen Bed SKU# ELIB5C LOT: AAYYWW-XXX For Residential Use Only Please visit our website for the most current instructions, assembly tips, report damage, or request parts. www.walkeredison.com Copyright 2024 by Walker E dison F urniture Co., LLC. All rights reserved. Revised 02/2025-V3 ©...
- Page 2 Be careful! Power tools can cause cracking or damage to the furniture, it can also break the hardware if misused. Power tool damages are not covered by the Walker Edison warranty. Scan to get assembly tips and help!
- Page 3 ELIB5C LOT: AFYYWW-XXX Distribution By: Date: MM/YYYY Walker Edison Furniture Company Rev. 02/2025-V2 1553 W 9000 S, West Jordan, CANFER compliant / conforme au CANFER UT 84088 United States TSCA Title VI compliant / conforme au titre VI de la TSCA TSCA Title VI certied / certié...
- Page 4 Hardware List Part Size Name Quantity Quantity 10x40mm Wooden Dowel 4x30mm Screw 1/4x80mm Bolt with Nut Hex Key Support 4x16mm Screw 19mm Plastic foot Bolt 7x60mm 3,5x40mm Screw Flat Key Perforated 1/4x75mm Head Bolt 25x15mm Fork washer The hardware quantities listed above are required for proper assembly. Extra hardware pieces may be included.
- Page 5 Step 1 Let’s get started. Start by inserting Wooden dowels (A) into the Footboard Rail (5), Headboard Rail (6), Headboard Panel (8), Headboard Panel Rail(13) and Bed Side Rail (24). Wood Dowels Dica Dowels are essential in furniture assembly to create strong, precise connections. They ensure structural integrity, prevent shifting, and simplify alignment, resulting in sturdier, longer-lasting furniture.
- Page 6 Step 2 Then insert Perforated Head Bolt (L) into the Footboard Left Leg (3), Footboard Right Leg (4), Headboard Right Leg (21) and Headboard Left Leg (22). To keep your product looking its best and scratch-free, try assembling it on a soft surface like carpet or a blanket.
- Page 7 Step 3 Now we will attach the Headboard Left Leg (22) into Headboard Panel (8) and secure the Perforated Head Bolt (L) with Fork Washer (M) and Flat Key (K). Also attach the Headboard Panel Rail (13) into Headboard Left Leg (22). Pay attention to this hole position...
- Page 8 Step 4 Secure the Headboard Rail (6) into Headboard Left Leg (22) with Screws ( J) and Phillips head screwdriver.
- Page 9 Step 5 Attach Headboard Right Leg (21) as in the previous steps. Use Flat Key (K) to Perforated Head Screw (M) and Phillips Head Screwdriver to Screws ( J).
- Page 10 Step 6 Secure the Headboard Panel Rail (13) to Headboard Panel (8) with Screws (B) and Phillips Head Screwdriver.
- Page 11 Step 7 Secure Footboard Rail (5) to Footboard Left Leg (3) and Footboard Right Leg (4) with Screws ( J) and Phillips Head Screwdriver. Pay attention to this hole position...
- Page 12 Step 8 Attach the Support (F) to Footboard Rail (5) with Screws (G) and Phillips Head Screwdriver.
- Page 13 Step 9 Also a ttach the Support (F) to Headboard Rail (6) with Screws (G) and Phillips Head Screwdriver.
- Page 14 Step 10 Unscrew Nut (C2) from Screw (C1). Attach Bed Side Rail (24) into Headboard Left Leg (22) and Headboard Right Leg (21) with Screw (C1) in the Nut (C2), tightening with the Hex Key (E).
- Page 15 Step 11 Now we will attach Footboard Left Leg (3) and Footboard Right Leg (4) into Bed Side Rails (24) tightening the Perforated Head Bolt (L) with Fork Washer (M) and Flat Key (K).
- Page 16 Step 12 With the Hammer, secure Plastic Feet (H) into the Center Feet (10). Then fix the Center feet (10) into Center Slat (11) with Screw (I) and Hex Key (E).
- Page 17 Step 13 Place the Center Slat (11) inside the Support (F) and secure Screws (G) on the side of the Support. Use a Phillips Head Screwdriver.
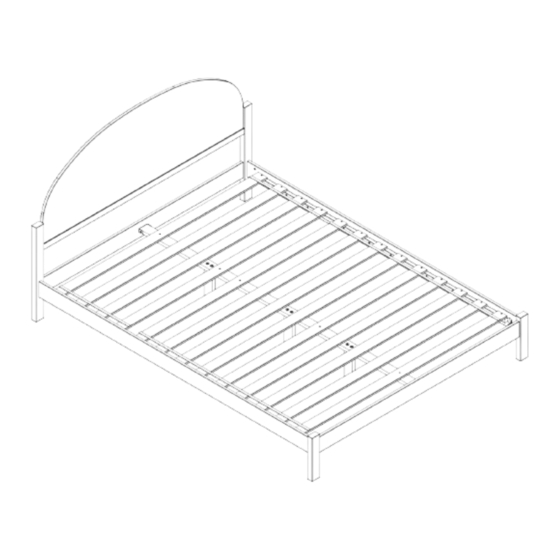
- Page 18 Step 14 Finally, we will place the Slat (9) and Slat (12) into wood support on Bed Side Rail. Align following the details and attach using Screw (B) and a Phillips screwdriver.
- Page 19 You did it! Enjoy your new bed! Congratulations on your new piece of furniture!We would love to hear about it and see it. Please leave us a review or post a picture with #mywalkeredisonhome...
- Page 20 ce t Call us at We are available to help Monday - Thursday 8am-5pm, Friday 8am-3pm For cleaning, never use abrasives, use a soft cloth and water with neutral soap to clean the furniture.
- Page 21 Elias Lit courbée Queen Elias cama curva Queen Pour usage résidentiel seulement Visite notre site Web pour obtenir les instructions les plus récentes, des conseils d'assemblage, signaler des dommages ou commander des pièces. www.walkeredison.com Sólo para uso residencial Visite nuestro sitio web para consultar las últimas instrucciones, consejos de montaje, notificar daños o solicitar piezas. www.walkeredison.com Copyright 2024...
- Page 22 électriques, règle-les sur le mode le plus lent. Fais attention à toi ! Les outils électriques peuvent provoquer des fissures ou endommager les meubles, mais aussi les autres composants s’ils sont mal utilisés. Les dommages causés par un outil électrique ne sont pas couverts par la garantie Walker Edison. Utilice las herramientas eléctricas con cuidado.
- Page 23 ELIB5C LOT: AFYYWW-XXX Date: MM/YYYY Distribution By: Walker Edison Furniture Company Rev. 02/2025-V2 1553 W 9000 S, West Jordan, CANFER compliant / conforme au CANFER UT 84088 United States TSCA Title VI compliant / conforme au titre VI de la TSCA TSCA Title VI certied / certié...
- Page 24 Liste de composants / Lista de hardware Parte Partie Taille Quantité Quantity Parte Tamaño Nombre Cantidad Cheville 10x40mm Espiga 4x30mm Tornillo Vis avec Écrou cylindrique 1/4x80mm Tornillo con Tuerca cilíndrica Clé Allen Llave Allen Support Soporte 4x16mm Tornillo Pied en plastique 19mm Pie de plastico 7x60mm...
- Page 25 Étape / Paso 1 (FR) Commence insérant la Cheville (A) dans le Barre du Pied de Lit (5), Barre du tête de lit (6), Panneau du tête de lit (8), Latte du tête de lit (13) et Barre avant (24). (ESP) Empiece insertando las Espigas (A) en el Travesaño de la piecera (5), Travesaño de cabecera (6), Panel de cabecera (8), Listón de cabecera (13) y Travesaño delantero (24).
- Page 26 Étape / Paso 2 (FR) Insérez les Vis (L) dans les Pied gauche du pied de lit (3), Pied arrière du pied de lit (4), Tête de lit pied droit (21) et Tête de lit pied gauche (22). (ESP) Inserte los Tornillos (L) en el Pie izquierdo de la piecera (3), Pie derecho de la piecera (4), Cabecera pie derecho (21) y Cabecera pie izquierdo (22).
- Page 27 Étape / Paso 4 (FR) Unis le Barre de la tête de lit (6) dans les Tête de lit pied gauche (22) avec la Vis ( J) et la clé Phillips. (ESP) Fije el Travesaño de cabecera (6) a la Cabecera pie izquierdo (22) con Tornillo ( J) y un Destornillador Phillips. Étape / Paso 5 (FR) Fixez le Tête de lit pied droit (21) comme dans les étapes précédentes.
- Page 28 Étape / Paso 6 (FR) Unis le Latte de tête de lit (13) dans les Panneau de la tête de lit (8) avec la Vis (B) et la Clé Phillips. (ESP) Fije el Listón de cabecera (13) a la Panel de cabecera (8) com Tornillo (B) y um Destornillador Phillips. Étape / Paso 7 (FR) Fixez le Barre du pied de lit (5) aux Pied gauche du pied de lit (3) et Pied arrière du pied de lit (4) avec la Vis ( J) et un Clé...
- Page 29 Étape / Paso 8 (FR) Fixez le Support (F) à la Barre du pied de lit (5) avec la vis (G) et un Clé Phillips. (ESP) Fije el Soporte (F) a la Travesaño de la piecera (5) con el tornillo (G) y una llave Phillips. Étape / Paso 9 (FR) Fixez le Support (F) à...
- Page 30 Étape / Paso 10 (FR) Dévissez d'abord Écrou cylindrique (C2) de la vis (C1). Fixez le Barre avant (24) dans le Tête de lit pied gauche (22) et le Tête de lit pied droit (21) avec la vis (C1) dans le Écrou Cylindrique (C2), serrage avec la Clé Allen (E). (ESP) Primero desenrosquemos la Tuerca cilíndrica (C2) del Tornillo (C1).
- Page 31 Étape / Paso 12 (FR) Avec le marteau, fixez le Pied en plastique (H) dans le Pied Central (10). Fixez ensuite les Pied Central (10) dans la Latte Central (11) avec la Vis (I) et la Clé Allen (E). (ESP) Con el martillo, fije el Pie de plastico (H) en el Pie Central (10).
- Page 32 Étape / Paso 14 (FR) Enfin, nous fixerons la Latte de sommier (9) et la Latte de sommier (12) dans le support en bois de la Barre avant (24). Alignez avec les détails et fixez avec les vis (B) et le Clé Phillips. (ESP) Finalmente, fijaremos el Listón de plataforma (9) y el Listón de plataforma (12) en el soporte de madera del Travesaño delantero (24).
- Page 33 Tu as réussi ! Profite de ton nouveau ¡Lo ha conseguido! ¡Disfrute de su nueva Cama Bravo pour ton nouveau meuble ! Nous aimerions t'en entendre parler et le voir. S'il te plait, laisse-nous un commentaire ou publie une photo sur #mywalkeredisonhome ¡Enhorabuena por sus nuevos muebles! Nos encantaría oírlo y verlo.
- Page 34 Assembler des meubles peut parfois être compliqué. Notre équipe de service client, située dans l'Utah, est là pour obtenir des informations sur les produits, aider pour l'assemblage d'un produit ou pour tout autre problème de support client. Appelle-nous Envoie-nous les e-mails à Visite notre site accueil au client à...