
Manuels Connexes pour STAMOS S-LS-45 S


Sommaire des Matières pour STAMOS S-LS-45 S
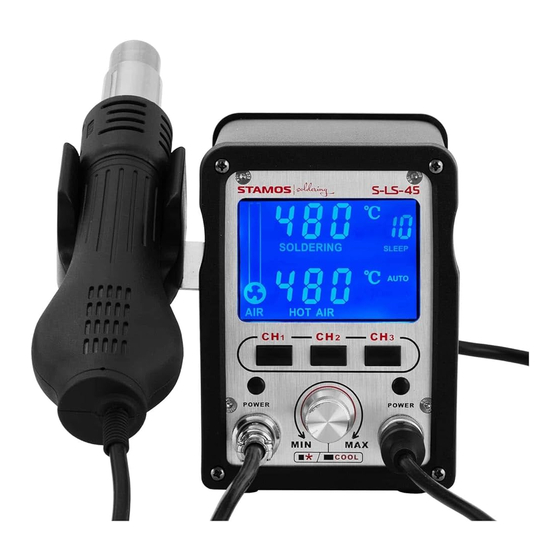
- Page 1 S - L S - 4 5 S S - L S - 4 5 BEDIENUNGSANLEITUNG User manual | Manuel d´utilisation | Istruzioni per l‘uso | Manual de instrucciones | Instrukcja obsługi | Návod k použití...
-
Page 2: Technisches Datenblatt
Einige Teile dieses Gerätes können sehr warm werden. Um Verletzungen zu vermeiden, seien Sie beim Berühren dieser Flächen vorsichtig. • Das Gerät regelmäßig reinigen, damit sich kein Schmutz auf Dauer festsetzen kann. TECHNISCHES DATENBLATT Modell S-LS-45 S | S-LS-45 Spannung (V) 230 ~ 50Hz Nennstrom (A) Leistung (W) Arbeitstemperatur (⁰C) - Page 3 VERWENDUNGSBEREICH Einstellung der Temperatur: Drehknopf /Schalter (9) einmal drücken, der Temperaturwert am Display des Lötkobens Das Gerät ist vorgesehen für: fängt an zu blinken (2). Den Drehknopf (9) entsprechend drehen, um den gewünschten Temperaturwert einzustellen. Löten oder Entlöten elektronischer Elemente wie beispielsweise: SOIC, CHIP, QFP, PLCC, BGA, SMD uvm. Die Betriebsanzeige (1) fängt an zu leuchten.
-
Page 4: Sicherheitshinweise
Man muss sicher gehen, dass die spitze der Heißluft-Entlötstation sauber ist und keine Hindernisse oder Blockaden der Temperatur ⁰C oder ⁰F blinkt auf- mit dem Drehknopf (9) wird die gewünschte Temperatureinheit eingestellt. Die Fünftes Drücken der Schalters/Drehknopfs (9): Änderung der angezeigten Temperatureinheiten (C/F), Kennzeichnung aufweist. - Page 5 TECHCNICAL DETAILS AUSTAUSCH DER LÖTSPITZE UND DES HEIZELEMENTES STELLEN SIE SICHER, DASS DER Model S-LS-45 S | S-LS-45 LÖTKOLBEN VÖLLIG ERKALTET IST. Austausch der Lötspitze: Entfernen Sie die Mutter, die die Abdeckung der Lötspitze sichert und entfernen Sie die Voltage (V) 230 ~ 50Hz Abdeckung.
-
Page 6: Principle Of Operation
OPERATION – SMD REWORK STATION ONLY Any damage resulting from a non-conform use of the device is payable by the user! Device must be placed on stable work table, SMD rework gun must be placed into the holder. Fix the appropriate nozzle and connect the device to the power source. PRINCIPLE OF OPERATION Turn on the device with the main switch placed at the back of the device, turn on the SMD rework gun with switch Assembly:... -
Page 7: General Remarks
Simultaneously press buttons: (6) - memory button CH1 and (7) - SMD rework gun on / off switch and keep pressing REPLACEMENT OF HOT AIR REWORK HEATING ELEMENT them for about 2 seconds. The display will show: Using button / function knob (9), set the desired SMD rework gun temperature compensation. Press the button / function knob (9) to save the changes. -
Page 8: Regular Cleaning
Niektóre elementy urządzenia mogą się bardzo nagrzewać. W celu uniknięcia obrażeń należy zachować ostrożność podczas dotykania tych powierzchni. • Należy regularnie czyścić urządzenie, aby nie dopuścić do trwałego osadzenia się zanieczyszczeń. KARTA DANYCH TECHNICZNYCH Model S-LS-45 S | S-LS-45 Napięcie (V) 230 ~ 50Hz Prąd znamionowy (A) Moc (W) 0 / +40 Temperatura pracy (⁰C) -
Page 9: Montaż Urządzenia
OBSZAR ZASTOSOWANIA OBSŁUGA TYLKO STACJI LUTOWNICZEJ Urządzenie przeznaczone jest do: Urządzenie należy umieścić na stabilnym podłożu, kolbę lutowniczą należy umieścić w uchwycie. Różnego rodzaju lutowania lub rozlutowywania elementów elektronicznych, takie jak: SOIC, CHIP, QFP, PLCC, BGA, Podłączyć przewód zasilający urządzenie, zainstalować odpowiednią końcówkę lutowniczą w kolbie. SMD, itp. -
Page 10: Uwagi Odnośnie Bezpieczeństwa
Farenheit), oznaczenie temperatury ⁰C lub ⁰F miga – pokrętłem (9) ustawić wymaganą jednostkę temperatury. Piąte naciśnięcie przycisku – pokrętła funkcyjnego (9): zmiana wyświetlania jednostek temperatury (Celsjusz/ Podczas korzystania z małych dysz należy pamiętać o tym aby przepływ powietrza był dostosowany do zamontowanej dyszy oraz aby uniknąć... - Page 11 WYMIANA GRZAŁKI: Odkręcić nakrętkę mocującą obudowę końcówki lutowniczej i zdjąć obudowę końcówki. TECHNICKÁ SPECIFIKACE Odkręcić nakrętkę mocującą grzałkę (4) i delikatnie wysunąć grzałkę (6) wraz z płytką z przewodami (7). Wymienić całość pamiętając o sposobie podłączenia przewodów. Model S-LS-45 S | S-LS-45 Napětí (V) 230 ~ 50Hz STANDARDOWE CZYSZCZENIE Uwagi ogólne Jmenovitý...
- Page 12 OBLAST POUŽITÍ Nastavení teploty: stiskněte otočný knoflík / tlačítko (9) jednou, hodnota teploty páječky na displeji (2) začne Zařízení je určeno pro: blikat. Otáčením knoflíku (9) nastavte požadovanou hodnotu teploty. Indikátor hřání (1) bude svítit. Když dosáhne Různého typu pájení nebo rozpájení elektronických prvků jako jsou: SOIC, CHIP, QFP, PLCC, BGA, SMD apod. požadovanou teplotu, bude blikat rychle.
- Page 13 Je zakázáno používat zařízení v blízkosti hořlavých materiálů, plynů nebo jiných tohoto typu předmětů. Trysky a hroty páječek, a také vzduch vycházející z páječky hot air mají velmi vysokou teplotu, je zakázáno se dotýkat těchto prvků, a také nasměrovat proud horkého vzduchu přímo na tělo nebo obličej. To může způsobit popáleniny. Po delší...
-
Page 14: Consignes De Sécurité
Nettoyez régulièrement l‘appareil afin de ne pas laisser la saleté s‘y installer durablement. STANDARDNÍ ČIŠTĚNÍ FICHE TECHNIQUE Obecné poznámky Modèle S-LS-45 S | S-LS-45 • Nikdy nepostřikujte zařízení vodou. K čištění nepoužívejte žádné kartáče či nástroje, které by mohly poškodit povrch zařízení. Tension (V) 230 ~ 50Hz •... - Page 15 DOMAINE D’UTILISATION l‘interrupteur (11), le fer à souder commence à chauffer. L’appareil est prévu pour: Réglage de la température: Appuyer une fois sur le bouton rotatif / commutateur (9), la température du fer à Souder et dessouder des éléments électroniques tels que les SOIC, CHIP, QFP, PLCC, BGA, SMD, etc. souder, affichée sur l’écran, se met alors à...
-
Page 16: Informations De Sécurité
Sixième pressions sur le bouton rotatif / Interrupteur (9): Confirmation de saisie de tous les paramètres entrés, qui ont été décrit ci-dessus. L’appareil prendra alors en compte tous les paramètres saisis. INFORMATIONS DE SÉCURITÉ Les buses ne doivent pas être installées de force. N‘utilisez pas de pinces ou pincettes pour cela. Modification de la température du fer à... -
Page 17: Nettoyage Courant
Ne vaporisez jamais de l‘eau sur l‘appareil. Ne vous servez jamais de brosses ou ustensiles qui pourraient endommager SCHEDA TECNICA la surface de l‘appareil pendant le nettoyage. Modello S-LS-45 S | S-LS-45 • Avant de commencer le nettoyage, débranchez l’appareil de l’alimentation. Tensione (V) - Page 18 CAMPO DI APPLICAZIONE USO DELLA STAZIONE SALDANTE Il prodotto è adatto per le seguenti applicazioni: L’apparecchio deve essere posto su un piano stabile; il saldatoio deve essere fissato al supporto. Saldare o dissaldare elementi elettronici come ad esempio: SOIC, CHIP, QFP, PLCC, BGA, SMD e molto altro. Collegare l’apparecchio alla corrente mediante la spina;...
-
Page 19: Istruzioni Sulla Sicurezza
Premere una sesta volta l’interruttore (9): registrazione di tutti i dati inseriti seguendo le istruzioni di cui sopra. Il A seconda delle esigenze dell’utente, le diverse impostazioni dell’afflusso di aria possono generare lievi differenze di dispositivo funzionerà secondo i parametri impostati. temperatura. -
Page 20: Información Técnica
• Non bagnare mai l’apparecchio. Per la pulizia non utilizzare mai spazzole o utensili che possano danneggiare la superficie dell’apparecchio. Modelo S-LS-45 S | S-LS-45 • Prima di procedere alla pulizia, scollegare l’apparecchio dalla rete elettrica. Tensión (V) 230 ~ 50Hz Corriente nominal (A) REGOLARE CONTROLLO DELL‘APPARECCHIO... - Page 21 CAMPO DE APLICACIÓN Ajuste de la temperatura: Pulse el regulador/interruptor (9) y el valor de la temperatura comenzará a parpadear (2). El equipo ha sido diseñado para: Ajuste la temperatura utilizando el regulador (9) y el piloto de funcionamiento (1) se iluminará. En cuanto el soldador Soldar y desoldar elementos electrónicos como: SOIC, CHIP, QFP, PLCC, BGA, SMD, etc.
-
Page 22: Informaciones Generales
Ajustar la corrección deseada para el valor de temperatura con la tecla – con el mando rotatorio (9). SUSTITUCIÓN DE LOS ELEMENTOS CALEFACTORES DEL LA UNIDAD DE AIRE CALIENTE Memorizar los ajustes realizados con la tecla – el mando rotatorio (9). Corrección de la temperatura de la pistola de aire caliente: Activar el aire caliente y esperar hasta que se haya alcanzado la temperatura programada. -
Page 23: Limpieza Estándar
NAMEPLATE TRANSLATIONS LIMPIEZA ESTÁNDAR Recomendaciones generales • Evite mojar el dispositivo. Para la limpieza no utilice cepillos o utensílios que puedan dañar la superficie del aparato. • Antes de proceder con la limpieza, desconecte el dispositivo del suministro eléctrico. COMPROBACIONES REGULARES A REALIZAR EN EL DISPOSITIVO Compruebe periódicamente que los componentes del equipo no estén dañados. - Page 24 NOTIZEN/NOTES Hiermit bestätigen wir, dass die hier in dieser Anleitung aufgeführten Geräte CE-konform sind. We hereby certify that the appliances listed in this manual are CE compliant. Par la présente, nous confirmons que les appareils présentés dans ce mode d´emploi sont conformes aux normes CE. Niniejszym potwierdzamy, że urządzenia opisane w tej instrukcji są...
- Page 25 Umwelt – und Entsorgungshinweise Hersteller an Verbraucher Sehr geehrte Damen und Herren, gebrauchte Elektro – und Elektronikgeräte dürfen gemäß europäischer Vorgaben [1] nicht zum unsortierten Siedlungsabfall gegeben werden, sondern müssen getrennt erfasst werden. Das Symbol der Abfalltonne auf Rädern weist auf die Notwendigkeit der getrennten Sammlung hin.