Télécharger Imprimer la page

Publicité

Les langues disponibles

Les langues disponibles

Liens rapides

Montage- und Bedienungs-
D
anleitung
Instructions de montage et de
F
service
Equipment Class 1
Sub-class 20
Funk-Fernbedienung für Deckenventilatoren
RF Remote Control for Ceiling Fans
Télécommande radio pour ventilateurs de plafond
Telecomando a raggi radio per ventilator a soffito
FB-FNK Advanced
433,9 MHz
Mounting and operating
2
GB
Istruzioni per il montaggio
18
I
ROOM TEMP
AUTO
1
SET TEMP
°F
AUTO
2
°F
°C
°C
TIMER
H
1 2 3 4
TIMER
H
manual
e l´uso
10
26

Publicité

loading

Sommaire des Matières pour CasaFan FB-FNK Advanced

  • Page 1 AUTO °F °C °C TIMER 1 2 3 4 TIMER FB-FNK Advanced Equipment Class 1 Sub-class 20 433,9 MHz Funk-Fernbedienung für Deckenventilatoren RF Remote Control for Ceiling Fans Télécommande radio pour ventilateurs de plafond Telecomando a raggi radio per ventilator a soffito...
  • Page 2 AUTO1 oder AUTO2 Funktion aktiviert Voreingestellte ROOM TEMP AUTO Aktuelle Raumtempe- SET TEMP °F °F AUTO Temperatur für AUTO ratur am Handsender °C °C Funktion TIMER 1 2 3 4 Anzeige für schwache Batterie (Batterie TIMER austauschen) Tasten “/” Taste DELAY OFF Taste TEMP SET Taste LICHT und DIMMER...
  • Page 3  Über die Montage- und Bedienungsanleitung Bevor Sie das CasaFan Produkt benutzen, lesen Sie bitte diese Montage- und Bedienungsanleitung aufmerksam durch. Bewahren Sie die Anleitung griffbereit auf. Geben Sie das Produkt nie ohne Montage- und Bedienungsanleitung an andere Personen weiter.
  • Page 4 Das Gerät darf nur vollständig montiert betrieben werden! Montagehinweise Achtung CasaFan Fernbedienungen dürfen nur vom Fachmann unter Ein- haltung der VDE 0100 installiert werden. Die Spannungsangabe auf dem Typenschild muss mit der vorhandenen Netzspannung übereinstimmen. Das Hausnetz muss geerdet sein! Die Netzleitungen dürfen bei der Montage nicht beschädigt werden.
  • Page 5 Nach dem Einschalten der Netzspannung ist Ihr Ventilator mit der Fernbedienung betriebs- bereit. Platzierung der Fernbedienung bei CasaFan-Ventilatoren in extraflacher Bauweise, z.B. FLAT, GLASHAUS FLAT oder OFFICE FAN Bitte montieren Sie das Empfangsteil der Fernbedienung wie auf der nachfolgenden Skizze 3 schema- tisch dargestellt.
  • Page 6 Deckenstange Baldachin Codierung der FB-FNK Advanced Die Empfangs- (Skizze 4) und Sendeeinheiten (Skizze 5) der Fernbedienung müssen die gleiche Codierung aufweisen. Schieben Sie die Schalter in die gewünschte Position Ihrer Wahl (Werkseinstellung ist für alle Schalter nach oben). Verwenden Sie hierzu einen kleinen Schrau- bendreher oder einen Kugelschreiber.
  • Page 7 Wenn Ihr Ventilator über einen Schalter zur Drehrichtungsänderung für Sommer- / TIMER Winterbetrieb verfügt, so darf dieser nur bei Stillstand der Flügel (Motor AUS) umgeschaltet werden! Bei Nichtbeachtung unterliegen Schäden am Motor und/oder der Fernbedienung nicht der Gewährleistung. Bedienung und Funktionen der Fernbedienung FB-FNK Advanced Taste LC-Display/FUNKTION Erklärung ROOM TEMP...
  • Page 8 Automatische Temperaturprogramme Die Auto 1-Funktion - Durch Drücken der AUTO 1 - Taste erscheint das ermöglicht es, mit dem AUTO 1 - Symbol im Display. Durch anschließendes Ventilator in Abhängig- Drücken der TEMP SET-Taste beginnt die Max.- keit von der Raumtempe- Raumtemperaturanzeige (rechter Wert) zu blinken.
  • Page 9 Sinkt die Raumtempera- - Durch 2-maliges Drücken der AUTO 2 - Taste wird tur auf einen bestimmten das Programm AUTO 2 gestartet. Wert und darunter, - Der Ventilator läuft auf höchster Stufe (max. läuft der Ventilator auf voreingestellte Drehzahlstufe), wenn die Raum- kleinster Drehzahlstufe temperatur höher oder gleich der eingestellten weiter.
  • Page 10 AUTO1 or AUTO2 function activated Preset temperature AUTO Current room tempera- ROOM TEMP SET TEMP °F °F AUTO for AUTO function ture on remote control °C °C TIMER 1 2 3 4 Display for battery low (replace battery) TIMER Button “/” Button DELAY OFF Button TEMP SET Button LIGHT and...
  • Page 11  About this operating instructions Before using the CasaFan product, read the operating instructions carefully. Keep the operating in- structions within reach. Never pass the fan onto another person without the operating instructions. Explanation of symbols: Dangerous electric voltage Warn the user of the dangers caused by electricity.
  • Page 12 Before installation: Attention! CasaFan remote controls may only be installed by a professional electrician under observance of the German VDE 0100 industrial standard (or the applicable federal and/or state code). The specified voltage on the model tag must correspond with the available mains voltage.
  • Page 13 Once the mains voltage is switched on again, the ceiling fan is available to operation with the remote control. Installation of the remote control of CasaFan fans in an extremely flat construction, e.g. FLAT, GLASHAUS FLAT or OFFICE FAN Please install the receiver unit of the remote as shown in diagram 3. Once the device is electrically in- stalled, you may stick the receiver unit to the ceiling with the double-sided sticky points.
  • Page 14 Downrod Lower Canopy Coding of the FB-FNK Advanced The remote control receiver (diagram 4) and transmitter unit (diagram 5) must have the same code. Put the switch in the desired position you selected (factory default is up for all swit- ches).
  • Page 15 (motor OFF)! If this fundamental issue is not observed, any resulting damage to the motor and/or the remote control is not covered by the warranty. Operation and functions of the remote control FB-FNK Advanced Button LC-Display/FUNCTION...
  • Page 16 Automated Temperature Programs The AUTO 1 function ma- - The symbol AUTO 1 is activated on the display kes it possible to run the by pressing the button AUTO 1. By pressing the fan depending on room button TEMP SET again, the max. room tempera- temperature.
  • Page 17 When the room tempera- - The program AUTO 2 is started by pressing the ture drops to, or below button AUTO 2 twice. a certain value, the fan - The fan operates at the highest speed (max. pre- continues to run at the set fan speed), when room temperature is higher lowest fan speed.
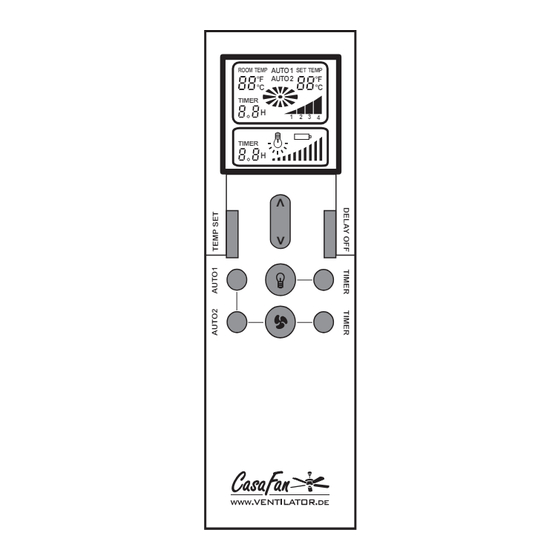
  • Page 18 AUTO1 oder AUTO2 Funktion aktiviert Voreingestellte AUTO Température ambi- ROOM TEMP SET TEMP °F AUTO °F Temperatur für AUTO ante actuelle sur °C °C Funktion TIMER l‘émetteur portatif 1 2 3 4 (échan- Batterie faible ger batterie) TIMER Bouton “/” Bouton DELAY OFF Bouton TEMP SET Bouton Lumière et...
  • Page 19 Remarque particulière à l’intention de l’utilisateur. Description des télécommandes radio FB-FNK Advanced La télécommande CasaFan FB-FNK Advanced est uniquement destinée à la commande de venti- lateurs de plafond avec ou sans éclairage.Elle permet de choisir 4 niveaux de vitesse et dispose d‘une fonction marche/arrêt.Indépendamment du mode de fonctionnement actuel du moteur, la...
  • Page 20 L’appareil ne doit être utilisé qu’entièrement assemblé ! Montage Attention les télécommandes CasaFan doivent être uniquement montées par un professionnel dans le respect de la norme VDE 0100. L‘indication de la tension sur la plaque signalétique doit correspondre à la tension du réseau.Le réseau local doit disposer d‘une prise de terre.
  • Page 21 à l‘emploi. Placement de la télécommande sur les ventilateurs CasaFan de construction extra-plate, par exemple FLAT, GLASHAUS FLAT ou OFFICE FAN Veuillez monter l‘unité de réception de la télécommande conformément au dessin 3 ci-dessous.Après le raccordement électrique, collez l‘unité...
  • Page 22 Tige de montage Cache inférieur Codage de la télécommande FB-FNK Advanced Les unités de réception (dessin 4) et d‘émission (dessin 5) de la télécommande doivent pré- senter le même codage.Placez les interrupteurs dans la position souhaitée (le réglage d‘usine place tous les interrupteurs vers le haut).
  • Page 23: Indications Générales

    été ou hiver, celui-ci doit uniquement être activé lorsque les pales sont à l‘arrêt (moteur à l‘ARRÊT) !En cas de non-respect de ces instructions, les dégâts subis par le moteur et/ou la télécommande n‘entrent pas dans le cadre de la garantie. Utilisation et Function de la télécommande FB-FNK Advanced Bouton LC-Display/FUNCTION...
  • Page 24 Programmes de température automatiques La fonction AUTO1 permet Une pression de la touche AUTO 1 fait apparaî- de commander le venti- tre le symbole correspondant à l‘écran.Lorsque lateur en fonction de la vous appuyez ensuite sur la touche TEMP SET, température de la pièce.
  • Page 25 Avec la fonction AUTO 2, - Une pression sur la touche AUTO 2 fait appa- vous avez la possibilité de raître le symbole correspondant à l‘écran.Lorsque faire fonctionner le ven- vous appuyez ensuite sur la touche TEMP SET, ROOM TEMP AUTO SET TEMP tilateur en fonction de la...
  • Page 26 AUTO1 o AUTO2 funzione attivo Predefinita tem- Temperatura effettiva ROOM TEMP AUTO SET TEMP °F °F peratura per AUTO AUTO sul telecomando °C °C funzione TIMER 1 2 3 4 Indictore per batteria digradare (scambiare TIMER batteria) Tasto “/” Tasto DELAY OFF Tasto TEMP SET Tasto LIGHT e DIMMER...
  • Page 27  Sulle istruzioni per l’uso Prima di utilizzare il telecomandi CasaFan, leggete con attenzione le relative istruzioni e con- servatele a portata di mano. In caso di trasferimento del prodotto a terzi, accludete sempre le relative istruzioni per l’uso. Significato dei simboli: Pericolo tensione elettrica Avverte l’utente del rischio di danno provocato da tensione elettrica.
  • Page 28 L’apparecchio può essere utilizzato solo a montaggio completato! Montagehinweise Achtung I telecomandi CasaFan devono essere installati esclusivamente da un tecnico nel rispetto dell’ordinamento VDE 0100. L’indicazione relativa alla tensione sulla targhetta deve corrispondere alla tensione di rete disponibile. La rete domestica deve essere messa a terra! I cavi di rete non devono essere danneggiati al momento del montaggio.
  • Page 29 Dopo aver azionato la tensione di rete, il ventilatore è pronto ad essere utilizzato con il telecomando. Posizionamento del telecomando con ventilatori CasaFan su modelli extra-piatti, come ad es. FLAT, GLASHAUS FLAT o OFFICE FAN Montare l’elemento di ricezione del telecomando come illustrato schematicamente dal seguente schi- zzo 3.
  • Page 30 Asta Coperchio inferiore Codifi cazione di FB-FNK Advanced L’unità di ricezione (schizzo 4) e di trasmissione (schizzo 5) del telecomando devono avere la stessa codifi cazione Spingere l’interruttore nella posizione desiderata a vostra scelta (l’impostazione di fabbrica è rivolta verso l’alto per tutti gli interruttori). Utilizzare un piccolo cacciavite o una penna a sfera.
  • Page 31: Informazioni Fondamentali

    (motore OFF)! In caso di mancato rispetto di questa avvertenza, i danni causati al motore e/o al telecomando non sono coperti da garanzia. L‘uso e funzione FB-FNK Advanced Tasto LC-Display/FUNZIONE...
  • Page 32 Programmi di temperatura automatici La funzione Auto 1 con- - Premendo il tasto AUTO 1, viene visualizzato il sim- sente di ventilare con il bolo AUTO 1 sul display. Premendo poi il tasto TEMP ventilatore a seconda della SET inizia a lampeggiare l’indicazione di temperatura temperatura dell’ambiente.
  • Page 33 La funzione Auto 2 con- - Premendo il tasto AUTO 2, viene visualizzato il ROOM TEMP AUTO SET TEMP sente di ventilare con il simbolo AUTO 2 sul display. Premendo poi il tasto °F °F AUTO °C °C ventilatore a seconda della TEMP SET inizia a lampeggiare l’indicazione di TIMER 1 2 3 4...
  • Page 34 ACHTUNG IMPORTANT Dieses Gerät entspricht der EG-Richtlinie 2002/96/EG. Das This product conforms to EU Directive 2002/96/EC. This Symbol mit der durchgestrichenen Abfalltonne am Gerät appliance bears the symbol of the barred waste bin. This bedeutet, dass das Gerät nach seiner Aussonderung nicht indicates that, at the end of its useful life, it must not im Haushaltsmüll entsorgt werden darf, sondern an einer be disposed of as domestic waste, but must be taken to...
  • Page 35 Richtlinie 1999/5/EG (R&TTE) Declaration of Conformity in accordance with the Radio and Telecommunications Terminal Equipment Act (FTEG) and Directive 1999/5/EC (R&TTE Directive) Hersteller/Manufacturer EVT/Casafan-Ventilatoren Inh.: Wolfgang Kissling Gelnhäuser Str. 35 D 63505 Langenselbold Fernbedienung für Deckenventilatoren / Remote Control for ceiling fans...
  • Page 36 CasaFan reserves the right to make improving changes on products on sale. CasaFan se réserve d´apportertous changements susceptibles d´améliorer les produits en vente. CasaFan si riserva di apportare tutte le varianti migliorative ai prodotti in corso di vendita. CasaFan * Otto-Hahn-Str. 3 * 63594 Hasselroth ©...