Whisper S53W Instructions De Montage
Table des Matières
Les langues disponibles
Les langues disponibles
Liens rapides
EN
Fitting Instructions for Basic Carrier
D
Montageanleitung für Basisträgersystem
ES
Instrucciones de montaje para el sistema de transporte.
F
Instructions de montage pour Basic Carrier
NO
Monteringsanvisning for takstativ
PT
Instruções de Montagem para sistema de transporte.
RU
Установочные Инструкции для Поперечных Балок
Revision No: 2C
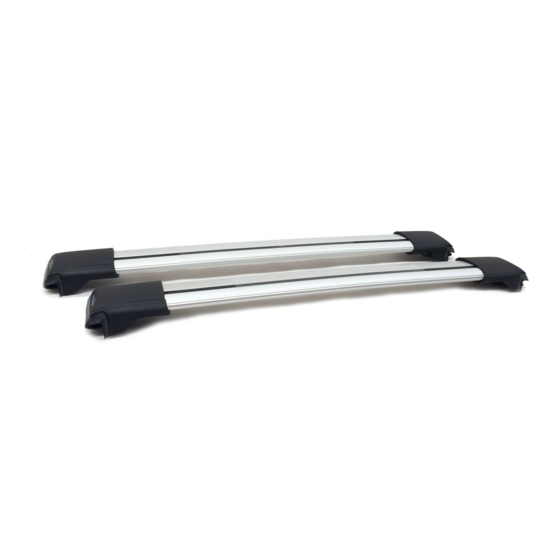
x 1
WHISPBAR RAIL BAR
x 1
1
x 2
S53W
Table des Matières

Manuels Connexes pour Whisper S53W


Sommaire des Matières pour Whisper S53W
-
Page 23: Première Installation
WHISPBAR RAIL BAR S53W Première installation Retirer les pièces de contenu de l'emballage et vérifier. Contactez votre revendeur si certaines pièces sont manquantes ou endommagées. Veiller à ce que les barres de toit soient tournées vers l'avant du véhicule. Utiliser les clés pour retirer les caches Tout en maintenant la clé... - Page 24 WHISPBAR RAIL BAR S53W Localiser la clé hexagonale dans un des pieds des barres de toit. Etendre le pied. Retirer la clé hexagonale en soulevant puis en faisant glisser. A l'aide de la clé hexagonale, dévisser la vis du pied en tournant 10 fois.
-
Page 25: Montage
WHISPBAR RAIL BAR S53W Montage Ce produit a deux longueurs de barres différentes. La barre la plus longue doit etre utilisée à l'avant du véhicule et la plus courte à l'arrière. Placer une extrémité de la barre transversale sur le longeron du toit opposé... - Page 26 WHISPBAR RAIL BAR S53W Une fois que barres transversales sont en place, serrer la vis jusqu'à 5 Nm (3.7 ft lb). Répéter l'opération pour tous les pieds. Faire glisser la clé hexagonale en position dans l'un des pieds de barre de toit.
- Page 27 WHISPBAR RAIL BAR S53W Vérifier que la barre transversale est solidement fixée au véhicule. ATTENTION : Vérifier régulièrement que les vis sont bien serrées...
- Page 28 WHISPBAR RAIL BAR S53W Maintenance Les charges longues doivent etre attachées avec des sangles non élastiques à l'avant et l'arrière du véhicule. Les objets à bouts pointus (skis) doivent être transportés avec les pointes tournées vers l'arrière du véhicule. Retirez tous les objets en vrac ou amovibles de la charge avant le chargement.
-
Page 29: Accessoires Disponibles Pour Ce Produit
WHISPBAR RAIL BAR S53W Placer les barres transversales à une distance minimale de 700 mm (27 1/2") lorsqu'aucune autre distance n'est indiquée dans les instructions de montage. Cela est particulièrement important pour le transport de charges longues. Placer les barres transversales à une distance minimale de 700 mm lorsqu'aucune autre distance n'est indiquée... -
Page 57: Garantie Limitée À Vie
WHISPBAR RAIL BAR S53W GARANTIE LIMITÉE À VIE POUR OBTENIR DES RENSEIGNEMENTS TECHNIQUES OU DES PIÈCES DE RECHANGE prière de contacter votre dépositaire, de consulter le site www.whispbar.com ou d’appeler au (888) 925-4621, du lundi au vendredi, entre 7 heures et 17 heures, heure du Pacifique. - Page 58 WHISPBAR RAIL BAR S53W Garantie quinquennale Whispbar (UE) Chez Whispbar, nous pouvons nous vanter de garantir que l'ensemble de nos produits est conçu, testé et fabriqué conformément aux exigences les plus strictes. Par ailleurs, tous les produits Whispbar vendus au sein de l'UE bénéficient d'une garantie quinquennale sur les pièces et la main d'oeuvre.