afx light CLUB-MIX2-IP Manuel D'utilisation
Table des Matières
Les langues disponibles
Les langues disponibles
Liens rapides
CLUB-MIX2-IP
CODE: 16-1024
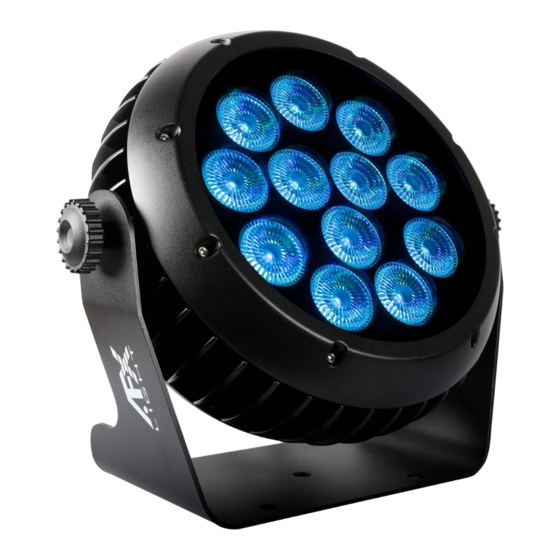
LED PAR CAN 12 X 12W RGBW
WITH SEPARATE LED CONTROL
PROJECTEUR PAR A LED RGBW 12 X 12W
A CONTROLE SEPARE DES LED
LED PAR STRAHLER 12 X 12W RGBW
MIT GETRENNTER LED- STEUERUNG
LED PAR PROJECTOR 12 X 12W RGBW
MET APARTE BESTURING VAN DE LEDS
PROYECTOR PAR DE LED RGBW 12 X 12W
CON CONTROL SEPARADO DE LOS LED – IP65
GB - User Manual - p. 2
F - Manuel d'Utilisation - p. 7
D - Bedienungsanleitung - S. 11
NL - Handleiding - p. 16
View the product on our website
ES - Manual de Uso - p. 20
and download the multilanguage
manual
DMX Channels - p. 25
Table des Matières

Manuels Connexes pour afx light CLUB-MIX2-IP


Sommaire des Matières pour afx light CLUB-MIX2-IP
-
Page 7: Explication Des Symboles
MANUEL D'UTILISATION DESCRIPTION • 12 LED 12W RGBW • Contrôle séparé des 9 LED extérieurs et des 3 LED au centre • 10/18 canaux DMX • Fonctionnement automatique, DMX, maître-esclave, commandé par la musique ou la télécom- mande fournie • Entrées / Sorties SEETRONIC •... -
Page 8: Connexion De L'alimentation Et Du Câble Signal
l’appareil par vous-même. Une réparation mal faite peut entraîner des dommages et des dys- fonctionnements. Contactez un service technique agréé. Utilisez uniquement des pièces déta- chées identiques aux pièces d’origine. • Assurez-vous que le cordon d’alimentation n’est jamais écrasé ni endommagé. •... -
Page 9: Panneau De Contrôle
2. Connexion du câble signal La connexion entre la sortie du Maître et l’entrée de l‘Esclave se fait au moyen du cordon XLR à 3 broches fourni. La sortie DMX de la console de commande doit être branchée sur l’entrée DMX du premier Maître. -
Page 10: Description Télécommande
RECOMMANDATIONS POUR LES BATTERIES Ce pictogramme indique que les piles et batteries usagées ne doivent pas être jetées avec les ordures ménagères, mais déposées dans des points de collecte séparés pour être recyclées. Tenir les piles à l’abri d’une chaleur excessive telle que le soleil, le feu ou similaires. Lorsque les piles ne sont pas utilisées, retirez-les pour éviter les dommages causés par des fuites ou la corrosion de la pile. - Page 25 DMX CHANNEL CHART www.afx-light.com...
- Page 26 © Copyright LOTRONIC 2023...
- Page 27 DISCOVER OUR OTHER PRODUCTS OF THE PAR IP RANGE CLUB-WHITE450-IP CLUB-UV450-IP CODE: 16-1022 CODE: 16-1023 CLUB-MIX3-IP CLUB-710-IP CODE: 16-1025 CODE: 16-1026 www.afx-light.com...