Télécharger Imprimer la page

Publicité

Les langues disponibles

Les langues disponibles

Liens rapides

MICROWAVE
OVEN
I N S T R U C T I O N F O R I N S TA L L AT I O N A N D U S E
N O T I C E D ' I N S TA L L AT I O N E T D ' E M P L O I
I N S T R U C T I E V O O R I N S TA L L AT I E E N G E B R U I K
N Á V O D K O B S L U Z E A I N S TA L A C I
I N S T R U K C J E M O N TA Ż U I O B S Ł U G I
MWP 1052-26 EN
1 0 1 5 - 2 2
www.rmgastro.com

Publicité

loading

Sommaire des Matières pour Redfox MWP 1052-26 EN

  • Page 1 N Á V O D K O B S L U Z E A I N S TA L A C I I N S T R U K C J E M O N TA Ż U I O B S Ł U G I MWP 1052-26 EN 1 0 1 5 - 2 2...
  • Page 2 CONTENT Instruction for installation and use CONTENU Notice d‘installation et d‘emploi INHOUD Instructie voor installatie en gebruik OBSAH Návod k obsluze a instalaci TREŚĆ Instrukcje montażu i obsługi 2023-08-01...
  • Page 3 INSTRUCTION FOR INSTALLATION AND USE...
  • Page 4 PRECA UTIONS TO AVOID POSSIB L E EXPOSURE TO EXCESSIVE MICROWAVE ENERGY (a) Do not attempt to operate this oven with the door open since this can result in harmful exposure to microwave energy. It is important not to break or tamper with the safety interlocks. (b) Do not place any object between the oven front face and the door or allow soil or cleaner residue to accumulate on sealing surfaces.
  • Page 5 IMPORTANT SAFETY INSTRUCTIONS WARNING To reduce the risk of fire, electric shock, injury to persons or exposure to excessive microwave oven energy when using your appliance, follow basic precautions, including the following: 1. This appliance is not intended for use by persons (including children) with reduced physical, sensory or mental capabilities, or lack of experience and knowledge, unless they have been given supervision or instruction...
  • Page 6 WARNING : The contents of feeding bottles and baby food jars shall be stirred or shaken and the temperature checked before consumption, in order to avoid burns. 8. Only use utensils that are suitable for use in microwave ovens 9. When heating food in plastic or paper containers, keep an eye on the oven due to the possibility of ignition.
  • Page 7 To Reduce the Risk of Injury to Persons Grounding Installation DA NGER Electric Shock Hazard This appliance must be grounded. In the event of Touching some of the internal an electrical short circuit, grounding reduces the components can cause serious risk of electric shock by providing an escape wire personal injury or death.
  • Page 8 UTENSIL S See the instructions on "Materials you can use in microwave oven or to be avoided in microwave oven." There may be certain non-metallic utensils that are not CAUTION safe to use for microwaving. If in doubt, you can test the Personal Injury Hazard utensil in question following the procedure below.
  • Page 9 Materials to be avoided in microwave oven Utensils Remarks Aluminum tray May cause arcing. Transfer food into microwave-safe dish. Food carton with May cause arcing. Transfer food into microwave-safe dish. metal handle Metal or metal- Metal shields the food from microwave energy. Metal trim may trimmed utensils cause arcing.
  • Page 10 Countertop Installation Remove all packing material and accessories. Cabinet: Remove any protective film found Examine the oven for any damage such as on the microwave oven cabinet surface. dents or broken door. Do not install if oven is damaged. Installation Select a level surface that provide enough open space for the intake and/or outlet vents...
  • Page 11 Cleaning Instructions Always keep the oven clean 1. Cleaning the glass viewing window, the inner door panel and oven front face. For best performance and to maintain the high degree of safety, the inner door panel and oven front face should be free of food or grease build-up. Wipe these parts with a mild detergent, rinse and wipe dry.
  • Page 12 OPERATION Control Panel and Features (1) Power Buttons (2) Time entry Button (3) X2 Button (4) Stop/Reset Button ( ) Start Button (6) Number Buttons GB-10...
  • Page 13 OPERATION INSTRUCTION Five power levels are available. Level High M. High Defrost Hold Med. Power 100% PL10 Display Appendix. A User Options Items bolded below are the default values. Option Discription Setting OP:10 3 seconds beep OP:11 Continuous beep EOC Tone OP:12 5 quick beeps,Repeating OP:20...
  • Page 14 Appendix. B Default Cook Times The oven shall ship with the following Preset Cook Times unless otherwise noted in the product Specification. Button Cook Factors Display (Time) Power 0:10 100% 0:20 100% 0:30 100% 0:45 100% 1:00 100% 1:30 100% 2:00 100% 3:00...
  • Page 15 1. Power Up " " displays when the oven is electrified for the first time. If " " button pressed, the oven will change to idle mode. Note: Under idle mode, no button can be pressed. 2. Idle Mode 1) Entry.The oven shall enter idle mode after a set of seconds have expired in Ready Mode without a keyboard press or a door open and close.
  • Page 16 5. Pause Mode 1) While in Manual Cook Mode, or Preset Program Cook Mode, if the door is open or closed, or if the " " pad is pressed, the oven will enter Pause Mode. 2) While paused, LED will display the remaining cooking time. 3) Only the fan and lamp work.
  • Page 17 8. End of Cook Cycle Mode 1) After the time has expired in a Manual Cook Mode, or a Preset Program Cook Mode, the oven shall go into The End of Cook Cycle Mode. 2) During this mode, "End" displays. 3) If either User Option OP:11 or "OP:12"...
  • Page 18 11. Programming Mode This mode allows the user to assign cook times and power levels to the once touche button. 1) Open the door and press "1" for 5 seconds,the buzzer will sound once and enter to Programming Mode. 2) "ProG" displays. 3) Press any number ,0 to 9,and the LED will display the saved time, then you can input the time you need.
  • Page 19 12. Double Quantity cooking Under ready state, press "X2" button and then press number buttons 0-9 in 5 seconds, the oven will start cooking with the quantity preset cooking time. 2) Press "X2", "doub" displays. When press number buttons, LED will display the quantity preset time.
  • Page 20 14. Use Option Mode 1) Open the oven door and press "2" for 5 seconds. The buzzer sounds once and enter this mode. 2) LED displays "OP: - -". 3) Press any number button to enter related mode setting. For example: to set the voice of the buzzer to medium. Press " 2 ", "OP:22" displays. If you want to change, keep pressing "2", LED displays "OP:20", "OP:21","OP:22","OP:23", "OP:20"...
  • Page 21 Trouble shooting It is forbidden to run the unit without any food inside. It is very dangerous. According to Waste of Electrical and Electronic Equipment (WEEE) directive, WEEE should be separately collected and treated. If at any time in future you need to dispose of this product please do NOT dispose of this product with household waste.
  • Page 22 NOTICE D‘INSTALLATION ET D‘EMPLOI...
  • Page 23 Four à micro-ondes MANUAL D’INSTRUCTION Model: MWP1052-26 E/N Lire attentivement ces instructions avant d’utiliser votre four à micro-ondes, et les conserver soigneusement. Si vous suivez les instructions, votre four vous permettra nombreuses années de bon service. SAUVER CES INSTRUCTIONS ATTENTIVEMENT...
  • Page 24 
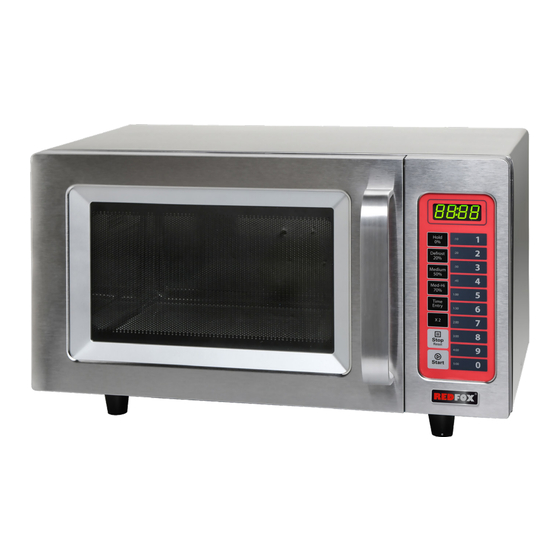
DESCRIPTION GÉNÉRALE DE L'APPAREIL – Le four à microondes MWP1052-26EN est un appareil conçu et fabriqué pour chauffer, rôtir ou décongeler des denrées alimentaires contenues dans des récipients spéciaux destinés à l'alimentation humaine, et ce plus rapidement par rapport aux fours traditionnels. –...
  • Page 25 RÉGLER VOTRE FOUR Nom des parties et des accessoires du four Retirez le four et toutes les pièces du carton et de la cavité du four. Votre four dispose des accessoires suivants : Notice d’utilisation A) Panneau de commande B) Fenetre d’ observation C) Assemblage de port D) Systeme de verrouillage de securite’...
  • Page 26 CARACTÉRISTIQUES TECHNIQUES Tableau 1: Données techniques de l'appareil Description Unité de mesure MWP1052-26 Puissance 1,55 Alimentation électrique V/Ph/Hz 230V /1/50Hz Contenance du four Litres Dimensions de l'appareil 511x432x311 Poids net 14,7 Type d'installation Installation au comptoir Le tableau indique le type de matière dans laquelle sont fabriqués les récipients. Tableau 2: Matières des récipients Matière du récipient Fonctionnement à...
  • Page 27 DESCRIPTION DES COMMAN- L'appareil est équipé des dispositifs de commandes cités, nécessaires pour activer ses fonctions principa- les. A) Afficheur: Affiche les paramètres de cuisson et l'heure. B) Boutons : ils servent à sélect- ionner le niveau de puissance correspondant. C) Bouton : il sert à...
  • Page 28 Option Discription Setting O O P P : : 1 1 0 0 3 3 s s e e c c o o n n d d s s b b e e e e p p Continuous beep OP:11 EOC Tone 5 quick beeps,Repeating OP:12...
  • Page 29 MODE D'EMPLOI On cite les modes d'emploi et de programmation des différentes fonctions de l'appareil. Power up (Allumage) – Brancher la machine à l'aide du câble d'alimentation , le message « _ _ _ _ » s'affi-che alors à l'écran.Si vous appuyez sur la touche STOP, le four passe en mode d'inactivité.
  • Page 30 Mode «Open Door» Le mode « Open Door » permet aux utilisateurs d'arrêter temporairementle cycle de cuisson afin de contrôler le produit qui se trouve à l'intérieur de l'appareil. Dans ce mode, l'écran est vide. Seuls le ventilateur et l'ampoule sont en fonctionnement. Lorsque la porte est fermée, si l'option "OP: 60" a été sélectionnée, pendant que le four effectuait un cycle de cuisson programmé...
  • Page 31 Mode de fin de cycle de cuisson - Après que le temps est écoulé en mode de cuisson manuelle ou en mode de cuisson à programme programmé, le four passe en mode de fin de cycle de cuisson. - Pendant ce mode, "End" est affiché. - Si l'une des options utilisateur «...
  • Page 32 touche numérique correspondante pour lancer le programme enregistré. S'il n'y a pas de programme enregistré, l'avertisseur sonore retentit lorsque vous appuyez sur la touche numérique et il ne fonctionnera pas. Par exemple: définissez le programme comme cuisson mémoire. Programme; Le niveau de puissance PL7 et le temps de cuisson est de 1 minute et 25 secondes. Remarque: 1.
  • Page 33 b. Appuyez sur les touches numériques "3" pour enregistrer le programme en "3". c. Appuyez sur "1", "2", "5" pour entrer le temps de cuisson. "1:25" s'affichera à l'écran. d. Appuyez sur "MED-HI 70%", l'écran affichera "PL7". La première étape est terminée. e.
  • Page 34 CONSEILS D'UTILISATION 1. En fonction du mode de fonctionnement (à microondes, grill ou mode combiné) et du type de préparation à effectuer (décongélation, cuisson, réchauffement, etc.), préparer convenablement l'aliment et l'introduire dans un récipient approprié. En cas d'aliments qui, durant la préparation, pourraient éclabousser les parois du four, mettre un couvercle sur le récipient.
  • Page 35 – Ne pas introduire de récipients en métal (acier, cuivre, barquettes en aluminium, etc.) ou de récipients plaqués ou avec des gravures en métal (or, argent, etc.) pour éviter de provoquer des étincelles ou des arcs magnétiques. – Ne pas utiliser l'appareil pour cuire les œufs. –...
  • Page 36 A ne nettoyer qu'avec des détergents à usage alimentaire. N'utiliser en aucun cas des produits de nettoyage corrosifs, inflammables ou qui contiennent des substan- ces nocives pour la santé. – Si on prévoit de ne pas utiliser l'appareil durant une longue période, après l'avoir nettoyé et débranché...
  • Page 37 INSTRUCTIE VOOR INSTALLATIE EN GEBRUIK...
  • Page 38 Magnetron GEBRUIKSAANWIJZING model: MWP 1052-26 EN Wij vragen u deze instructies aandachtig te lezen voordat u de magnetron voor het eerst gebruikt. Als u de instructies opvolgt, zal uw magnetron u jarenlang goed van dienst zijn. BEWAAR ZORGVULDIG DEZE BEDIENINGSHANDLEIDING...
  • Page 39 BIJVOEGSEL Als de magnetronoven niet naar behoren wordt schoongemaakt, kunnen de kwaliteit en de toestand van de oppervlakken afnemen, wat de levensduur van de oven kan inkorten en eventueel tot gevaarlijke situaties kan leiden. Specificatie Model: MWP1052-26EN 230 V~50 Hz Nominale spanning: Nominaal ingangsvermogen (magnetron): 1 550 W...
  • Page 40 volwassen persoon. (alleen voor modellen met 17. Bewaar gebruik apparaat niet een grill) buitenshuis. Gebruik alleen vaatwerk die geschikt is voor de 18. Gebruik de oven niet in de buurt van water, in een vochtige kelder of in de nabijheid van een magnetron.
  • Page 41 U mag de magnetron niet in een kast plaatsen, tenzij deze in een kast is getest. Deze apparaten zijn niet bedoeld om te worden gebruikt in combinatie met een externe timer of een apart afstandsbedieningsysteem. De deur of buitenoppervlakken kunnen tijdens het gebruik heet worden. Middelen voor het loskoppelen van het apparaat van het stroomnet, die uitgerust zijn met contacten die in alle polen geopend kunnen worden en die voor een volledige loskoppeling binnen overspanningscategorie III zorgen, moeten in vaste kabels opgenomen worden in...
  • Page 42 3. De verlengkabel moet een geaarde kabel met zijn. Bij twijfel kunt u de veiligheid van het gebruik omliggende onderdelen moeten grondig worden gereinigd 4. De lange kabel moet zo geplaatst worden dat hij nie met een vochtige doek, als deze over het aanrecht of tafelblad hangt, waar kindere verontreinigd zijn.
  • Page 43 Gebruik om voedsel af te dekken om spatten te voorkomen of als verpakking voor het Bakpapier stoomkoken Alleen degene die veilig zijn voor gebruik in de magnetron. Volg de instructies van de fabrikant. Deze moeten als "Magnetronbestendig" (Microwave Safe) gemarkeerd zijn. Sommige plastic potten worden zacht zodra het voedsel erin opwarmt.
  • Page 44 Bedieningspaneel Keramische plaat Transparant ovenvenster Assemblage deuren Veiligheidsvergrendelingssysteem Opmerking: Forceer de keramische plaat niet. 2) Neem de potten en plaats deze voorzichtig in de oven tijdens het gebruik om beschadiging van de keramische plaat te voorkomen. Raak de keramische plaat na gebruik niet met uw handen aan om brandwonden door hoge temperaturen te voorkomen.
  • Page 45 Afb. 1 30 cm 10 cm 10 cm VRIJ Er moet een afstand van 10 cm worden aangehouden tussen het apparaat en de rechter- en achterwand, en 30 cm vanaf de bovenkant. Demonteer nooit de poten van het apparaat en blokkeer nooit de luchttoevoer en uitlaatopening.
  • Page 46 Zorg ervoor dat u na gebruik van het apparaat gemorste vloeistoffen, oliespatten en voedselresten zo snel mogelijk verwijdert. Als de oven verontreinigd gebruikt wordt, neemt de efficiëntie af en blijft er vuil aan de ovenoppervlakken kleven, wat onaangename geuren kan veroorzaken. Reinig de binnenkant van de oven met een doek die gedrenkt is in lauw water met een mild reinigingsmiddel, en spoel daarna af met zeep en een vochtige doek.
  • Page 47 Prestatietoetsen (2) Tijdinvoer toets (3) Dubbele hoeveelheid toets (4) Stop/Reset-toets (5) Start-toets (6) Numeriek toetsenbord BEDIENINGSINSTRUCTIES...
  • Page 48 Bijlage A Gebruikersopties Onderstaande vetgedrukte items zijn de defaultwaarden. Optie Omschrijving Instelling OP:10 3 seconden piep OP:11 Ononderbroken piep 1 EOC toon OP:12 5 snelle piepjes, herhaling OP:20 Beeper uit OP:21 Laag Beeper OP:22 Medium Geluidsvolume OP:23 Hoog OP:30 Sleutel pieptoon Uit Beeper OP:31 Sleutel pieptoon Aan...
  • Page 49 De oven wordt geleverd met de volgende vooringestelde kooktijden, tenzij anders vermeld in de productspecificatie. Toets Display (Tijd) Kookfactoren Vermogen 0:10 100 % 80 % 0:20 100 % 80 % 0:30 100 % 80 % 0:45 100 % 80 % 1:00 100 % 80 %...
  • Page 50 1. Aansluiting _ _ _ _ _ _ _ " " wordt weergegeven als de oven voor het eerst ingeschakeld wordt. Als u op de " " toets drukt, gaat de oven in de slaapstandmodus. Voor sommige modellen 2. Slaapstandmodus Input.
  • Page 51 5. Pauzemodus 1) In deze modus kan de gebruiker de kookcyclus tijdelijk stoppen om het gekookte voedsel te controleren of te roeren. In de Handmatige kookmodus of in de Kookmodus met vooringesteld programma, en als de deur open - toets gedrukt wordt, gaat de oven naar de Pauzemodus of gesloten is, of als op de "...
  • Page 52 Einde kookcyclus modus Nadat de tijd in de Handmatige kookmodus of in de Vooringestelde kookprogramma modus is verstreken, gaat de oven naar de Einde kookcyclus modus. Tijdens deze modus wordt "EIND" weergegeven. Als de Gebruikersoptie OP:11 of "OP:12” geselecteerd is, zal de oven dit blijven signaleren totdat de gebruiker dit bevestigd door de deur te openen en te sluiten of door op de "...
  • Page 53 11. Programmeermodus In deze modus kan de gebruiker kooktijden en vermogensniveaus toewijzen door eenmaal op de bijbehorende aanraaktoets te drukken. 1) Open de deur en druk gedurende 5 seconden op de "1"-toets; de zoemer klinkt één keer en de oven schakelt over naar de programmeermodus. "PROGRAMMA"...
  • Page 54 Stap 5: Druk op " " om op te slaan. De volgende keer dat u dit programma gebruikt, drukt u gewoon op "3" en het overeenkomstige programma zal opnieuw starten. Opmerking: 1. Als er een stroomuitval is, gaat het opgeslagen programma niet verloren. 2.
  • Page 55 Voorbeeld: In de programmeermodus, druk op de numerieke toets "3" om het koken in twee fasen in te stellen. De eerste fase is PL7 en de kooktijd is 1 minuut 25 seconden. De tweede fase is PL5 en de kooktijd is 5 minuten 40 seconden. De procedure is als volgt: Open de deur, druk 5 seconden op de numerieke toets "1"...
  • Page 56 15. Servicemodus 1) Open de ovendeur en druk 5 seconden op de "3"-toets om naar de servicemodus over te schakelen. 2) Op het display wordt weergegeven "SERVICE".: 3) Controleer de sluitings- of openingstijden van de deur; druk gewoon op de numerieke toets "3" en op het display verschijnen volgende tijden Als u op de "...
  • Page 57 Normaal Bij het gebruik van de magnetron kan een verstoring van ontvangen radio- en tv-signalen ontstaan. Dit is vergelijkbaar De magnetron stoort de met storing van kleine elektrische apparaten, zoals een blender, tv-ontvangst. stofzuiger en elektrische ventilator. Dit is normaal. Gedimd licht in de oven Bij een laag stroomverbruik van de magnetron kan de intensiteit van het licht in de oven afnemen.
  • Page 58 met het normale huisvuil. Stuur het indien mogelijk naar een AEEA-inzamelpunt. Installatie (aanvulling) 1. Het omschakelen van de werking van deze magnetron kan spanningschommelingen op het elektriciteitsnet veroorzaken. Deze werking van de oven onder ongunstige elektriciteitsleidingen kan nadelige gevolgen hebben. Dit apparaat is bedoeld voor aansluiting op een voedingssysteem met een maximaal toelaatbare systeemimpedantie van Zmax = 0,2 Ohm op de voedingsinterface van de gebruiker.
  • Page 59 NÁVOD K OBSLUZE A INSTALACI...
  • Page 60 Mikrovlnná trouba NÁVOD K model: MWP 1052-26 EN...
  • Page 61 (c) VÝSTRAHA: DODATEK MWP1052-26EN 230 V~50 Hz 1550 W 1000 W 25 L...
  • Page 62 Varování: Varování: Varování: Varování: Varování: –...
  • Page 63 Varování...
  • Page 64 Nádobí nádobí nádobí...
  • Page 65 Nádobí nádobí...
  • Page 66 ou linku Obr. 1 30 cm 10 cm 10 cm OPEN...
  • Page 69 OP:10 OP:11 OP:12 OP:20 OP:21 OP:22 OP:23 OP:30 OP:40 OP:41 OP:42 OP:43 OP:50 OP:51 OP:60 OP:61 OP:70 OP:80 OP:81 OP:90 OP:91...
  • Page 70 0:10 100% 0:20 100% 0:30 100% 0:45 100% 1:00 100% 1:30 100% 2:00 100% 3:00 100% 4:00 100% 5:00 100%...
  • Page 71 _ _ _ _ _ _ _ 3) Z...
  • Page 73 10. V...
  • Page 74 1:25...
  • Page 78 Normální...
  • Page 80 INSTRUKCJE MONTAŻU I OBSŁUGI...
  • Page 81 INSTRUKCJA OBSŁUGI KUCHENKA MIKROFALOWA MWP 1052-26 Należy przeczytać uważnie tę instrukcję przed pierwszym użyciem urządzenia i zachować ją w miejscu dostępnym dla każdego kolejnego użytkownika. Przy prawidłowym postępowaniu, zgodnie z zasadami opisanymi w tym dokumencie, kuchenka będzie służyła przez wiele lat. Specyfikacja Model: MWP1052-26...
  • Page 82 ŚRODKI OSTROŻNOŚCI ZAPOBIEGAJĄCE EKSPOZYCJI NA NADMIERNĄ ENERGIĘ MIKROFALOWĄ (a) Proszę nie probówać używać kuchenki z otwartymi drzwiczkami, ponieważ to może spowodować szkodliwą ilość energii mikrofalowej. Proszę nie poruszać mechanizmów blokujących ani ich nie manipulować. (b) Nie umieszczać żadnych przedmiotów pomiędzy czoło kuchenki i drzwiczki i nie pozwolić, aby się...
  • Page 83 8. Podczas ogrzewu żywności w plastikowych czy papierowych opakowaniach należy kuchenkę uważnie obserwować, żeby nie doszło do wzpłonięcia. 9. Jeżeli państwo zaobserwują dym, należy wyłączyć urządzenie czy odłączyć od sieci elektrycznej i zostawić zamknięte drzwiczka, żeby udusić powstałe płomienie. 10. Nie rozgotowywać żywność. 11.
  • Page 84 Obniżenie ryzyka poranienia osób. Uziemnienie NIEBEZPIECZEŃSTWO Niebezpieczeństwo urazu prądem elektrycznym. Dotyk niektórych wewnętrznych komponentów może spowodować ważne poranienie czy nawet śmierć. Nie demontować urządzenie. OSTRZEŻENIE Niebezpieczeństwo urazu prądem elektrycznym. Niewłaściwe użycie uziemnienia może spowodować uraz prądem elektrycznym. Nie podłączać urządzenie do gniazda elektrycznego, jeżeli nie jest właściwie zainstalowane i uziemnione.
  • Page 85 Wteczka z dwiema okrągłymi kołkami - PRZYBORY OSTRZEŻENIE Niebezpieczeństwo poranienia Jest niebezpieczne, aby serwis czy naprawy zawierające zdejmowanie oprawy chroniącej przed promieniowaniem mikrofalowym, wykonywał ktokolwiek inny niż osoba powołana. Patrz instrukcje w części: „Materiały, których można czy nie można używać w kuchence mikrofalowej“.
  • Page 86 unikania pary. Papierowe Tylko na krótkie gotowanie/ogrzewanie. Nie zostawiać podczas talerze i kubki gotowania kuchenkę bez nadzoru. Papier do Używać do przykrycia, żeby nie dochodziło do tryskania albo jako pieczenia opakunek do gotowania w parze. Plastikowe Tylko te, które są bezpieczne do użycia w kuchence mikrofalowej. opakowania Używać...
  • Page 87 A) Panel sterowania B) Szyba C) Drzwi D) System blokad bezpieczeństwa E) Płyta ceramiczna Uwaga: 1) Nie należy dociskać płyty ceramicznej na siłę. 2) Naczynia powinny być delikatnie stawiane na płytę, żeby jej nie uszkodzić. 3) Po użyciu nie należy dotykać płyty ceramicznej, aby uniknąć oparzenia wysoką temperaturą Instalacja na powierzchni blatu kuchennego: Zdejmujemy wszystkie opakowania i wyjmujemy akcesoria.
  • Page 88 Instalacja 1. Wybierz płaską powierzchnię, która zapewnia wystarczająco dużo miejsca na wloty i/lub otwory wentylacyjne (Rys.1) Rys. 1 Należy zachować odstęp 10 cm między urządzeniem oraz prawą i tylną ścianą, i 30-centymetrowy odstęp u góry. Nigdy nie demontuj nóżek urządzenia ani nie blokuj wlotu i wylotu powietrza.
  • Page 89 Instrukcje czyszczenia Zawsze należy utrzymywać piekarnik w czystości! 1. Czyszczenie szyby, wewnętrznego panelu drzwi i frontu piekarnika. Aby uzyskać najlepszą wydajność i utrzymać wysoki stopień bezpieczeństwa, wewnętrzny panel drzwi i przednia powierzchnia piekarnika powinny być wolne od nagromadzonych resztek jedzenia lub tłuszczu. Należy wycierać...
  • Page 90 DZIAŁANIE Panel sterowania i funkcje (1) Przyciski zasilania (2) Przycisk wprowadzania czasu (3) Przycisk X2 (4) Przycisk Stop/Reset (5) Przycisk Start (6) Przycisk numeryczny INSTRUKCJA OBSŁUGI Dostępnych jest pięć poziomów mocy. Poziom Defrost High M. . Hi Hold Med. 100% PL10 Wyświetlacz *Rozmrażanie...
  • Page 91 Dodatek A - Opcje użytkownika Pogrubione poniżej pozycje są wartościami domyślnymi. Opcja Opis Ustawienia OP:10 3 sekundowy dźwięk OP:11 Ciągły sygnał dźwiękowy EOC Tony OP:12 5 szybkich sygnałów dźwiękowych, powtarzanie OP:20 Sygnał dźwiękowy wyłączony OP:21 Niski Głośność OP:22 Średni sygnału OP:23 Wysoki OP:30...
  • Page 92 INSTRUKCJA UŻYTKOWANIA 1. . Moc " _ _ wyświetla się, gdy kuchenka używana jest po raz pierwszy. Jeśli przycisk: " zostanie naciśnięty, piekarnik przejdzie w tryb spoczynku. Uwaga: W trybie bezczynności nie można nacisnąć żadnego przycisku. 2. Tryb czuwania 1) Wejście. Piekarnik przejdzie w tryb bezczynności po upływie kilku sekund w trybie gotowości bez naciskania klawiatury lub otwierania i zamykania drzwi.
  • Page 93 6. . Ręczne zapisywanie programów 1) Gdy piekarnik jest w trybie gotowości, naciśnięcie pola na klawiaturze spowoduje przejście piekarnika w tryb ręcznego wprowadzania gotowania. 2) W tym trybie wyświetla się „00:00” 3) Po naciśnięciu " "," "," " or " "...
  • Page 94 10. Program On the Fly 1) Gdy piekarnik gotuje lub znajduje się w trybie pauzy, jeśli wybrano opcję użytkownika OP:51, naciśnij przyciski numeryczne, zaprogramowany program gotowania rozpocznie się automatycznie. 2) LED wyświetla pozostały czas gotowania. 3) Po zakończeniu programu pieczenia piekarnik wejdzie w tryb zakończenia cyklu pieczenia. "...
  • Page 95 Gotowanie podwójnej ilości W stanie gotowości należy nacisnąć przycisk „X2”, a następnie przyciski numeryczne 0-9 w ciągu 5 sekund, piekarnik rozpocznie pieczenie z zaprogramowaną ilością czasu gotowania. 2) Po naciśnięciu „X2”, wyświetli się „doub”. Po naciśnięciu przycisków numerycznych dioda LED wyświetli zaprogramowany czas.
  • Page 96 15. . Tryb serwisowy 1) Otwórz drzwi piekarnika i naciśnij „3” przez 5 sekund, aby przejść do trybu serwisowego. 2) LED wyświetla "SErU". 3) Aby sprawdzić godziny zamknięcia lub otwarcia drzwi wystarczy nacisnąć przycisk z cyfrą „1”, dioda LED wyświetli czas. następnie naciśnij przycisk numeryczny "4"...
  • Page 97 Rozwiązywanie problemów Normalne Kuchenka mikrofalowa zakłóca odbiór telewizji Używanie kuchenki mikrofalowej może zakłócać odbiór radia i telewizji. Chodzi o podobne zakłócenie jak w wypadku małych elektrycznych urządzeń jak mikser, odkurzacz czy wentylator elektryczny. Taka sytuacja jest zupełnie normalna. Tłumione światło w kuchence Podczas gotowania mikrofalowego z użyciem niskiej wydajności może dojść...
  • Page 100 List of service organizations: CZ: RM GASTRO CZ s. r. o., Náchodská 818/16, Praha 9 Tel. +420 281 926 604, info@rmgastro.cz, www.rmgastro.cz SK: RM Gastro Slovakia, Rybárska 1, Nové Město nad Váhom Tel.: +421 32 7717061, obchod@rmgastro.sk, www.rmgastro.sk PL: RM GASTRO Polska Sp. z o. o., ul. Skoczowska 94, 43-450 Ustroń Tel.: +33 854 73 26, www.rmgastro.pl...