Télécharger Imprimer la page

Publicité

Les langues disponibles
  • FR

Les langues disponibles

  • FRANÇAIS, page 3

Liens rapides

Jumelles vision nocturne infrarouge
Infrared night vision
VIS1065
Guide d'utilisation ....................................... 3
User's guide................................................18
Instrucciones de uso......................................30
Bedienungsanleitung...................................44
Guida all'uso.................................................58
1
VIS1065 - Indice A – Fev. 23

Publicité

loading

Sommaire des Matières pour Num'axes VIS1065

  • Page 1 Jumelles vision nocturne infrarouge Infrared night vision VIS1065 Guide d’utilisation ........3 User’s guide..........18 Instrucciones de uso………………………………..30 Bedienungsanleitung………………....44 Guida all’uso…………………………....58 VIS1065 - Indice A – Fev. 23...
  • Page 2 : https://www.numaxes.com SIMPLIFIED EU DECLARATION OF CONFORMITY NUM’AXES declares that the equipment type VIS1065 is in compliance with applicable European regulations. The full text of the EU declaration of conformity is available on the following website: https://www.numaxes.com...
  • Page 3 
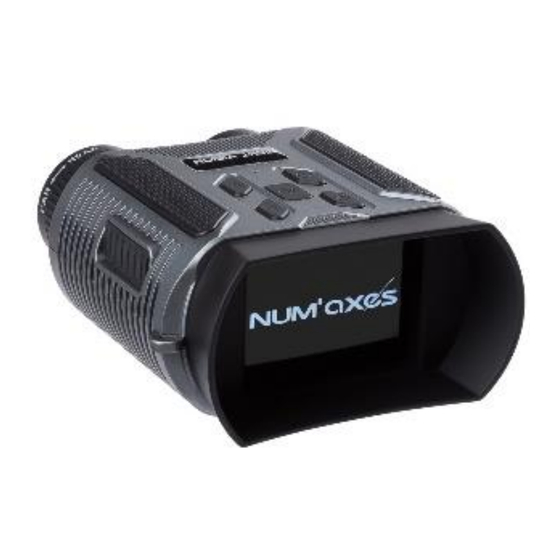
Bouton photos|vidéos Défilement vers le bas Bouton Mode Ecran Passage tour de cou Lumière infrarouge 10. Objectif 11. Indicateur de charge 12. Port USB 13. Emplacement carte microSD 14. Mollette de mise au point VIS1065 - Indice A – Fev. 23...
  • Page 4 Chargement USB Pour mettre les jumelles vision infrarouge VIS1065 en charge, soulevez la languette située sur le côté du produit et insérez le câble de charge USB. Lors de la charge, le voyant à côté du port USB est rouge. Lorsque la charge est terminée, le voyant est éteint.
  • Page 5 / éteindre les jumelles de vision infrarouge VIS1065. Choix du mode (photo|vidéo/lecture) et menu de réglages Les jumelles de vision infrarouge VIS1065 disposent de 3 modes (Mode Photo / Mode Vidéo / Mode Lecture) et 1 Menu de réglages. Appuyez plusieurs secondes sur le bouton Mode pour passer du Mode Photo au Mode Vidéo ou au Mode Lecture.
  • Page 6 Prendre une photo / faire une vidéo Bouton : en mode Photo, appuyez sur ce bouton pour prendre une photo. En mode Vidéo, appuyez sur ce bouton pour démarrer l’enregistrement d’une vidéo, appuyez à nouveau pour terminer l’enregistrement. VIS1065 - Indice A – Fev. 23...
  • Page 7 6.2. Mode Lecture Appuyez plusieurs secondes sur le bouton et plusieurs fois jusqu’à arriver au Mode Lecture. • Lecture des photos et des vidéos Appuyez sur les boutons pour prévisualiser une photo ou une vidéo. VIS1065 - Indice A – Fev. 23...
  • Page 8 Appuyez sur le bouton ON/OFF pour quitter l’écran de suppression. Menu de réglages Dans le mode photo|vidéo, appuyez sur le bouton ON/OFF pour entrer/sortir du menu de réglages. VIS1065 - Indice A – Fev. 23...
  • Page 9 Date / Heure Formatage Réglage par défaut Version • Configuration du menu Appuyez sur les boutons pour sélectionner le paramètre souhaité. Puis appuyez sur le bouton pour entrer dans les options du paramètre. VIS1065 - Indice A – Fev. 23...
  • Page 10 Transmission des vidéos et des photos vers un ordinateur Connectez dans la prise USB de votre appareil (vision infrarouge VIS1065) le câble USB et connectez l’autre extrémité du câble USB dans la prise USB de votre ordinateur. « Stockage de masse » apparaît sur l’écran de l’appareil.
  • Page 11 Câble de charge USB courant ≤ 2A Environ 4 à 5h en fonctionnement en Autonomie permanence avec IR Français, Anglais, Allemand, 5 langues Espagnol, Italien. Dimensions 113 x 86.5 x 51.6mm Poids 227 g VIS1065 - Indice A – Fev. 23...
  • Page 12 Réglez la mise au point en tournant la molette de mise au point progressivement pour ajuster la netteté. Si l’appareil est bloqué ou ne réagit pas à l'opération en raison d'une mauvaise utilisation, le produit VIS1065 peut-être réinitialisé en appuyant longuement sur le bouton puis en appuyant légèrement sur le bouton...
  • Page 13 Z.A.C. des Aulnaies – 745 rue de la Bergeresse – C.S. 30157 45161 OLIVET CEDEX – FRANCE Pour toutes réparations, le service après-vente NUM’AXES a impérativement besoin : − De votre produit complet − De la preuve d’achat (facture ou ticket de caisse) VIS1065 - Indice A – Fev. 23...
  • Page 14 - L’endommagement du produit résultant : - De la négligence ou faute de l’utilisateur - D’une utilisation contraire aux instructions ou non prévue - De réparations faites par des réparateurs non agréés - La perte ou le vol VIS1065 - Indice A – Fev. 23...
  • Page 15 17. Collecte et recyclage de votre appareil en fin de vie Le pictogramme apposé sur l’emballage de votre produit signifie que l’équipement ne peut être mêlé aux ordures VIS1065 - Indice A – Fev. 23...
  • Page 16 à la protection de la santé humaine. Pour plus d’informations sur les lieux de collecte des équipements usagés, vous pouvez contacter votre mairie, le service de traitement des déchets ménagers ou nous retourner le produit. VIS1065 - Indice A – Fev. 23...
  • Page 17 Tél. +33 (0)2 38 63 64 40 – Fax +33 (0)2 38 63 31 00 info@numaxes.com EXPORT Tél. +33 (0)2 38 69 96 27 – Fax +33 (0)2 38 63 31 00 export@numaxes.com www.numaxes.com VIS1065 - Indice A – Fev. 23...
  • Page 18 ON/OFF button and Settings menu button OK button and photos|vidéos Scroll down Mode button Display screen Lanyard hole Infrared light 10. Lens 11. Charging light 12. USB port 13. TF card holder 14. Adjustment wheel VIS1065 - Indice A – Fev. 23...
  • Page 19 USB charging To charge the VIS1065 Infrared Vision Binoculars, lift the tab on the side of the product and insert the USB charging cable. When charging, the light next to the USB port is red. When charging is complete, the light will be off.
  • Page 20 VIS1065 Infrared Vision Binoculars on/off. Mode selection (photo|video/replay mode) and settings menu The VIS1065 infrared vision binoculars have 3 modes (Photo Mode / Video Mode / Playback Mode) and 1 Settings Menu. Press the Mode button for several seconds to switch from Photo Mode to Video Mode or Replay Mode.
  • Page 21 In Video mode, press this button to start recording a video, press again to end recording. • Meaning of icons Photo Vidéo 1X: zoom magnification :: battery charge level IR:1: infrared light level VIS1065 - Indice A – Fev. 23...
  • Page 22 Playback mode. • Photo and video playback Press the buttons to preview a photo or video. Photo Video Press the button to play/stop the video. VIS1065 - Indice A – Fev. 23...
  • Page 23 Setting menu In photo|video mode, press the ON/OFF button to enter/exit the settings menu. Set up Video Resolution Time stamp Video length Auto power off Photo Resolution Stand by Exposure Language VIS1065 - Indice A – Fev. 23...
  • Page 24 Menu screen, press Transmission of videos and photos to a computer Connect the USB cable to the USB socket on your device (VIS1065 infrared vision) and connect the other end of the USB cable to the USB socket on your computer. "Mass Storage"...
  • Page 25 USB USB charging cable courant ≤ 2A About 4h to 5h in continuous Autonomy with IR operation French, English, German, Language Spanish, Italian Dimensions of product 113 x 86.5 x 51.6mm Weight of product 227 g VIS1065 - Indice A – Fev. 23...
  • Page 26 - Adjust the focus by moving the focus wheel gradually to adjust the sharpness. - If the device is stuck or does not respond to operation due to misuse, the VIS1065 can be reset by holding down the button and then lightly pressing the ON/OFF button 11.
  • Page 27 This warranty does not cover the following: - battery / accessory replacement, - direct or indirect transport risks linked to the return of the product to NUM’AXES, - product damage resulting from: VIS1065 - Indice A – Fev. 23...
  • Page 28 - Photos and drawings are not contractual. 15. Register your product Your product can be registered on our website at www.numaxes.com. 16. Accessories You may purchase microSD card at any time from www.numaxes.com or from your retailer. VIS1065 - Indice A – Fev. 23...
  • Page 29 For further information about collection points for used equipment, you can either contact your local government/ waste management services, or return the product to NUM’AXES. VIS1065 - Indice A – Fev. 23...
  • Page 30 INSTRUCCIONES DE USO 1. Composición del embalaje − 1 binoculares de visión infrarroja VIS1065 − 1 estuche de transporte − 1 correa de transporte − 1 paño de microfibra − 1 cable USB − 1 guía de instrucciones 2. Presentación del producto Desplácese hacia arriba...
  • Page 31 Carga USB Para cargar los prismáticos de visión infrarroja VIS1065, levante la lengüeta situada en el lateral del producto e inserte el cable de carga USB. Durante la carga, la luz situada junto al puerto USB se iluminará en rojo. Cuando la carga se haya completado, la luz se apagar.
  • Page 32 VIS1065. Selección de modo (foto|vídeo/reproducción) y menú de ajustes Los prismáticos de visión infrarroja VIS1065 disponen de 3 modos (Modo Foto / Modo Vídeo / Modo Reproducción) y 1 menú de configuración. Pulse el botón Modo durante varios segundos para pasar del modo Foto al modo Vídeo o al modo Reproducción.
  • Page 33 : en el modo Foto, pulse este botón para hacer una foto. En el modo Vídeo, pulse este botón para iniciar la grabación de un vídeo, pulse de nuevo para finalizar la grabación. VIS1065 - Indice A – Fev. 23...
  • Page 34 Modo de reproducción Pulse el botón durante varios segundos y repetidamente hasta llegar al modo Reproducción. • Reproducción de fotos y vídeos Pulsa los botones para previsualizar una foto o un vídeo. VIS1065 - Indice A – Fev. 23...
  • Page 35 Pulse el botón ON/OFF para salir de la pantalla de borrado. Menú Ajustes En el modo foto|vídeo, pulse el botón ON/OFF para entrar/salir del menú de ajustes. VIS1065 - Indice A – Fev. 23...
  • Page 36 Idioma Fecha / Hora Formateo Ajuste por defecto versión • Configuración del menú Pulse los botones para seleccionar el ajuste deseado. A continuación, pulse el botón para entrar en las opciones del parámetro. VIS1065 - Indice A – Fev. 23...
  • Page 37 Menú, pulse Transmisión de vídeos y fotos a un ordenador Conecte el cable USB a la toma USB de su dispositivo (VIS1065 visión por infrarrojos) y conecte el otro extremo del cable USB a la toma USB de su ordenador.
  • Page 38 Tipo-C - tensión DC5V, Cable de carga USB corriente ≤ 2A Aproximadamente 4-5 Autonomía horas de funcionamiento continuo con IR Francés, inglés, alemán, 5 idiomas español e italiano. Dimensiones 113 x 86.5 x 51.6mm Peso VIS1065 - Indice A – Fev. 23...
  • Page 39 Ajuste el enfoque moviendo la rueda de enfoque gradualmente para ajustar la nitidez. Si el aparato se atasca o no responde al funcionamiento debido a un mal uso, el VIS1065 puede reiniciarse manteniendo pulsado el botón y, a continuación, pulsando ligeramente el botón ON/OFF VIS1065 - Indice A –...
  • Page 40 Si el problema persiste, llame al servicio posventa de NUM'AXES al 02 38 63 64 40. Con la ayuda de nuestros técnicos, muchos problemas pueden solucionarse por teléfono.
  • Page 41 14. Condiciones de garantía La garantía sólo se hará efectiva si el justificante de compra (factura o recibo) se presenta a NUM'AXES sin borrar. Esta garantía no cubre ninguno de los puntos siguientes: Sustitución de baterías o accesorios Riesgos de transporte directos o indirectos relacionados con la devolución del producto a NUM'AXES...
  • Page 42 - NUM'AXES no se hace responsable de los daños que pudieran resultar de una mala utilización o de un fallo del producto. - NUM'AXES se reserva el derecho de modificar las características de sus productos con el fin de aportar mejoras técnicas o de ajustarse a nuevas normativas.
  • Page 43 Tél. +33 (0)2 38 63 64 40 – Fax +33 (0)2 38 63 31 00 info@numaxes.com EXPORT Tél. +33 (0)2 38 69 96 27 – Fax +33 (0)2 38 63 31 00 export@numaxes.com www.numaxes.com VIS1065 - Indice A – Fev. 23...
  • Page 44 Nach oben scrollen Leuchtanzeige ON/OFF-Taste und Menüeinstellungen-Taste OK-Taste und Schaltfläche Fotos|Videos Nach unten scrollen Modus-Taste Bildschirm 8. Passage Halsband 9. Infrarotlicht 10. Ziel 11. Ladeanzeige 12. USB-Anschluss 13. Steckplatz für microSD-Karte 14. Einstellrad VIS1065 - Indice A – Fev. 23...
  • Page 45 USB-Ladegerät Um das Infrarot-Fernglas VIS1065 aufzuladen, heben Sie die Lasche an der Seite des Produkts an und stecken Sie das USB- Ladekabel ein. Während des Ladevorgangs leuchtet die LED neben dem USB- Anschluss rot. Wenn der Ladevorgang abgeschlossen ist, schaltet sich die LED aus.
  • Page 46 3 Sekunden lang gedrückt, um das Infrarot-Sichtgerät VIS1065 zu starten/auszuschalten. Auswahl des Modus (Foto|Video/Wiedergabe) und Einstellungsmenü Das Infrarot-Fernglas VIS1065 verfügt über 3 Modi (Fotomodus / Videomodus / Wiedergabemodus) und 1 Einstellungsmenü. Drücken Sie mehrere Sekunden lang auf die Modus-Taste , um...
  • Page 47 : Drücken Sie im Fotomodus auf diese Taste, um ein Foto aufzunehmen. Im Videomodus: Drücken Sie diese Taste, um die Aufnahme eines Videos zu starten, drücken Sie sie erneut, um die Aufnahme zu beenden. VIS1065 - Indice A – Fev. 23...
  • Page 48 Drücken Sie mehrere Sekunden lang die Taste und mehrmals, bis Sie zum Wiedergabemodus gelangen. • Wiedergabe von Fotos und Videos Drücken Sie die Tasten , um eine Vorschau eines Fotos oder Videos anzuzeigen. VIS1065 - Indice A – Fev. 23...
  • Page 49 , um die Datei zu löschen oder nicht zu löschen. Drücken Sie die ON/OFF-Taste , um den Löschbildschirm zu verlassen. Einstellungsmenü Drücken Sie im Foto-|Videomodus die ON/OFF-Taste , um das Einstellungsmenü aufzurufen/zu verlassen. VIS1065 - Indice A – Fev. 23...
  • Page 50 Einstellungen Videoauflösung Zeitstempel Videolänge Automatische Abschaltung Foto Auflösung Standby-Modus Belichtung Sprache Datum / Uhrzeit Formatierung Standardeinstellung Version • Einrichten des Menüs Drücken Sie die Tasten d , um die gewünschte Einstellung auszuwählen. VIS1065 - Indice A – Fev. 23...
  • Page 51 Übertragen von Videos und Fotos auf einen Computer Schließen Sie das USB-Kabel an den USB-Anschluss Ihres Geräts (Infrarot-Vision VIS1065) an und stecken Sie das andere Ende des USB-Kabels in den USB-Anschluss Ihres Computers. Auf dem Bildschirm des Geräts erscheint "Massenspeicher".
  • Page 52 2000 mAh Lithium-Akku Wiederaufladbarebatterie Typ-C - Spannung USB-Ladekabel DC5V, Strom ≤ 2A Ca. 4-5h bei Dauerbetrieb Autonomie mit IR Deutsch, Englisch, 5 Sprachen Französisch, Spanisch, Italienisch. Abmessungen 113 x 86.5 x 51.6mm Poids 227 g VIS1065 - Indice A – Fev. 23...
  • Page 53 Stellen Sie den Fokus ein, indem Sie das Fokussierrad schrittweise bewegen, um die Schärfe anzupassen. Wenn das Gerät aufgrund von Missbrauch blockiert ist oder nicht auf die Bedienung reagiert, kann das Produkt VIS1065 VIS1065 - Indice A – Fev. 23...
  • Page 54 Je nach Ausmaß der Fehlfunktion müssen Sie Ihr Produkt möglicherweise zur Reparatur und zum Testen an den NUM'AXES-Kundendienst zurücksenden. Schicken Sie Ihr Produkt nicht an Ihren Händler zurück. Schicken Sie es an die folgende Adresse : VIS1065 - Indice A – Fev. 23...
  • Page 55 : Ihres kompletten Produkts Den Kaufnachweis (Rechnung oder Kassenzettel) Wenn Sie eines dieser Elemente weglassen, wird der NUM'AXES- Kundendienst Ihnen die Reparatur in Rechnung stellen. Eine Pauschale von 25 € (inkl. MwSt.) wird im Falle einer ungerechtfertigten Rücksendung durch den Kundendienst berechnet (z.
  • Page 56 − NUM'AXES kann nicht für Schäden haftbar gemacht werden, die aus einer unsachgemäßen Verwendung oder einem Ausfall des Produkts resultieren könnten. − NUM'AXES behält sich das Recht vor, die Eigenschaften seiner Produkte zu ändern, um technische Verbesserungen vorzunehmen oder neue Vorschriften zu erfüllen.
  • Page 57 Erhaltung der natürlichen Ressourcen und zum Schutz der menschlichen Gesundheit bei. Weitere Informationen zu den Sammelstellen für gebrauchte Geräte erhalten Sie bei Ihrer Stadtverwaltung, dem Amt für Haushaltsabfälle oder Sie können das Produkt an uns zurücksenden. VIS1065 - Indice A – Fev. 23...
  • Page 58 Pulsante OK e Pulsante Foto|Video Scorri verso il basso Pulsante di modalità Schermo Passaggio intorno al collo 9. Luce infrarossa 10. Obiettivo 11. Indicatore di carico 12. Porta USB 13. Slot per scheda MicroSD VIS1065 - Indice A – Fev. 23...
  • Page 59 Ricarica USB Per caricare il binocolo VIS1065 Infrared Vision, sollevare la linguetta sul lato del prodotto e inserire il cavo di ricarica USB. Durante la ricarica, la luce accanto alla porta USB è rossa. Quando la carica è completa, la luce si spegne.
  • Page 60 VIS1065 Infrared Vision. Selezione della modalità (foto|video/riproduzione) e menu delle impostazioni Il binocolo VIS1065 per la visione a infrarossi dispone di 3 modalità (Modalità foto / Modalità video / Modalità riproduzione) e di 1 menu impostazioni. Premere il pulsante Modalità...
  • Page 61 Scattare una foto / girare un video Pulsante : in modalità Foto, premere questo pulsante per scattare una foto. In modalità Video, premere questo pulsante per avviare la registrazione di un video, premere nuovamente per terminare la registrazione. VIS1065 - Indice A – Fev. 23...
  • Page 62 Premere il tasto per alcuni secondi e ripetutamente fino a raggiungere la modalità di riproduzione. • Lecture des photos et des vidéos Appuyez sur les boutons pour prévisualiser une photo ou une vidéo. VIS1065 - Indice A – Fev. 23...
  • Page 63 Premere i pulsanti per eliminare o meno il file. Premere il tasto ON/OFF per uscire dalla schermata di eliminazione. Menu Impostazioni In modalità foto|video, premere il pulsante ON/OFF entrare/uscire dal menu delle impostazioni. VIS1065 - Indice A – Fev. 23...
  • Page 64 Impostazioni Risoluzione video Marcatempo Lunghezza video Spegnimento automatico risoluzione foto Stand by Esposizione Lingua Data / Ora Formattazione Impostazione default versione • Configurazione del menu Premere i pulsanti per selezionare l'impostazione desiderata. VIS1065 - Indice A – Fev. 23...
  • Page 65 Trasmissione di video e foto a un computer Collegare il cavo USB alla presa USB del dispositivo (visore a infrarossi VIS1065) e collegare l'altra estremità del cavo USB alla presa USB del computer. Sullo schermo del dispositivo apparirà la dicitura "Mass Storage".
  • Page 66 Cavo di ricarica USB DC5V, corrente ≤ 2A Circa 4-5 ore di Autonomia funzionamento continuo con IR Francese, inglese, tedesco, 5 lingue spagnolo, italiano. Dimensioni 113 x 86.5 x 51.6mm Peso 227 g VIS1065 - Indice A – Fev. 23...
  • Page 67 Regolare la messa a fuoco spostando gradualmente la rotella di messa a fuoco per regolare la nitidezza. Se il dispositivo è bloccato o non risponde al funzionamento a causa di un uso improprio, il VIS1065 può essere resettato tenendo premuto il pulsante premendo leggermente il pulsante ON/OFF...
  • Page 68 NUM’AXES - Z.A.C. des Aulnaies – 745 rue de la Bergeresse – C.S. 30157 - 45161 OLIVET CEDEX – Francia Per tutte le riparazioni, il servizio di assistenza NUM'AXES ha bisogno di : Il vostro prodotto completo Prova d'acquisto (fattura o scontrino).
  • Page 69 25 € IVA inclusa. 13. Garanzia NUM'AXES garantisce il prodotto contro i difetti di fabbricazione per un periodo di due anni dall'acquisto. Il costo del trasporto del prodotto da e verso la fabbrica è di esclusiva responsabilità...
  • Page 70 − Se il prodotto risulta difettoso, NUM'AXES lo riparerà o lo sostituirà, a seconda delle sue esigenze. − NUM'AXES non sarà responsabile di eventuali danni che potrebbero derivare da un uso improprio o da un guasto del prodotto. − NUM'AXES si riserva il diritto di modificare le caratteristiche dei suoi prodotti per apportare miglioramenti tecnici o per conformarsi a nuove normative.
  • Page 71 Per ulteriori informazioni sui punti di raccolta delle apparecchiature usate, è possibile contattare il comune di residenza, il servizio di trattamento dei rifiuti domestici o restituire il prodotto a noi. VIS1065 - Indice A – Fev. 23...
  • Page 72 Tél. +33 (0)2 38 63 64 40 – Fax +33 (0)2 38 63 31 00 info@numaxes.com EXPORT Tél. +33 (0)2 38 69 96 27 – Fax +33 (0)2 38 63 31 00 export@numaxes.com www.numaxes.com VIS1065 - Indice A – Fev. 23...