Publicité
Liens rapides
NOTE: It is suggested that you anchor your shower arm and tub spout elbows or water lines.
RP75722▲
3
4
2
RP48040▲
3
4
2
RP62603▲
3
2
SHOWERHEAD AND SHOWER ARM INSTALLATION:
Install a 1/2" threaded pipe nipple to extend beyond the
finished wall 3/8" to 1/2". Apply plumber's tape to thread on
pipe nipple and screw brass adapter (1) securely onto nipple.
Apply plumber's tape to outlet end of shower arm (3) and screw
showerhead (2) onto the shower arm, using provided wrench (4)
to tighten securely. Check position of set screw on top of shower
arm (3) making sure it is not sticking through to the inside
opening where it could interfere with the assembly. Slide shower
arm and head assembly over the adapter and tighten set screw
against the adapter.
www.brizo.com
RP37762▲
1
(3) = 1 15/16"
RP54873▲
(3) = 9/16"
RP74646▲
1
(3) = 3/8"
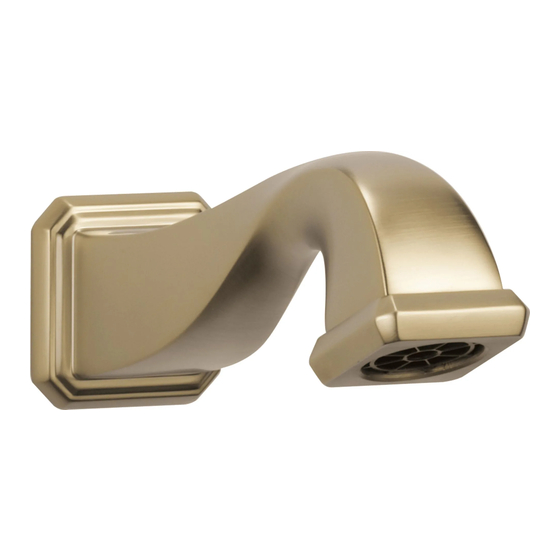
TUB SPOUT INSTALLATION:
Install 1/2" (13 mm) threaded pipe nipple (1) to extend past finished wall (2) per dimension (3). Connection of
deck mount spouts to in–wall valves is not recommended. Neither is the use of hand showers connected to tub
spouts in a tub/shower push button diverter combination, or hand showers connected in lieu of a tub spout to a
tub / shower valve. Piping between valve body and tub spout must be a minimum of 1/2" (13 mm) copper pipe
or 1/2" (13 mm) iron pipe in a straight drop no less than 8" (203 mm) but no more than 18" (457 mm) long with
only one iron pipe or copper 90 degree elbow to the tub spout nipple. Apply plumber tape to threads on pipe
nipple and screw on tub spout.
A.
1
4
(3) = 3/8"
A.
76615
1/16" (49 mm
1.5 mm)
±
±
1/16" (14.3 mm
1.5 mm)
±
±
1/16" (9.5 mm
1.5 mm)
±
±
RP62605▲
3
2
1/16" (9.5 mm
1.5 mm)
±
±
TUB SPOUT INSTALLATION:
Install 1/2" (13 mm) threaded pipe
nipple (1) to extend past finished wall
(2) per dimension (3). Connection of
deck mount spouts to in–wall valves is
not recommended. Neither is the use of
hand showers connected to tub spouts
in a tub/shower push button diver ter
combination, or hand showers connected
in lieu of a tub spout to a tub / shower
valve. Piping between valve body and tub
spout must be a minimum of 1/2" (13 mm)
copper pipe or 1/2" (13 mm) iron pipe in
a straight drop no less than 8" (203 mm)
but no more than 18" (457 mm) long with
only one iron pipe or copper 90 degree
elbow to the tub spout nipple.
1
RP75722▲ Shower Arm
RP48040▲ Shower Arm
RP62603▲ Shower Arm
B.
RP62605▲
1
3
Apply plumber's tape to thread on pipe nipple and
B.
screw brass adapter (1) securely onto nipple. Check
position of set screw on bottom of spout (2) making sure
it is not sticking through to the inside opening where it
could interfere with the assembly. Slide tub spout over
the adapter and tighten set screw, on bottom of spout,
against the adapter. Note: This spout utilizes a pull
down diverter mechanism. To divert from spout to
shower, pull down on spout tip (3).
RP37762▲ Tub Spout
RP54873▲ Tub Spout
RP74646▲ Tub Spout
RP62605▲ Tub Spout
s Specify Finish
1
3
2
1
3
2
1
3
2
1
2
1/14/14
Rev. B
Publicité

Manuels Connexes pour Brizo RP75722

Sommaire des Matières pour Brizo RP75722
- Page 1 RP75722▲ Shower Arm RP37762▲ Tub Spout RP48040▲ Shower Arm RP54873▲ Tub Spout 76615 RP62603▲ Shower Arm RP74646▲ Tub Spout RP62605▲ Tub Spout s Specify Finish NOTE: It is suggested that you anchor your shower arm and tub spout elbows or water lines.
- Page 2 RP75722▲ Brazo de Regadera / Tuyau de Pomme de Douche RP37762▲ Tubo de Salida para Bañera / Bec RP48040▲ Brazo de Regadera / Tuyau de Pomme de Douche RP54873▲ Tubo de Salida para Bañera / Bec RP62603▲ Brazo de Regadera / Tuyau de Pomme de Douche RP74646▲...