JVC RA-F230W Manuel D'instructions

JVC RA-F230W Manuel D'instructions

Radio-réveil à projection
Masquer les pouces Voir aussi pour RA-F230W:

Publicité

Les langues disponibles
  • FR

Les langues disponibles

  • FRANÇAIS, page 1

Liens rapides

PROJECTION ALARM CLOCK RADIO
FM/AM
RA-F230W
Manuel d'instructions
Gebruiksaanwijzing
Manual de instrucciones
Manual de Instruções
Instruction Manual
Ce produit est fabriqué, distribué, entretenu et garanti
exclusivement par les Établissements DARTY et Fils. « JVC » est
la marque de commerce de JVCKENWOOD Corporation, utilisé
sous licence par les Établissements DARTY et Fils.

Publicité

Table des Matières
loading

Sommaire des Matières pour JVC RA-F230W

  • Page 1 Manual de Instruções Instruction Manual Ce produit est fabriqué, distribué, entretenu et garanti exclusivement par les Établissements DARTY et Fils. « JVC » est la marque de commerce de JVCKENWOOD Corporation, utilisé sous licence par les Établissements DARTY et Fils.
  • Page 2: Avertissements

    AVERTISSEMENTS Cet appareil est destiné à un usage domestique uniquement. Toute utilisation  autre que celle prévue pour cet appareil, ou pour une autre application que celle prévue, par exemple une application commerciale, est interdite. Aération  Prévoyez un espace libre d'au moins 10 cm tout autour du produit. Il convient que l’aération ne soit pas gênee par l’obstruction des ouvertures ...
  • Page 3: Manipulation Et Utilisation Des Piles

    La plaque signalétique est située sous l'appareil. Manipulation et utilisation des piles Seuls les adultes doivent manipuler les piles. Ne laissez jamais les enfants utiliser cet appareil sauf si le couvercle du compartiment des piles est solidement fermé. Cet appareil fonctionne avec deux piles de type AAA de 1,5 V (non fournies). Ces piles sont accessibles et peuvent être remplacées.
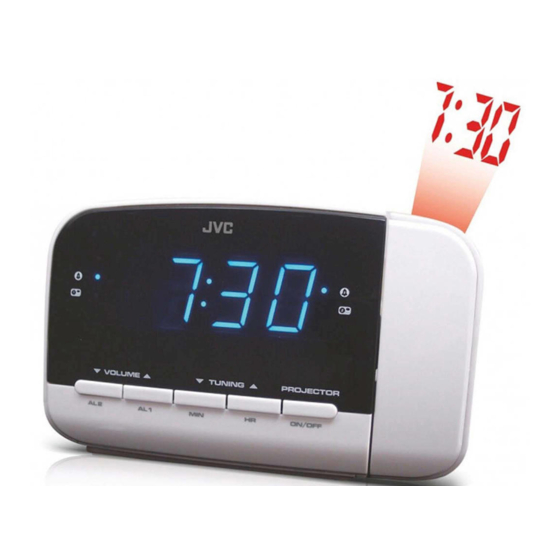
  • Page 4: Bouton Mem (Mémorisation)

    1. Bouton POWER (ALIMENTATION) 13. Couvercle du compartiment des 2. Écran d'affichage piles (au fond) 14. Bouton MARCHE/ARRÊT: du 3. Bouton VOLUME / AL2 button PROJECTEUR 4. Bouton VOLUME / AL1 button 15. Molette du projecteur 5. Antenne FM 16. Projecteur 6.
  • Page 5: Fonctionnement De La Radio

    MISE EN MARCHE/MODE RADIO Appuyez sur POWER pour mettre l’appareil en marche et activer le mode radio. • La fréquence radio s’affiche brièvement, puis l’horloge s'affichera de nouveau. FONCTIONNEMENT DE LA RADIO Appuyez sur POWER pour mettre la radio en marche. •...
  • Page 6    programmée.  FR-5...
  • Page 7    FR-6...
  • Page 8 Quels que soient votre panne et le lieu d'achat de votre produit en France, avant de vous déplacer en magasin Fnac, appelez le 0 969 324 334 du lundi au samedi (8h30-21h00) et le dimanche et jours fériés (10h00-18h00). (prix d’un appel local) FR-7...
  • Page 9: Belangrijke Veiligheidsinstructies

    WAARSCHUWINGEN • Dit apparaat is alleen bedoeld voor huishoudelijk gebruik en mag niet voor andere doeleinden of toepassingen worden gebruikt, zoals niet-huishoudelijk gebruik of in een commerciële omgeving. • Ventilatie Laat minstens een vrije ruimte van 10cm rond het product. •...
  • Page 10 In het inwendige van het Er bevinden zich apparaat bestaat een belangrijke gebruiks- en gevaarlijke spanning die onderhoudsinstructies in een risico op elektrische de literatuur die met dit schokken oplevert. apparaat is geleverd. Het typeplaatje bevindt zich onderaan het apparaat. Installatie en gebruik van de batterijen Alleen volwassenen mogen handelingen met batterijen uit te voeren.
  • Page 11: Standby-Modus

    OMSCHRIJVING VAN DE ONDERDELEN Boven- en zijaanzicht Vooraanzicht 1. AAN/UIT knop 11. BAND 2. Display 12. MEM knop 13. Batterijdeksel (onderaan) 3. VOLUME / AL2 knop 4. VOLUME / AL1 knop 14. PROJECTOR ON/OFF knop 5. FM-antenne 15. Projectorwiel 6. TUNING / HR knop 16.
  • Page 12: De Klok Instellen

    DE KLOK INSTELLEN In de stand-bymodus, druk en houd SET ingedrukt totdat het display knippert. Terwijl het display knippert, druk herhaaldelijk op HR en MIN totdat de gewenste tijd wordt weergegeven.  Druk en houd HR en MIN ingedrukt om snel vooruit te gaan. Druk op SET om te bevestigen.
  • Page 13 UW FAVORIETE RADIOSTATIONS IN HET GEHEUGEN OPSLAAN U kunt tot 10 FM en 10 AM radiostations in het geheugen opslaan. Volg de stappen onder "DE RADIO BEDIENEN" en stem af op het radiostation dat u in het geheugen wilt opslaan. Druk en houd SET gedurende circa 2 seconden ingedrukt, “P01”...
  • Page 14: Technische Gegevens

    WERKING VAN DE INSLAAPTIMER De inslaapfunctie is bedoeld om de radio automatisch uit te schakelen. De inslaaptimer instellen 1. Druk op SLEEP. • “90” wordt op het display weergegeven. 2. Druk herhaaldelijk op SLEEP om te kiezen uit 90, 80, 70, 60, 50, 40, 30, 20 of 10 minuten.
  • Page 15 NL-7...
  • Page 16: Medidas De Seguridad Importantes

    ADVERTENCIAS Este aparato ha sido diseñado únicamente para uso doméstico y no debe  utilizarse para ningún otro propósito o aplicación, como por ejemplo en entornos no domésticos o comerciales. Ventilación  Deje un espacio mínimo de 10 cm alrededor del aparato. No deberá...
  • Page 17 Manipulación y uso de la batería La pila solo debe ser manipulada por personas adultas. No permita que ningún niño utilice esta unidad sin haber cerrado bien la tapa del compartimento de la pila. Esta unidad utiliza 2 pilas tipo AAA de 1.5V (no incluida), las cuales son accesibles y pueden reemplazarse.
  • Page 18: Ubicación De Los Controles

    UBICACIÓN DE LOS CONTROLES Vistas trasera y lateral Vista frontal 12. MEMORIA 1. Botón de ENCENDIDO/APAGADO 13. Tapa de las pilas (parte inferior) 2. Pantalla 14. ACTIVAR / DESACTIVAR PROYECTOR 3. VOLUMEN / AL2 15. Ruedecilla del proyector 4. VOLUMEN / AL1 16.
  • Page 19: Ajuste Del Reloj

    AJUSTE DEL RELOJ En el modo de espera, mantenga pulsado SET hasta que la pantalla comience a parpadear. Mientras parpadea, pulse HR y MIN repetidamente hasta mostrar la hora deseada.  Mantenga pulsado HR o MIN para avanzar con rapidez los dígitos de la hora o los minutos respectivamente.
  • Page 20: Función De Repetición De Alarma

    PRESINTONIZACIÓN DE SUS EMISORAS FAVORITAS Se pueden presintonizar hasta 10 emisoras FM y 10 emisoras AM. Siga los pasos en la sección "USO DE LA RADIO" para sintonizar las emisoras que desea guardar. Mantenga pulsado SET durante unos 2 segundos hasta que "P01"...
  • Page 21: Ajuste Del Temporizador De Apagado Automático

    USO DE LA FUNCIÓN DE APAGADO AUTOMÁTICO La función de apagado automático tiene por objeto apagar automáticamente la radio. Ajuste del temporizador de apagado automático 1. Pulse SLEEP. • “90” aparecerá en la pantalla. 2. Pulse repetidamente SLEEP para seleccionar 90, 80, 70, 60, 50, 40, 30, 20 o 10 minutos.
  • Page 22 ES-7...
  • Page 23: Instruções Importantes De Segurança

    AVISOS Este aparelho destina-se apenas a uma utilização doméstica e não deve ser  utilizado para qualquer outro fim ou em qualquer outra aplicação, tal como a utilização não doméstica ou num ambiente comercial. Ventilação  Permita uma folga mínima de 10 cm em torno do produto. A ventilação não deve ser obstruída pela cobertura das aberturas de ...
  • Page 24: Localização Dos Controlos

    A placa das especificações encontra-se no fundo do aparelho. Manuseamento e utilização da pilha Apenas os adultos devem substituir as pilhas. Não permita que uma criança use este aparelho, a não ser que a tampa do compartimento das pilhas esteja bem fixada à unidade.
  • Page 25: Acertar O Relógio

    12. Botão MEM 1. Botão POWER (energia) 13. Tampa do compartimento das pilhas 2. Ecrã (no fundo) 3. Botão VOLUME / AL2 14. Botão PROJECTOR ON/OFF 4. Botão VOLUME / AL1 (ligar/desligar projetor) 5. Antena FM 15. Disco do projetor 6.
  • Page 26: Funcionamento Do Rádio

    FUNCIONAMENTO DO RÁDIO Prima POWER para ligar o rádio. A frequência FM predefinida ou a última  frequência sintonizada. A frequência FM predefinida é 87.5 MHz.  Prima BAND para entrar no modo de rádio AM. A frequência AM predefinida é 522 kHz. ...
  • Page 27: Função Snooze

    Prima repetidamente AL1 / AL2 para definir o despertador para acordar ao som do besouro ou do rádio. • As luzes indicadoras correspondentes acendem no ecrã. Verificar a hora do despertador Prima e mantenha premido AL1 / AL2 durante 2 segundos. A hora do despertador começa a piscar no ecrã.
  • Page 28   PT-6...
  • Page 29 WARNINGS This appliance is intended for domestic household use only and should not  be used for any other purpose or in any other application, such as for non domestic use or in a commercial environment. Ventilation  Allow at least a 10 cm gap all around the product. The ventilation should not be impeded by covering the ventilation openings ...
  • Page 30: Battery Handling And Usage

    BATTERY HANDLING AND USAGE Only adults should handle battery. Do not allow a child to use this apparatus unless the battery cover is securely attached to the unit. The battery type used in the unit is 2 x 1.5V AAA size batteries (not included) which are accessible and can be replaced.
  • Page 31: Battery Backup

    3. VOLUME / AL2 button 12. MEM button 4. VOLUME / AL1 button 13. Battery cover (at the bottom) 14. PROJECTOR ON/OFF button 5. FM aerial 15. Projector wheel 6. TUNING / HR button 16. Projector 7. TUNING / MIN button Alarm 1 buzzer indicator 8.
  • Page 32 Press BAND once to enter the AM radio mode. The default AM radio frequency is 522 kHz.  Repeatedly press BAND to select the desired radio band. Adjust the volume by repeatedly pressing VOLUME Repeatedly press TUNING to tune into the desired station. •...
  • Page 33: Snooze Function

    To turn off the alarm , press POWER and the alarm will come on again at the set time on the following days. To cancel the alarm, repeatedly press AL1 / AL2 until the alarm indicator light goes out on the display. SNOOZE FUNCTION This function can be used to stop the alarm temporarily for about 9 minutes once the alarm is activated.
  • Page 34 EN-6...
  • Page 37 Made in China...

Table des Matières