Sauder 410287 Instructions D'assemblage
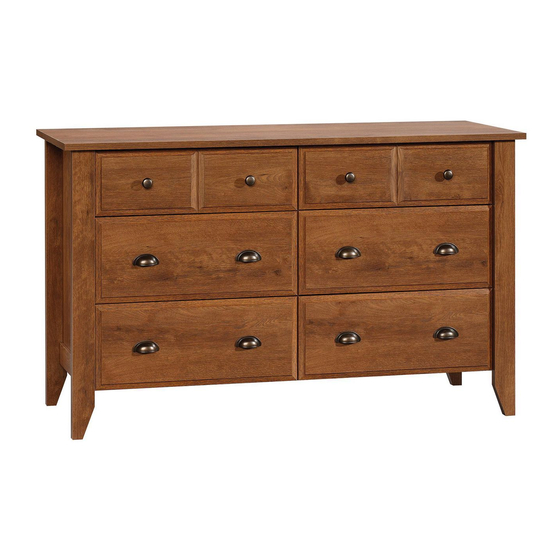
Commode
Table des Matières
Dresser
Need help? Visit to view video assembly tips or chat with a live rep. Prefer the
phone?
Share your journey!
WARNING
CHOKING HAZARD - Small Parts
Not for children under 3 years.
Adult assembly required.
NOTE: THIS INSTRUCTION
BOOKLET CONTAINS IMPORTANT
SAFETY INFORMATION.
PLEASE READ AND KEEP FOR
FUTURE REFERENCE.
English pg 1-22
Français pg 23-25
Español pg 26-28
Purchased: __________________
Be sure to give us a ring before
making any returns.
Table des Matières

Manuels Connexes pour Sauder 410287


Sommaire des Matières pour Sauder 410287
- Page 1 WARNING CHOKING HAZARD - Small Parts Not for children under 3 years. Adult assembly required. Dresser NOTE: THIS INSTRUCTION BOOKLET CONTAINS IMPORTANT SAFETY INFORMATION. Need help? Visit to view video assembly tips or chat with a live rep. Prefer the PLEASE READ AND KEEP FOR FUTURE REFERENCE.
- Page 2 Table of Contents Assembly Tools Required Part Identifi cation No. 2 Phillips Screwdriver Tip Shown Actual Size Hardware Identifi cation Assembly Steps 6-22 Hammer Not actual size Français 23-25 Español 26-28 Skip the power trip. Safety 29-30 This time. Part Identifi cation å...
-
Page 3: Part Identifi Cation
Now you know Part Identifi cation our ABCs. D166 D975 D166 D975 D132 D167 D975 D138 D132 D167 D975 D138 Page 3... - Page 4 Hardware Identifi cation å Screws are shown actual size. You may receive extra hardware with your unit. 40CA CABINET RIGHT - 6 40CB CABINET LEFT - 6 40CC DRAWER RIGHT - 6 40CD DRAWER LEFT - 6 HIDDEN CAM - 22 CAM SCREW - 12 CAM DOWEL - 10 PULL- 8...
- Page 5 Hardware Identifi cation å Screws are shown actual size. You may receive extra hardware with your unit. BLACK 2-1/4" FLAT HEAD SCREW - 6 BLACK 1-7/8" FLAT HEAD SCREW - 3 BLACK 1-1/8" MACHINE SCREW - 4 SILVER 3/4" MACHINE SCREW - 16 QQ GOLD 5/16"...
- Page 6 Step 1 Assemble your unit on a carpeted fl oor or on the empty å carton to avoid scratching your unit or the fl oor. Push twenty-two HIDDEN CAMS (AA2) into the å ENDS (A and B), UPRIGHT (C), BOTTOMS (E), and DRAWER BRACES (M65).
- Page 7 Step 2 Turn twelve CAM SCREWS (BB2) into the FRONT LEGS (G and H) å and DRAWER FRONTS (K2, L2, Q2, and R2). (12 used) Page 7...
- Page 8 Step 3 Fasten the REAR LEGS (I) to the ENDS (A and B). Use six å BLACK 2-1/4" FLAT HEAD SCREWS (KK).
- Page 9 Step 4 Turn four BLACK 9/16" FLAT HEAD SCREWS (OO) into å the ENDS (A and B) until the shoulders of the SCREWS rest on the surfaces of the ENDS. Slide the END MOLDINGS (J) onto the ENDS (A and B). å...
- Page 10 Step 5 Fasten the FRONT LEGS (G and H) to the ENDS (A and B). å Tighten six HIDDEN CAMS. Angled edge Page 10...
- Page 11 Step 6 Fasten three CABINET RIGHTS (40CA) to the RIGHT END (A) å and three CABINET LEFTS (40CB) to the LEFT END (B). Use twelve GOLD 5/16" FLAT HEAD SCREWS (QQ) through holes #1 and #4. GOLD 5/16" FLAT HEAD SCREW (12 used in this step) Roller end Roller end...
- Page 12 Step 7 Fasten three CABINET RIGHTS (40CA) and three å CABINET LEFTS (40CB) to the UPRIGHT (C). Use twelve GOLD 5/16" FLAT HEAD SCREWS (QQ) through holes #1 and #4. GOLD 5/16" FLAT HEAD SCREW (12 used in this step) Roller end Unfi...
- Page 13 Step 8 Fasten the LEFT END (B) and UPRIGHT (C) to the å Caution TOP (D). Tighten four HIDDEN CAMS. Do not stand the unit upright without the BACK fastened. The unit may collapse. Finished edge f a c S u r w i t h D E N H I D...
- Page 14 Step 9 Insert four METAL PINS (GG) into the BOTTOMS (E). å Now might be a Insert the METAL PINS (GG) in one end of the å good time to refresh BOTTOMS (E) into the holes in the LEFT END (B). your drink.
- Page 15 Step 10 Fasten the RIGHT END (A) to the TOP (D) and BOTTOMS (E). Tighten å four HIDDEN CAMS. NOTE: Be sure the METAL PINS in the BOTTOMS insert into the holes å in the RIGHT END. Fasten the BRACE (SS) and FOOT BASE (UU) to the BOTTOM (E). å...
- Page 16 Step 11 Carefully turn your unit over onto its front edges. Unfold the å Caution BACK (F) and lay it over your unit. Do not stand the unit upright without the Make equal margins along all four edges of the BACK (F). å...
-
Page 17: Hidden Cam
Step 12 VIEW THE T-LOCK BOX VIDEO The tabs should insert freely With the palm of your hand, into the slots. Gently tilt the tap the DRAWER BOTTOM DRAWER SIDES side to side down into the groove. until the tabs slip into the slots. fi... - Page 18 Step 13 Insert a SLIDE CAM (HH) into the SMALL DRAWER SIDES (D10 and D11). å Fasten the DRAWER RIGHT (40CC) and DRAWER LEFT (40CD) to the Almost time to å SMALL DRAWER SIDES (D10 and D11). Use four GOLD 5/16" FLAT celebrate! With a nap.
- Page 19 Step 14 Fasten two KNOBS (FF) to the SMALL RIGHT DRAWER å FRONT (K2). Use two BLACK 1-1/8" MACHINE SCREWS (MM). Want options? Customize your item with add-on Fasten two PULLS (EE) to the RIGHT DRAWER FRONT (Q2). å hardware kits available Use four SILVER 3/4"...
- Page 20 Step 15 Carefully stand your unit upright. å Position your unit in its fi nal location. Turn the FOOT down so it touches the fl oor. å To insert the drawers into your unit, tip the front of the drawers down and drop the rollers on the drawers behind the rollers å...
- Page 21 Step 16 We recommend using the SAFETY BRACKET (WW) for added å stability. Use a BLACK 9/16" LARGE HEAD SCREW (XX) into the top of the unit and a BLACK 1-7/8" FLAT HEAD SCREW (LL) into a stud in your wall. BLACK 1-7/8"...
- Page 22 Step 17 To make adjustments to the drawers, loosen SCREW #4 in the SLIDES a 1/4 turn, then turn the cam clockwise or å counter-clockwise. Notice how the drawer raises or lowers as you turn the cam. By adjusting the drawers this way, it will help the DRAWER FRONTS line up better when closed.
-
Page 23: Liste De Pièces
Commode Utilisez les instructions d’ a ssemblage en français avec les NOUS SOMMES LA POUR VOUS AIDER! schémas étape par étape du manuel d’instruction en anglais. Nous faisons de notre mieux pour nous assurer que votre meuble Chaque étape en français correspond à la même étape arrive dans d’excellentes conditions. - Page 24 ÉTAPE 1 ÉTAPE 7 Ne pas serrer les EXCENTRIQUES ESCAMOTABLES à Fixer trois ÉLÉMENTS DROITE (40CA) et trois ÉLÉMENTS cette étape. GAUCHE (40CB) au MONTANT (C). Utiliser douze VIS DORÉES TÊTE PLATE 8 mm (QQ). Assembler l’élément sur un sol à moquette ou sur le carton vide pour éviter d’endommager l’élément ou le sol.
- Page 25 ÉTAPE 11 ÉTAPE 14 Ne pas relever l’élément dans sa position verticale avant d’ a voir Fixer deux BOUTONS (FF) au DEVANT DROIT DE PETIT fi xé l’ARRIÈRE. L’élément risque de s’eff ondrer. TIROIR (K2). Utiliser deux VIS NOIRES À MÉTAUX 28 mm (MM). Avec précaution, retourner l’élément sur ses chants avant.
-
Page 26: Lista De Partes
Cómoda Use estas instrucciones de ensamblaje en español junto con las ESTAMOS AQUI PARA AYUDAR! fi guras paso-a-paso provistas en el folleto inglés. Cada paso Tratamos de asegurar que su mueble llega en condición excelente. en español corresponde al mismo paso en inglés. Se destacan Nuestros representantes de Servicio al Cliente son amables y las fi... - Page 27 PASO 1 PASO 7 No apriete los EXCÉNTRICOS ESCONDIDOS en este paso. Fije tres GABINETES DERECHO (40CA) y tres GABINETES IZQUIERDO (40CB) al PARAL (C)). Utilice doce TORNILLOS Ensamble la unidad sobre un piso alfombrado o sobre el cartón DORADOS DE CABEZA PERDIDA de 8 mm (QQ). vacío para evitar rayar la unidad o el piso.
- Page 28 PASO 11 PASO 14 No coloque la unidad en posición vertical hasta que se fi je el Fije dos MANILLAS (FF) a la CARA DERECHA DE CAJÓN DORSO. La unidad podría caerse. PEQUEÑO (K2). Utilice dos TORNILLOS NEGROS PARA METAL de 28 mm (MM). Cuidadosamente voltee la unidad para que repose sobre los bordes delanteros.
- Page 29 WARNING Please use your furniture correctly and safely. Improper use can cause safety hazards, or damage to your furniture or household items. Carefully read the following safety information. Death or serious injury may occur when children climb on furniture. A remote control, toys or other items placed on the furniture may encourage a child to climb on the furniture which could cause it to tip-over and result in serious injury or death.
- Page 30 ADVERTENCIA Por favor use el mobiliario correcta y seguramente. El mal uso puede causar riesgos de seguridad o daño a las unidades o artículos domésticos. Lea cuidadosamente la siguiente información de seguridad. Pueden suceder lesiones graves o la muerte cuando los niños se suben en los muebles. Un control remoto, juguetes u otros artículos colocados en los muebles pueden alentar a un niño a subirse en el mueble, lo cual podría causar que se derribe y resultaría en lesiones graves o la muerte.
- Page 31 Dear Valued Customer: So, how did it go? Thanks so much for choosing furniture. I hope the Set a world record for speed? purchase and assembly process was a positive experience Feeling good about yourself? and you feel good about the furniture you just built. If you Nice.